a collaborative guide to atlas development
TRANSCRIPT
A Collaborative guide to ATLAS Development
R. Clint Whaley ∗Peter Soendergaard †
July 27, 2016
Abstract
This paper exists to get you started if you want to do some ATLAS development.The hope is that as new developers work on ATLAS, they will add to this note, so thatthis information grows with time.
∗[email protected]†[email protected]
1

Contents
1 Introduction 3
2 Adding to this note 3
3 Getting the ATLAS code through github 43.1 Background on ATLAS code base . . . . . . . . . . . . . . . . . . . . . . . . 43.2 Getting the ATLAS basefile tree and the working ATLAS directory . . . . . 43.3 Basefile/extracted file interaction . . . . . . . . . . . . . . . . . . . . . . . . 5
4 ATLAS coding style 5
5 Adding a LAPACK routine to ATLAS 75.1 Row-major LAPACK routines . . . . . . . . . . . . . . . . . . . . . . . . . . 75.2 Outline of Steps . . . . . . . . . . . . . . . . . . . . . . . . . . . . . . . . . 85.3 Create and debug tester . . . . . . . . . . . . . . . . . . . . . . . . . . . . . 8
5.3.1 Writing ATLAS/src/testing C-to-f77 wrapper . . . . . . . . . . . . 95.3.2 Getting your routines extracted . . . . . . . . . . . . . . . . . . . . . 9
5.4 Create and debug ATLAS internal routines . . . . . . . . . . . . . . . . . . 95.5 Add C and F77 interface routines . . . . . . . . . . . . . . . . . . . . . . . . 105.6 Update the LAPACK quick reference guides . . . . . . . . . . . . . . . . . . 10
6 Architectural defaults 106.1 Rambling on about architectural defaults . . . . . . . . . . . . . . . . . . . 106.2 Making your own architectural defaults . . . . . . . . . . . . . . . . . . . . 116.3 Getting ATLAS to use your shiny new defaults . . . . . . . . . . . . . . . . 11
7 Sanity testing for an ATLAS install 127.1 Invoking the sanity tests . . . . . . . . . . . . . . . . . . . . . . . . . . . . . 127.2 Understanding the sanity test output . . . . . . . . . . . . . . . . . . . . . . 127.3 Finding the context of the error . . . . . . . . . . . . . . . . . . . . . . . . . 137.4 Tracking down an error in the BLAS interface testers . . . . . . . . . . . . . 147.5 Tracking down an error in the bin/ testers . . . . . . . . . . . . . . . . . . 15
8 Antoine’s testing scripts 158.1 Finding errors . . . . . . . . . . . . . . . . . . . . . . . . . . . . . . . . . . . 168.2 Tracking down errors in the bin/ testers . . . . . . . . . . . . . . . . . . . . 16
9 Finding a good NB for GEMM 169.1 Better kernel timing does not always yield faster GEMM . . . . . . . . . . . 179.2 Large NB means more time in cleanup . . . . . . . . . . . . . . . . . . . . . 179.3 Large NB means more time in unblocked application code . . . . . . . . . . 179.4 Finding a good NB . . . . . . . . . . . . . . . . . . . . . . . . . . . . . . . . 18
2
10 Information on atlconf 2010.1 Probe Overview . . . . . . . . . . . . . . . . . . . . . . . . . . . . . . . . . . 2010.2 Architectural Probes . . . . . . . . . . . . . . . . . . . . . . . . . . . . . . . 2310.3 Notes on configure . . . . . . . . . . . . . . . . . . . . . . . . . . . . . . . . 2310.4 Compiler Setup and Handling in ATLAS Config . . . . . . . . . . . . . . . . 23
3
1 Introduction
This note exists to get you started if you want to write new code for ATLAS, or if youwant to modify ATLAS source. It is not for kernel contribution, which is what most peopledo when contributing to ATLAS. Kernel contribution is much simpler, and is explained inATLAS/doc/atlas contrib.pdf or in html format at:
http://math-atlas.sourceforge.net/devel/atlas_contrib/
So what is the difference between development and kernel contribution? In kernel con-tribution, you write a kernel to be used by ATLAS, using the provided ATLAS testers andtimers to verify it, and when you are satisfied with its performance and reliability, yousubmit your kernel to the ATLAS team, and they accept it or not, and you are done.
Doing actual core development is quite a bit more complex. Probably the biggest changeis that you will need to write your own tester and timer for your new code. No code will beaccepted into the ATLAS code base without a tester which can be used to verify it. Sincewriting a decent tester is usually at least as hard as writing the code it tests, and is alwaysa whole lot less enjoyable, the author must bear the pain of producing it along with thepride of producing the code. As a developer, you will be responsible for testing such newcode on several platforms as well.
If you are instead hoping to modify some of the existing code base, remember thatfor non-kernel operations, portability and robustness must be the primary goal. There aremany sections of ATLAS that we know to be second rate on a certain platform, but wealso know that it works on the twenty or so architectures that ATLAS is routinely compiledfor, so we leave it that way. This means that when a modification is made to a previouslyexisting routine, the modifying author must have good evidence that the new code is asportable as the old. In short, the barrier to replacing tested code is high.
It is possible that users want access to the git repository even though they do not planon doing development, mainly I’d guess so they can get access to the newest stuff withoutwaiting for developer releases. Also, kernel contributors who make subsequent changes totheir routines can speed up their adoption by submitting them as patches on the basefiles,or through a pull request.
2 Adding to this note
This note is included in the AtlasBase/TexDoc of the repository, and anyone can submita patch against it giving additional information. As the founder of ATLAS, I have writtena seed of a document explaining how to get access to the code. It is my hope that otherdevelopers will add important information that they discover as they go, so that this docwill grow over time, getting much information that I probably take so much for grantedthat I would never think to document.
Therefore, new sections are welcome, and probably a FAQ appendix would be a goodidea. As people contribute, their names will be added to the author list.
4
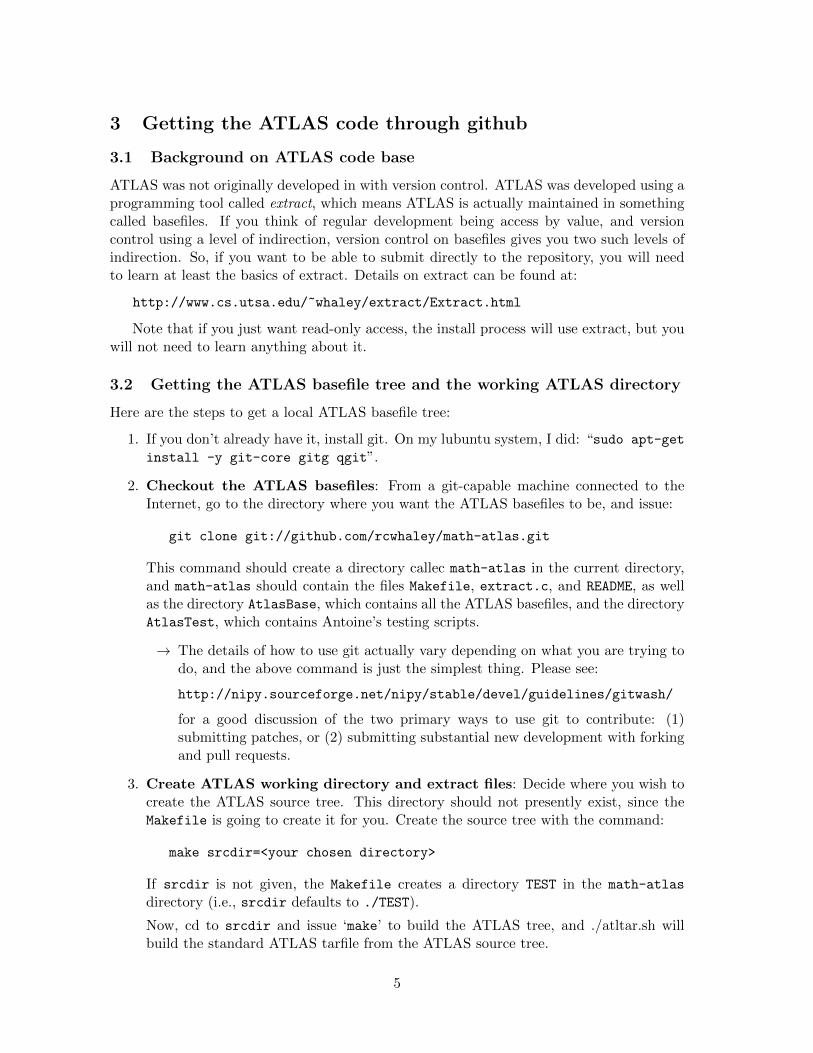
3 Getting the ATLAS code through github
3.1 Background on ATLAS code base
ATLAS was not originally developed in with version control. ATLAS was developed using aprogramming tool called extract, which means ATLAS is actually maintained in somethingcalled basefiles. If you think of regular development being access by value, and versioncontrol using a level of indirection, version control on basefiles gives you two such levels ofindirection. So, if you want to be able to submit directly to the repository, you will needto learn at least the basics of extract. Details on extract can be found at:
http://www.cs.utsa.edu/~whaley/extract/Extract.html
Note that if you just want read-only access, the install process will use extract, but youwill not need to learn anything about it.
3.2 Getting the ATLAS basefile tree and the working ATLAS directory
Here are the steps to get a local ATLAS basefile tree:
1. If you don’t already have it, install git. On my lubuntu system, I did: “sudo apt-get
install -y git-core gitg qgit”.
2. Checkout the ATLAS basefiles: From a git-capable machine connected to theInternet, go to the directory where you want the ATLAS basefiles to be, and issue:
git clone git://github.com/rcwhaley/math-atlas.git
This command should create a directory callec math-atlas in the current directory,and math-atlas should contain the files Makefile, extract.c, and README, as wellas the directory AtlasBase, which contains all the ATLAS basefiles, and the directoryAtlasTest, which contains Antoine’s testing scripts.
→ The details of how to use git actually vary depending on what you are trying todo, and the above command is just the simplest thing. Please see:
http://nipy.sourceforge.net/nipy/stable/devel/guidelines/gitwash/
for a good discussion of the two primary ways to use git to contribute: (1)submitting patches, or (2) submitting substantial new development with forkingand pull requests.
3. Create ATLAS working directory and extract files: Decide where you wish tocreate the ATLAS source tree. This directory should not presently exist, since theMakefile is going to create it for you. Create the source tree with the command:
make srcdir=<your chosen directory>
If srcdir is not given, the Makefile creates a directory TEST in the math-atlas
directory (i.e., srcdir defaults to ./TEST).
Now, cd to srcdir and issue ‘make’ to build the ATLAS tree, and ./atltar.sh willbuild the standard ATLAS tarfile from the ATLAS source tree.
5

3.3 Basefile/extracted file interaction
You’ll have to scope the extract page for any kind of real feel for how this works, but someatlas-specific details are in order here. In each subdirectory of the ATLAS/ tree, you willfind a file Make.ext. If you type make -f Make.ext, this makefile will extract all new filesin this subdirectory for which the basefile is newer.
So, what usually happens is you a messing with something, and you do it in the ATLAS/
directory. When you are confident in your change, you put it into the appropriate basefilein the AtlasBase/ directory (note that examining Make.ext will show you what basefile agiven extracted file comes from), and you then re-extract over your working copy with theabove command.
4 ATLAS coding style
ATLAS attempts to use a unified coding style. Older codes may not adhere to it strictly(especially in function prototyping and single-line ifs), but all new codes should do so.
• Strict ANSI/ISO 9899-1990 C conformance is required
– Must use /* */, not //
• Lines are at most 80 characters in length
• No tabs should be used in the file, only spaces
→ in vim can use :set expandtab
• Indentation is always 3 characters, and the braces should line up, as in:
for (i=0; i < N; i++)
{
for (j=0; j < N; j++)
statement;
}
All braces are lined up this way (eg., ifs, functions & loops).
• Multiline function calls have arguments indented to the opening paren:
error = function_call(arg1, arg2, arg3,
arg4, ar5);
• If bodies are always on a separate line from if, so you want:
if (cond)
statement;
rather than:
if (cond) statement;
6
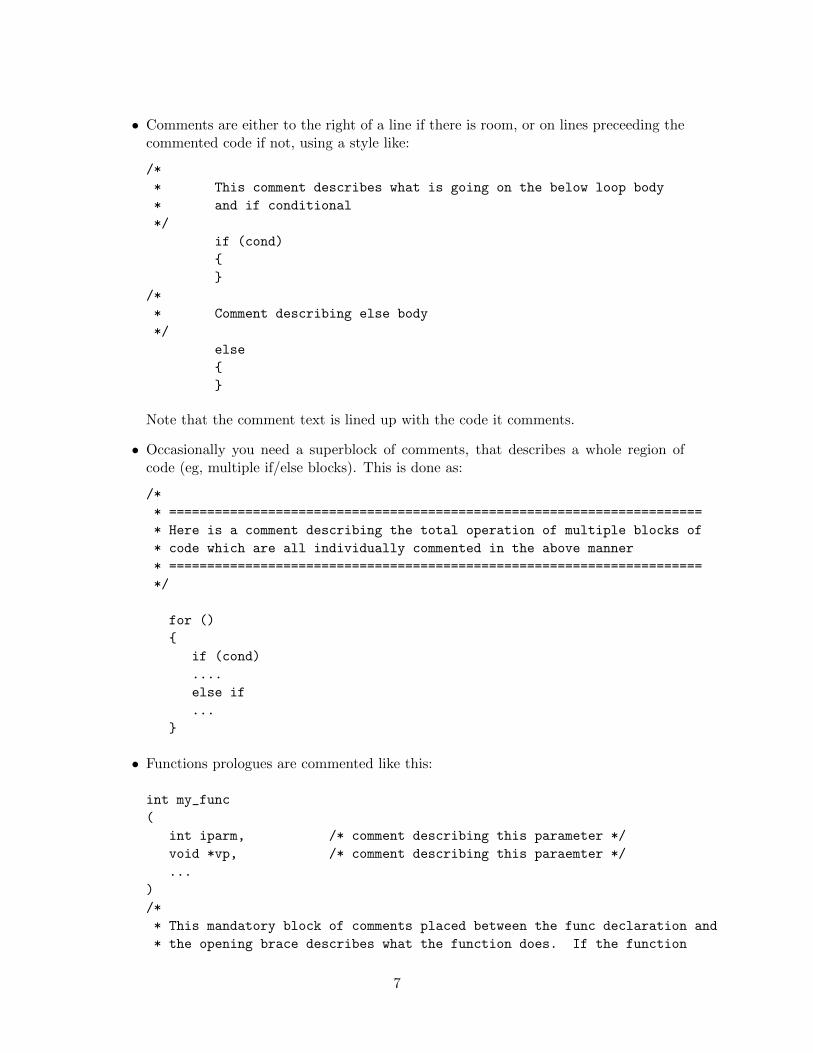
• Comments are either to the right of a line if there is room, or on lines preceeding thecommented code if not, using a style like:
/*
* This comment describes what is going on the below loop body
* and if conditional
*/
if (cond)
{
}
/*
* Comment describing else body
*/
else
{
}
Note that the comment text is lined up with the code it comments.
• Occasionally you need a superblock of comments, that describes a whole region ofcode (eg, multiple if/else blocks). This is done as:
/*
* ======================================================================
* Here is a comment describing the total operation of multiple blocks of
* code which are all individually commented in the above manner
* ======================================================================
*/
for ()
{
if (cond)
....
else if
...
}
• Functions prologues are commented like this:
int my_func
(
int iparm, /* comment describing this parameter */
void *vp, /* comment describing this paraemter */
...
)
/*
* This mandatory block of comments placed between the func declaration and
* the opening brace describes what the function does. If the function
7
* returns a value, this block of comments end with line(s) describing the
* the return value, of the form:
* RETURNS: 0 on success, non-zero error message otherwise
* second line describing return value
*/
{
}
5 Adding a LAPACK routine to ATLAS
It is probably not practical that ATLAS will provide a complete LAPACK API (as it doeswith the BLAS) in the foreseeable future, both due to the algorithmic complexity of someof the operations, and to the sheer number of routines in LAPACK. It must be understoodthat adding routines adds to the inertia and maintenance costs of the package, and thisadditional burden must be offset by real advantage for the user.
ATLAS has so far only added LAPACK routines to ATLAS when we can make aperformance-enhancing algorithm modification. For instance, we added the LU and Choleskyfactorizations because we used the recursive formulations of these routines, which providesfor better performance on pretty much any cache-based architecture.
However, when we have added such routines, we usually add the correlated routineseven when a performance advantage is not supplied. For instance, upon adding GETRFsupport, we also added GETRS and GESV. As far as column- major routines go, we supplyno better algorithm for GETRS or GESV than LAPACK. However, since these routines arevery simple, and GETRF is very often used with them, we added them along with GETRF.The idea here is that their maintenance costs are not heavy, and real advantage is givento the user in that we have sped up GETRF, and if the factor and solve are all he needs,ATLAS will supply a complete solution.
The column-major comment points out another reason to add a routine to ATLAS:ATLAS supplies the only performance-aware row-major LAPACK implementation that Iam aware of (I’m sure there are some, I just don’t know of any that aren’t simply usingthe col-major stuff, and thus performing terribly). It is possible that someone would wantto add an LAPACK routine to ATLAS simply because they need a row-major version, andsomeone being motivated enough to write it would probably be ample justification to addthe routine to the ATLAS tarfile.
5.1 Row-major LAPACK routines
So far, we have accepted no routines that do not also include a row-major equivalent, bothfor BLAS and for LAPACK. We hope to continue this. There are as yet only a few users ofthe row-major LAPACK/BLAS that I am aware of, but I believe that this is a chicken/eggproblem.
Some people insist on using row-major arrays in C, but if they have access to a BLAS/LAPACKthat supports it, they find the performance is no better than what they get with simpleloops, or that it is calling the col-major in a naive way, and cutting the problems size theycan solve in half by copying. Therefore, people with row-major bias don’t call the stuff’cause it doesn’t help them, and the problem continues.
8

It is my belief, therefore, that good-quality row-major stuff must be produced beforesignificant demand will appear. If I’m wrong, I guess we’ll someday drop support for row-major, but I don’t think this will be the case over a long enough time line.
Therefore, despite it being a hassle, having a good quality row-major implementationis critical for getting an LAPACK routine into ATLAS. For many routines, since we haverow-major BLAS, the algorithm stays the same, and only some pointer arithmetic need bechanged.
Other routines in LAPACK (GETRF is one) have a built in algorithmic bias towardscolumn-major (in GETRF, this is doing row-pivoting), and another algorithm with the samestability and usage characteristics should be employed for row-major (eg., column-pivoting,for GETRF).
5.2 Outline of Steps
Here are the general steps to use when adding an LAPACK routine to ATLAS:
1. Create and debug tester using LAPACK
• Update extractors
• Update Makefiles
2. Write and test ATLAS internal routines using above tester
• Update extractors
• Update Makefiles
3. Update atlas clapack.h to include your new routines
4. Create C and F77 interfaces to your routine
• Update extractors
• Update Makefiles
5. Update clapack.h
6. Update the LAPACK quick reference guides.
5.3 Create and debug tester
The first step in adding a new routine to ATLAS is to create a tester (and timer) which canbe used to verify the correctness of your code. More than half of the challenge is gettingthe tester right; with a good tester/timer, the code usually comes fairly easily.
Your tester will go in ATLAS/bin when extracted; you can examine some of the testersavailable there to get an idea of what you should do (eg., look at ATLAS/bin/[lu/llt/slv/trtri/uum]tst.c).All of these routines come from the basefile AtlasBase/Clint/atlas-tlp.base, which iswhat you should submit your patch against, unless you want to create your own, separatebasefile.
After your tester is written, its column-major components can be tested against LA-PACK by using the make <rout>tstF target in ATLAS/bin/<arch>. You can even test the
9
row-major components by having the F77 interface transpose the matrices on input, andback on output. See ATLAS/bin/uumtst.c for an example of this for square matrices.
As part of your debugging of the tester, be sure that it not only agrees that LAPACKproduces the right answer, but truly detects errors as well. For instance, manually overwritean entry, both in the matrix and in the padding (in separate tests), and make sure it iscaught by the tester.
5.3.1 Writing ATLAS/src/testing C-to-f77 wrapper
You first need a way for your tester, written in C, to call the LAPACK routine, writtenin F77. All such language translation routines are kept in ATLAS/src/testing, and comefrom the basefile ATLAS/Clint/atlas-ilp.base. This wrapper is trivial, though some ofthe integer/string stuff is not obvious. Steal the code from the other examples.
5.3.2 Getting your routines extracted
Now you need to get your files to appear in the right subdirectories, so you need an entryin the appropriate Make.ext. All the Make.ext files comes from AtlasBase/make.base, sofind the rout for your directory in this file (for examples the line saying@ROUT ATLAS/interfaces/lapack/F77/src/) and add your routine name to the line con-taining the name of all the other routines.
So, now you are in your working directory (say ATLAS/src/lapack), and you type make
-f Make.ext, and nothing happens, no new files show up. This is because you need tore-extract your Make.ext file. This can of course be done by removing your whole ATLAStree and reinstalling, but less brutally you can “just” use something like this: extract -b
/home/soender/AtlasBase/make.base -o Make.ext rout=ATLAS/src/lapack -langM. The-langM switch is required for extract to properly handle makefiles, so you cannot skip it.
This is the basic procedure for this sort of stuff. When you need a makefile in a BLDdirsubdirectory, the appropriate makefile is copied by Make.top from the ATLAS/makes/ di-rectory. Check Make.ext to see which basefile they come from, and add your routine nameamong the names of the other routines.
Remember to update the Makefiles for both ATLAS/bin and ATLAS/src/testing, andto get these makefiles into the appropriate subdirs. In order to extract new makefiles, andget them put into the appropriate subdirs, I typically do something like (from the BLDdir:
pushd ~/TEST/ATLAS/makes/ ; make -f Make.ext ; cd .. ; \
make refresh ; popd
(replace the path and arch appropriately, obviously).
5.4 Create and debug ATLAS internal routines
The internal LAPACK routines are kept in AtlasBase/Clint/atlas-lp.base. Add yourroutine here, and update ATLAS/src/lapack’s Make.ext and Makefile appropriately tobuild your routine.
You will add your routine in atlas-lp.base with an additional @ROUT keyline, but alsodo not forget to update the include file atlas lapack.h at the bottom of the file as well.
10
You will need to add your routine to the prototype part, as well as to the macro renamingpart. Examine the basefile for details.
Once it is extracting, use your LAPACK-debugged tester to debug your code.
5.5 Add C and F77 interface routines
We do this step last, because we don’t want to add API routines until the code is working.Having debugged and made sure the code is faster than LAPACK, we’re now ready tomake it available to the user via the advertised APIs. The extracted API files are kept insubdirectories under ATLAS/interfaces/lapack.
The F77 interfaces are kept in AtlasBase/Clint/atlas-fint.base. Look at the ex-isting examples and notice how extract generates all four precision from the same routine,if you use the extract macros. All the code for this interface can be ripped from LAPACKand adapted. Note that you will usually need to examine both complex and real versionsof the original LAPACK routine, to find any differences in interface/testing and comments.You will also need to remove unneeded EXTERNAL declaration, etc.
This interface does the parameter checking, and converts any FORTRAN string argu-ments to some predefined integer values, and then call the ATLf77wrap interface. Scope anyof the existing routines for details on this.
The C interfaces are easy to write, since they should just check the input arguments,and then call the ATLAS routine. The codes are stored in atlas-clp.base. Check it outfor lots of examples.
5.6 Update the LAPACK quick reference guides
The ATLAS user API is defined in the quick reference guides under AtlasBase/TexDoc.Right now, the supported LAPACK API is small enough to fit both C and F77 interfaceson one card (single 2-sided landscape page), but eventually it will be split in two, as withthe BLAS quick reference cards. Either use the Makefile to do it, or remember to manuallythrow the -tlandscape flag to dvips, and the -paper a4r flag to xdvi.
6 Architectural defaults
ATLAS’s architectural defaults are simply a record of the results of a previously run ATLASsearch. They exist for a couple of reasons:
1. Using architectural defaults, install times are reduced to almost bearable levels
2. Because the search is empirical, installs can go wrong if unmonitored. Architecturaldefaults given out in the standard tarfile have at least passed the laugh test
6.1 Rambling on about architectural defaults
One FAQ for architectural defaults is why any timings are necessary when using them. Thestandard architectural defaults only rarely describe everything discovered by a search, butrather give only those data that we feel sure will not vary a great deal. For instance, formany machines, the kernels to use, etc., are fully specified, but CacheEdge is not. CacheEdge
11
varies depending on your L2 cache size, which varies depending on architecture revision, soit is not specified, allowing it to tune itself for this variable parameter, while still skippingthe search over less variable things (eg., if the L1 cache or FPU units change, this is usuallya new architecture, not a revision of an old).
That’s the theoretical reason why they shouldn’t cover all discovered items. However,ATLAS presently times the kernels in order to be able to produce a comprehensive SUM-MARY.LOG, and these timings could be skipped, assuming this functionality were addedto the atlas install process.
There are some weaknesses of architectural defaults. One of the main ones is how theycan go out of date, and cause slowdown. One big way this can happen is with compilerchanges. For instance, gcc 3.0 produces completely different (and inferior) x86 code thanthe 2.x series, and 4.0 was similarly worse than latter-day gcc 3. Almost all architecturaldefaults in ATLAS 3.10 were compiled with gcc 4.7.0.
Anytime a different compiler is used, the architectural defaults become suspect. Fortruly inferior compiler (like gcc 3.0, 4.0, or 4.1), there is no way to get good performance,but at least some problems can be worked around by having ATLAS adapt itself to the newcompiler, and architectural defaults prevent this from happening.
6.2 Making your own architectural defaults
This section describes how to create architectural defaults as of ATLAS 3.9.80 and later.For older releases, the process is similar, but not quite the same, and is covered in the olderatlas devel available in those tarfiles.
1. Get an install, correct in all details, that you want to immortalize.
2. cd to your OBJdir/ARCHS directory
3. Type make ArchNew
This will copy the search result output files into a directory <OBJdir>/ARCHS/<MACH>/,with appropriate subdirs under that. You can then go into these guys and delete files youdon’t want to be part of the defaults (eg., atlas cacheedge.h, etc).
Now, to save these defaults to a transportable format, you can have the makefile createthe tarfile for you by:
make tarfile
6.3 Getting ATLAS to use your shiny new defaults
If necessary, rename the tarfile with your archdefs to the same name as the architectureyou are presently compiling on (normally the file will already have the same name). Then,during configure, you simply tell ATLAS to use your directory of architectural defaults, byadding the following flag to configure:
-Ss ADdir <path to directory containing your tarfile>
Note that with this flag and ability to make archdefs, you can create an enire suite ofcustom archdefs for your particular machines, and keep them all together in a directory forfuture installs.
12

7 Sanity testing for an ATLAS install
From ATLAS3.3.8 forward, ATLAS has had a “sanity test”, which just does some quicktesting in order to ensure that there are no obvious problems with the installed ATLASlibraries. It runs all of the standard BLAS interface testers, with the default input files, andit then runs a few fixed cases of ATLAS’s lapack tester routines (eg., ATLAS/bin/invtst.c,etc). The advantage of these lapack testers is that they depend on many of the BLAS aswell as the lapack routines, so you get a lot of testing for a minor amount of time. Thesanity checks do not require any non-ATLAS libraries for testing, so the only dependencethat a user who has installed ATLAS may not be able to satisfy is the need for a Fortran77compiler, which is required for the BLAS interface testers. As of ATLAS3.7.12, ATLAS canalso run a reduced set of tests for users who do not have a fortran compiler.
7.1 Invoking the sanity tests
These tests are invoked from your install directory by:
make check
If you are using threads, you will want to run the same tests for threading via:
make ptcheck
7.2 Understanding the sanity test output
Once you fire off this tester, you’ll see a lot of compilation going on. All compilation is doneup front, and then the testers are run at the end. All tester output is dumped to some files(we’ll see specifics in a bit), which are then automatically grepped for errors at the end ofthe run. It is the results of this grep that the user will see. For example, here’s the outputfrom a run on my Athlon running Linux:
dudley.home.net. make check
...
... bunch of compilation ...
...
DONE BUILDING TESTERS, RUNNING:
SCOPING FOR FAILURES IN BIN TESTS:
fgrep -e fault -e FAULT -e error -e ERROR -e fail -e FAIL \
bin/Linux_ATHLON/sanity.out
8 cases: 8 passed, 0 skipped, 0 failed
4 cases: 4 passed, 0 skipped, 0 failed
8 cases: 8 passed, 0 skipped, 0 failed
4 cases: 4 passed, 0 skipped, 0 failed
8 cases: 8 passed, 0 skipped, 0 failed
4 cases: 4 passed, 0 skipped, 0 failed
8 cases: 8 passed, 0 skipped, 0 failed
4 cases: 4 passed, 0 skipped, 0 failed
DONE
SCOPING FOR FAILURES IN CBLAS TESTS:
13
fgrep -e fault -e FAULT -e error -e ERROR -e fail -e FAIL \
interfaces/blas/C/testing/Linux_ATHLON/sanity.out | \
fgrep -v PASSED
make[1]: [sanity_test] Error 1 (ignored)
DONE
SCOPING FOR FAILURES IN F77BLAS TESTS:
fgrep -e fault -e FAULT -e error -e ERROR -e fail -e FAIL \
interfaces/blas/F77/testing/Linux_ATHLON/sanity.out | \
fgrep -v PASSED
make[1]: [sanity_test] Error 1 (ignored)
DONE
So, in the LAPACK testers we see no failures (all tests show 0 failed), and we haveno output from the BLAS testers, which is what we want. Notice the lines like:
make[1]: [sanity_test] Error 1 (ignored)
This is due to fgrep’s behavior, and does not indicate an error. If fgrep does not findany pattern matches, it returns a 1, 0 on match. Therefore, since we are grepping for error,getting an “error condition” of 1 is what we hope for.
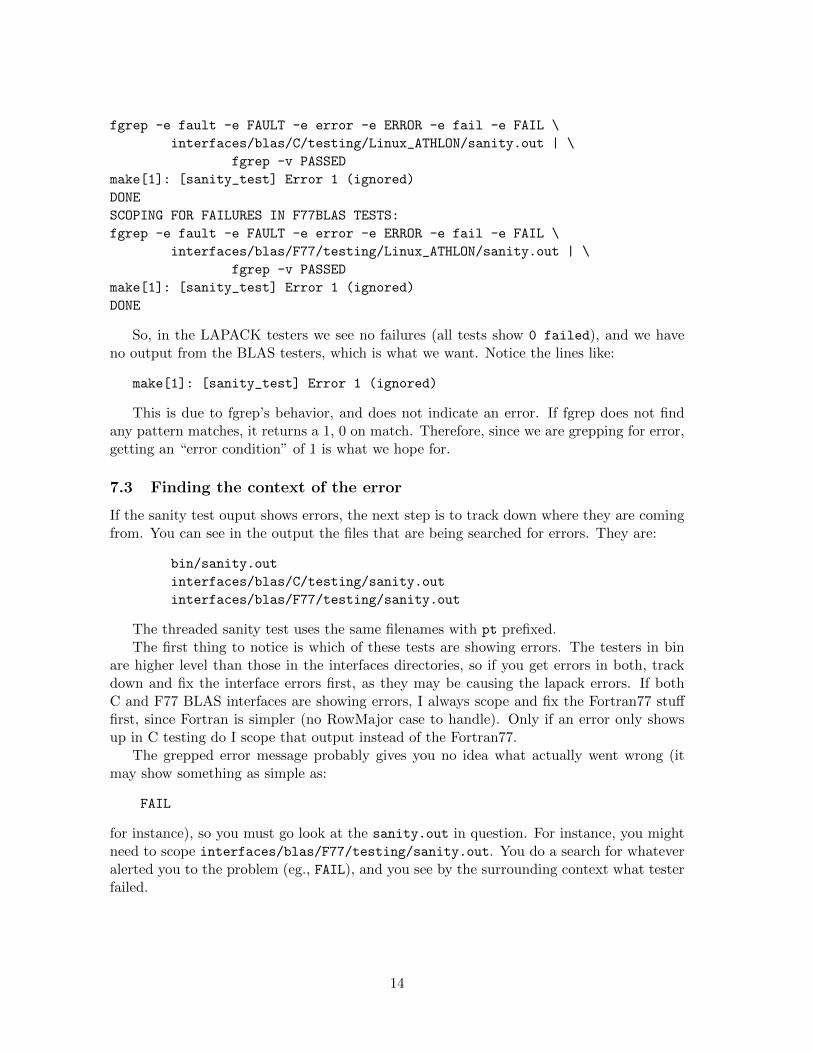
7.3 Finding the context of the error
If the sanity test ouput shows errors, the next step is to track down where they are comingfrom. You can see in the output the files that are being searched for errors. They are:
bin/sanity.out
interfaces/blas/C/testing/sanity.out
interfaces/blas/F77/testing/sanity.out
The threaded sanity test uses the same filenames with pt prefixed.The first thing to notice is which of these tests are showing errors. The testers in bin
are higher level than those in the interfaces directories, so if you get errors in both, trackdown and fix the interface errors first, as they may be causing the lapack errors. If bothC and F77 BLAS interfaces are showing errors, I always scope and fix the Fortran77 stufffirst, since Fortran is simpler (no RowMajor case to handle). Only if an error only showsup in C testing do I scope that output instead of the Fortran77.
The grepped error message probably gives you no idea what actually went wrong (itmay show something as simple as:
FAIL
for instance), so you must go look at the sanity.out in question. For instance, you mightneed to scope interfaces/blas/F77/testing/sanity.out. You do a search for whateveralerted you to the problem (eg., FAIL), and you see by the surrounding context what testerfailed.
14
7.4 Tracking down an error in the BLAS interface testers
The BLAS testers are split by BLAS Level (1, 2 or 3) and precision/type (s,d,c,z). Thebasic names of the tester executables are
x<pre>blat<lvl>
x<pre>cblat<lvl>
for Fortran77 and C, respectively. The Level 1 testers (x[s,d,c,z]blat1) test certain fixedcases, and thus take no input file. So if the error is in them, you simply run the executablewith no args in order to reproduce the failure.
The Level 2 and 3 testers allow a user to specify what tests should be run, via an inputfile. The standard input files that ATLAS runs with are:
<pre>blat<lvl>.dat
c_<pre>blat<lvl>.dat
respectively. The format of these input files is pretty self explanatory, and more explanationcan be found at:
www.netlib.org/blas/faq.html
To run the tester with these files, you redirect them into the tester. For instance, to runthe double precision Level 2 tester with the default input file, you’d issue:
./xdblat2 < ~/ATLAS/interfaces/blas/F77/testing/dblat2.dat
You should be aware that only the first error report in a run is accurate: one errorcan cause a cascade of spurious error reports, all of which may go away by fixing the firstreported problem. So, it is important to find and fix the errors in sequence.
I usually copy the input file in question to a new file that I can hack on (for instance, ifthe error was in the double precision Level 2, I might issue:
cp ~/ATLAS/interfaces/blas/F77/testing/dblat2.dat bad.dat
I then repeatedly run the routine and simplify the input file until I have found the smallest,simplest input that displays the error.
The next step is to rule out tester error. The way I usually do this is to demonstratethat the error goes away by linking to the Fortran77 reference BLAS rather than ATLAS(you can only do this for errors in the F77 interface, obviously). I usually just do it byhand, i.e., for the same example again, I’d do:
f77 -o xtst dblat2.o /home/rwhaley/lib/libfblas.a
If the ATLAS-linked code has the error, and this one does not, it is a strong indication thatthe error is in ATLAS. If the F77 BLAS are shown to be in error, it is usually a compilererror, and can be fixed by turning down (or off) the optimization used to compile the tester.
Now you should have confirmed the tester is working properly, and that the error is ina specific routine (let us say DNRM2 as an example). As a quick proof that DNRM2 isindeed the problem, you can link explicitly to the F77 version of DNRM2, and to ATLASfor everything else (see Section ?? for hints on how to do this). If this still shows the error,you are confident that ATLAS’s DNRM2 is indeed causing the problem, and you shouldeither track it down, or report it (depending on your level of expertise).
15
7.5 Tracking down an error in the bin/ testers
The sanity tests only run the LAPACK testers in this directory. The LAPACK routinesdepend on the BLAS, so ignore errors in lapack testers until all the BLAS pass with noerror. If you have errors in LAPACK but the BLAS pass all tests, then you have to huntfor the error in the LAPACK routines.
First, rule out that it’s not a problem in the BLAS that is just not showing up in theBLAS testing. Get yourself a reference BLAS library, as explained in Section ??. Then,set your Make.inc’s BLASlib macro to point to the created reference BLAS library. Then,you need to compile a library that uses ATLAS’s lapack routines, but the reference BLAS.This can be done by compiling the same executable name with sys suffixed. For instance,if you were running the LU tester, xdlutst, you would say make xdlutst sys, and thenrun this executable with the same input.
If the error goes away, then the error is really in the ATLAS BLAS somewhere. I thenusually look at the LAPACK routine and tester in question to find out what its BLASdependencies are, and manually link in the reference BLAS object files until I find the exactBLAS causing the problem. Usually once you know what routine causes the prob, youcan reproduce the error with the BLAS tester (i.e. you need a IDAMAX call with N=12,incX=82).
If the error still persists using ATLAS’s LAPACK and the Fortran77 BLAS, the nexttrick is to do LAPACK just like the BLAS: download and compile the F77 LAPACK fromnetlib (www.netlib.org/lapack/lapack.tgz). You then set your Make.inc’s FLAPACKlibto point to your Fortran77 lapack library. You then suffix the base executable name withF sys (eg., for LU again, you would do make xdlutstF sys), and you will get a testerlinked against the Fortran77 BLAS and LAPACK. If this also shows to be in error, there isan error in the tester, or in the compiler. Try turning down compiler optimization to rulein or out compiler errors.
8 Antoine’s testing scripts
Before a stable release, we always do as much testing as possible. The 900 pound gorilla oftesters is Antoine’s tester scripts. This tester can run as long as several days, and does agreat number of both fixed and random tests, and if it completes with no errors, you have apretty good idea that the code is fairly solid. Even the casual user ought to run the sanitytesting as a matter of course, and that should always be ran and passed first. Also, muchof the methodology for understanding output, tracking down problems, etc, is the same forthis tester and the sanity test, so read those sections first for tips I will not bother to repeathere.
You can run this full tester with this simple command given in your BLDdir:
make full_test
This can run for as long as several days (on modern machines, it usually takes morelike 4-8 hours). If your connection to the machine is not stable, it can die before the test iscomplete, so it makes sense to nohup this command and redirect the output. I usually do(using tcsh):
nohup make full_test >& make.out &
16
Once you are done, you can auto-search for error messages with:
make scope full_test
8.1 Finding errors
If the scope finds problems, you will need to investigate the tester log files for more info.These files will be found in the directory:
BLDdir/bin/AtlasTest/<ARCHNAME>
the .out file in that directory should be a complete text capture of the full testing log.More detailed output can be found in sibdirectories under here.
Once you have the error, you need to repeat it. You can try running the exact case, butsometimes that won’t do it (for instance, you have a memory error that requires you to runmany cases); you then need to find a small run that does demonstrate the error.
You should then apply the normal tricks (linking to F77 BLAS instead of sys blas,having the tester call the f77 blas twice, etc) to ensure the error really is in ATLAS, beforetracking the error to its source.
8.2 Tracking down errors in the bin/ testers
There are two types of bin/ testers: lapack and blas. The BLAS testers have executablenames of the form
x<pre>l<level>blastst
The BLAS testers test ATLAS against a known-good implementation, so the first thing todo is make sure the error is in ATLAS, and not the known-good implementation. To dothis, change your BLASlib back to the default F77 reference BLAS, and if necessary compilethem without optimization. and then relink and rerun the test in question. If the errorgoes away, you have found an error in your known-good library, not ATLAS. If it stays, youhave found an error in ATLAS, and you should track it down or report it. See Section 7.5for information on tracking problems in the LAPACK testers.
9 Finding a good NB for GEMM
One of the things I do most frequently with user-submitted kernels is reduce the blockingfactor that the user has chosen. I often choose smaller NB than the best for asymptoticGEMM performance, and even more often choose one that does not yield the best perfor-mance in the kernel timer. To understand why, you must understand the following points,explained in turn below:
1. Better kernel timing (eg. make ummcase in your <OBJdir>/tune/blas/gemm/ direc-tory) does not always yield better total GEMM performance
2. Large NB means significantly more time in cleanup code
3. Large NB means significantly more time in unblocked application code
17
9.1 Better kernel timing does not always yield faster GEMM
The kernel timer (invoked by one of the make mmcase variants available in <OBJdir>/tune/blas/gemm/)tries to mimic the way ATLAS calls the kernel. However, it does not do everything the sameway. First, there is no cleanup, so it is always calling the kernel only. More importantly,CacheEdge has not yet been determined, so no Level 2 Cache blocking is being performed.Therefore, it may sometimes look like you are better off to block the kernel for the L2when using these kernel timers, when in fact, if you instead block for the Level 1 cache,CacheEdge will then further speed things up later, and thus the smaller NB achieves betterGEMM performance, even when it runs slower in the kernel timer.
For machines with very large L1 caches, often several blocking factors that fit into L1have roughly the same performance. In such a case, it is very likely that you want to choosethe smallest achieving that rough performance, as it will allow more blocks to fit into theL2 blocking to be done later.
If a kernel appears to get much better performance with a large NB, the best idea is tobuild a full GEMM using both the best-performing small NB, and the best performing largeNB, and seeing what the gap truly is. Very often, the small kernel will actually be bettereven asymptotically, and if it is not, it will often be so much better for smaller problemsthat it makes sense to use it anyway.
Even beyond these explanations, it is sometimes the case that the kernel timer predictsgood performance that is not realized when the full GEMM is built. This is usually dueto inadequate cache flushing, leading to overprediction of performance because things areretained more in the cache than they are in practice. Therefore, I usually pump up theflushing mechanism (set L2SIZE of your Make.inc to ridiculously large levels). No matterwhat, actual full GEMM performance is the final arbiter. If it is not as high as predicted bythe kernel timer, it may be worthwhile to see if other, smaller NB, cases achieve the samefull-gemm performance.
9.2 Large NB means more time in cleanup
One bad news about choosing a large NB is that applications will spend more of their timein cleanup. Let us say you choose a block factor of 120. In this case, many applications willnever even call your optimized kernel, but spend all their time in GEMM cleanup. Someapplications are staticly blocked, and if their NB is smaller than yours, they can spend theirentire time in cleanup even for large problems.
Therefore, if you must choose a large NB in order to get adequate GEMM performance,you must pay an unusual amount of attention to cleanup optimization. However, as thenext section will discuss, even if cleanup ran at the same speed as your best kernel, this willyield poor performance for many codes.
9.3 Large NB means more time in unblocked application code
Probably the worst thing about choosing a large NB is that many applications use Level1 and 2 BLAS in order to do the unblocked part of the computation. These BLAS areusually at least an order of magnitude slower than GEMM. Therefore, as you increase NB,for applications with unblocked portions, you increase the proportion of time spent in thisorder-of-magnitude slower code. Therefore, even with perfect cleanup, a large NB may result
18
in an application running at less than half speed, even though GEMM performance isquite good.
To get an idea of this, simply scope the factorizations provided by LAPACK. Theseapplications are staticly blocked, so that the column factorizations (eg., DGETF2 for LU)are used until NB is reached. If ILAENV returns a blocking factor smaller than yourGEMM, the applications will stay in cleanup even for large problems. Even worse, someapplications (eg., QR) require workspace proportional to NB, and since dynamic memoryis not used, it is possible even if you hack ILAENV to use the correct blocking factor, theywill be forced to a smaller one.
9.4 Finding a good NB
I will call the first level of cache accessed by the floating point unit the Level 1 cache,regardless of whether it is the first level of cache of the machine (there are a number ofmachines, such as the P4 (prescott) and Itanium where the FPU skips the Level 1 cache).Let Ne be the number of elements of the data type of interest in this cache. If this cacheis write-through, then a rough guess for a good upper bound is NB ≤
√Ne. If the cache is
not write-through, this is still the upper bound, but many larger caches often benefit from
using a smaller NB, one roughly NB <√Ne3 . We can describe this more exactly, but these
bounds are easy to compute during tuning.You should not choose an NB that is a power of 2, as this could occasionally cause nasty
cache conflicts. There’s often a small advantage to choosing NB that are a multiple of cacheline size; this can sometimes be critical, depending on the arch.
So, the basic idea is to start looking at NB given by the above two computations, andthen try a little smaller and larger using the kernel timer. If you get two that tie for out-of-cache performance, always take the smaller. If best performance is achieved with verylarge NB (say NB ≥ 80), then always confirm that it yields better GEMM performancethan a smaller NB, and that application performance is not severely impacted, particularlyfor smaller problems.
The way I usually time application performance is to time ATLAS’s LU. This actuallygives you a very rosy picture of how a large block factor will effect performance, in that ituses recursion rather than staticly blocking. This means that ATLAS’s LU does not haveany unblocked code, and thus doesn’t slow down the way LAPACK’s LU will for large NB.However, if even this code shows performance loss for smaller sizes, you know your cleanupneeds to get a lot better, or you need to reduce NB, even if it results in a slight reductionin GEMM performance. If you want to get a better idea of how most applications willperform, time one of LAPACK’s factorizations instead.
Under no circumstances should you choose a blocking factor much larger than 120. Iconfine the ATLAS search to a maximal size of 80 for the above reasons, but occasionallygo a little higher for machines without effective L1 caches. However, this can absolutely killapplication performance. Further, it is never a good idea to completely fill an Level 2 cachewith your block. It may look good in GEMM, but it will die in any application, both forthe reasons above, and the following: The L2 cache is shared instruction/data. Filling itwith data will often lead to instruction loading/flushing cycle when a larger application iscalling. Remember that GEMM is of interest because of all the applications that are builtfrom it, not when used in isolation.
19

If a NB larger than 60 only gives you a few percent, always choose a smaller one; onlygo above 80 for significant advantage, and essentially don’t go above 120 unless absolutelynecessary, and then you can expect slowdown in many applications, even once you havefully optimized all cleanup cases.
20
10 Information on atlconf
NOTE: this information was out of date before it was finished, so this discussion shouldbe viewed as an introduction only.
For ATLAS 3.7.12, ATLAS’s configure routine was completely rewritten for greatermodularity. The total amount of code probably increased, but the amount that must beexamined at any time should be very much smaller.
In the new system, the topmost unit is ATLAS/configure which is a BFI shell scriptwhich allows ATLAS’s config.c to be invoked in a way very similar to gnu configure. Thisshell script gathers some info and fills in a Makfile which is then used to build xconfig
from ATLAS/CONFIG/src/config.c. config.c is a driver program that first calls var-ious probes to determine any information not overridden by user flags, and then callsxspew to create a full Make.inc for the target architecture. xsprew is built from the fileATLAS/CONFIG/src/SpewMakeInc.c.
The idea is to change ATLAS’s install so it consists of the following commands:
1. /path/to/ATLAS/configure : Create Make.inc and build subdirs in the presentdirectory (ATLAS no longer requires building in arch-spec directories under the sourcetree)
2. make build : Build ATLAS
3. make check : run sanity tests
4. make time : run simple benchmarks, compare observed vs. expected performance,and issue warning if too low
• Keep record of arch default installs with perfermance as % of clock rate (notpeak!)
• If arch def used wt bad compiler, this will detect performance difference, anduser should be warned
• If no arch defaults (so expected performance unknown), still create standardbenchmark output file for submission to ATLAS
5. make install : copy libraries and include files to user-specified directories
10.1 Probe Overview
From ATLAS 3.7.12 on, ATLAS’s config routine was rewritten for greater modularity, witheach config probe having its own driver and so on. For this discussion, we will refer to themachine doing the cross-compiliation as the frontend (abbreviated as FE), and the machinewhich ATLAS is being tuned for the backend (abbreviated as BE). Note that if you are notdoing cross-compilation (the majority of the time) the front-end and back-end are the samemachine.
Every type of probe has a frontend driver (occasionally, config may directly call thebackend driver, if there is only one) which will itself call multiple backend drivers. Forinstance, the probe to compute the architecure runs on the frontend, and calls differentbackend drivers depending on the assembly dialect and operating system of the backend.
21
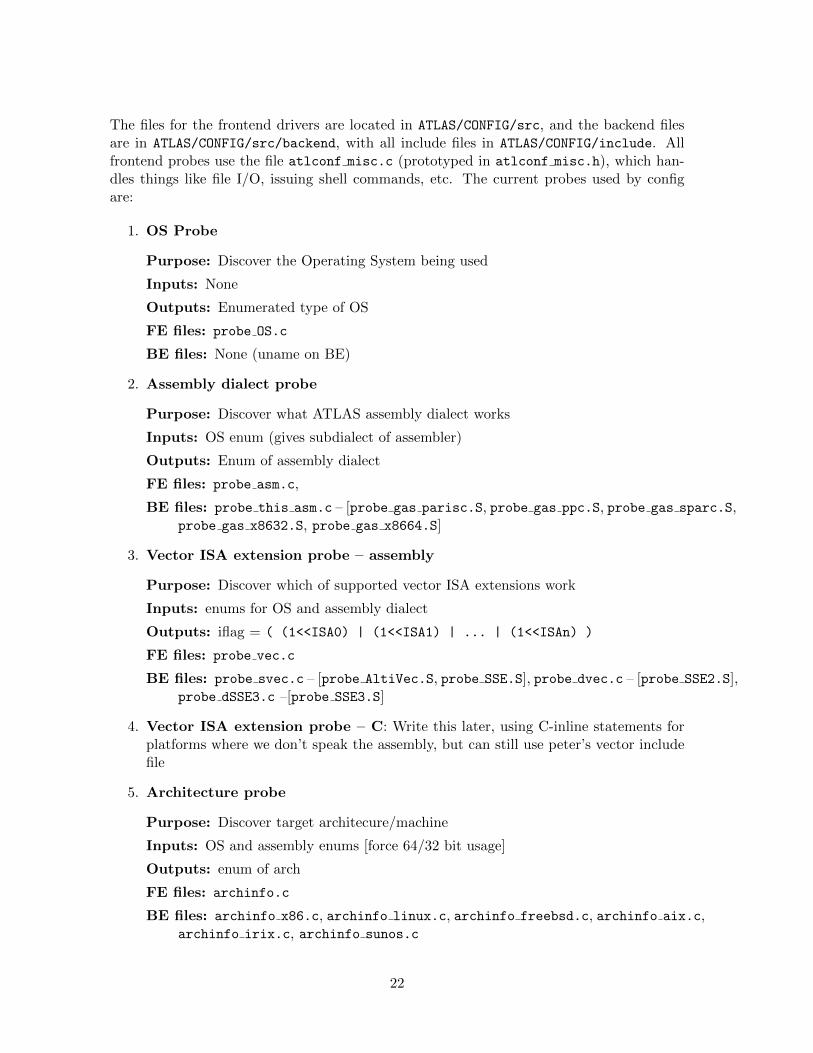
The files for the frontend drivers are located in ATLAS/CONFIG/src, and the backend filesare in ATLAS/CONFIG/src/backend, with all include files in ATLAS/CONFIG/include. Allfrontend probes use the file atlconf misc.c (prototyped in atlconf misc.h), which han-dles things like file I/O, issuing shell commands, etc. The current probes used by configare:
1. OS Probe
Purpose: Discover the Operating System being used
Inputs: None
Outputs: Enumerated type of OS
FE files: probe OS.c
BE files: None (uname on BE)
2. Assembly dialect probe
Purpose: Discover what ATLAS assembly dialect works
Inputs: OS enum (gives subdialect of assembler)
Outputs: Enum of assembly dialect
FE files: probe asm.c,
BE files: probe this asm.c – [probe gas parisc.S, probe gas ppc.S, probe gas sparc.S,probe gas x8632.S, probe gas x8664.S]
3. Vector ISA extension probe – assembly
Purpose: Discover which of supported vector ISA extensions work
Inputs: enums for OS and assembly dialect
Outputs: iflag = ( (1<<ISA0) | (1<<ISA1) | ... | (1<<ISAn) )
FE files: probe vec.c
BE files: probe svec.c – [probe AltiVec.S, probe SSE.S], probe dvec.c – [probe SSE2.S],probe dSSE3.c –[probe SSE3.S]
4. Vector ISA extension probe – C: Write this later, using C-inline statements forplatforms where we don’t speak the assembly, but can still use peter’s vector includefile
5. Architecture probe
Purpose: Discover target architecure/machine
Inputs: OS and assembly enums [force 64/32 bit usage]
Outputs: enum of arch
FE files: archinfo.c
BE files: archinfo x86.c, archinfo linux.c, archinfo freebsd.c, archinfo aix.c,archinfo irix.c, archinfo sunos.c
22
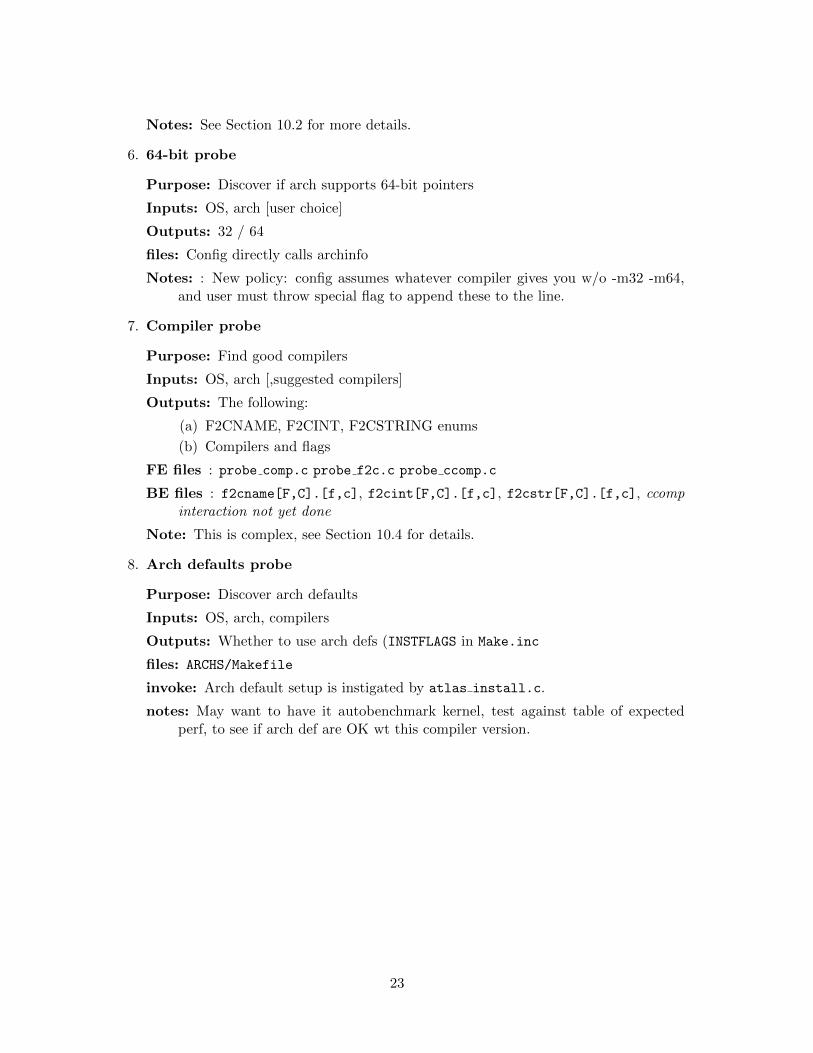
Notes: See Section 10.2 for more details.
6. 64-bit probe
Purpose: Discover if arch supports 64-bit pointers
Inputs: OS, arch [user choice]
Outputs: 32 / 64
files: Config directly calls archinfo
Notes: : New policy: config assumes whatever compiler gives you w/o -m32 -m64,and user must throw special flag to append these to the line.
7. Compiler probe
Purpose: Find good compilers
Inputs: OS, arch [,suggested compilers]
Outputs: The following:
(a) F2CNAME, F2CINT, F2CSTRING enums
(b) Compilers and flags
FE files : probe comp.c probe f2c.c probe ccomp.c
BE files : f2cname[F,C].[f,c], f2cint[F,C].[f,c], f2cstr[F,C].[f,c], ccompinteraction not yet done
Note: This is complex, see Section 10.4 for details.
8. Arch defaults probe
Purpose: Discover arch defaults
Inputs: OS, arch, compilers
Outputs: Whether to use arch defs (INSTFLAGS in Make.inc
files: ARCHS/Makefile
invoke: Arch default setup is instigated by atlas install.c.
notes: May want to have it autobenchmark kernel, test against table of expectedperf, to see if arch def are OK wt this compiler version.
23

10.2 Architectural Probes
We use the archinfo xxx probes to discover the following architectural information:
• ’n’: number of cpus
• ’c’: number of cache levels
• ’C’ #: size in KB of cache level #
• ’v’: verbose (prints strings as well as ints)
• ’m’: clock rate in Mhz
• ’a’: ATLAS architecture classification
• ’b’: support for 64 / 32 bits
• ’t’: Is cpu throttling currently on (-1: no, 0: don’t know, 1: yes)
If a given probe cannot find that particular item, it is returned as 0.The frontend wrapper script archinfo.c calls these guys according to OS, and tries to
get all flags filled in with union of functionality of archinfo x86 and archinfo <OS>.
10.3 Notes on configure
New policies:
• Any 64-bit arch defaults to building whatever the compiler natively does w/o flagsunless overridden
• L2SIZE always set to 4MB unless overridden
• Timer defaults to standard wall/cpu unless overridden
– Exception is solaris, where we default to solaris hr timers
– If Mhz is passed in, use cycle-accurate wall-timer on x86
10.4 Compiler Setup and Handling in ATLAS Config
This is complicated as hell. Potentially, each architecture/OS combo has unique compilerand flags for each supported compiler (more below), and the user can override any/all ofthese. I’m changing the number of supported compilers for greater flexability. These are:
ICC : compiles all C interface routines. Since it is not used for any kernel compilation theperformance impact of this compiler should be minimal.
SMC : used to compile ATLAS single precision matmul kernels
DMC : used to compile ATLAS double precision matmul kernels
SKC : used to compile all non-interface, non-gemm-kernel single precision ATLAS routines
24
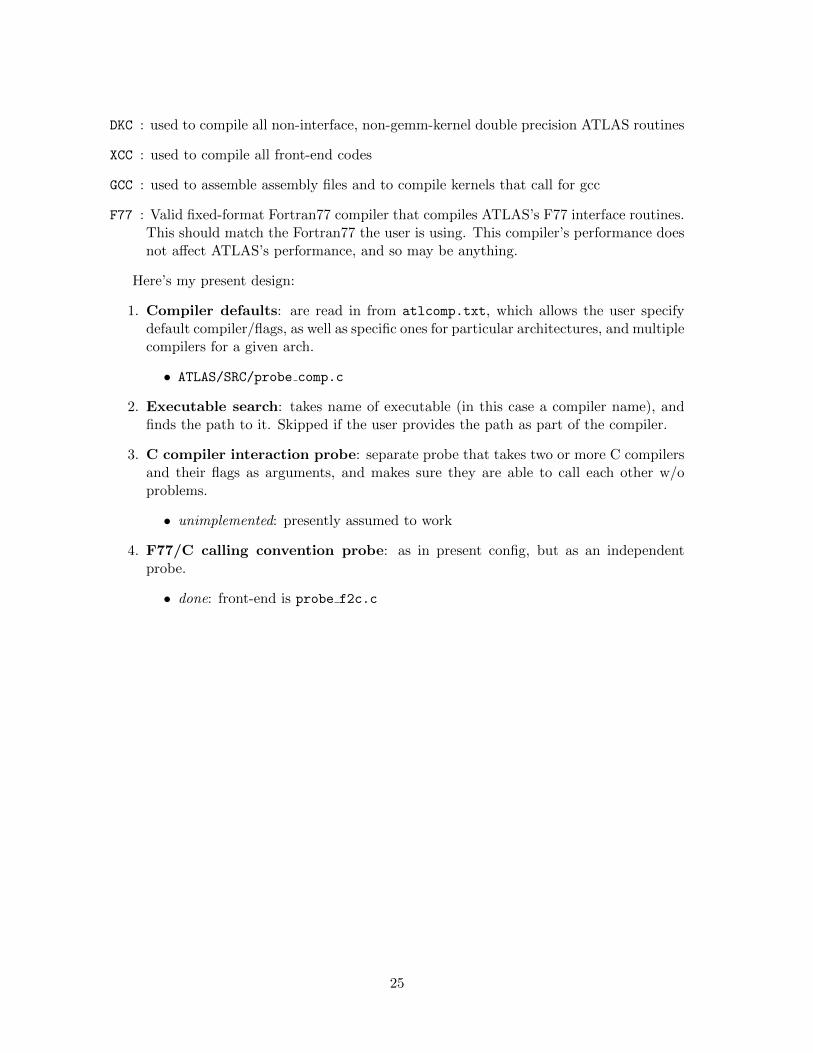
DKC : used to compile all non-interface, non-gemm-kernel double precision ATLAS routines
XCC : used to compile all front-end codes
GCC : used to assemble assembly files and to compile kernels that call for gcc
F77 : Valid fixed-format Fortran77 compiler that compiles ATLAS’s F77 interface routines.This should match the Fortran77 the user is using. This compiler’s performance doesnot affect ATLAS’s performance, and so may be anything.
Here’s my present design:
1. Compiler defaults: are read in from atlcomp.txt, which allows the user specifydefault compiler/flags, as well as specific ones for particular architectures, and multiplecompilers for a given arch.
• ATLAS/SRC/probe comp.c
2. Executable search: takes name of executable (in this case a compiler name), andfinds the path to it. Skipped if the user provides the path as part of the compiler.
3. C compiler interaction probe: separate probe that takes two or more C compilersand their flags as arguments, and makes sure they are able to call each other w/oproblems.
• unimplemented: presently assumed to work
4. F77/C calling convention probe: as in present config, but as an independentprobe.
• done: front-end is probe f2c.c
25