811-985 openinsight 9.3 for u2 quick start guide 9.3 for u2 quick...the uniobjects .net connector is...
TRANSCRIPT

OpenInsight for U2 Quick Start Guide Release 9.3

Page 2 of 91
Copyright © 2011, Revelation Software. All Rights Reserved.
INTRODUCTION ............................................................................................................. 4
STARTING OPENINSIGHT ............................................................................................ 5
I. Starting OpenInsight ............................................................................................................ 5
II. Opening an Existing Application ......................................................................................... 7
III. Creating a New Application ........................................................................................... 10
CONNECTING TO YOUR U2 DATABASE .................................................................. 13
I. Requirements....................................................................................................................... 13
II. Making the connection – U2 Connection Setup (legacy) ................................................. 14
III. Making the connection – UniObjects .Net (preferred) ................................................ 21
IV. Displaying and editing your data dictionaries.............................................................. 32
IV. Adding Calculated Columns to a Data Table ............................................................... 37
WORKING WITH FORMS ............................................................................................ 39
I. Creating a Data Entry Form .............................................................................................. 39
II. Adding Data to the Table ................................................................................................... 44
III. Creating an MDI Frame ................................................................................................. 47
IV. Creating an MDI Child .................................................................................................. 49
WORKING WITH POPUPS .......................................................................................... 57
I. Creating a Popup ................................................................................................................ 57
II. Adding Popup Functionality to a Window ....................................................................... 66
WORKING WITH REPORTS ........................................................................................ 71
I. Report Builder+ .................................................................................................................. 71
II Creating a Report ............................................................................................................... 71
SETTING AN APPLICATION ENTRY POINT .............................................................. 82

Page 3 of 91
Copyright © 2011, Revelation Software. All Rights Reserved.
OPENINSIGHT TOOLS FOR U2 INTEGRATION......................................................... 85

Page 4 of 91
Copyright © 2011, Revelation Software. All Rights Reserved.
Introduction Congratulations on using one of the most flexible and powerful database development tool kit in the world, OpenInsight from Revelation Software. This Quick Start guide is designed to let you jump right into application development with your U2 data. By following this document, you should be able to:
1. Attach your U2 data to OpenInsight 2. Convert data dictionaries from a U2 file 3. Create a data entry form for that data file 4. Create a Multiple Document Interface (MDI) frame with menu 5. Hook your data entry form up to the MDI frame 6. Create a popup for searching 7. Hook that popup up to your data entry form 8. Create a report against your data file 9. Hook up your report to the MDI Frame
So, in less than ten steps, you will have created an entire application. The Programmer’s Reference Manual found in the Help menu on the Application Manager screen will give more details and background about concepts and terms that you should become familiar with as you develop more with OpenInsight. You can also check out our website, www.Revelation.com, where we have a free, online threaded discussion where you can ask questions, or search on existing issues. Thanks again for trying out such a great product!
Page 5 of 91
Copyright © 2011, Revelation Software. All Rights Reserved.
Starting OpenInsight I. Starting OpenInsight
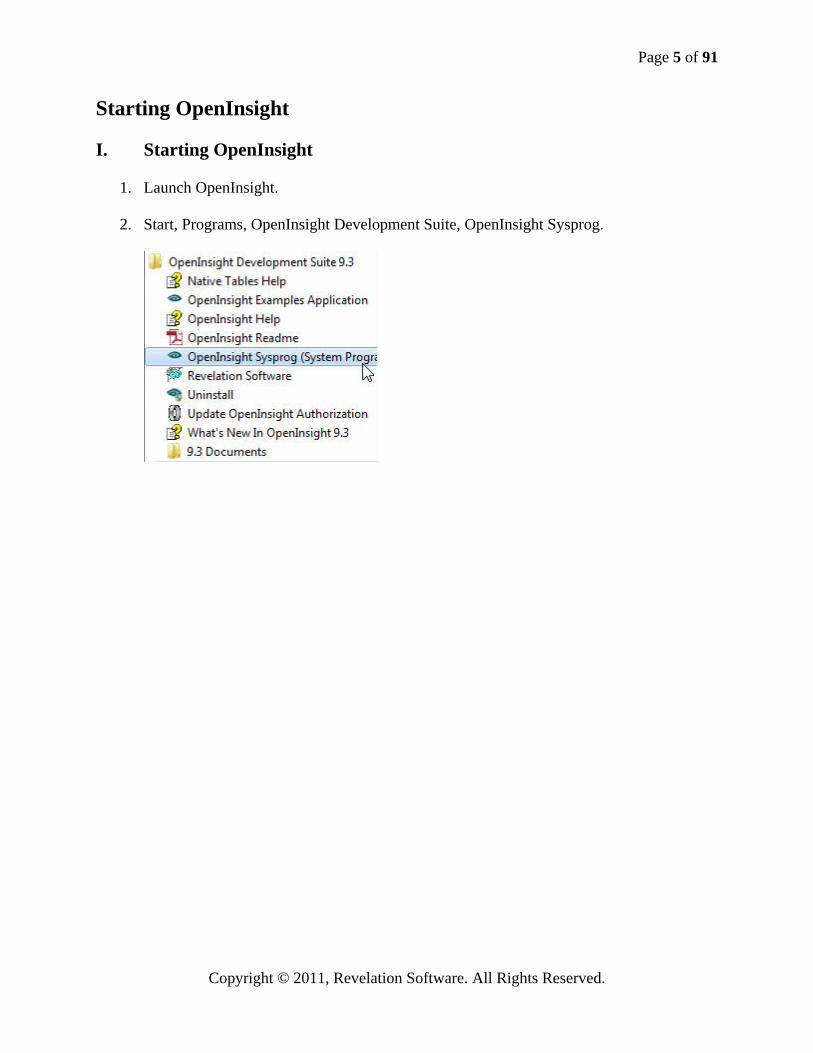
1. Launch OpenInsight.
2. Start, Programs, OpenInsight Development Suite, OpenInsight Sysprog.
Page 6 of 91
Copyright © 2011, Revelation Software. All Rights Reserved.
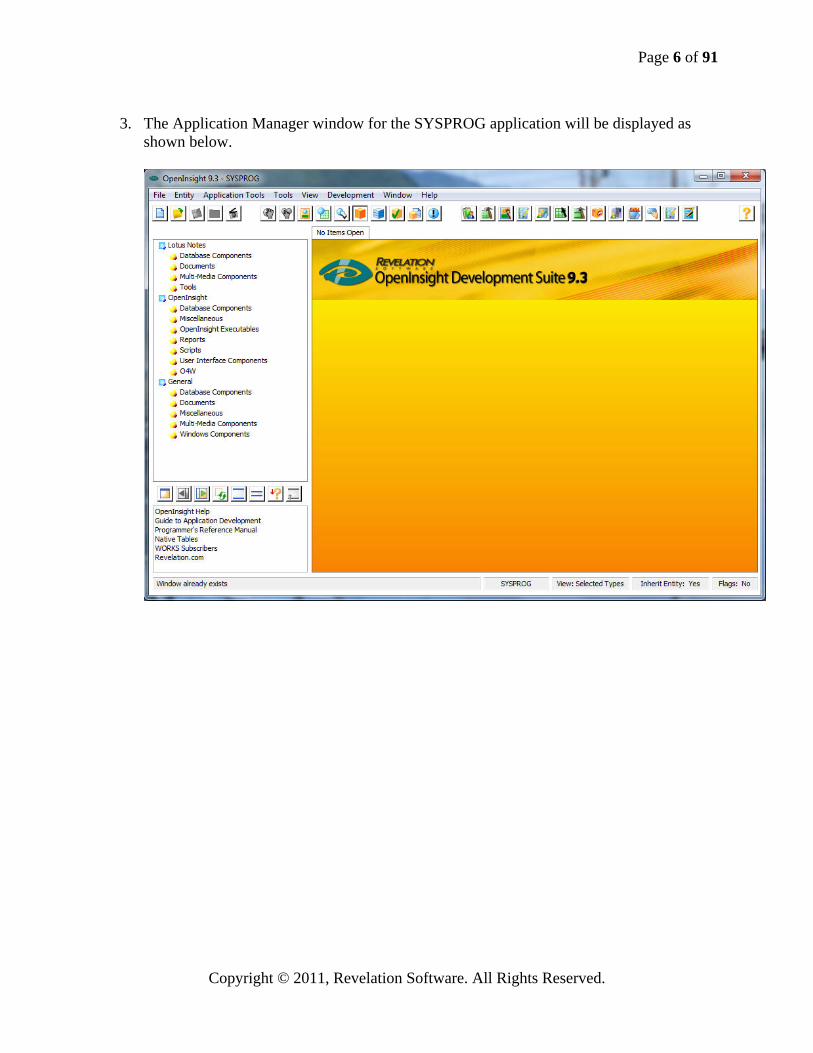
3. The Application Manager window for the SYSPROG application will be displayed as
shown below.

Page 7 of 91
Copyright © 2011, Revelation Software. All Rights Reserved.
II. Opening an Existing Application
4. Choose Open Application from the File menu. The Open Application dialog box will be displayed.
5. Choose the SYSPROG application from the Name list box.
6. Click in the User Name edit line and type SYSPROG.

Page 8 of 91
Copyright © 2011, Revelation Software. All Rights Reserved.
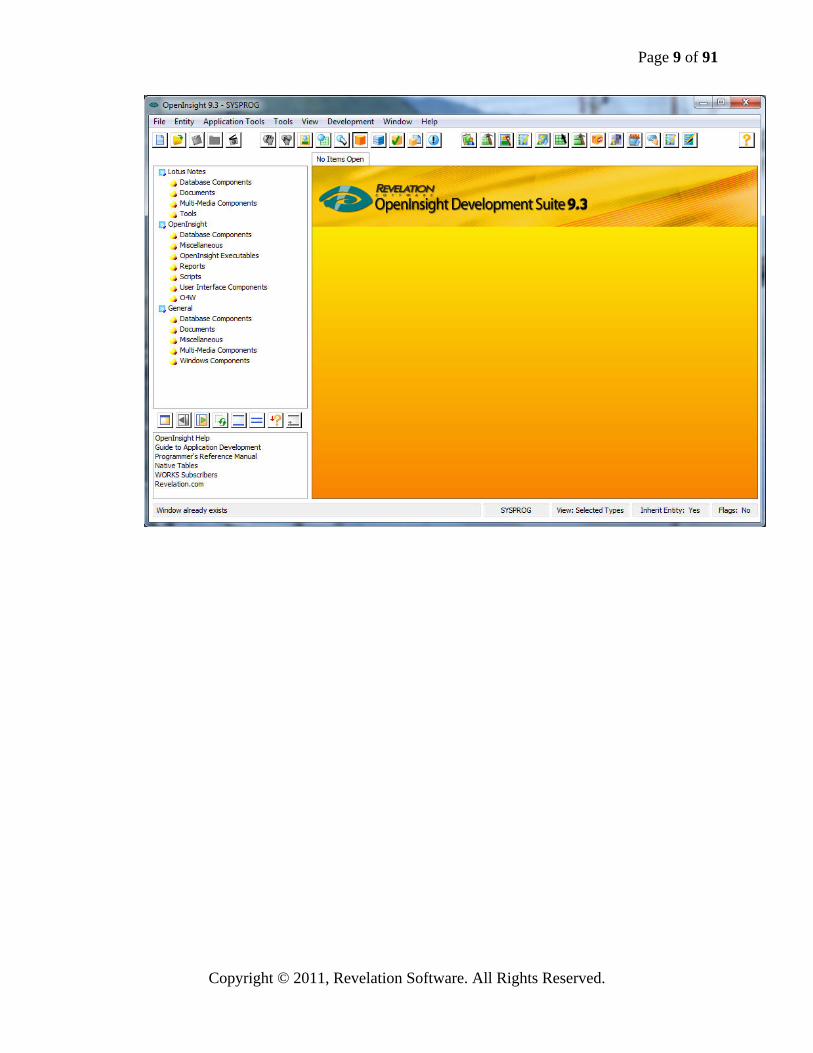
7. Click the OK button the open the SYSPROG application.
Note: To open any application provided with OpenInsight, enter the Application Name
in the User Name edit line. Passwords are not required for sample applications. The Application Manager window for the SYSPROG application will be displayed, as shown below.
Page 9 of 91
Copyright © 2011, Revelation Software. All Rights Reserved.
Page 10 of 91
Copyright © 2011, Revelation Software. All Rights Reserved.
III. Creating a New Application
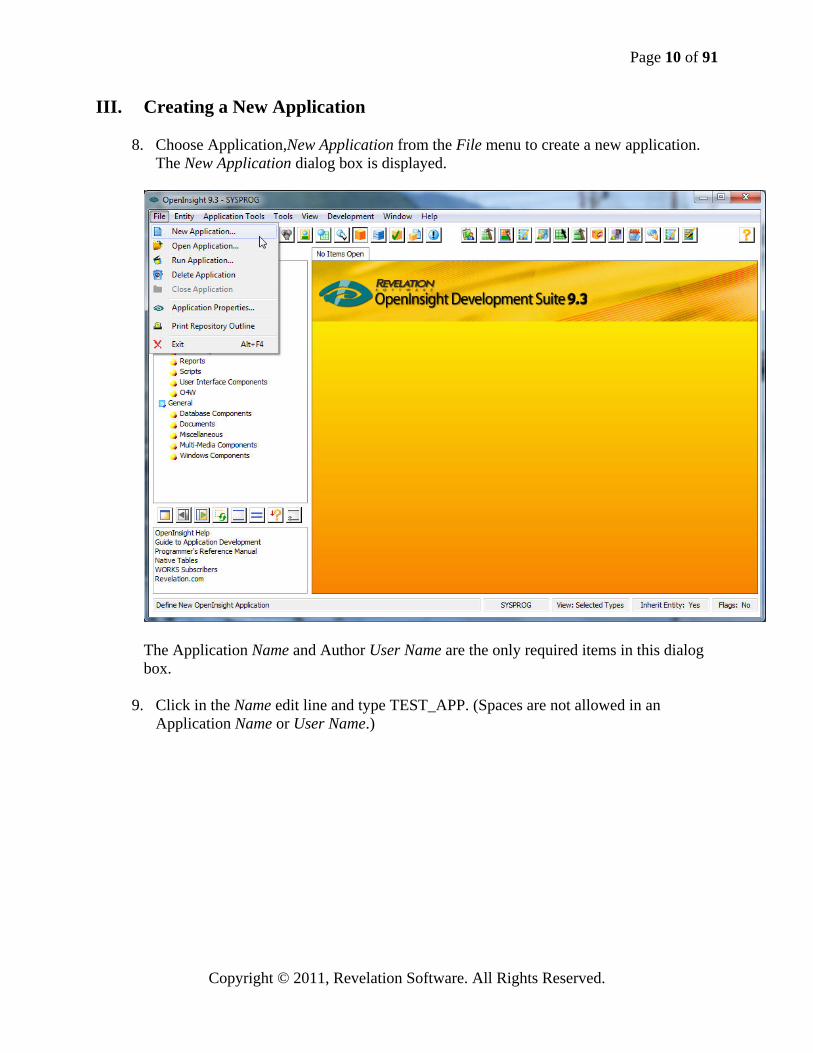
8. Choose Application,New Application from the File menu to create a new application. The New Application dialog box is displayed.
The Application Name and Author User Name are the only required items in this dialog box.
9. Click in the Name edit line and type TEST_APP. (Spaces are not allowed in an
Application Name or User Name.)
Page 11 of 91
Copyright © 2011, Revelation Software. All Rights Reserved.
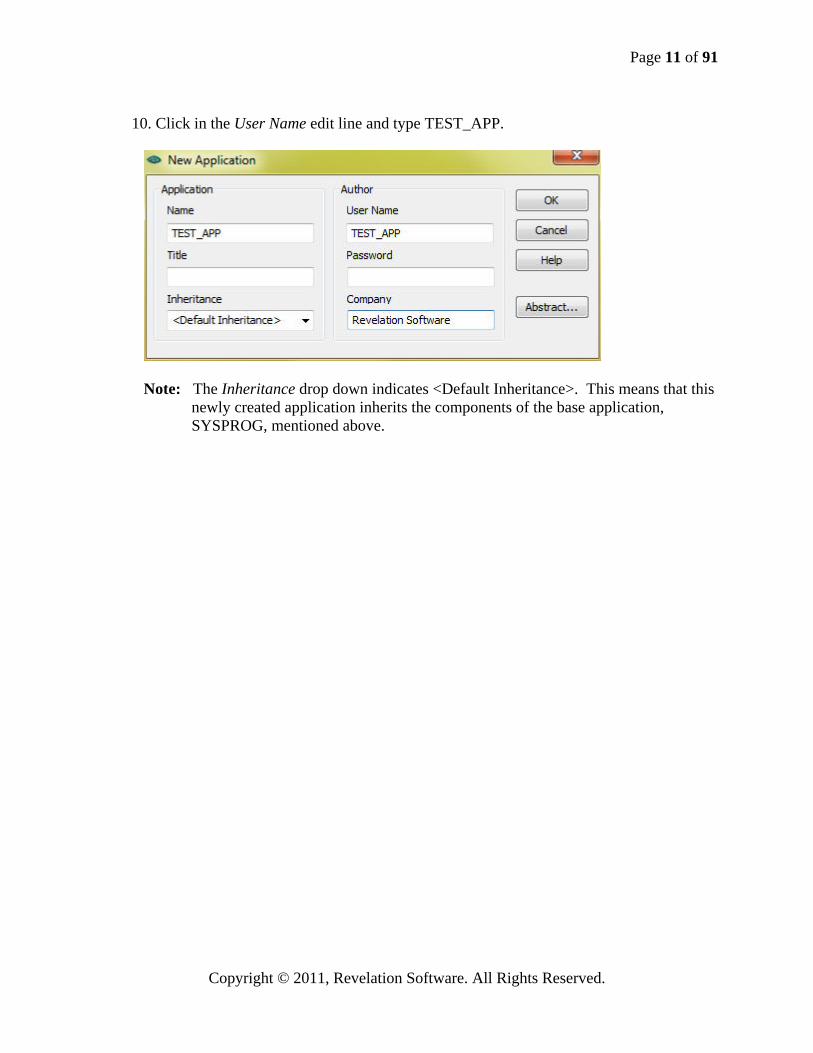
10. Click in the User Name edit line and type TEST_APP.
Note: The Inheritance drop down indicates <Default Inheritance>. This means that this newly created application inherits the components of the base application, SYSPROG, mentioned above.
Page 12 of 91
Copyright © 2011, Revelation Software. All Rights Reserved.
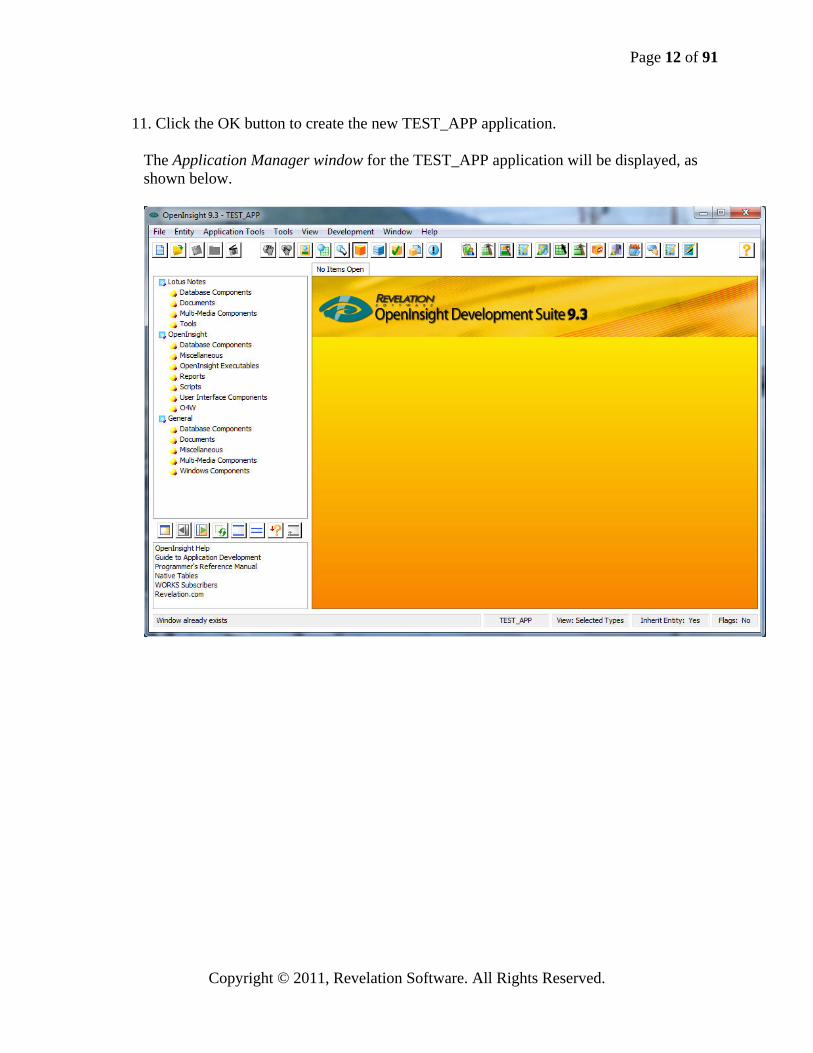
11. Click the OK button to create the new TEST_APP application.
The Application Manager window for the TEST_APP application will be displayed, as shown below.
Page 13 of 91
Copyright © 2011, Revelation Software. All Rights Reserved.
Connecting To Your U2 Database I. Requirements
The U2 connectors are dependent upon dlls supplied by Rocket Software. The Rocket Software download page can be found here. The U2 Connection Setup (legacy version) relies on the intercall libraries. The required dlls are as follows:
UVIC32.dll UVCINT32.dll UNIRPC.dll
These dlls need to reside in your OpenInsight directory. The UniObjects .Net connector relies on the uniobjects library. The required dlls are:
UODOTNET.dll UODOTNET4CF.dll
These dlls need to reside in your OpenInsight directory.
The UniObjects .Net connector is the preferred connector. The U2 Connection Setup remains in place to support legacy U2 connections. Rocket Software requires that you utilize their Connection Pooling license if your application will share a connection with multiple users. OpenInsight for Web (O4W) is such an application. The UniObjects .Net connector supports this pooling license.
Page 14 of 91
Copyright © 2011, Revelation Software. All Rights Reserved.
II. Making the connection – U2 Connection Setup (legacy)
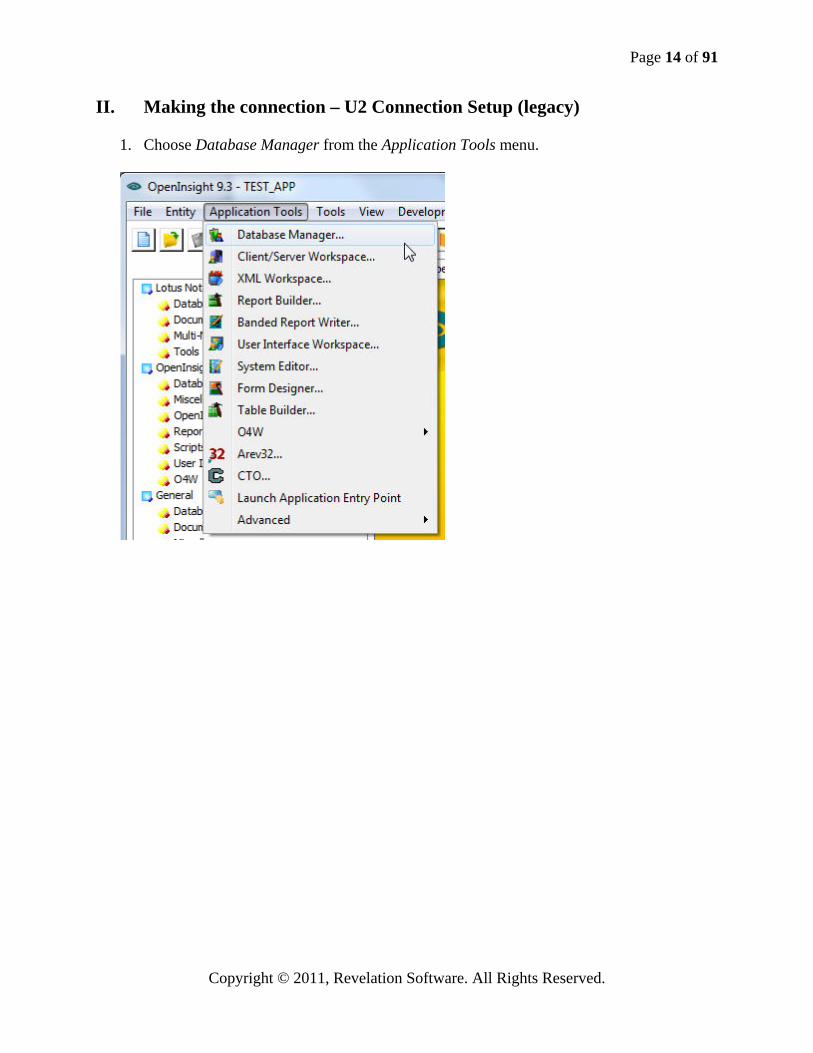
1. Choose Database Manager from the Application Tools menu.
Page 15 of 91
Copyright © 2011, Revelation Software. All Rights Reserved.
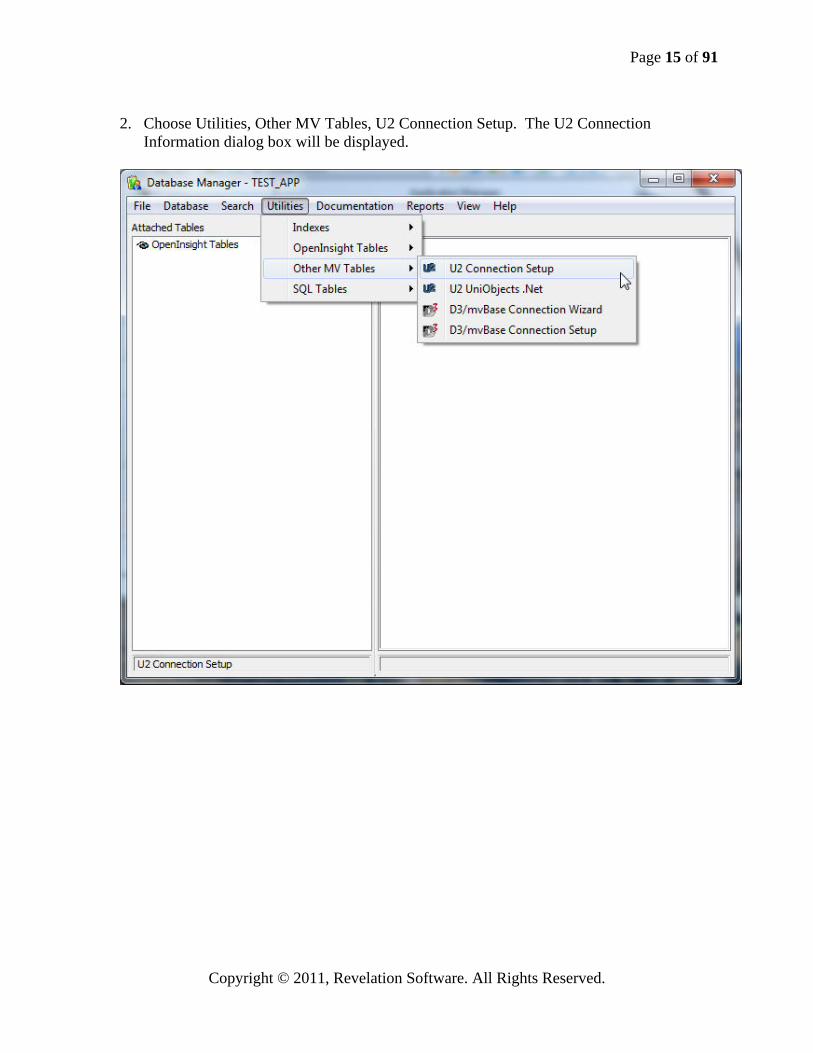
2. Choose Utilities, Other MV Tables, U2 Connection Setup. The U2 Connection
Information dialog box will be displayed.

Page 16 of 91
Copyright © 2011, Revelation Software. All Rights Reserved.
3. Enter a Volume Name (this is a name to associate your U2 data files with).
4. Enter your Shadow Dictionary Location (this is the location on your workstation where
the OpenInsight media tables will be located). If the path is not specified then the folder will be located in your OpenInsight directory.
5. Enter your Server Name or IP Address, Login Id, Password and Directory of your U2 files on the server.
6. Click Attach volume.
7. You have now established a connection to the U2 database.
Page 17 of 91
Copyright © 2011, Revelation Software. All Rights Reserved.
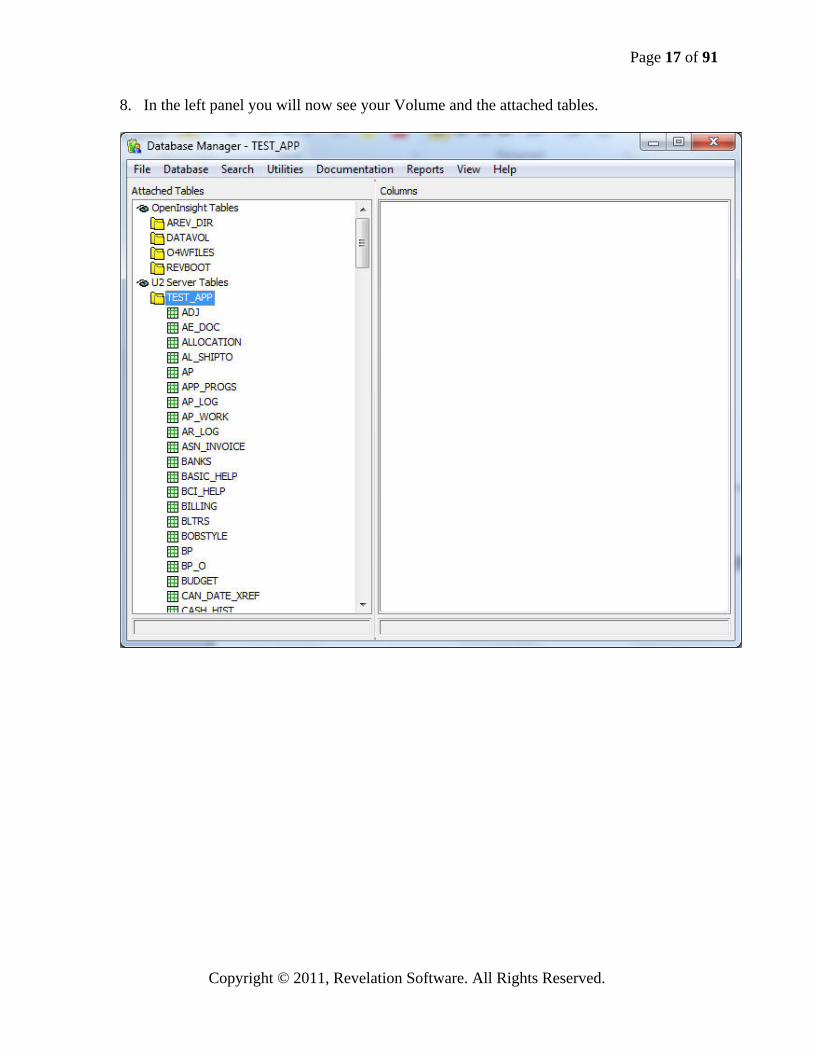
8. In the left panel you will now see your Volume and the attached tables.
Page 18 of 91
Copyright © 2011, Revelation Software. All Rights Reserved.
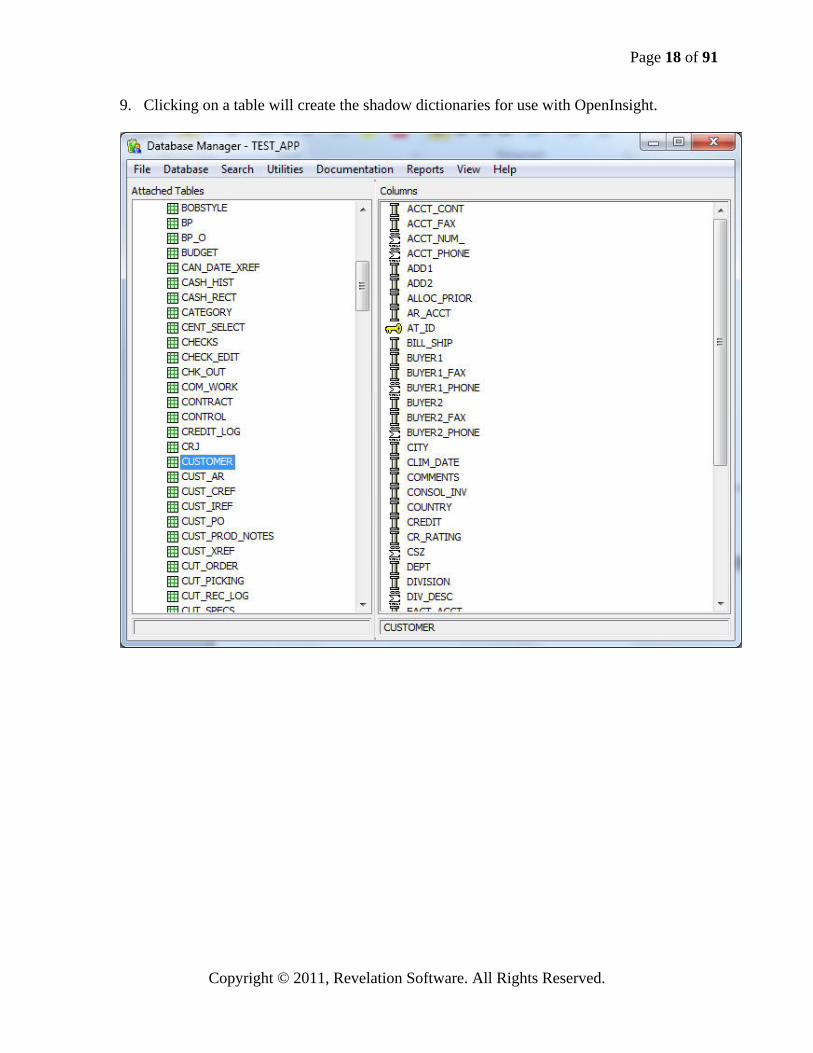
9. Clicking on a table will create the shadow dictionaries for use with OpenInsight.
Page 19 of 91
Copyright © 2011, Revelation Software. All Rights Reserved.
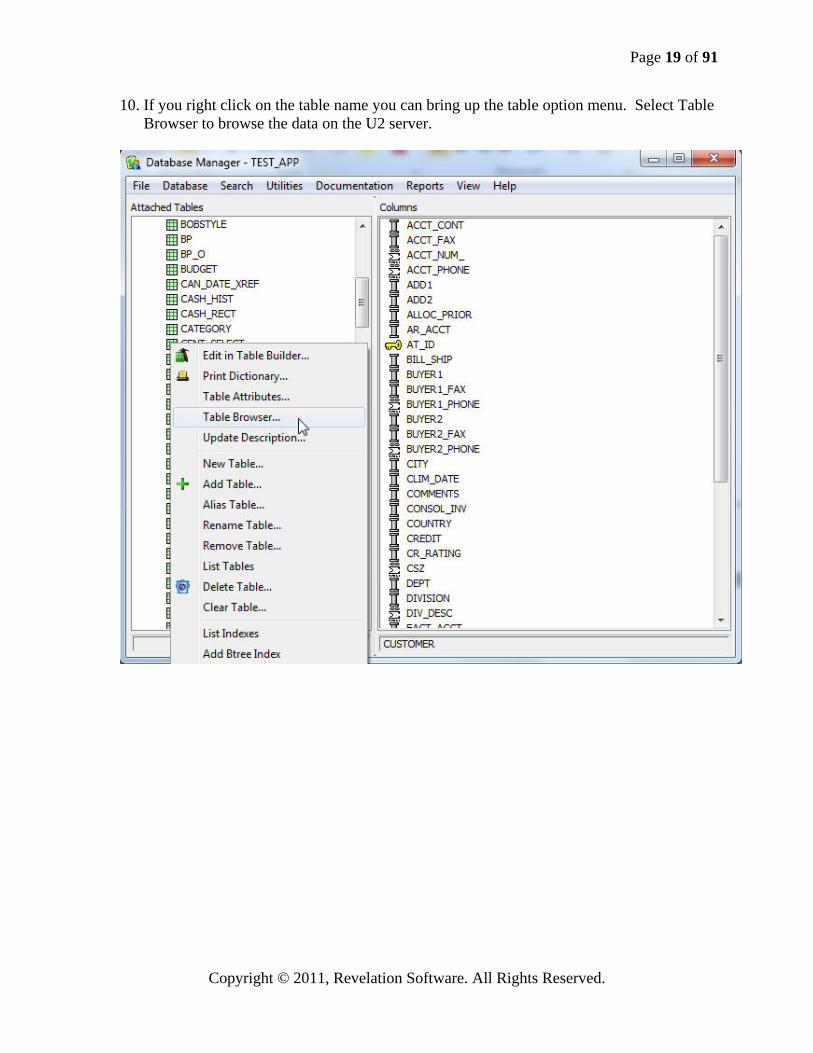
10. If you right click on the table name you can bring up the table option menu. Select Table Browser to browse the data on the U2 server.

Page 20 of 91
Copyright © 2011, Revelation Software. All Rights Reserved.
Page 21 of 91
Copyright © 2011, Revelation Software. All Rights Reserved.
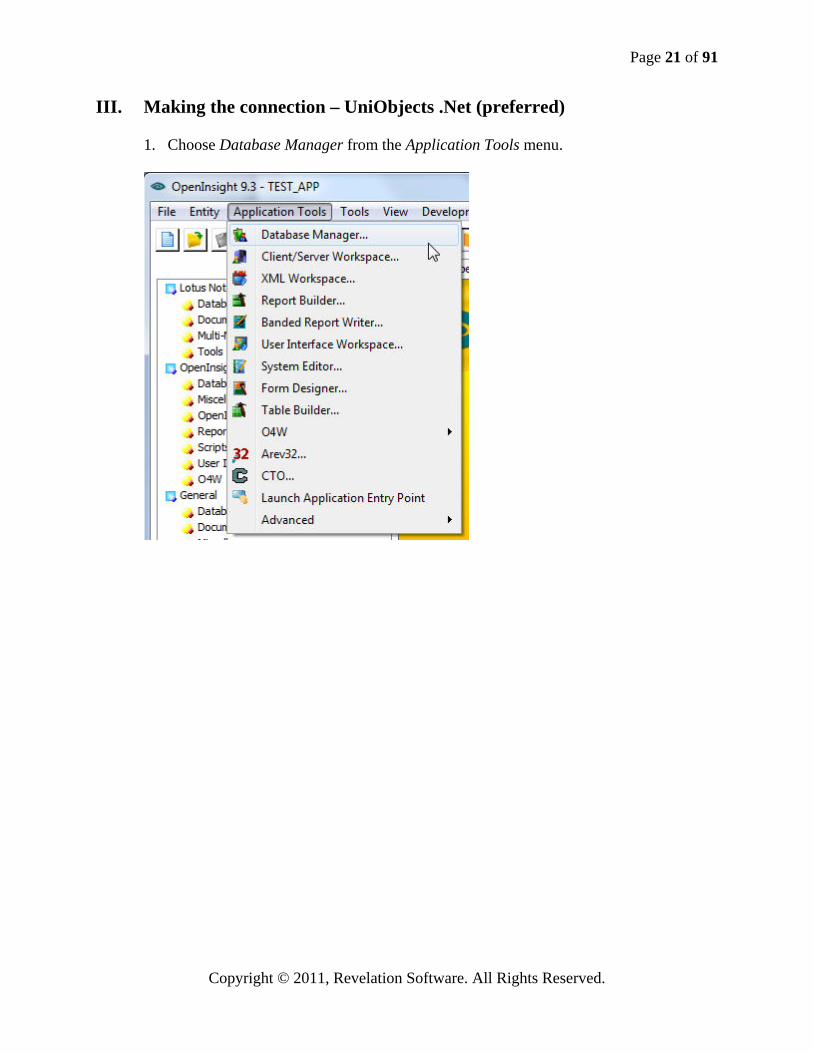
III. Making the connection – UniObjects .Net (preferred)
1. Choose Database Manager from the Application Tools menu.

Page 22 of 91
Copyright © 2011, Revelation Software. All Rights Reserved.
2. Choose Utilities, Other MV Tables, U2 UniObjects .Net. The U2 Connection
Information dialog box will be displayed.

Page 23 of 91
Copyright © 2011, Revelation Software. All Rights Reserved.
3. Enter a Volume Name (this is a name to associate your U2 data files with). 4. Enter your Shadow Dictionary Location (this is the location on your workstation
where the OpenInsight media tables will be located). If the path is not specified then the folder will be located in your OpenInsight directory.
5. Enter your Server Name or IP Address, Login Id, Password and Directory of your U2
files on the server. 6. Select your database type: UniVerse or UniData

Page 24 of 91
Copyright © 2011, Revelation Software. All Rights Reserved.
7. Click Attach volume.
8. You have now established a connection to the U2 database.

Page 25 of 91
Copyright © 2011, Revelation Software. All Rights Reserved.
9. The Volume Tables tab allows you to attach selective tables.
Page 26 of 91
Copyright © 2011, Revelation Software. All Rights Reserved.
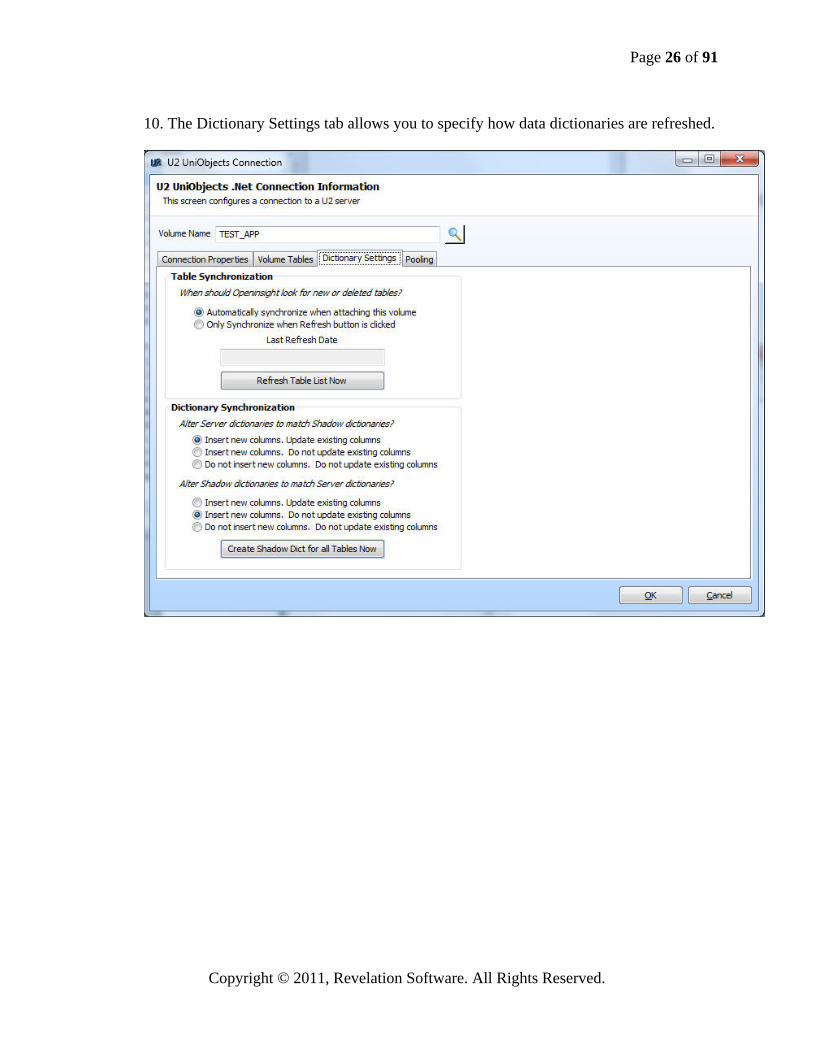
10. The Dictionary Settings tab allows you to specify how data dictionaries are refreshed.

Page 27 of 91
Copyright © 2011, Revelation Software. All Rights Reserved.
11. The Pooling tab allows you to enable U2 Connection Pooling. Please refer to the
Rocket Software web site for connection pooling information.

Page 28 of 91
Copyright © 2011, Revelation Software. All Rights Reserved.
12. In the left panel you will now see your Volume and the attached tables.
Page 29 of 91
Copyright © 2011, Revelation Software. All Rights Reserved.
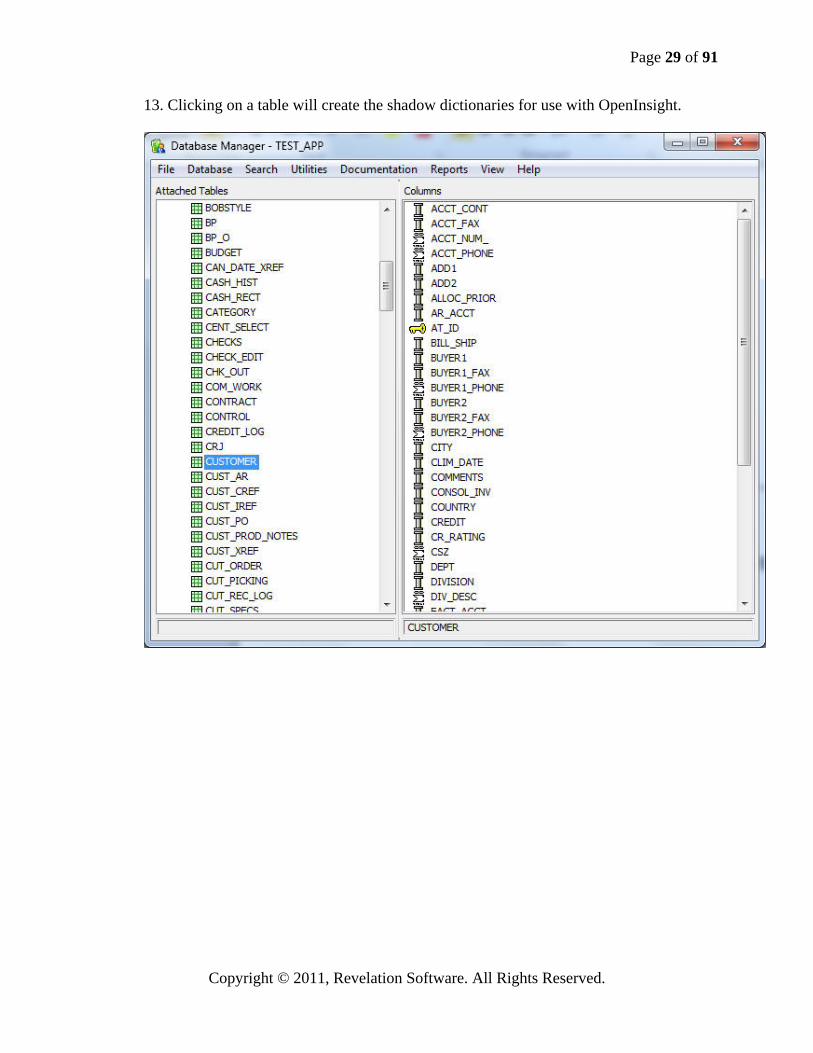
13. Clicking on a table will create the shadow dictionaries for use with OpenInsight.

Page 30 of 91
Copyright © 2011, Revelation Software. All Rights Reserved.
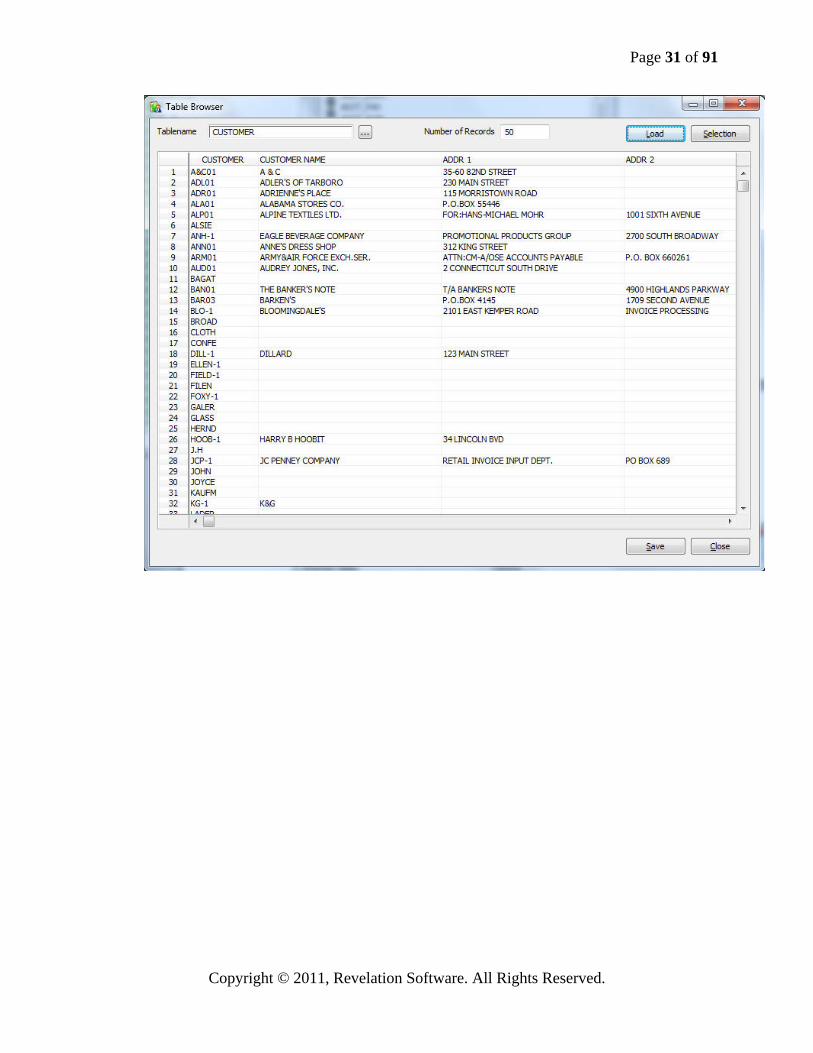
14. If you right click on the table name you can bring up the table option menu. Select Table Browser to browse the data on the U2 server.
Page 31 of 91
Copyright © 2011, Revelation Software. All Rights Reserved.

Page 32 of 91
Copyright © 2011, Revelation Software. All Rights Reserved.
IV. Displaying and editing your data dictionaries
1. Select Table Builder from Open Table from the File menu or press the Table Builder
button .
Page 33 of 91
Copyright © 2011, Revelation Software. All Rights Reserved.
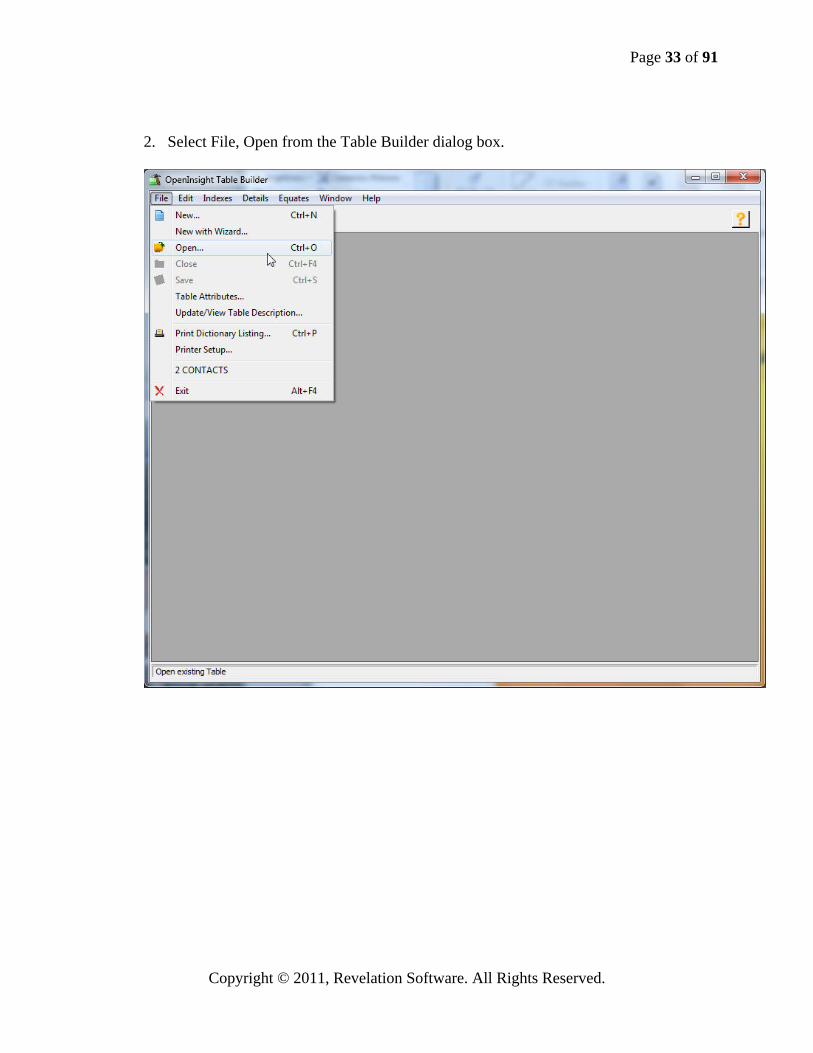
2. Select File, Open from the Table Builder dialog box.
Page 34 of 91
Copyright © 2011, Revelation Software. All Rights Reserved.
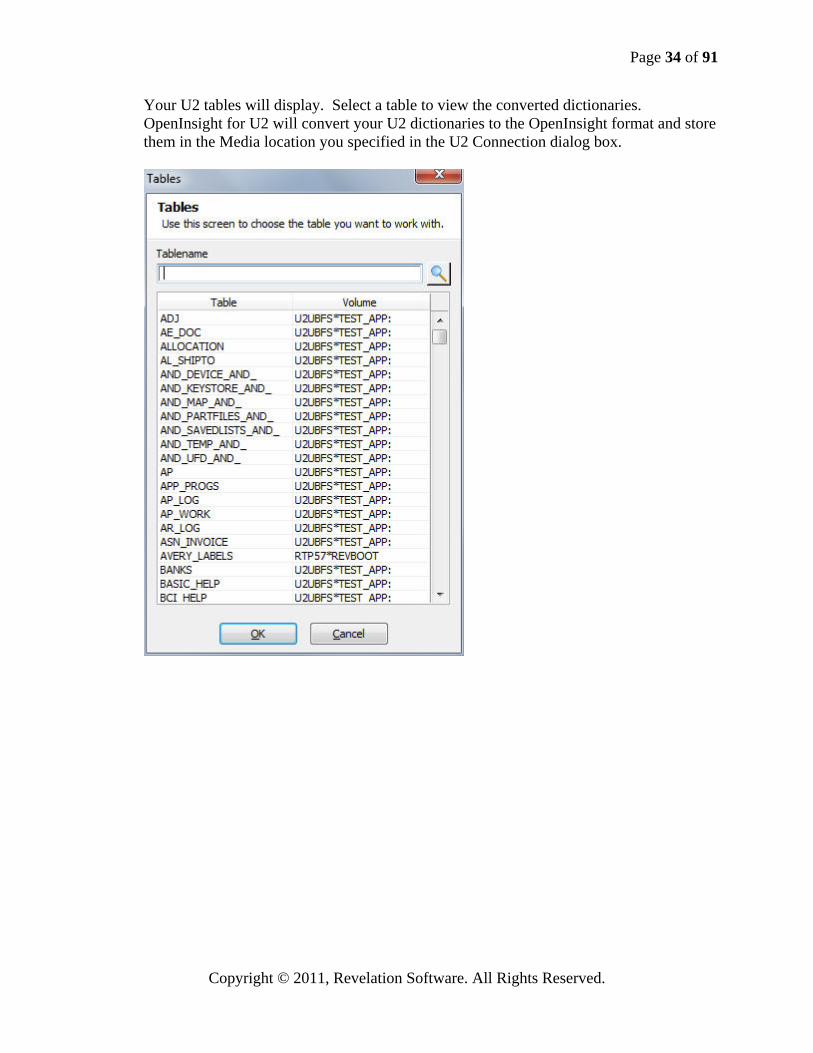
Your U2 tables will display. Select a table to view the converted dictionaries. OpenInsight for U2 will convert your U2 dictionaries to the OpenInsight format and store them in the Media location you specified in the U2 Connection dialog box.
Page 35 of 91
Copyright © 2011, Revelation Software. All Rights Reserved.
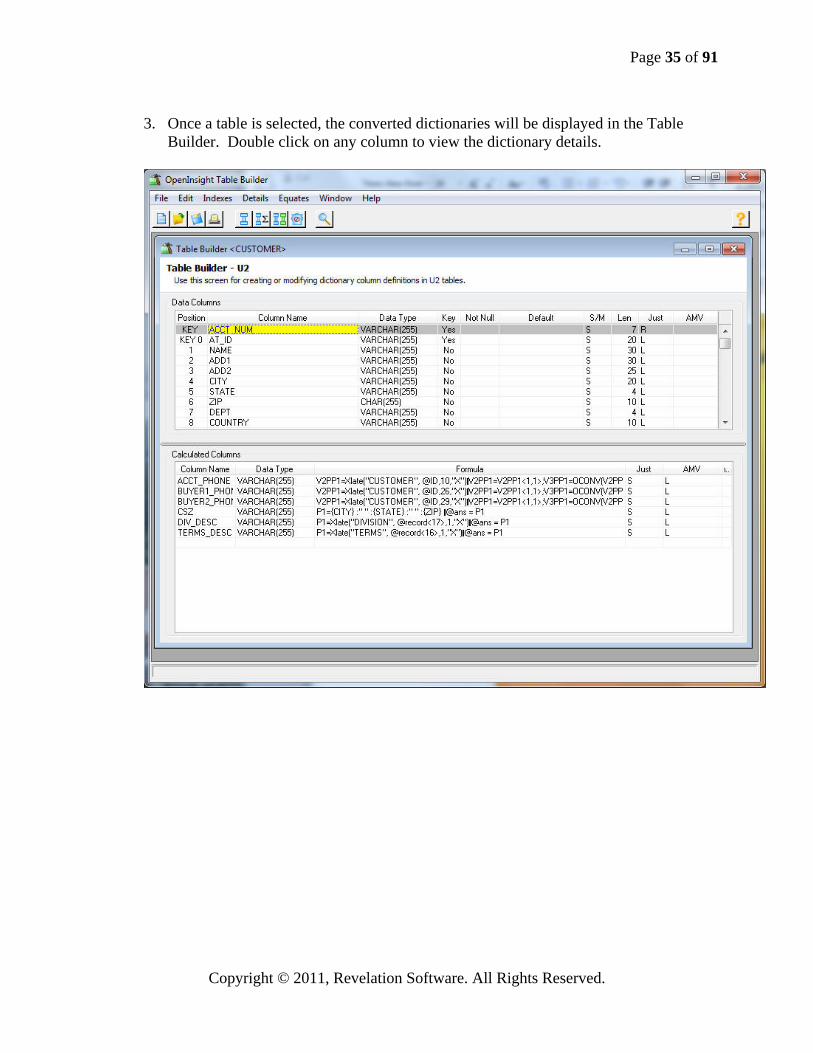
3. Once a table is selected, the converted dictionaries will be displayed in the Table
Builder. Double click on any column to view the dictionary details.

Page 36 of 91
Copyright © 2011, Revelation Software. All Rights Reserved.
4. The remaining examples outlined in this Quick Start Guide use a table containing the
dictionary structure outlined below:
Page 37 of 91
Copyright © 2011, Revelation Software. All Rights Reserved.
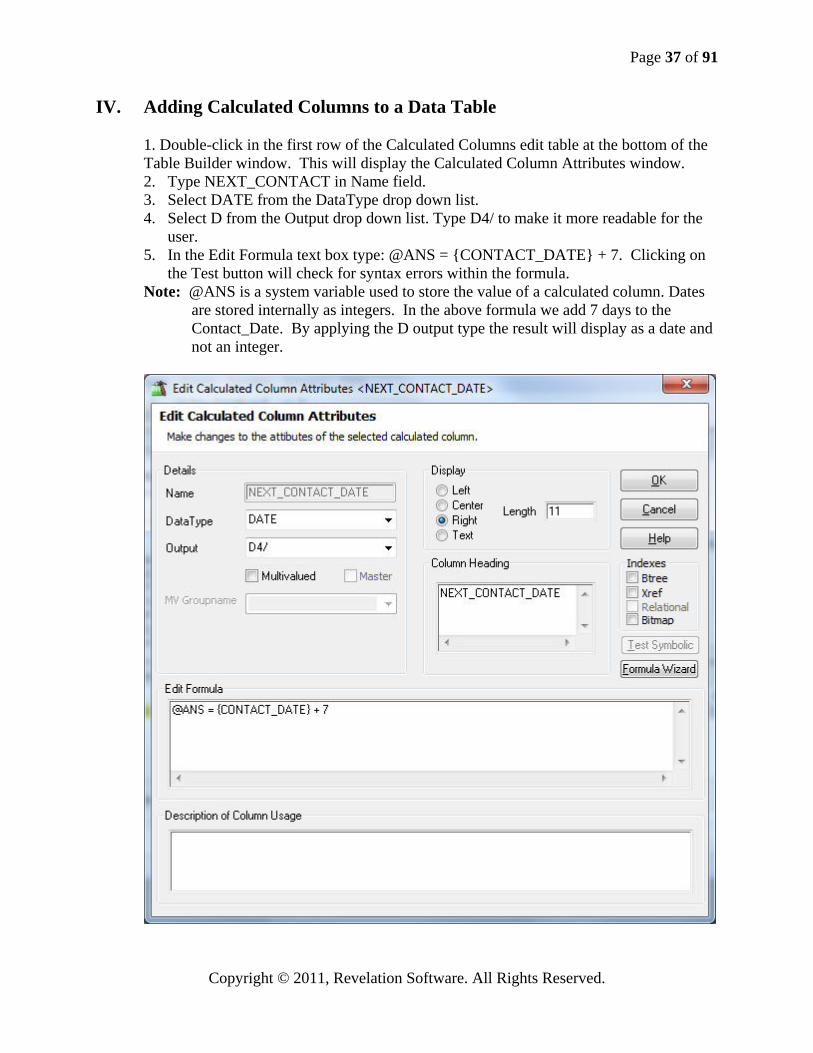
IV. Adding Calculated Columns to a Data Table
1. Double-click in the first row of the Calculated Columns edit table at the bottom of the Table Builder window. This will display the Calculated Column Attributes window. 2. Type NEXT_CONTACT in Name field. 3. Select DATE from the DataType drop down list. 4. Select D from the Output drop down list. Type D4/ to make it more readable for the
user. 5. In the Edit Formula text box type: @ANS = {CONTACT_DATE} + 7. Clicking on
the Test button will check for syntax errors within the formula. Note: @ANS is a system variable used to store the value of a calculated column. Dates
are stored internally as integers. In the above formula we add 7 days to the Contact_Date. By applying the D output type the result will display as a date and not an integer.
Page 38 of 91
Copyright © 2011, Revelation Software. All Rights Reserved.
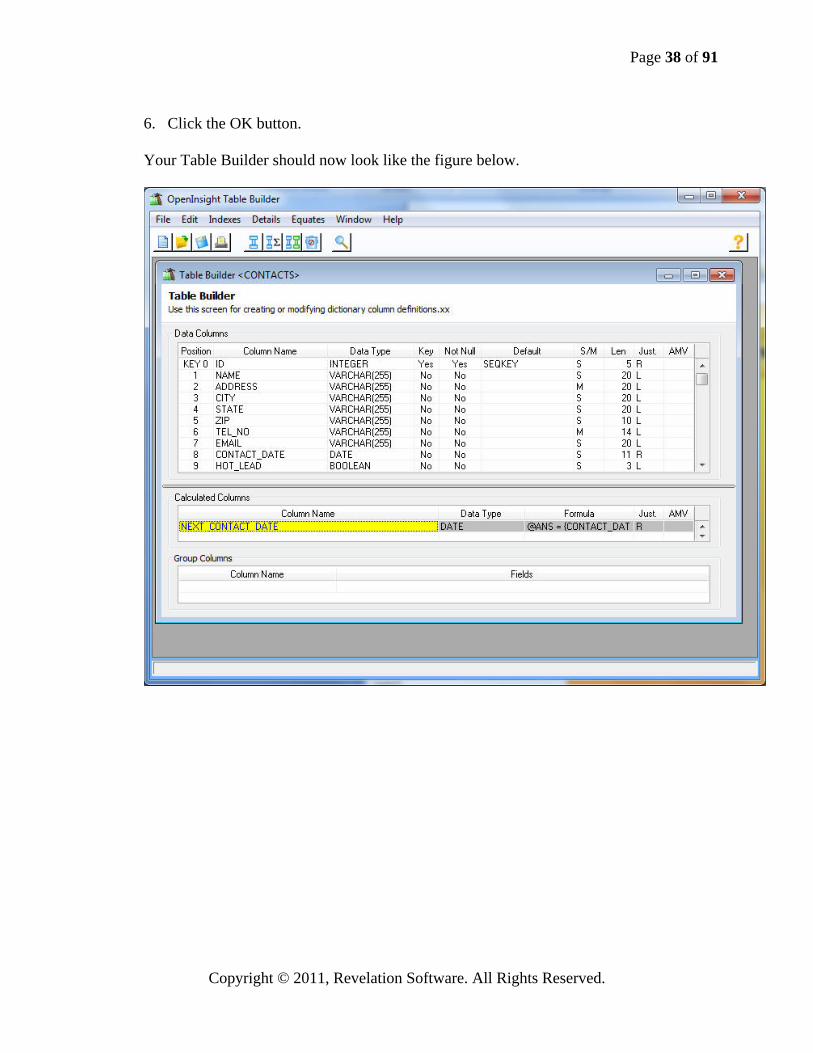
6. Click the OK button.
Your Table Builder should now look like the figure below.
Page 39 of 91
Copyright © 2011, Revelation Software. All Rights Reserved.
Working with Forms I. Creating a Data Entry Form
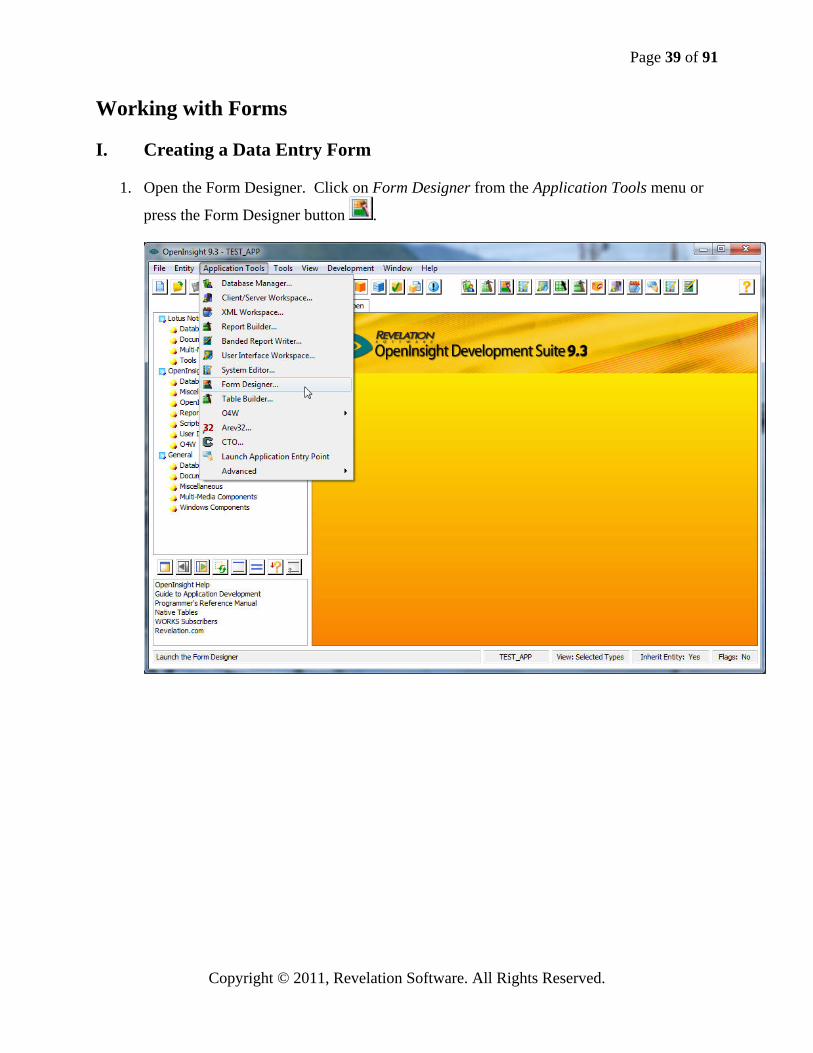
1. Open the Form Designer. Click on Form Designer from the Application Tools menu or
press the Form Designer button .

Page 40 of 91
Copyright © 2011, Revelation Software. All Rights Reserved.
2. Choose New Form from the File menu in the Form Designer to display the New Form
dialog box.
3. Select OpenInsight Tables from the Data Source drop-down list. A list of native tables is
displayed in the left list box.
Page 41 of 91
Copyright © 2011, Revelation Software. All Rights Reserved.
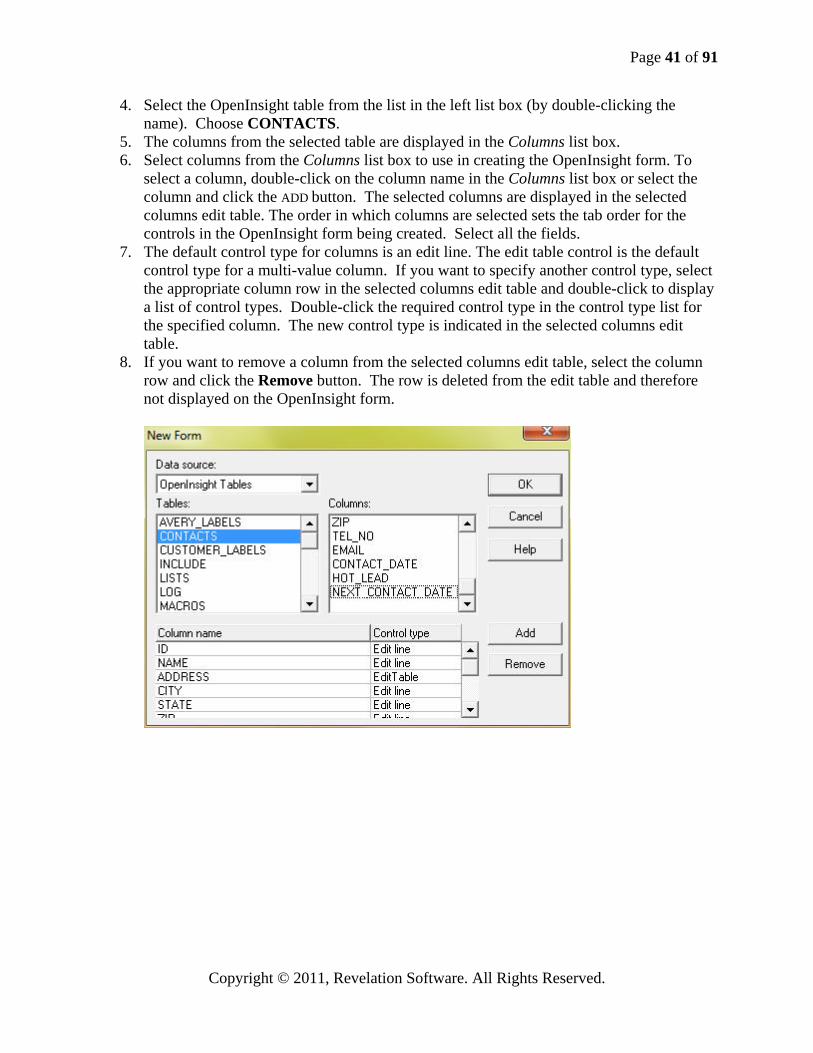
4. Select the OpenInsight table from the list in the left list box (by double-clicking the name). Choose CONTACTS.
5. The columns from the selected table are displayed in the Columns list box. 6. Select columns from the Columns list box to use in creating the OpenInsight form. To
select a column, double-click on the column name in the Columns list box or select the column and click the ADD button. The selected columns are displayed in the selected columns edit table. The order in which columns are selected sets the tab order for the controls in the OpenInsight form being created. Select all the fields.
7. The default control type for columns is an edit line. The edit table control is the default control type for a multi-value column. If you want to specify another control type, select the appropriate column row in the selected columns edit table and double-click to display a list of control types. Double-click the required control type in the control type list for the specified column. The new control type is indicated in the selected columns edit table.
8. If you want to remove a column from the selected columns edit table, select the column row and click the Remove button. The row is deleted from the edit table and therefore not displayed on the OpenInsight form.
Page 42 of 91
Copyright © 2011, Revelation Software. All Rights Reserved.
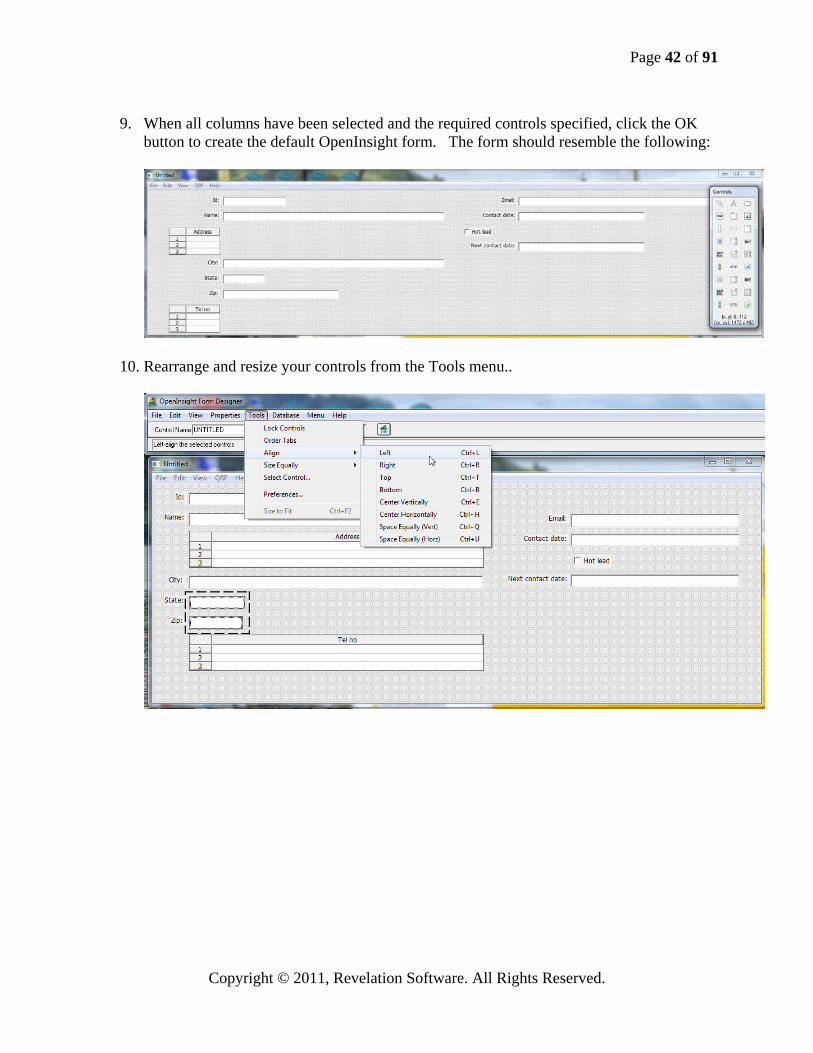
9. When all columns have been selected and the required controls specified, click the OK
button to create the default OpenInsight form. The form should resemble the following:
10. Rearrange and resize your controls from the Tools menu..

Page 43 of 91
Copyright © 2011, Revelation Software. All Rights Reserved.
11. Save the form by choosing Save from the Form Designer File menu. The Save As dialog
box will be displayed.
12. Type CONTACTS in the Form Name field and click the OK button.
Page 44 of 91
Copyright © 2011, Revelation Software. All Rights Reserved.
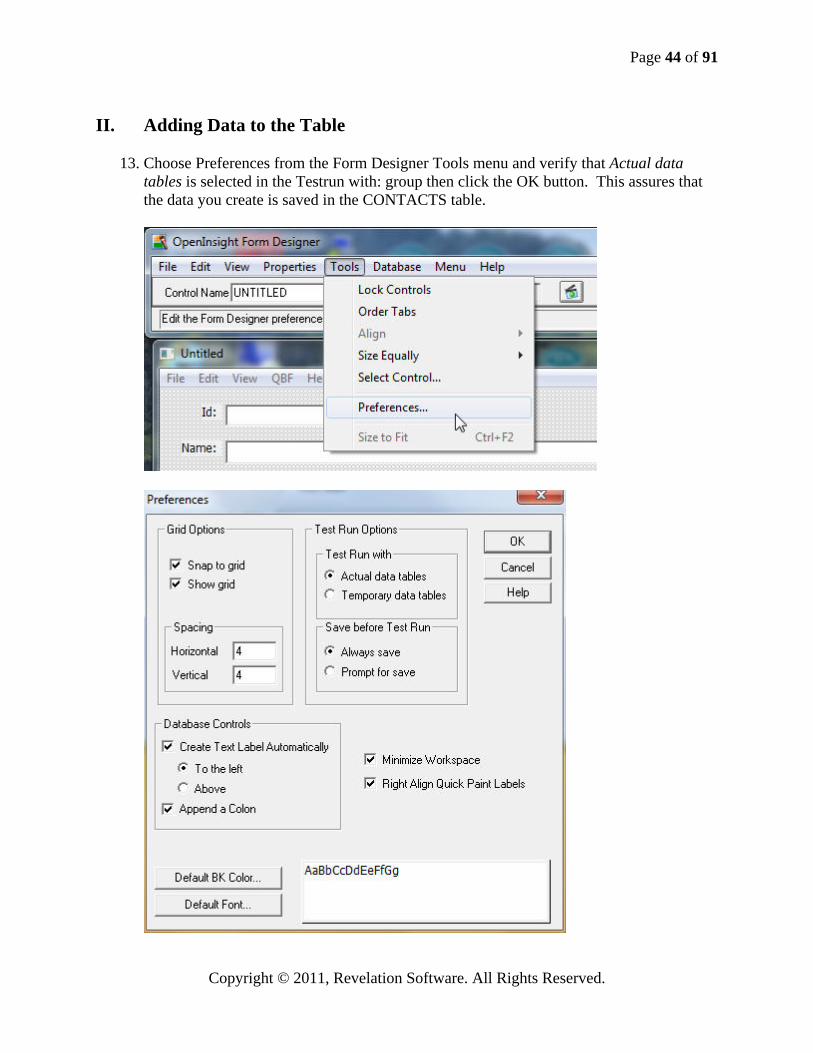
II. Adding Data to the Table
13. Choose Preferences from the Form Designer Tools menu and verify that Actual data
tables is selected in the Testrun with: group then click the OK button. This assures that the data you create is saved in the CONTACTS table.
Page 45 of 91
Copyright © 2011, Revelation Software. All Rights Reserved.
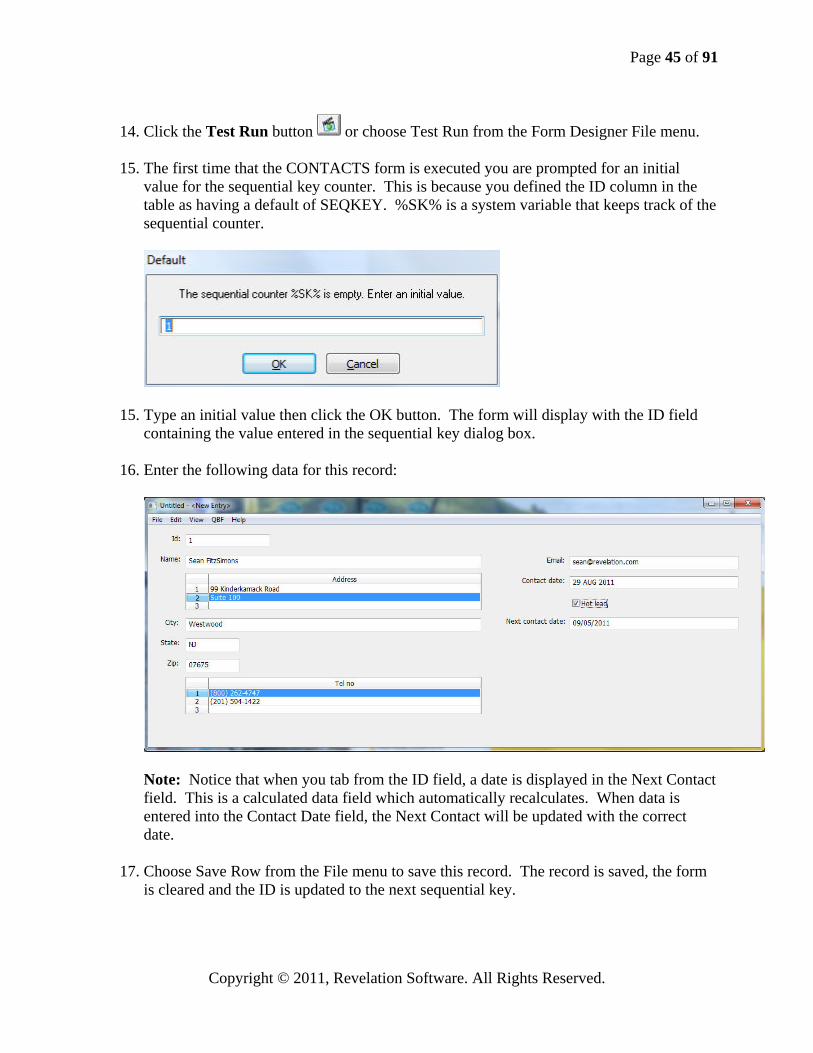
14. Click the Test Run button or choose Test Run from the Form Designer File menu.
15. The first time that the CONTACTS form is executed you are prompted for an initial value for the sequential key counter. This is because you defined the ID column in the table as having a default of SEQKEY. %SK% is a system variable that keeps track of the sequential counter.
15. Type an initial value then click the OK button. The form will display with the ID field containing the value entered in the sequential key dialog box.
16. Enter the following data for this record:
Note: Notice that when you tab from the ID field, a date is displayed in the Next Contact field. This is a calculated data field which automatically recalculates. When data is entered into the Contact Date field, the Next Contact will be updated with the correct date.
17. Choose Save Row from the File menu to save this record. The record is saved, the form
is cleared and the ID is updated to the next sequential key.

Page 46 of 91
Copyright © 2011, Revelation Software. All Rights Reserved.
18. Continue entering the next three records:
19. 19. After adding the last record, choose Close from the File menu to exit the form. This will
return you to the Form Designer.
Name Jill Smith Robert Jones Lawrence Granville Address 22 Waldorf Dr. 16 Scott Terrace 18 Riverview Ave City Youngstown Asbury Hibbing State OH MI MN Zip 06322 07299 05744 Tel No 888 121-9955 877 333-4444 800 532-9876 Email [email protected] [email protected] [email protected] Contact Date
08/20/11 08/30/11 09/02/11
Hot Lead True False True
Page 47 of 91
Copyright © 2011, Revelation Software. All Rights Reserved.
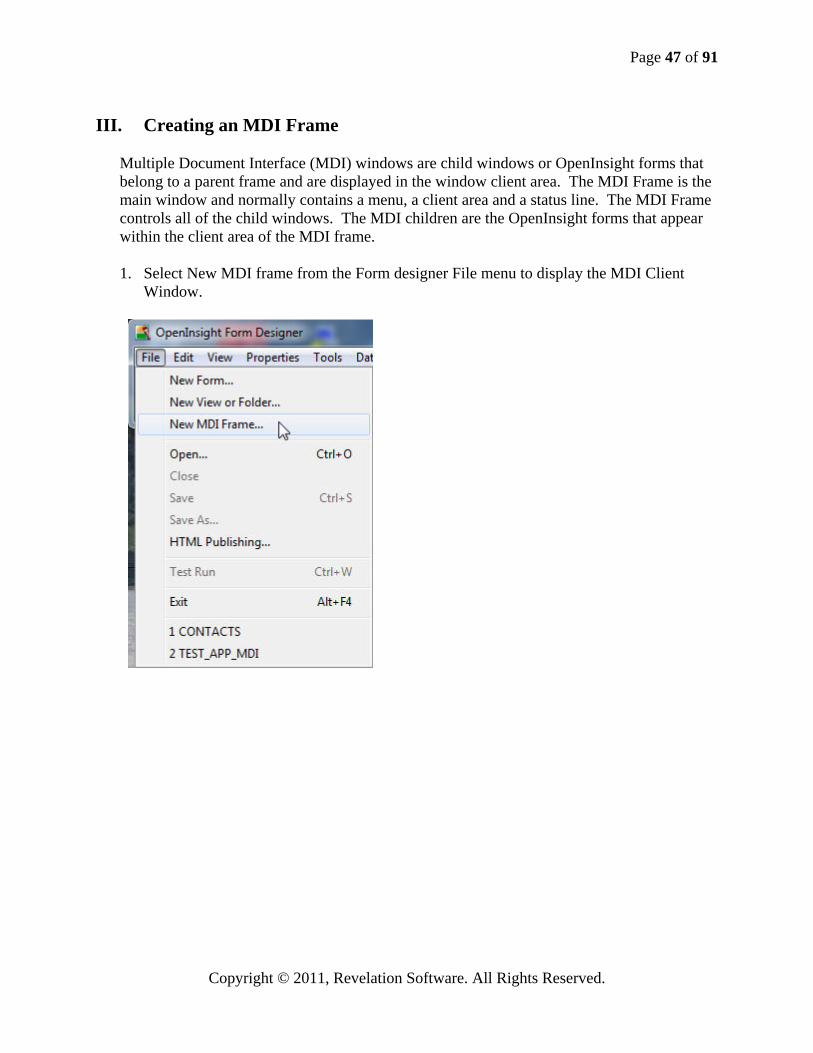
III. Creating an MDI Frame
Multiple Document Interface (MDI) windows are child windows or OpenInsight forms that belong to a parent frame and are displayed in the window client area. The MDI Frame is the main window and normally contains a menu, a client area and a status line. The MDI Frame controls all of the child windows. The MDI children are the OpenInsight forms that appear within the client area of the MDI frame.
1. Select New MDI frame from the Form designer File menu to display the MDI Client
Window.

Page 48 of 91
Copyright © 2011, Revelation Software. All Rights Reserved.
2. An MDI frame with an MDI client window is displayed. The MDI client window is part
of the frame window and cannot be deleted or copied. MDI child windows are confined to the MDI client area. The text “MDI Client Window” is visible only during OpenInsight form design so that you can distinguish the MDI client area from other controls. The Client Window should display as follows:
The MDI Client Window can be resized.
Page 49 of 91
Copyright © 2011, Revelation Software. All Rights Reserved.
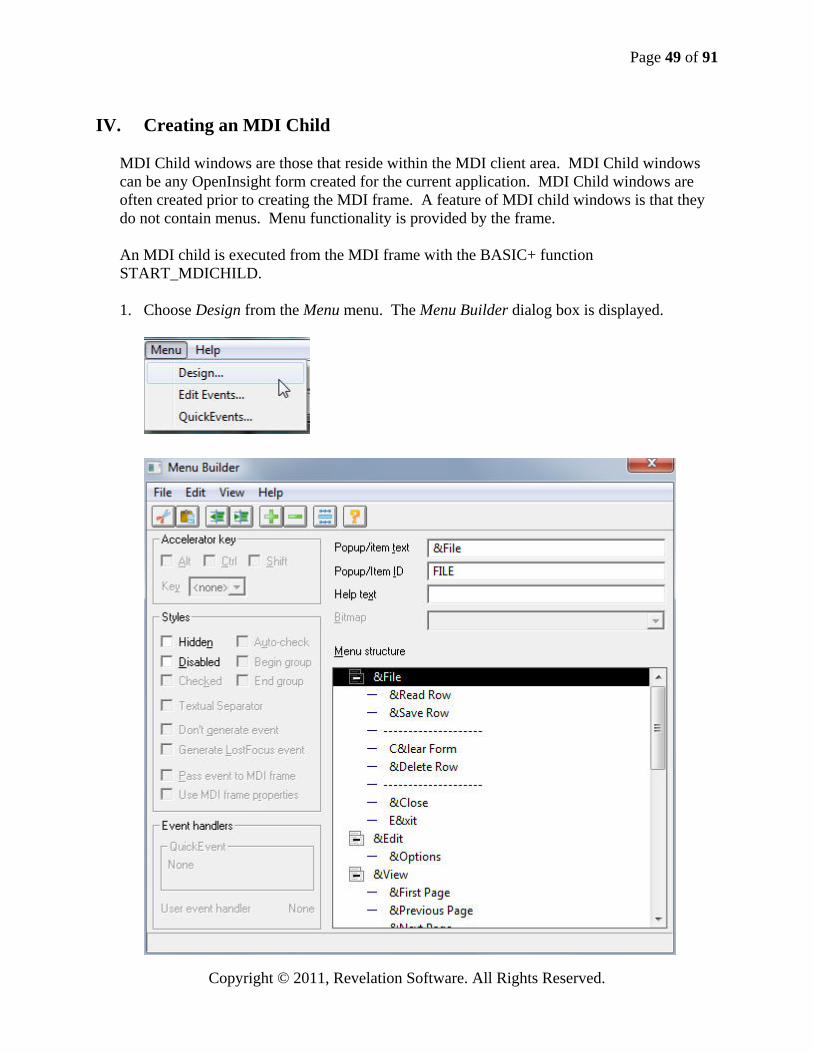
IV. Creating an MDI Child
MDI Child windows are those that reside within the MDI client area. MDI Child windows can be any OpenInsight form created for the current application. MDI Child windows are often created prior to creating the MDI frame. A feature of MDI child windows is that they do not contain menus. Menu functionality is provided by the frame.
An MDI child is executed from the MDI frame with the BASIC+ function START_MDICHILD.
1. Choose Design from the Menu menu. The Menu Builder dialog box is displayed.
Page 50 of 91
Copyright © 2011, Revelation Software. All Rights Reserved.
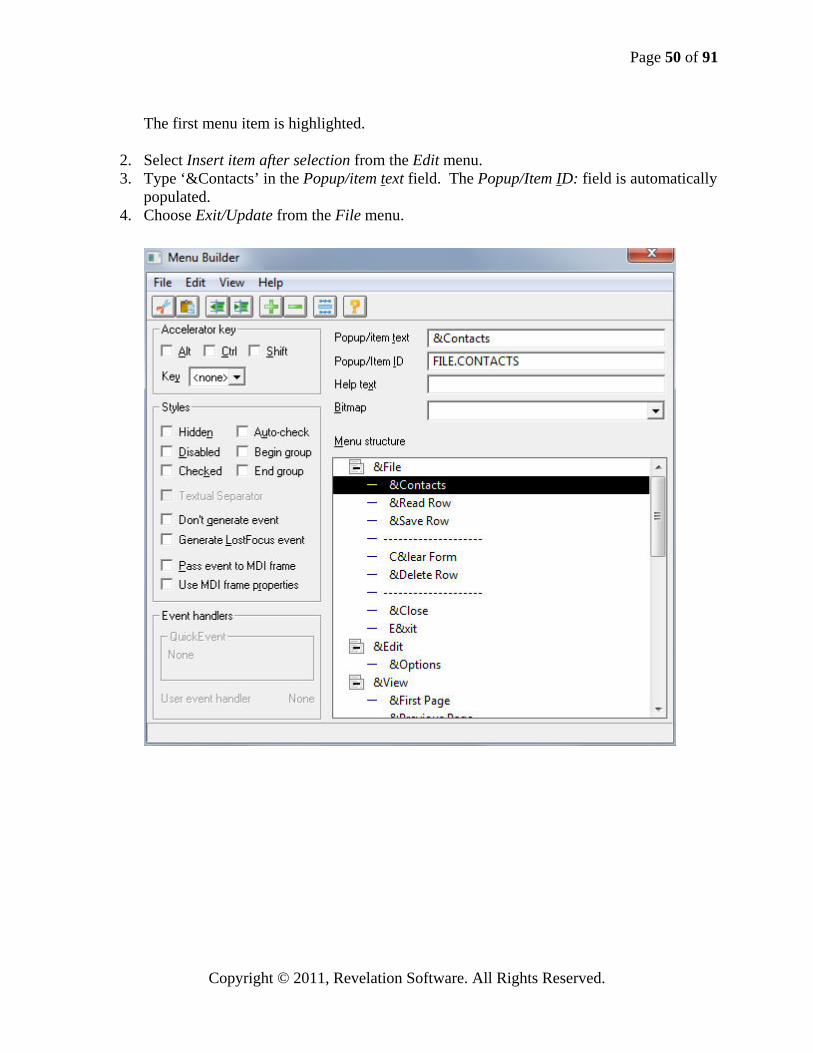
The first menu item is highlighted.
2. Select Insert item after selection from the Edit menu. 3. Type ‘&Contacts’ in the Popup/item text field. The Popup/Item ID: field is automatically
populated. 4. Choose Exit/Update from the File menu.
Page 51 of 91
Copyright © 2011, Revelation Software. All Rights Reserved.
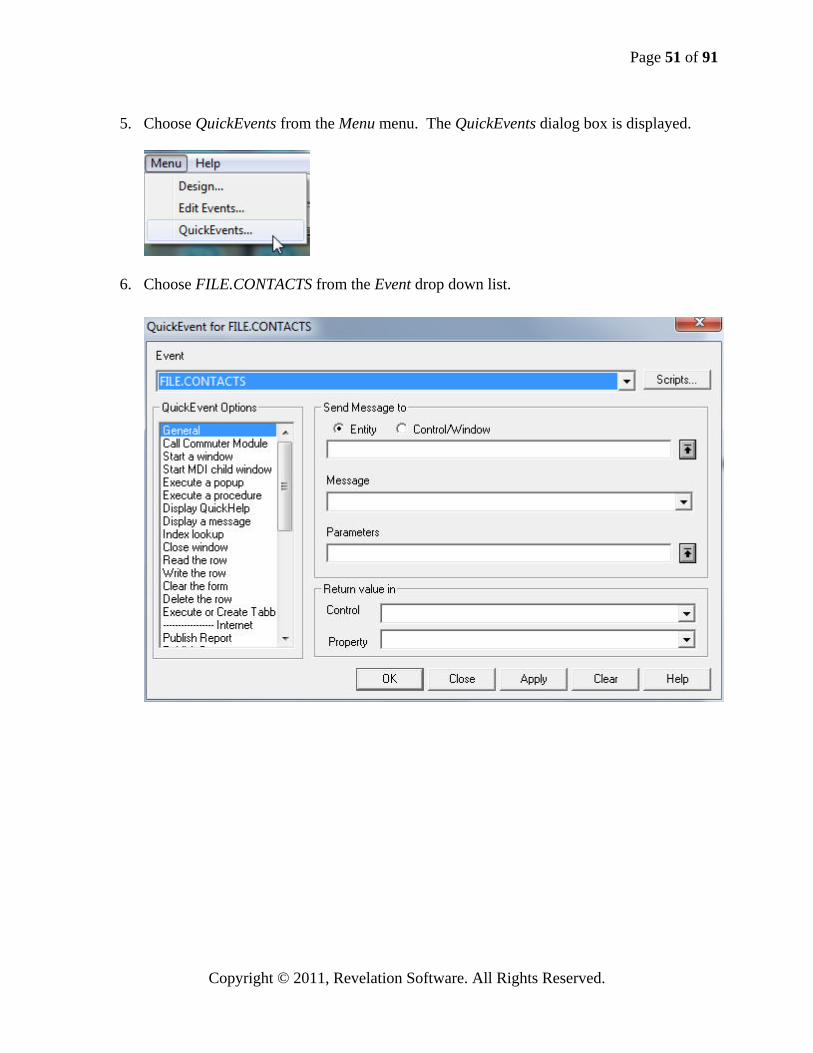
5. Choose QuickEvents from the Menu menu. The QuickEvents dialog box is displayed.
6. Choose FILE.CONTACTS from the Event drop down list.

Page 52 of 91
Copyright © 2011, Revelation Software. All Rights Reserved.
7. Choose Start MDI child window from the QuickEvent Options: list. The QuickEvent
dialog box will be populated with default settings for the Start_MDIChild function.
Page 53 of 91
Copyright © 2011, Revelation Software. All Rights Reserved.
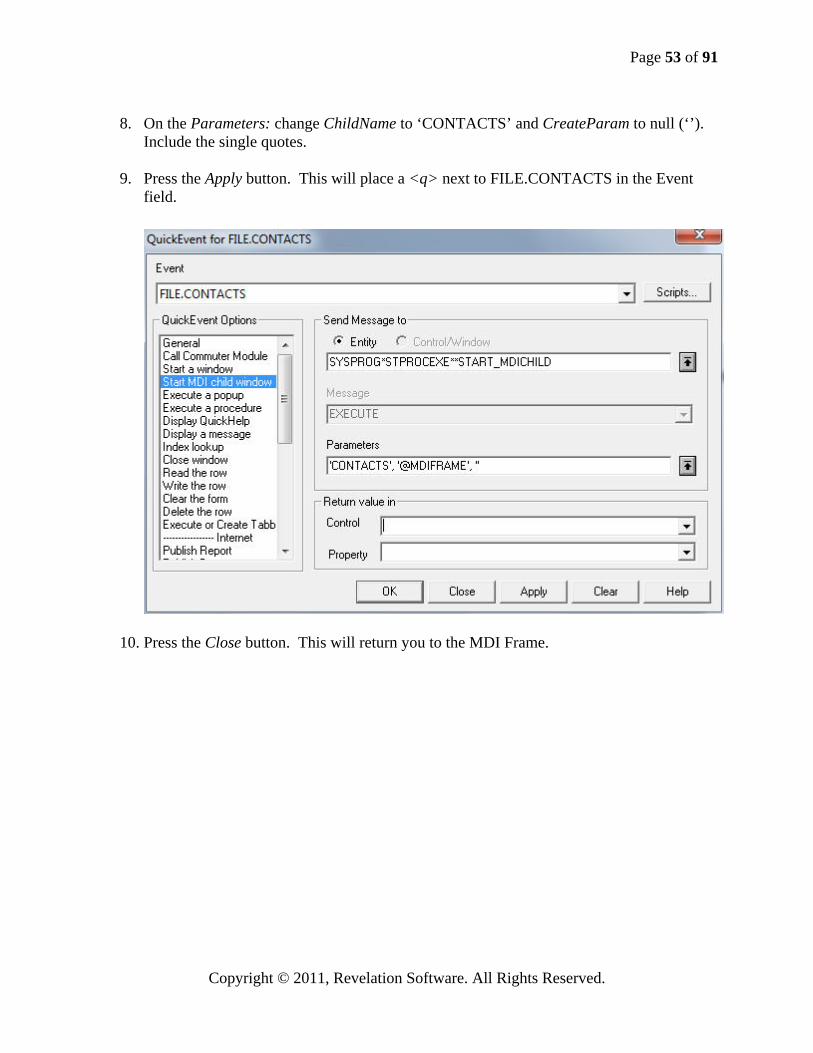
8. On the Parameters: change ChildName to ‘CONTACTS’ and CreateParam to null (‘’).
Include the single quotes.
9. Press the Apply button. This will place a <q> next to FILE.CONTACTS in the Event field.
10. Press the Close button. This will return you to the MDI Frame.
Page 54 of 91
Copyright © 2011, Revelation Software. All Rights Reserved.
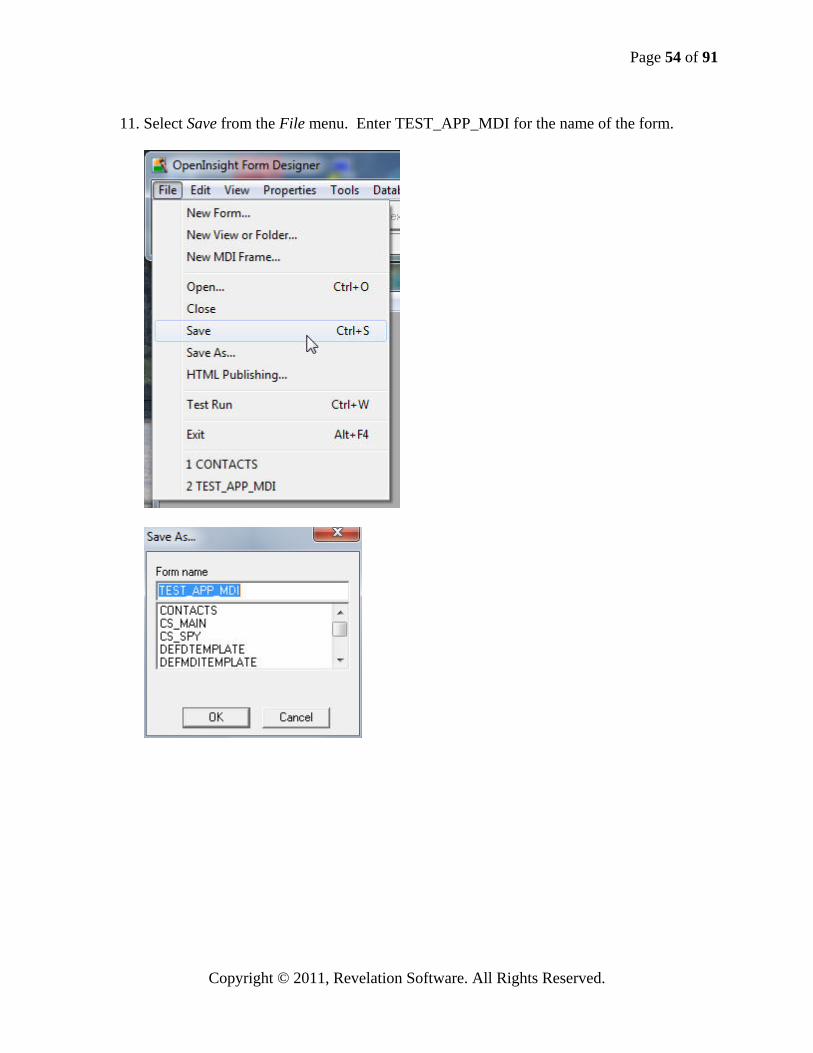
11. Select Save from the File menu. Enter TEST_APP_MDI for the name of the form.
Page 55 of 91
Copyright © 2011, Revelation Software. All Rights Reserved.
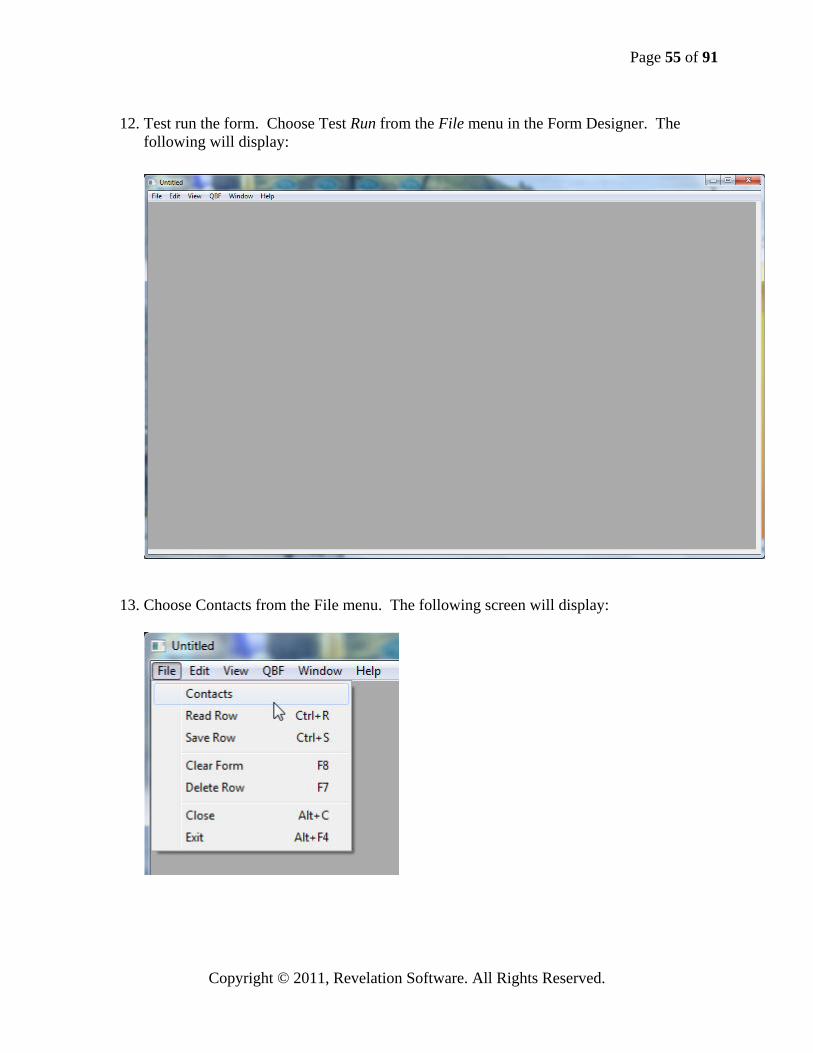
12. Test run the form. Choose Test Run from the File menu in the Form Designer. The
following will display:
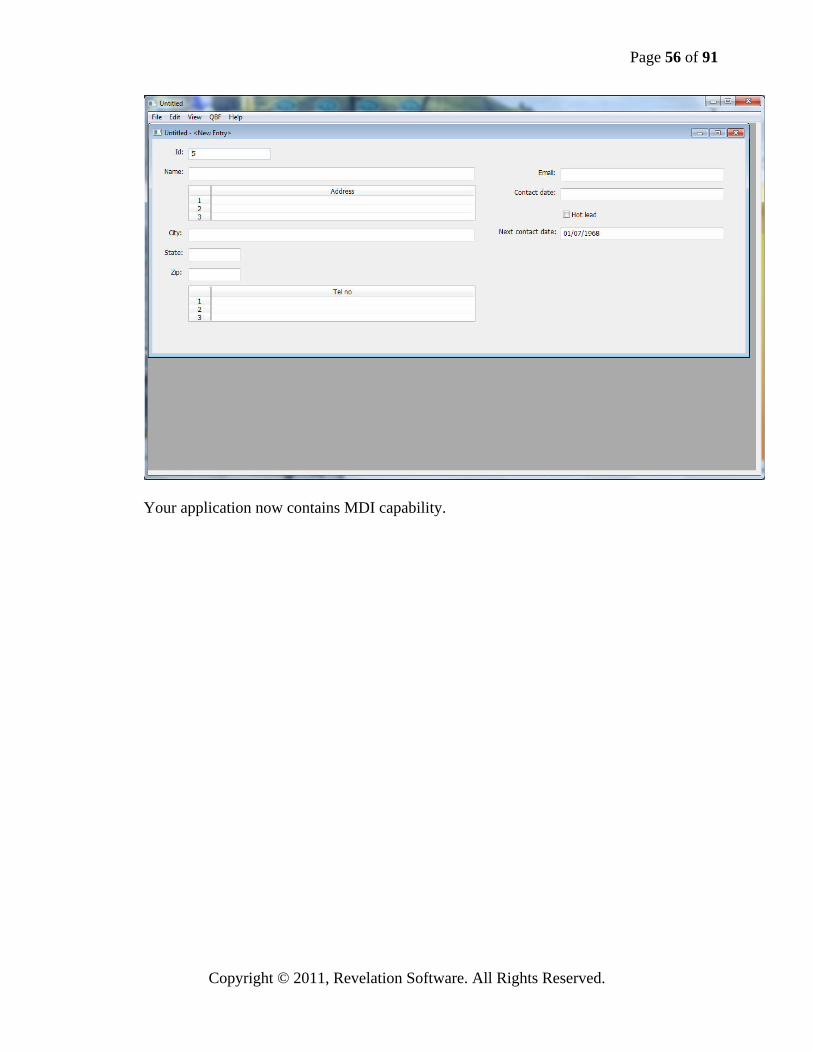
13. Choose Contacts from the File menu. The following screen will display:
Page 56 of 91
Copyright © 2011, Revelation Software. All Rights Reserved.
Your application now contains MDI capability.

Page 57 of 91
Copyright © 2011, Revelation Software. All Rights Reserved.
Working with Popups I. Creating a Popup
1. Launch the User Interface Workspace by clicking on UI Workspace from the Application
Tools menu or press the UI Workspace button .

Page 58 of 91
Copyright © 2011, Revelation Software. All Rights Reserved.
2. Choose New from the File menu; choose Popup from the New Entity dialog box to
display the Popup Designer below.
Page 59 of 91
Copyright © 2011, Revelation Software. All Rights Reserved.
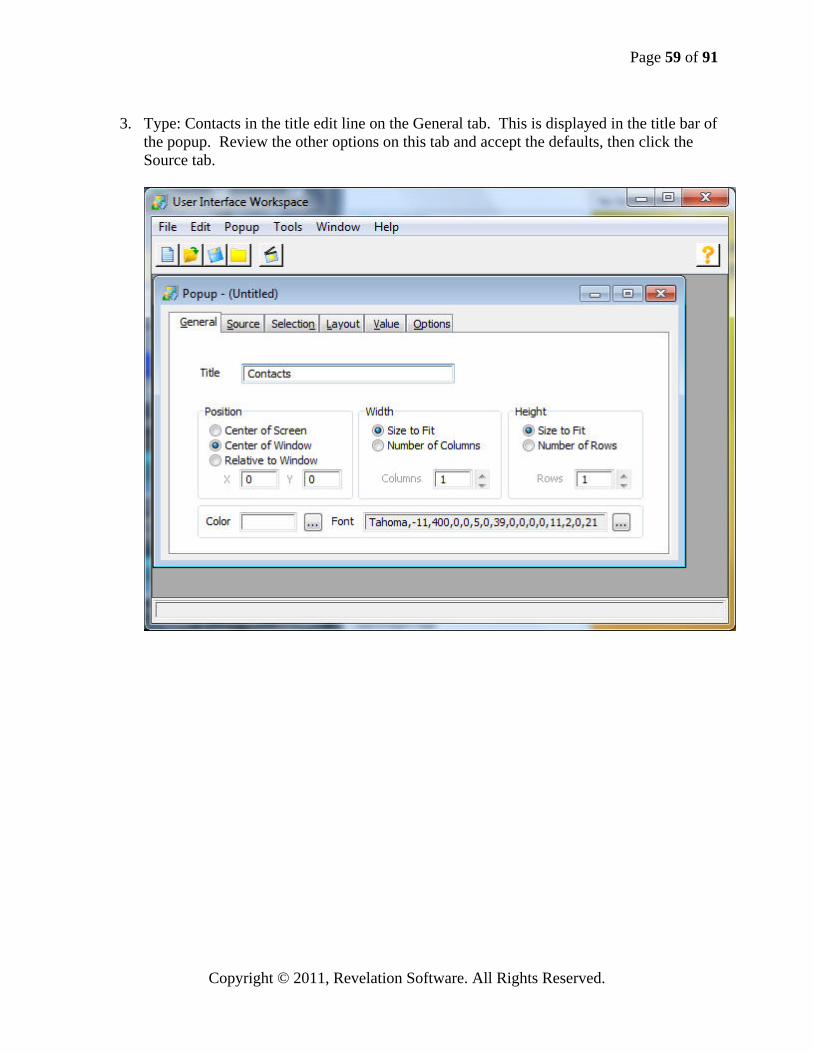
3. Type: Contacts in the title edit line on the General tab. This is displayed in the title bar of
the popup. Review the other options on this tab and accept the defaults, then click the Source tab.
Page 60 of 91
Copyright © 2011, Revelation Software. All Rights Reserved.
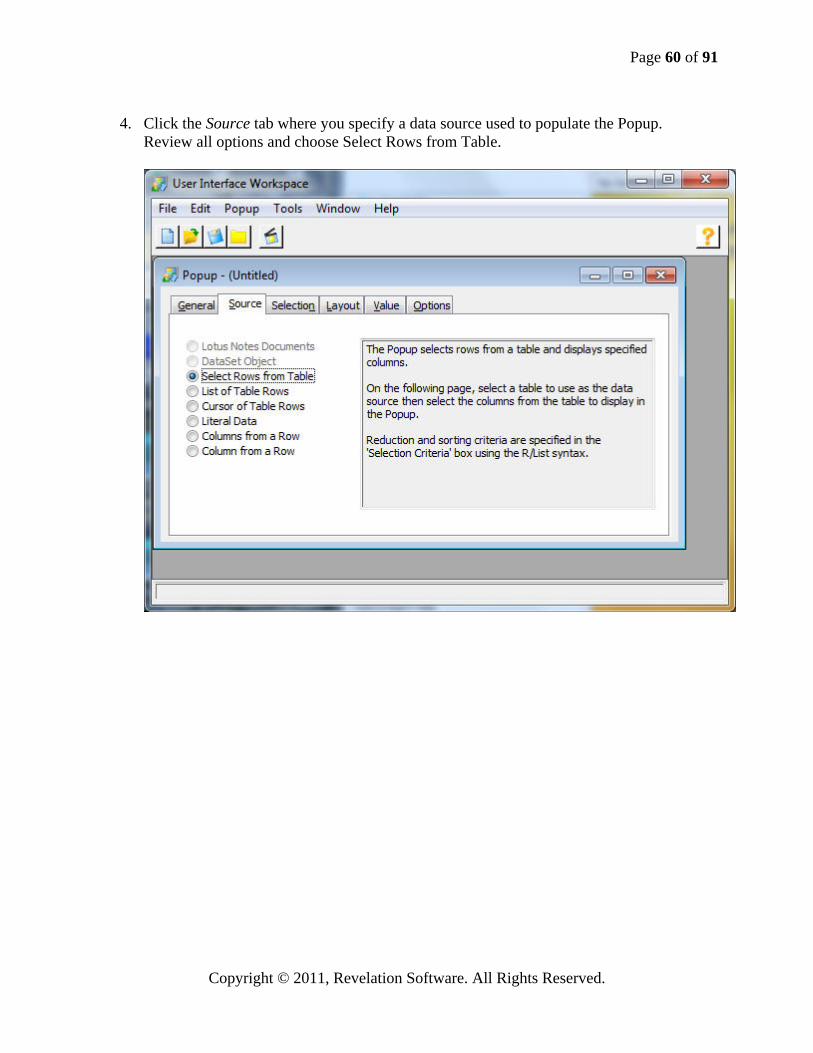
4. Click the Source tab where you specify a data source used to populate the Popup.
Review all options and choose Select Rows from Table.
Page 61 of 91
Copyright © 2011, Revelation Software. All Rights Reserved.
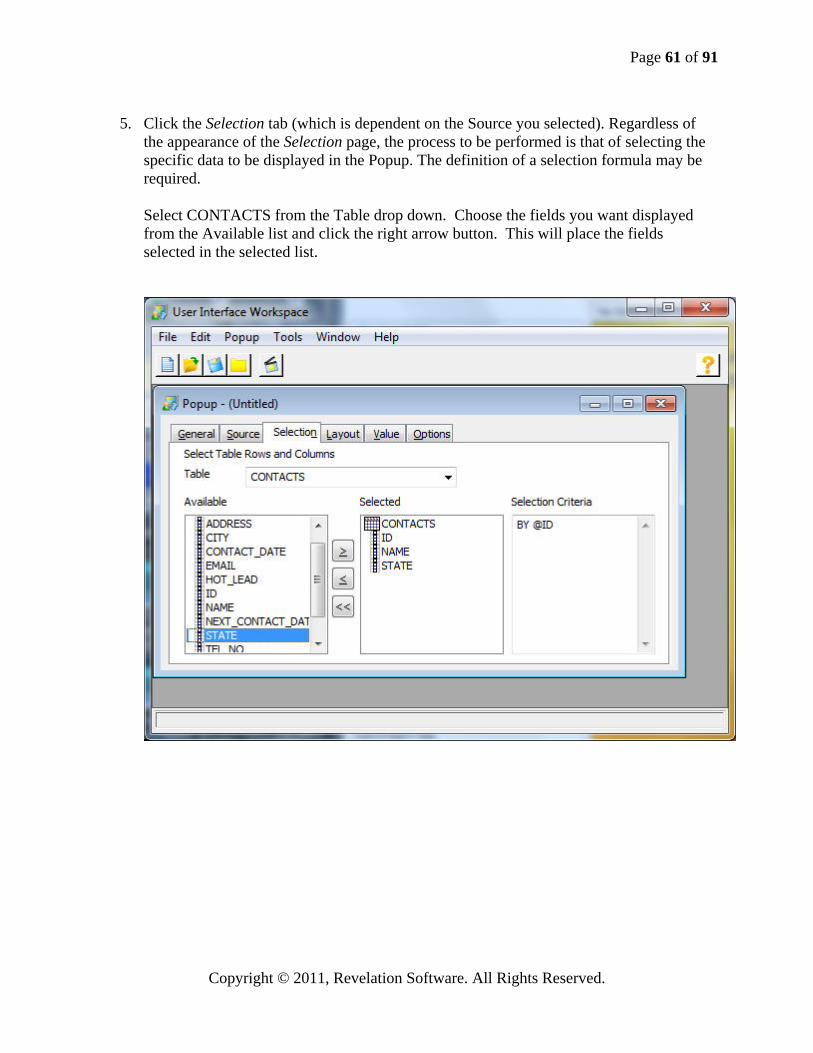
5. Click the Selection tab (which is dependent on the Source you selected). Regardless of
the appearance of the Selection page, the process to be performed is that of selecting the specific data to be displayed in the Popup. The definition of a selection formula may be required. Select CONTACTS from the Table drop down. Choose the fields you want displayed from the Available list and click the right arrow button. This will place the fields selected in the selected list.
Page 62 of 91
Copyright © 2011, Revelation Software. All Rights Reserved.
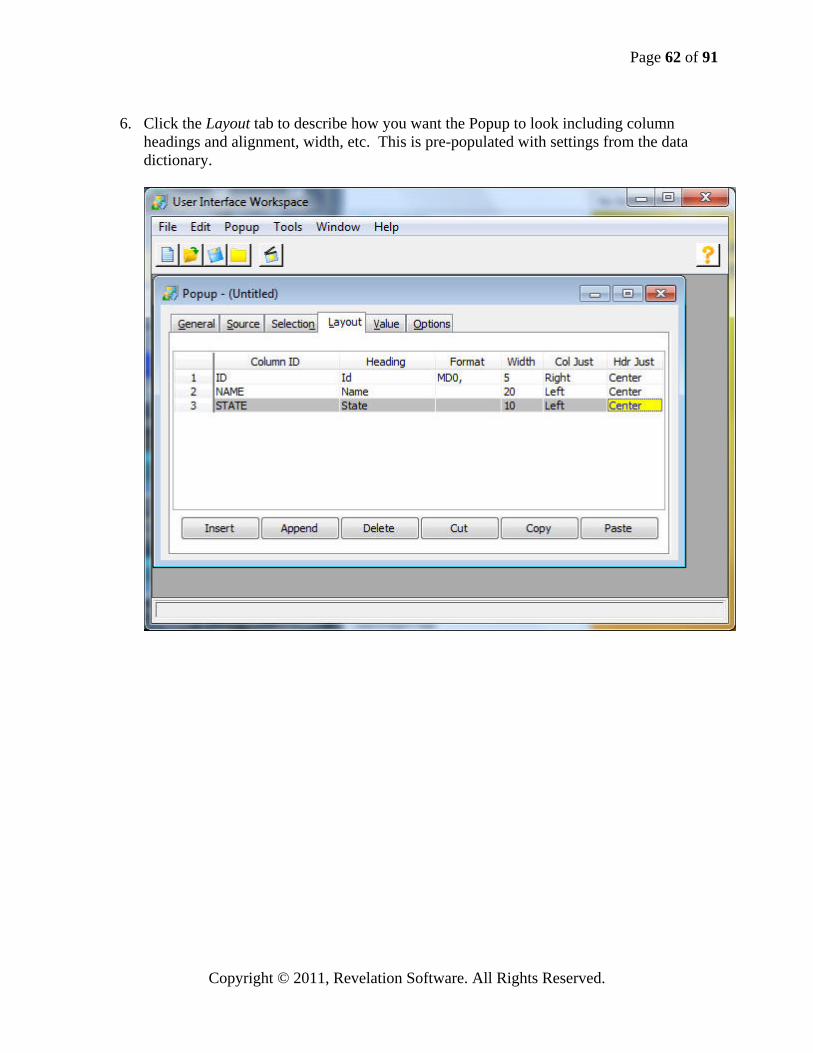
6. Click the Layout tab to describe how you want the Popup to look including column
headings and alignment, width, etc. This is pre-populated with settings from the data dictionary.

Page 63 of 91
Copyright © 2011, Revelation Software. All Rights Reserved.
7. Click the Value tab where you specify what information you want the Popup to return,
and specify the number of selections that can be made in the Popup.

Page 64 of 91
Copyright © 2011, Revelation Software. All Rights Reserved.
8. Click the Options tab where a number of miscellaneous characteristics of the Popup are
specified.

Page 65 of 91
Copyright © 2011, Revelation Software. All Rights Reserved.
9. Save the Popup, and then test it by choosing File, Test Run.

Page 66 of 91
Copyright © 2011, Revelation Software. All Rights Reserved.
II. Adding Popup Functionality to a Window
The most common use of a Popup is to provide users with a list of choices during data entry. The following procedure will demonstrate how to add a button to an existing form and the Event Handler necessary to execute the Popup and place the results within a data field.
1. Open the Form Designer. 2. Select Open from the File menu. Choose the CONTACTS form. 3. From the Controls tool bar select a button by clicking on the OK button icon, in the upper
right corner
4. Place the control on the form by moving the mouse cursor to a location on the form where you want to place the control. The mouse cursor changes to the control’s icon with a + appearing to the left and above the icon as soon as the mouse cursor enters the form. The + is used to help position the control. Click the left mouse button where you want to place the control. The control is displayed in the form in the selected state (with handles visible).
Page 67 of 91
Copyright © 2011, Revelation Software. All Rights Reserved.
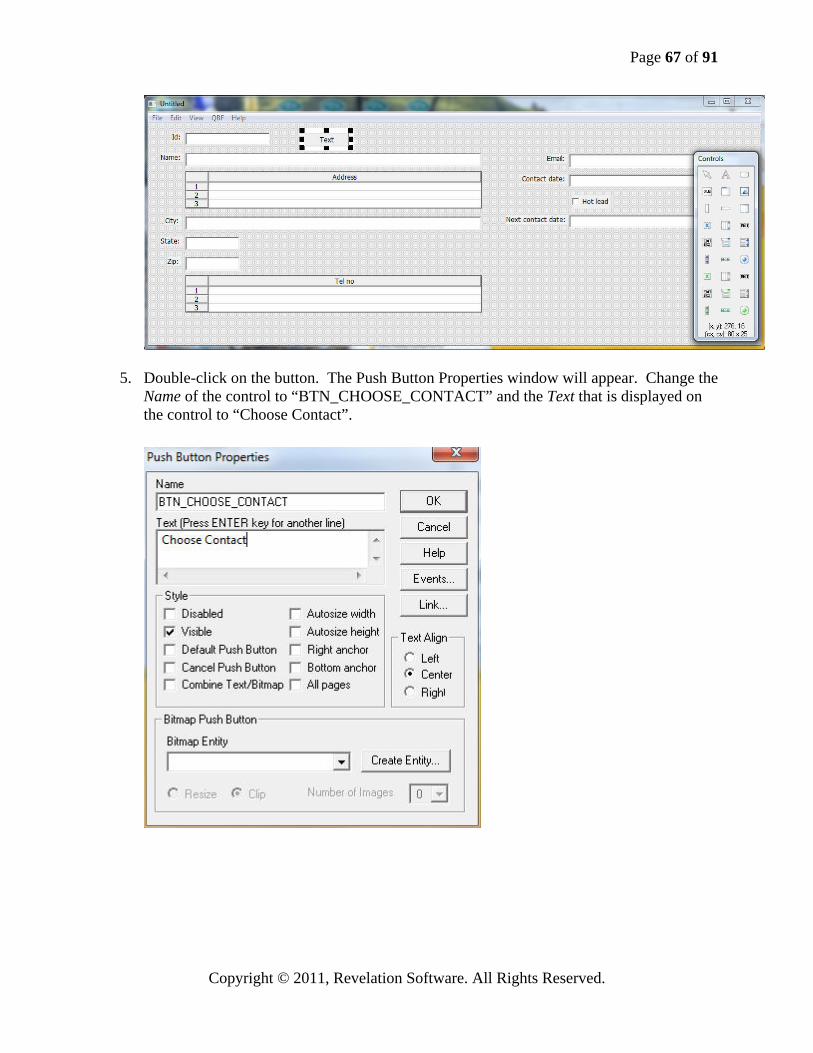
5. Double-click on the button. The Push Button Properties window will appear. Change the Name of the control to “BTN_CHOOSE_CONTACT” and the Text that is displayed on the control to “Choose Contact”.

Page 68 of 91
Copyright © 2011, Revelation Software. All Rights Reserved.
6. Click on the Events button to display the QuickEvent dialog box.
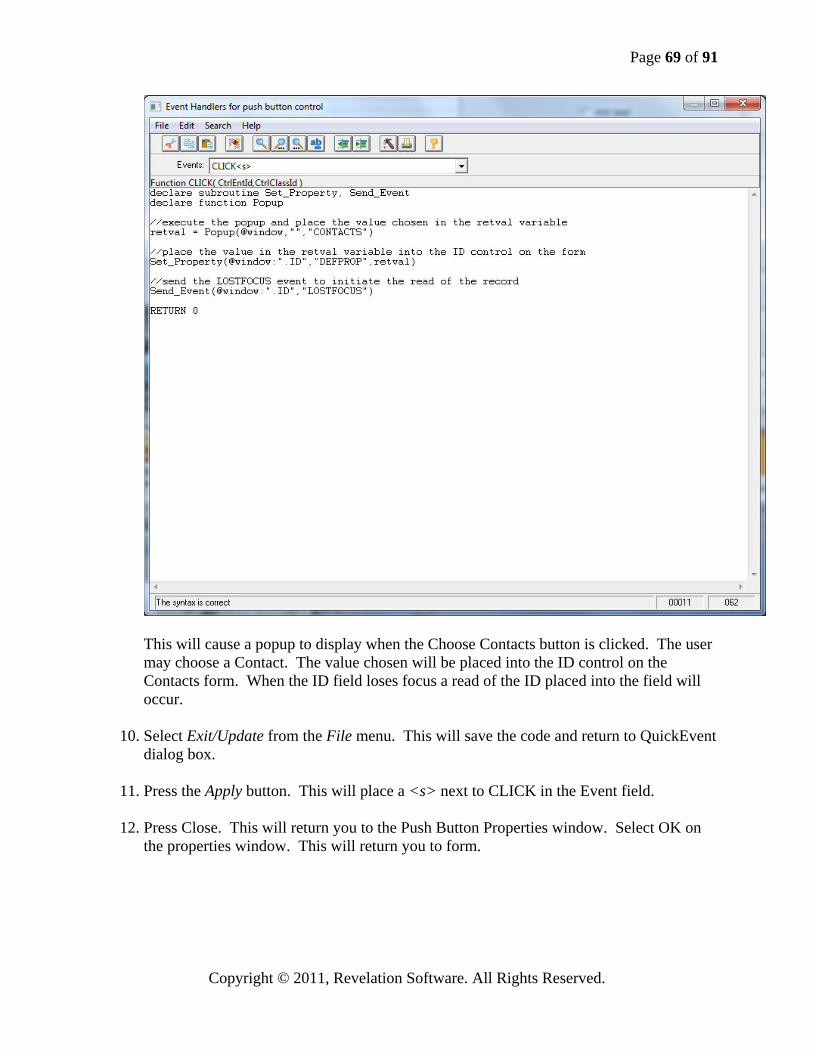
7. The CLICK event will be chosen by default. 8. Click on the Scripts button. This will launch the Event Editor. In the Editor type the
following code: declare subroutine Set_Property, Send_Event declare function Popup retval = Popup(@window,"","CONTACTS") Set_Property(@window:".ID",”DEFPROP”,retval) Send_Event(@window:".ID","LOSTFOCUS")
9. Select Check Syntax from the File menu. Any errors will be displayed at the bottom of
the Event Editor window. If the syntax is correct the status line will display “The syntax is correct”.
Page 69 of 91
Copyright © 2011, Revelation Software. All Rights Reserved.
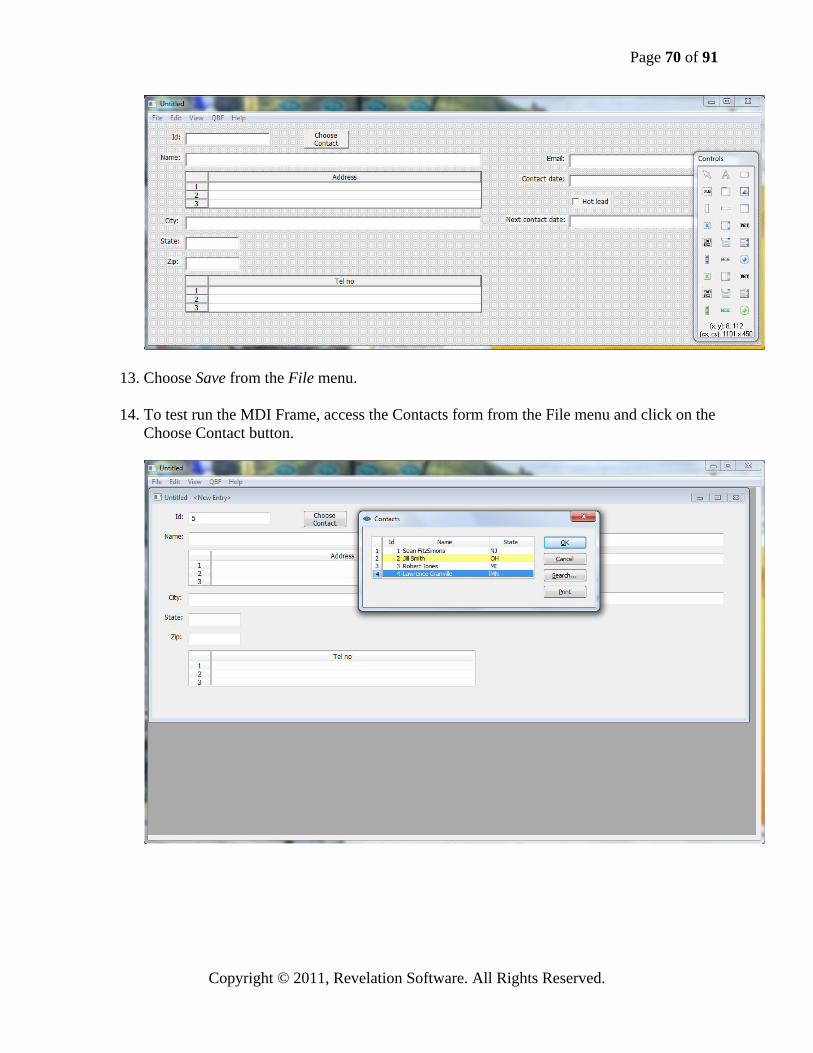
This will cause a popup to display when the Choose Contacts button is clicked. The user may choose a Contact. The value chosen will be placed into the ID control on the Contacts form. When the ID field loses focus a read of the ID placed into the field will occur.
10. Select Exit/Update from the File menu. This will save the code and return to QuickEvent
dialog box.
11. Press the Apply button. This will place a <s> next to CLICK in the Event field. 12. Press Close. This will return you to the Push Button Properties window. Select OK on
the properties window. This will return you to form.
Page 70 of 91
Copyright © 2011, Revelation Software. All Rights Reserved.
13. Choose Save from the File menu.
14. To test run the MDI Frame, access the Contacts form from the File menu and click on the Choose Contact button.
Page 71 of 91
Copyright © 2011, Revelation Software. All Rights Reserved.
Working with Reports I. Report Builder+
The OpenInsight Report Builder is a tool used to create R/List type reports. Using the Report Builder+ the developer or end-user can create columnar reports on any attached table with a minimum of effort.
II Creating a Report
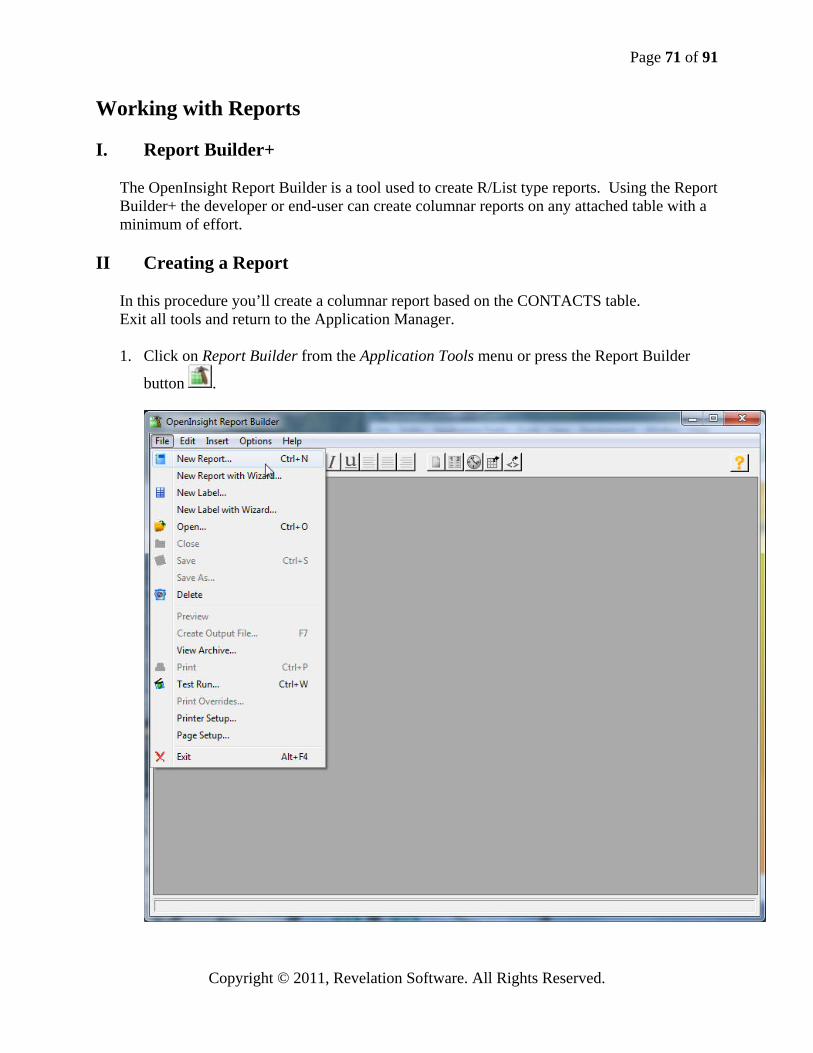
In this procedure you’ll create a columnar report based on the CONTACTS table. Exit all tools and return to the Application Manager. 1. Click on Report Builder from the Application Tools menu or press the Report Builder
button .
Page 72 of 91
Copyright © 2011, Revelation Software. All Rights Reserved.
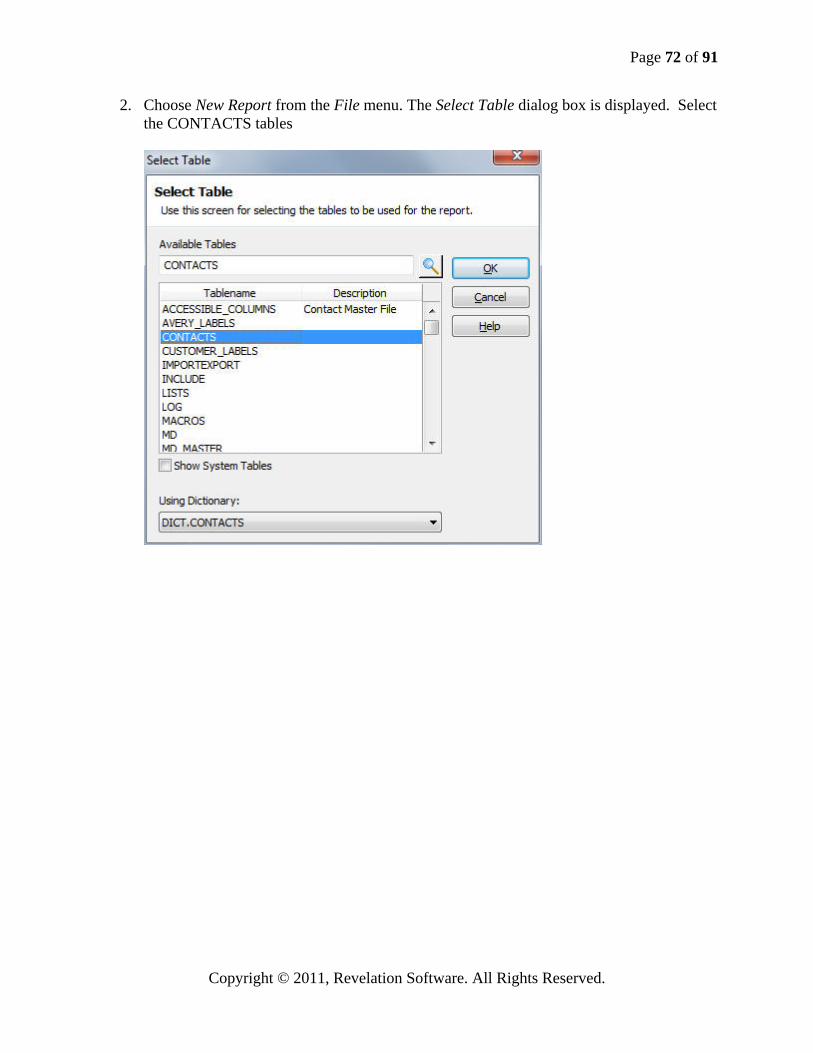
2. Choose New Report from the File menu. The Select Table dialog box is displayed. Select the CONTACTS tables
Page 73 of 91
Copyright © 2011, Revelation Software. All Rights Reserved.
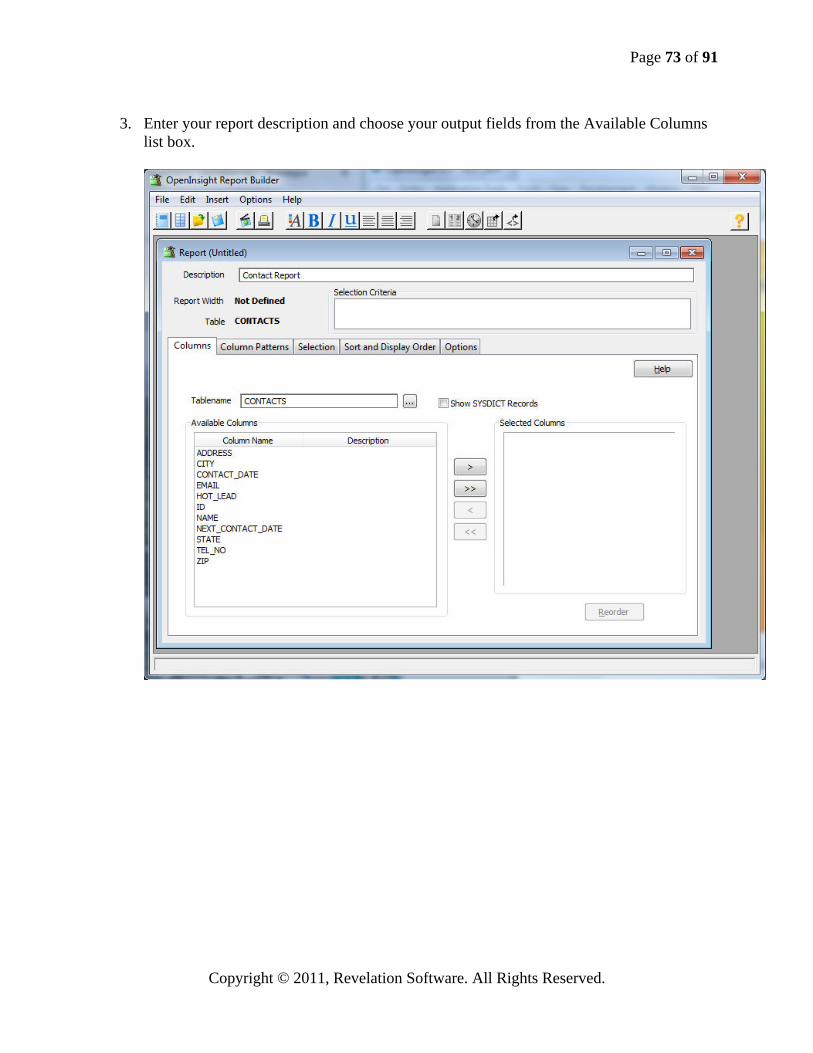
3. Enter your report description and choose your output fields from the Available Columns
list box.

Page 74 of 91
Copyright © 2011, Revelation Software. All Rights Reserved.
4. Once your entries are completed on the Columns tab, click on the Column Patterns tab to
set your column properties.
5. From the Available Columns list box, select the following fields by double clicking on
the Column Name for each specified field and clicking the > button. ID NAME TEL_NO CITY STATE

Page 75 of 91
Copyright © 2011, Revelation Software. All Rights Reserved.
6. The selected field names display in the Selected Columns list.
Note: If the Selected Columns are not in the order in which you want them to appear on the report, click the Reorder button to display the Reorder Dialog box.
7. Click on the Column Patterns tab to set the properties of each column. Click on each
column to set its column properties.

Page 76 of 91
Copyright © 2011, Revelation Software. All Rights Reserved.
8. Click on the Selection tab to create your selection criteria. Click the Insert button to add
it to the Current Criteria.
Page 77 of 91
Copyright © 2011, Revelation Software. All Rights Reserved.
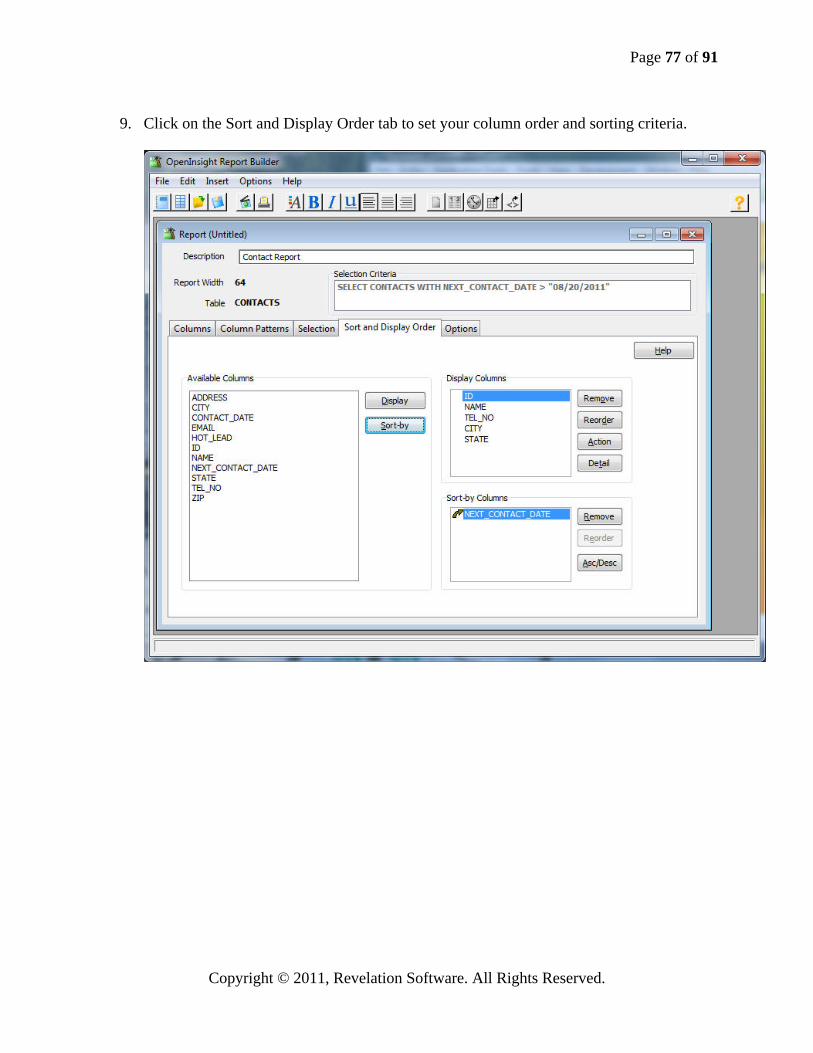
9. Click on the Sort and Display Order tab to set your column order and sorting criteria.
Page 78 of 91
Copyright © 2011, Revelation Software. All Rights Reserved.
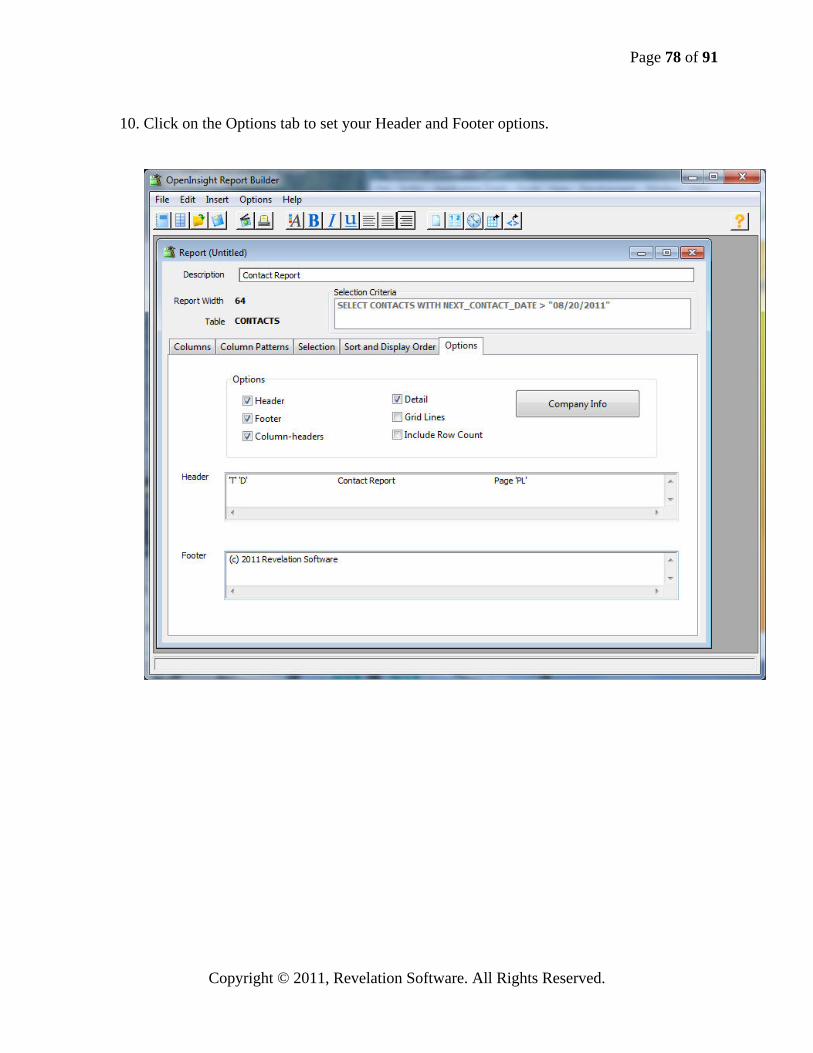
10. Click on the Options tab to set your Header and Footer options.

Page 79 of 91
Copyright © 2011, Revelation Software. All Rights Reserved.
11. To save the report, choose Save from the File menu.

Page 80 of 91
Copyright © 2011, Revelation Software. All Rights Reserved.
12. Type CONTACTS as the report name and click the OK button.

Page 81 of 91
Copyright © 2011, Revelation Software. All Rights Reserved.
13. Choose Print Preview from the File menu. The following report will be displayed.
14. Click the Close button on the Preview window.

Page 82 of 91
Copyright © 2011, Revelation Software. All Rights Reserved.
Setting an Application Entry Point
The application entry point is the first window that is displayed when the application is executed at runtime. For our purposes this will be the MDIFrame TEST_APP_MDI. The following steps will define the application entry point. 1. Choose Application Properties from the Application Manager File menu to display the
Application Properties dialog box shown below.

Page 83 of 91
Copyright © 2011, Revelation Software. All Rights Reserved.
2. Click the SETUP ENTRY POINT button (in the bottom left hand corner of the dialog
box). The Setup Application Main Entry Point dialog box is displayed, as shown below.
3. Clear the No Application Entry Point check box. The window names in the Window Name list box become enabled.
4. Select the form TEST_APP_MDI in the Window Name list box.
5. Click the OK button to update the application Entry Point option and return to the
Application Properties dialog box. Click the OK button to close this dialog.
6. You will need to close and reopen OpenInsight to the TEST_APP application. Now choose Run Application from the File, Application menu. Your application will now launch.

Page 84 of 91
Copyright © 2011, Revelation Software. All Rights Reserved.
7. Select the TEST_APP application and enter TEST_APP in the User Name edit line, then click the OK button to execute the TEST APPLICATION.
8. The TEST_APP_MDI window is displayed in runtime mode.
Congratulations! You’ve successfully completed your first application using OpenInsight for U2. And what you have learned here is just the beginning. You may continue by taking a look at the sample applications that are included with OpenInsight, or begin your own development project. Whatever your choice, we wish you continued success using OpenInsight.

Page 85 of 91
Copyright © 2011, Revelation Software. All Rights Reserved.
OpenInsight Tools for U2 Integration
It is now possible to interactively run U2 programs and commands from within the CTO environment. At the standard CTO TCL prompt (“>”), issue the command: >U2TCL If this is the first time you are issuing the command during the current session, you will be prompted for the name of the previously-defined U2 Connection to use. If successful, you will be presented with the U2TCL TCL prompt: U> From this prompt, any command you issue will be executed on the host system defined by the U2 Connection. You will remain at the U2TCL prompt, able to run multiple commands, until you exit. When you wish to exit the U2TCL and return to CTO, issue either the command: U>QUIT Or U>EXIT If you wish to re-enter U2TCL during the same TCL session, just reissue the command: >U2TCL And you will be reconnected using the previously-defined U2 Connection. If you wish to change the connection you are using, issue the U2TCL command along with the name of the U2 Connection you wish to use: >U2TCL OtherU2ConnectionName Programs run in the U2TCL can also take advantage of some advanced OpenInsight functionality. A series of support routines allows developers to include, in their U2 programs, calls to OpenInsight’s messagebox, popup, and other GUI functions. To install these support routines on a connection, issue the OIDEPLOY command from within the U2TCL: U>OIDEPLOY You will be prompted to enter the name of the U2 file where you want these support programs to be installed. U2TCL will put the support programs in this file, compile, and catalog them. For your convenience, there is also a record created in this file, named CTO_FUNCTIONS, which contains all the function definitions and that can be included in your U2 programs. The support programs include CTO_MSG, CTO_POPUP, CTO_RUNWIN, CTO_RUNWIN_WAIT, CTO_DIALOG_BOX, CTO_GET_PROPERTY, CTO_SET_PROPERTY,
Page 86 of 91
Copyright © 2011, Revelation Software. All Rights Reserved.
CTO_SET_PRINTER, CTO_GUI_FUNCTION, and CTO_GUI_SUBROUTINE. For more information on these routines, please see <<insert reference here>> It is also possible to invoke the U2TCL to execute a single command and then terminate. The syntax is: U2TCL <connectionName>,<command to run> For example: >U2TCL MyU2ConnectionName,RUN BP SOMEPROGRAM Will run the program SOMEPROGRAM located in the BP file on the host defined by MyU2ConnectionName. If there are U2 commands that you will run frequently, you can define MD entries that make running these commands more convenient. These are comparable to “cataloging” a CTO program, or creating a CTO “paragraph” or “proc”. The record layout of these MD entries is: ID: <commandname>
1. U2 2. <connectionname> 3. <full command to run>
For example, to define a CTO command called U2TEST that runs on the connection MyU2ConnectionName and runs the U2 command RUN BP SOMEPROGRAM, you would create an MD record that looked like: ID: U2TEST
1. U2 2. MyU2ConnectionName 3. RUN BP SOMEPROGRAM
As another convenience, if you have a U2 program file attached to your OpenInsight system, and you wish to run a program from that file, you can issue the U2RUN command. The syntax for the U2RUN command is similar to the “normal” CTO RUN command; you must specify the name of the file containing the program you wish to run, and the program name. For example: U2RUN BP SOMEPROGRAM The U2RUN command will retrieve the information about the U2 Connection from the definition of the U2 file contained in the OpenInsight database manager; it will (if necessary) open the connection to that U2 Connection, and invoke U2TCL to run the specified program. U2/OI Integration Routines

Page 87 of 91
Copyright © 2011, Revelation Software. All Rights Reserved.
You may run U2 programs via U2TCL (or via U2RUN, discussed below), without major modifications. However, if these programs will be run in the CTO environment exclusively, you can enhance them so that they can use OpenInsight functionality, such as popups, message boxes, and OIPI printer management. This functionality is available by adding calls to CTO_DIALOG_BOX, CTO_GET_PROPERTY, CTO_GUI_FUNCTION, CTO_GUI_SUBROUTINE, CTO_MSG, CTO_POPUP, CTO_RUNWIN, CTO_RUNWIN_WAIT, CTO_SET_PRINTER, and CTO_SET_PROPERTY. See the standard CTO documentation for information on how to use these functions. In order to make these functions available to the U2 programs, you must put these support routines on the U2 system. This needs to be done only on those systems where you will modify the U2 programs to call these functions. From within U2TCL, you can issue the special command OIDEPLOY. You will be prompted to enter the name of the U2 program file where these should be created. U2TCL will then verify that the file is accessible, copy these routines to the U2 system, compile, and catalog them. U2RUN U2RUN allows you to run U2 programs without entering the U2TCL environment. The syntax for using U2RUN is: U2RUN <OITableNameOfU2File> <ProgramName> For U2RUN to work, you must have defined (via the OpenInsight Table Manager) a “connection” to the U2 system, and then defined (as accessible in OpenInsight) the file where the desired program resides. U2RUN will use the connection and table information to connect to the U2 system and run the specified program. “Cataloged” U2 Programs CTO supports the ability to “catalog” a U2 program so that it can be invoked just by entering the catalog name at CTO TCL. To create a “cataloged” U2 program, you must manually create a record in the MD. Name this MD record whatever you wish to use when invoking the U2 program; field 1 of the record must contain a “U2”, field 2 contains the connection name to the U2 system, and field 3 contains the full statement to run on the U2 system. Unsupported Functionality Since the U2 integration features only offer a basic level of U2 emulation, the following functionality is _not_ supported via U2TCL, U2RUN, or cataloged U2 programs:
‐ U2 pagination is not passed through to the U2TCL routine – for example, routines like LISTF keep going until they’re complete;
‐ In an associated issue, single-character input is not supported; ‐ Keystrokes entered in response to prompts from the U2 system may be echoed in the
U2TCL environment
Page 88 of 91
Copyright © 2011, Revelation Software. All Rights Reserved.
Subroutine Test_U2UBFS_Subcall( connection_name ) /* ** Sample program showing how to interact with the server ** By writing a record ** Issuing a TCL command ** Calling a program ** ** In this example we create the text for a U2 program ** Write the text in the BP file on the server using WRITE_ROW ** Issue commands to compile and catalog it using U2UBFS_EXECPROC ** Call the subroutine on the server with parameters using U2UBFS_SUBCALL ** 02-10-12 rjc Created */ $Insert msg_Equates $Insert logical $Insert vol_table_equates $Insert SSPERRORS_600 Declare Function Msg, u2UBFS_execproc, GET_STATUS call Set_Status(0) * Edit the volume id and program name to suit your needs * The volume id is the connection name in the U2UBFS_CONNECTION_DETAILS window * If not passed in, for an existing connection If Assigned(connection_name) Else connection_name = '' If connection_name # '' Then Call Attach_table(connection_name, '', '') End else Locate 'U2UBFS' In @volumes(vol_file_sys$) Using @fm Setting pos Then connection_name = @volumes(vol_location$)<pos,1> end If connection_name = '' Then Msg(@window, 'Unable to determine the U2 connection to use, terminating') Return '' end end *--- * Create an example program which will have two parameters * The program will accept a value in the first parameter * and return a modified value in the second parameter * In real life you will call an existing catalogued program * You can call any routine with 0 to 30 parameters * You can pass data in and or out of any parameter *--- * the name of the program program_file = 'BP' ; * I ASSUME you have a BP file. Change this to a different file as needed program_name = 'OI_CLIENT' ;

Page 89 of 91
Copyright © 2011, Revelation Software. All Rights Reserved.
* Define it program_body = 'SUBROUTINE ':program_name:'(INPARAM, OUTPARAM)' program_body<-1> = '* Test program to Demonstrate calling u2 from OI' program_body<-1> = '' program_body<-1> = 'OUTPARAM="YOU PASSED *" : INPARAM : "*"' program_body<-1> = 'RETURN' * Write it to the server, don't bother to lock the record lock_flag = 0 ssp_response = '' Call Write_Row(program_file, program_name, program_body, lock_flag) Call Get_Status(ssp_response) Call Set_Status(0) If ssp_response<1,1> # SSP_ROW_WRITTEN_OK$ Then Convert @fm To @vm In ssp_response Msg(@window, 'Unable to write row ': @vm : ssp_response) Return '' end *--- * Compile it at the server using Execproc * U2UBFS_EXECPROC is very useful in other situations too * Note that you can use U2UBFS_EXECPROC to send ANY tcl command and capture the reps * result_code = u2ubfs_execProc(connection_name, command, captured, pReplies, pInteractive ) * connection_name = connection name from the connection defintion window * captured = the output of the command, i.e. what would appear on the screen in a terminal session * pReplies = Similar to a DATA statement, you can supply an FM delimited list of answers to expected prompts * pInteractive = '' ; * True if the you want OI to put up a message box if the server prompts for data *--- command = 'BASIC ' :program_file : ' ' : program_name captured = '' pReplies = '' pInteractive = '' result_code = u2ubfs_execProc(connection_name, command, captured, pReplies, pInteractive ) If result_code eq -1 Then Msg(@window, 'Unable to execute command ' : Quote(command) ) Return '' End else Msg(@window, captured) End *--- * Cataloged it now using execproc * Note thst if you run the program multiple times U2 will prompt "Do you want to Overwrite (Y/N)" * So, pass a "Y" in pReplies, U2 will use it as the answer * If you expect multiple prompts, pass an @fm delimited string of answers *---

Page 90 of 91
Copyright © 2011, Revelation Software. All Rights Reserved.
command = 'CATALOG ' : program_file : ' ' : program_name pReplies = 'Y' ; * provide a reply incase U2 prompts about overwriting result_code = u2ubfs_execProc(connection_name, command, captured, pReplies, pInteractive ) If result_code eq -1 Then Msg(@window, 'Unable to execute command ' : Quote(command) ) Return '' End else Msg(@window, captured) End *---- * Finally ... * Call The procedure using the U2UBFS_SUBCALL subroutine * Usage: * subroutine U2UBFS_SUBCALL(tconnection_name,tSubName,tParamCount,P1,P2,P3,P4,P5,...,P30) * IN sconnection_name = U2 volume name or handle * IN SubName = Name of subroutine to Execute * IN ParamCount = Number of parameters expected by the subroutine ( 0 - 30 ) * IN/OUT P1 ... P30 ( Optional) parameter values, default to '' * * The called routine must be a cataloged subroutine on the server * if the called routine changes any parameter the calling routine can retrieve it * In this example we have 2 parameters, passing data in the first, getting response from the second *--- ParamCount = 2 ; * our example uses 2 parameters inparam = timedate() ; * our example expects something in the first param outparam = '' ; * our example expects nothing in the second param Call u2ubfs_Subcall(connection_name, program_name, ParamCount, inparam, outparam) * echo the result call msg(@window, inparam : @vm : outparam ) Return ''
Revelation Software, Inc 99 Kinderkamack Road Ste 109 Westwood, NJ 07675 U.S.A Toll Free: 800-262-4747 Phone: 201-594-1422 Fax: 201-722-9815 www.revelation.com
Revelation Software Ltd. 45 St Mary’s Road Ealing, London, W5 5RG U.K. Phone: +44 0 208 912 1000 Fax: +44 0 208 912 1001 [email protected]
Revelation Software Australia Pty Ltd. PO Box 300 Brookvale, NSW 2100 Australia Phone: +61 2 8003 4199 Fax: +61 2 9332 6099 [email protected]
Revelation Software is a division of Revelation Technologies, Inc.
Part No. 811-985