65x5 25 classic vamp spin speakers - roswell … · roswell’s classic vamp spin speakers are back...
TRANSCRIPT
www.roswel lmarine.com
Installation & Usage Instructions
Part # C920-1824
6.5 x 5.25 ClassicVamp Spin Speakers
Rev. 22-Sept-17
If you have any questions please call : 1-321-638-1331Information: [email protected]
www.roswellmarine.com6.5x5.25” Classic Vamp Spin Speaker Installation Instructions
Welcome to the family.
FEATURES• Premium sandblasted and anodized, aluminum
�nish.• Speaker Spin Technology allows the 5.25” speaker
to spin 180 Degrees.• Custom designed speaker grills.• Integrated white LED's back-light the cone to
create your desired visual atmosphere.• Machined Billet Roswell 3” clamp with 1.90”,
2.375”, and 3.00” adapters.
F
E
B DC
A
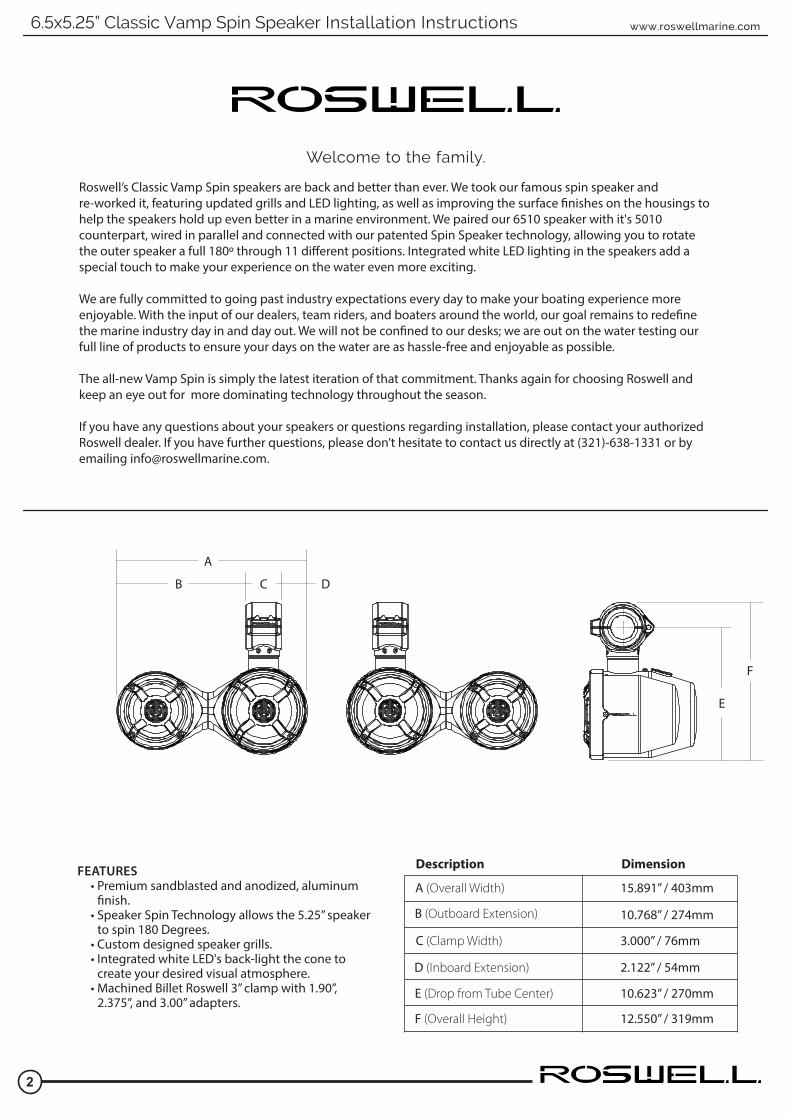
Description Dimension
A (Overall Width) 15.891” / 403mm
10.768” / 274mm
3.000” / 76mm
2.122” / 54mm
10.623” / 270mm
B (Outboard Extension)
C (Clamp Width)
D (Inboard Extension)
E (Drop from Tube Center)
12.550” / 319mmF (Overall Height)
2
Roswell’s Classic Vamp Spin speakers are back and better than ever. We took our famous spin speaker and re-worked it, featuring updated grills and LED lighting, as well as improving the surface �nishes on the housings to help the speakers hold up even better in a marine environment. We paired our 6510 speaker with it's 5010 counterpart, wired in parallel and connected with our patented Spin Speaker technology, allowing you to rotate the outer speaker a full 180º through 11 di�erent positions. Integrated white LED lighting in the speakers add a special touch to make your experience on the water even more exciting.
We are fully committed to going past industry expectations every day to make your boating experience more enjoyable. With the input of our dealers, team riders, and boaters around the world, our goal remains to rede�ne the marine industry day in and day out. We will not be con�ned to our desks; we are out on the water testing our full line of products to ensure your days on the water are as hassle-free and enjoyable as possible.
The all-new Vamp Spin is simply the latest iteration of that commitment. Thanks again for choosing Roswell and keep an eye out for more dominating technology throughout the season.
If you have any questions about your speakers or questions regarding installation, please contact your authorized Roswell dealer. If you have further questions, please don’t hesitate to contact us directly at (321)-638-1331 or by emailing [email protected].
www.roswellmarine.com
3
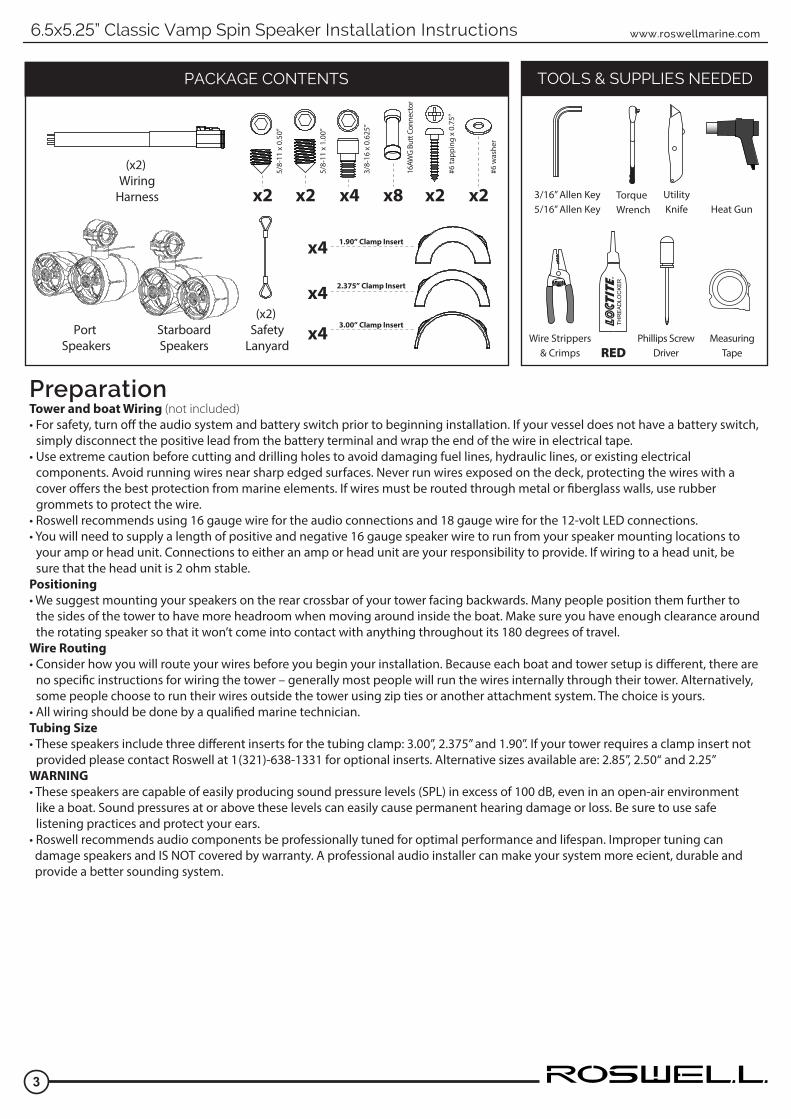
PACKAGE CONTENTS TOOLS & SUPPLIES NEEDED
3/16” Allen Key5/16” Allen Key
Port
SpeakersStarboardSpeakers
(x2) Wiring
Harness x8x2 x2 x4Heat Gun
UtilityKnife
THR
EAD
LOC
KER
REDWire Strippers
& Crimps
x4 1.90” Clamp Insert
x4 2.375” Clamp Insert
x43.00” Clamp Insert
PreparationTower and boat Wiring (not included)• For safety, turn o� the audio system and battery switch prior to beginning installation. If your vessel does not have a battery switch,
simply disconnect the positive lead from the battery terminal and wrap the end of the wire in electrical tape. • Use extreme caution before cutting and drilling holes to avoid damaging fuel lines, hydraulic lines, or existing electrical
components. Avoid running wires near sharp edged surfaces. Never run wires exposed on the deck, protecting the wires with a cover o�ers the best protection from marine elements. If wires must be routed through metal or �berglass walls, use rubber grommets to protect the wire.
• Roswell recommends using 16 gauge wire for the audio connections and 18 gauge wire for the 12-volt LED connections.• You will need to supply a length of positive and negative 16 gauge speaker wire to run from your speaker mounting locations to
your amp or head unit. Connections to either an amp or head unit are your responsibility to provide. If wiring to a head unit, be sure that the head unit is 2 ohm stable.
Positioning• We suggest mounting your speakers on the rear crossbar of your tower facing backwards. Many people position them further to
the sides of the tower to have more headroom when moving around inside the boat. Make sure you have enough clearance around the rotating speaker so that it won’t come into contact with anything throughout its 180 degrees of travel.
Wire Routing• Consider how you will route your wires before you begin your installation. Because each boat and tower setup is di�erent, there are
no speci�c instructions for wiring the tower – generally most people will run the wires internally through their tower. Alternatively, some people choose to run their wires outside the tower using zip ties or another attachment system. The choice is yours.
• All wiring should be done by a quali�ed marine technician.Tubing Size• These speakers include three di�erent inserts for the tubing clamp: 3.00”, 2.375” and 1.90”. If your tower requires a clamp insert not
provided please contact Roswell at 1 (321)-638-1331 for optional inserts. Alternative sizes available are: 2.85”, 2.50“ and 2.25”WARNING• These speakers are capable of easily producing sound pressure levels (SPL) in excess of 100 dB, even in an open-air environment
like a boat. Sound pressures at or above these levels can easily cause permanent hearing damage or loss. Be sure to use safe listening practices and protect your ears.
• Roswell recommends audio components be professionally tuned for optimal performance and lifespan. Improper tuning can damage speakers and IS NOT covered by warranty. A professional audio installer can make your system more ecient, durable and provide a better sounding system.
x2 x2
(x2) Safety
Lanyard
6.5x5.25” Classic Vamp Spin Speaker Installation Instructions
MeasuringTape
Phillips ScrewDriver
TorqueWrench
5/8-
11 x
0.5
0”
5/8-
11 x
1.0
0”
3/8-
16 x
0.6
25”
16AW
G B
utt C
onne
ctor
#6 ta
ppin
g x
0.75
”
#6 w
ashe
r
Black
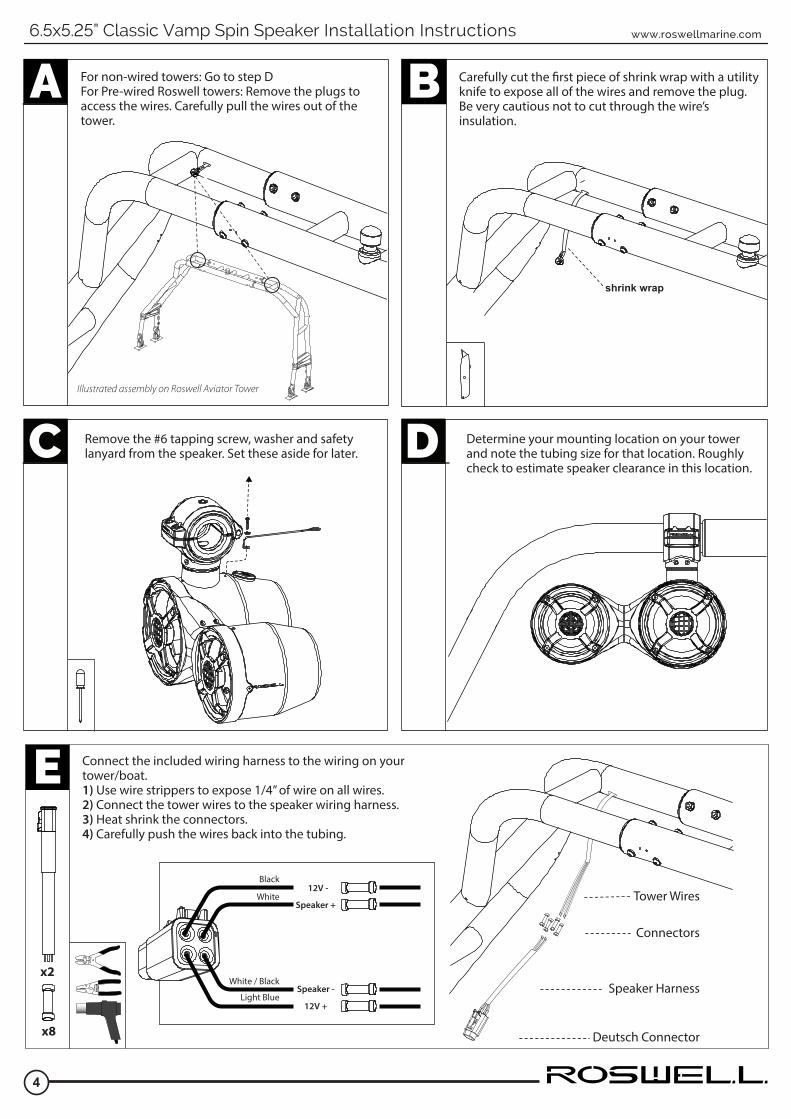
C Remove the #6 tapping screw, washer and safety lanyard from the speaker. Set these aside for later.
6.5x5.25” Classic Vamp Spin Speaker Installation Instructions www.roswellmarine.com
4
x8
Connect the included wiring harness to the wiring on your tower/boat.1) Use wire strippers to expose 1/4” of wire on all wires.2) Connect the tower wires to the speaker wiring harness.3) Heat shrink the connectors.4) Carefully push the wires back into the tubing.
Carefully cut the �rst piece of shrink wrap with a utility knife to expose all of the wires and remove the plug. Be very cautious not to cut through the wire’s insulation.
shrink wrap
For non-wired towers: Go to step DFor Pre-wired Roswell towers: Remove the plugs to access the wires. Carefully pull the wires out of the tower.
x2
Illustrated assembly on Roswell Aviator Tower
A B
E
Speaker Harness
Connectors
Tower Wires
Deutsch Connector
D Determine your mounting location on your tower and note the tubing size for that location. Roughly check to estimate speaker clearance in this location.
Speaker +
Speaker -
12V +
12V -
White / Black
Light Blue
White
6.5x5.25” Classic Vamp Spin Speaker Installation Instructions www.roswellmarine.com
5
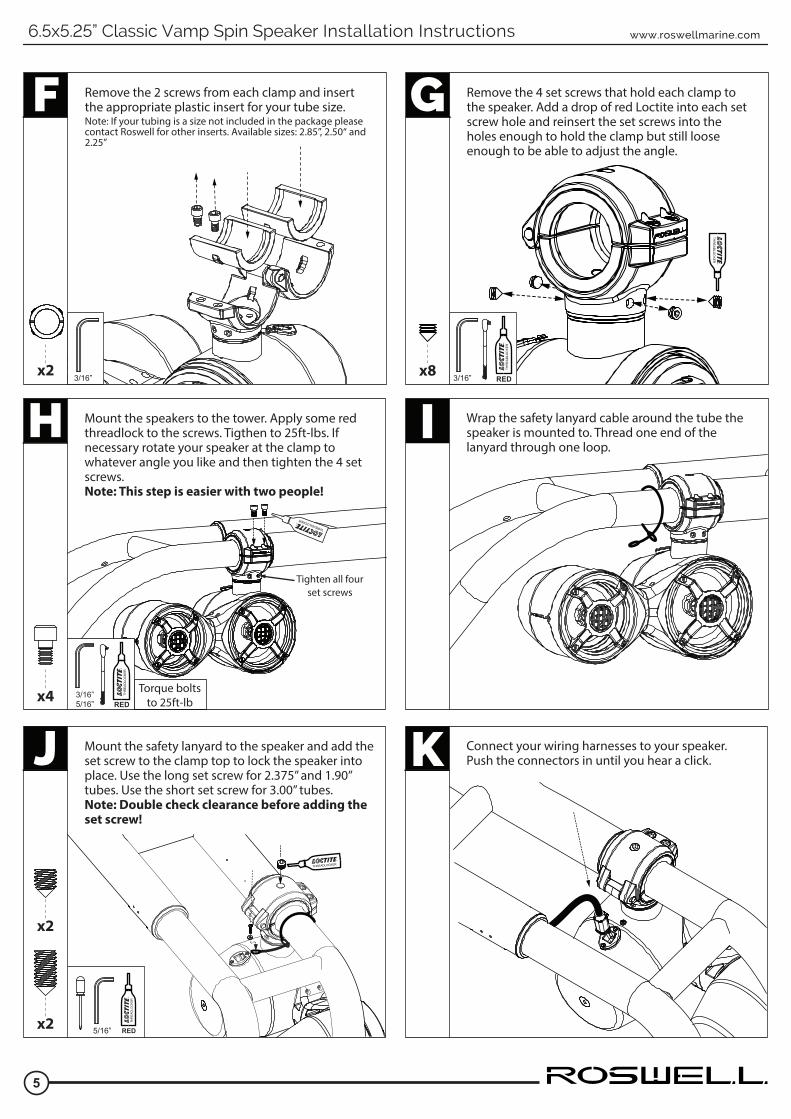
F Remove the 2 screws from each clamp and insert the appropriate plastic insert for your tube size.Note: If your tubing is a size not included in the package please contact Roswell for other inserts. Available sizes: 2.85”, 2.50“ and 2.25”
H Mount the speakers to the tower. Apply some red threadlock to the screws. Tigthen to 25ft-lbs. If necessary rotate your speaker at the clamp to whatever angle you like and then tighten the 4 set screws.Note: This step is easier with two people!
THREADLOCKER
3/16”5/16”
THR
EAD
LOC
KER
5/16”
THR
EAD
LOC
KER
Torque boltsto 25ft-lb
x2
G Remove the 4 set screws that hold each clamp to the speaker. Add a drop of red Loctite into each set screw hole and reinsert the set screws into the holes enough to hold the clamp but still loose enough to be able to adjust the angle.
x4
I Wrap the safety lanyard cable around the tube the speaker is mounted to. Thread one end of the lanyard through one loop.
J Mount the safety lanyard to the speaker and add the set screw to the clamp top to lock the speaker into place. Use the long set screw for 2.375” and 1.90” tubes. Use the short set screw for 3.00” tubes.Note: Double check clearance before adding the set screw!
K Connect your wiring harnesses to your speaker. Push the connectors in until you hear a click.
3/16” 3/16”
THR
EAD
LOC
KER
THR
EADLO
CKER
Tighten all four set screws
x8
x2
x2
THREADLOCKER
6.5x5.25” Classic Vamp Spin Speaker Installation Instructions www.roswellmarine.com
6
Enjoy your Roswell Classic Vamp Spin Speakers!
Use & Care
These speakers are built to the highest standards of marine durability. However, they are still a sensitive piece of electronic equipment. When cleaning, avoid hosing down the speakers directly and do not use harsh cleaners on the speakers and housings as they could damage the �nish. Simply wiping the speaker down with a damp cloth should be su�cient to ensure years of enjoyment.
It is necessary to regularly check the tightness of the bolts securing the Roswell speaker to your tower. Bolts and screws tend to rattle loose over time due to the vibrations and shaking that your boat experiences while on the water or in transit.
Covering your speakers with something removable like saran wrap or aftermarket fabric covers during transit or storage can save you a lot of time cleaning and also protect your speakers from damage.
Roswell Limited Warranty
Roswell warrants the 6.5x5.25” Classic Vamp Spin Speakers against defects in material and workmanship for a period of ONE (1) YEAR from the original date of purchase. This warranty is not transferable and applies only to the original retail purchaser from an authorized Roswell retailer. Upon inspection by Roswell, should service be necessary under this warranty for any reason due to manufacturer defects, Roswell will, at our own discretion, repair or replace the defective product with new or similar condi- tioned product at no charge.
THIS WARRANTY DOES NOT COVER INSTALLATION OR DAMAGE RESULTING FROM ACCIDENT, MISUSE, ABUSE, IMPROPER WIRING, COSMETIC DAMAGE DUE TO NORMAL WEAR AND TEAR, EXPOSURE TO CHEMICALS OR HARSH ENVIRONMENTS, OPERATION OUTSIDE OF THE MANUFACTURERS RECOMMENDATIONS OR SPECIFICATIONS, OR AGAINST INSTRUC- TIONS IN OWNERS MANUAL. IN ADDITION, ANY PRODUCT THAT HAS BEEN OPENED, TAMPERED WITH OR MODIFIED, OR IF ANY SERIAL NUMBERS HAVE BEEN REMOVED, WILL NOT BE COVERED BY ANY PART OF THE MANUFACTURES WARRANTY.
All warranty claims must �rst be made in direct contact with Roswell’s warranty department. When �rst contact is made the warranty representative will issue an RA # to open a claim. All warranty returns should be sent to Roswell freight prepaid and must be accompanied by proof of purchase (a copy of original sales receipt). Direct returns from consumers or non-authorized retailers will be refused unless speci�cally authorized by Roswell with a valid return authorization number (RA#).
All warranty returns should be packed in the original packaging and must be accompanied by a copy of the original sales receipt. Product damage during shipping will not be covered under this warranty. The customer or retailer may choose to have this damage repaired at the normal “Out of Warranty” repair cost.
In no event will Roswell be liable for incidental, consequential, or other damages resulting from the use of this product. This includes but is not limited to, damage of hearing, property or person, damage based upon inconvenience or on loss of use of the product, and to the extent permitted by law, damages for personal injury.
This warranty applies to products being sold and used in the United States of America and Canada. In all other countries please contact your authorized Roswell representative.
For warranty and non-warranty repairs, please contact Roswell Marine Inc.
Phone: 1-321-638-1331Email: [email protected]