65870607 sacroiliac joint exercises for back pain relief (2)
TRANSCRIPT

Learn More About Sam’s Protocols at: www.SamVisnic.com or www.Endyourbackpainnow.com/blog Copyright 2011. Sam Visnic. Page 1
Sacroiliac Joint Exercises For Stability And Pain Relief By
Sam Visnic NMT SamVisnic.com
Endyourbackpainnow.com
©2011 Sam Visnic
All Rights Reserved.
Warning!
This information is NOT medical advice, and does not replace the diagnosis nor treatment of a licensed physician. This report and related content is for information purposes ONLY. Always seek the advice of a qualified health care professional before beginning any health program. Any
actions taken as a result of reading this report and/or related information is at your OWN risk. Endyourbackpainnow.com, Sam Visnic, and all related affiliates and associates, assume
no liability as a result of actions taken on your part.

Learn More About Sam’s Protocols at: www.SamVisnic.com or www.Endyourbackpainnow.com/blog Copyright 2011. Sam Visnic. Page 2
What are the symptoms of Sacroiliac Joint Pain?
As you can see from the image above, the most common area of pain related to SI joint problems is right next to the small bones that can be felt just to the sides of the lower spinal vertebrae called the posterior superior iliac spines. (PSIS for short).
Of course, this area is not necessarily the only spot that can have pain due to SI joint issues. Pain can be felt over the hip joint, down to the gluteal and hamstring muscles, and even up the lumbar spine.

Learn More About Sam’s Protocols at: www.SamVisnic.com or www.Endyourbackpainnow.com/blog Copyright 2011. Sam Visnic. Page 3
Frequently, SI joint dysfunction is overlooked and misdiagnosed, mostly due to the multiple effects that are seen as a result that makes the overall situation appear to be multi-factorial and complicated. SI joint expert, Richard Don Tigny, has identified the following:
More Direct Effects Of The Subluxation At S31
1. The gluteus medius is inhibited when held in anterior rotation 2. The ilial origin of the gluteus maximus is separated from its sacral origin 3. The iliolumbar ligaments are loosened as the ilia approximate the vertebra 4. The long posterior ligaments will be stretched and may avulse from the PSIS 5. The ilial origin of the piriformis is separated from its sacral origin 6. If the sciatic nerve exits through the piriformis it may become painful
Now, I know that may sound like a lot of anatomy gibberish, so let me make it clearer. Essentially, when the SI joint bone/s become mis-aligned (also called subluxed), they move the points at which the muscles attach further apart. When this occurs, it can cause strain. In some cases, as in #6 listed above, the sciatic nerve may become choked and cause irritation and pain.
At first when the SI joint dysfunction appears, these may not all be present, but as the problem becomes chronic, some or all of them may appear and make it very difficult for the average doctor or therapist to see through to the root cause of the pain.
What are the most common causes of SI joint pain? Just like any other back pain issue, there can, of course be many very complicated issues, from nerve entrapment to spinal derangements, and even infections. However, assuming these major issues have been ruled out, the two most common causes of pain are:
1. Mechanical dysfunction 2. Structural leg length discrepancy
Mechanical Dysfunction This refers to the irregular movement of the SI joint (which shouldn’t move much at all). The most common mechanical dysfunction, according to DonTigny, is subluxation of the joint at S3.
1 More Direct Effects Of The Subluxation At S3. Image Captions. DonTigny, Richard. www.thelowback.com
Learn More About Sam’s Protocols at: www.SamVisnic.com or www.Endyourbackpainnow.com/blog Copyright 2011. Sam Visnic. Page 4
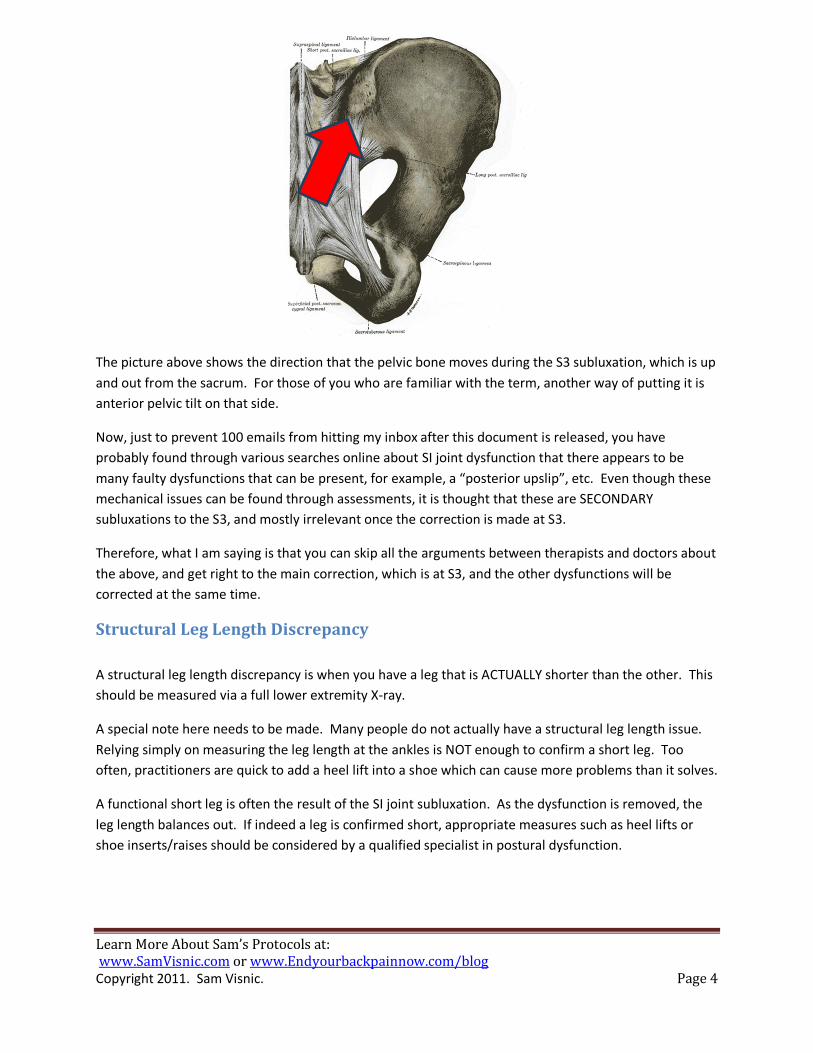
The picture above shows the direction that the pelvic bone moves during the S3 subluxation, which is up and out from the sacrum. For those of you who are familiar with the term, another way of putting it is anterior pelvic tilt on that side.
Now, just to prevent 100 emails from hitting my inbox after this document is released, you have probably found through various searches online about SI joint dysfunction that there appears to be many faulty dysfunctions that can be present, for example, a “posterior upslip”, etc. Even though these mechanical issues can be found through assessments, it is thought that these are SECONDARY subluxations to the S3, and mostly irrelevant once the correction is made at S3.
Therefore, what I am saying is that you can skip all the arguments between therapists and doctors about the above, and get right to the main correction, which is at S3, and the other dysfunctions will be corrected at the same time.
Structural Leg Length Discrepancy A structural leg length discrepancy is when you have a leg that is ACTUALLY shorter than the other. This should be measured via a full lower extremity X-ray.
A special note here needs to be made. Many people do not actually have a structural leg length issue. Relying simply on measuring the leg length at the ankles is NOT enough to confirm a short leg. Too often, practitioners are quick to add a heel lift into a shoe which can cause more problems than it solves.
A functional short leg is often the result of the SI joint subluxation. As the dysfunction is removed, the leg length balances out. If indeed a leg is confirmed short, appropriate measures such as heel lifts or shoe inserts/raises should be considered by a qualified specialist in postural dysfunction.

Learn More About Sam’s Protocols at: www.SamVisnic.com or www.Endyourbackpainnow.com/blog Copyright 2011. Sam Visnic. Page 5
How to fix SI joint dysfunction Correcting SI joint dysfunction starts with ruling out serious issues with the joint. As always, a trip to your doctor can address these. If you are cleared for serious pathology, then mechanical corrections are the next step.
Correcting the subluxation at S3 There are a number of simple self-corrections that can be done, but I find the one that is MOST useful involves a partner (preferably a therapist or chiropractor). The reason why the partner version is best is because there are actually no muscles that move the SI joint itself. Muscles surround the joint, and influence it, but none have the ability to move the joint itself.
Now, I’m not against the self-corrections, because sometimes they do work, but the partner-assisted versions I have found to be MUCH more efficient for correction.
The goal of these mobilizations is to move the pelvic bone into posterior tilt and down on the sacrum, which is the opposite motion as the subluxation in the picture above.
When performing SI joint mobilizations, be sure to do the correction on BOTH sides. This is a critical point. You MUST correct both.
How is the correction done? You won’t believe how simple the correction is to perform. When I first learned of this maneuver from Richard DonTigny’s work, I was floored at how fast one could get SI joint pain relief. It’s not uncommon for someone with pain at an 8 on a 10 scale to go down to a 2 or 3 within minutes. (Provided the pain was coming from the SI joint).
The primary goal of the correction, as stated above, is to essentially move the pelvic bone into posterior tilt. This can be done a number of ways, as indicated on Don Tigny’s website2, but here are the two I recommend:
2 Thelowback.com (Richard DonTigny’s website)

Learn More About Sam’s Protocols at: www.SamVisnic.com or www.Endyourbackpainnow.com/blog Copyright 2011. Sam Visnic. Page 6
The Self-Correction Exercise
The starting position involves the foot flat on the ground, about 6-8 inches from the glute. The goal is to push the thigh toward the foot until the glute comes up off the ground. In addition, an effort should be made to squeeze the glute on that side. The toughest part about this movement for most people is letting the NON-working side completely relax. This may take a bit of practice.
Perform the motion gently, and repeat for 5-8 reps, then switch sides. If someone is monitoring your leg length at the ankles (at the medial malleoli), they will notice that after each set, there will be a change in the length of the leg relative to the other.
If the movement produces no pain, each side can be done in an alternating fashion UNTIL NO FURTHER LEG LENGTH CHANGES OCCUR. This usually takes around 2-3 sets on each leg.
CAUTION: Personally, I feel that attempting to make a full correction on day 1 for some people is NOT a good idea. Depending on how long the dysfunction has been present, there are likely to be many compensation patterns that have occurred in your body, and a full correction may be akin to, for example, having flat feet for years and suddenly getting a new pair of orthotic shoe inserts with a FULL correction on day 1. In case you don’t know what I mean by this, doing this may create all sorts of aches and pains far from the SI joint. I feel that it is far better off starting with a small amount of correction at first to test, then increasing aggressiveness pending the results. (Most back pain sufferers have no problem, but JUST in case…)

Learn More About Sam’s Protocols at: www.SamVisnic.com or www.Endyourbackpainnow.com/blog Copyright 2011. Sam Visnic. Page 7
The Partner-Assisted Correction Mobilization
This movement is performed best by lying on the floor, while the partner holds the leg at a 45-degree angle just above the ankle. Then, GENTLY, the partner shifts their weight to the back leg while pulling the leg JUST enough for the glute to lift from the ground. Then, the movement is reversed, UNDER CONTROL. This process is repeated as in the self-correction. NOTE: There should be absolutely ZERO pain during this movement, and it is SUPER gentle.
When to apply the SI joint corrections: These can be done every 1-2 hours throughout the day. Always do them BEFORE your corrective stretching and exercise program, then again AFTER.
Stretches For SI Joint Stability All corrective approaches need to start with removing restriction from normal movement. Stretching muscles serves to restore normal range of motion, as well as reducing tension in “facilitated” (overactive) muscles. To some degree, all muscles around the lumbar-pelvic-hip region can influence SI joint function in some way, but the key areas to address are included below:
External Hip Rotators

Learn More About Sam’s Protocols at: www.SamVisnic.com or www.Endyourbackpainnow.com/blog Copyright 2011. Sam Visnic. Page 8
This stretch, called the 90/90 stretch3, is fantastic for addressing the glutes and deep hip rotators. You will get the stretch on the front leg, by the way, and be careful not to go too hard with it too soon. A sign that this is happening is when you feel numbness or tingling in your foot as you hold the stretch, which can be from the piriformis muscle strangling the sciatic nerve. If you feel this, back off the stretch. Additionally, many people find it hard to even get INTO this position. That is a strong sign these muscles need to be stretched.
Commonly, you will see this stretch performed in yoga classes, etc. with the lower back rounded and essentially laying on top of the thigh. I do NOT advise this. In fact, this is commonly done due to lack of understanding that the pelvis is the key to stretching the hip rotators. Performing an ANTERIOR pelvic tilt will increase the stretch. Doing the stretch in this way conditions you to learn proper pelvic control, to tip from the hips instead of the lumbar spine, and avoids aggravating any potential disc issues that may be present.
Adductors (Groin)
I know you have likely seen a ton of sites recommending groin stretches of all sort, however, I don’t tend to spend a lot of time on these muscles. In fact, I find them to be more of the result of dysfunction in the SI joints or weakness in the lateral hips, rather than a primary cause. Additionally, as soon as the pain is reduced and squats can be introduced into the program, I prefer to use a wide stance squat to stretch them while strengthening them. However, since there are SOME people that need to stretch them right away to get relief, I’ve included them in this program.
There are a few different versions of adductor stretches. The one shown in the picture above stretches them with the hips flexed, and technically is the easiest to learn. The other version involves standing or on a therapy table with the hips straight, which will focus on a different area of the adductors. Due to technical reasons for attempting to explain this stretch, I won’t include it here, but will on additional information on my website.
3 How To Eat, Move and Be Healthy. Chek, Paul. Pg.93. CHEK Institute. 2004.

Learn More About Sam’s Protocols at: www.SamVisnic.com or www.Endyourbackpainnow.com/blog Copyright 2011. Sam Visnic. Page 9
Hip Flexors
The kneeling hip flexor stretch is arguably the most important stretch for the low back pain sufferer. I have seen more people get relief from this simple stretch than almost anything else. This is due to the immense influence the rectus femoris (quad muscle) and psoas has on pelvic tilt. When these two muscles harbor excess tension relative to the glutes, hamstrings, and abdominals, excessive anterior pelvic tilt is the result. When this occurs, back pain is sure to follow. The key to this stretch is CONTROLLING pelvic tilt. Allowing the pelvis to tilt anteriorly during this stretch renders it near useless, unless your hip flexors are SO tight you can’t help to get a strong stretch even if its done wrong. When instructing this one, I always teach to perform it with a posterior pelvic tilt and squeezing the glutes to maintain the position of the pelvis as you shift forward into the stretch.
Foam Roll Glutes and Iliotibial (IT) Bands
The IT band is not a muscle, but instead a super thick band of tissue that runs down the lateral part of the leg to the knee. The primary concern is that a big chunk of this band connects to the glutes at the top. Excess tension in the IT bands + gluteals will cause the legs to abduct along with the external rotation that occurs from dominance in the hip rotators. (Very commonly seen in powerlifters who use a Sumo-Stance for lifts).
I find stretches for the IT band to be near useless, as they tend to hit mostly the lateral glute fibers, and can agitate knee pain if overdone. Using a foam roller to self-massage these muscles does the trick.

Learn More About Sam’s Protocols at: www.SamVisnic.com or www.Endyourbackpainnow.com/blog Copyright 2011. Sam Visnic. Page 10
These muscles are frequently very tender, and usually require a number of sessions to make decent progress.
Exercises For SI Joint Stability Stabilization of the SI joints comes from the muscles that surround them. There are approximately 29 muscles in the lumbar-pelvic-hip complex. Each of these muscles performs an important role in stability of joints, as well as movement. When imbalances in these muscles are present, or deconditioning from lack of exercise, increased injury potential and pain are frequently the result.
The exercises that I recommend for SI joint stability are the same that you would find in the programs that I recommend for the correction of excessive anterior pelvic tilt. Once the correction of the S3 subluxation is made, the following muscles must be strengthened.
NOTE: These are not full descriptions regarding these movements, but instead a brief synopsis. For more information and instruction, refer to my DVD program, End Your Back Pain Now!, or additionally, consult with your qualified therapist or functional movement practitioner.
Abdominal Wall The function of the abdominals is to flex the spine, but also to create posterior tilt of the pelvis. It is important to separate these two functions when assigning exercises. I include both, but I always start with the pelvic tilting function first. My primary “go-to” tool is the Chattanooga Stabilizer Biofeedback Pressure Unit. This tool keeps you honest about how well your abdominal muscles are functioning when performing pelvic tilting exercises. While a full outline of how to use this device, along with a full description of the corrective exercise/stretching protocol is beyond the scope of this report, I will introduce you to a few of the top exercises. (You can find videos/dvds of these on my website: www.youtube.com/Holisticsam)
Lower Abdominal Leg Slide (without Stabilizer)
The goal of this exercise is to learn how to appropriately stabilize your spine with your abdominals while moving your legs. This version, called the Lower Abdominal Leg Slide, is a great place to begin. Start by tilting your pelvis posterior (this movement will flatten your lumbar spine toward the floor). The space between your lumbar spine and the floor should be just enough for you to slide your hand between. This position is held, while one leg is slid outward away from the body until it is almost straight, then

Learn More About Sam’s Protocols at: www.SamVisnic.com or www.Endyourbackpainnow.com/blog Copyright 2011. Sam Visnic. Page 11
returned back to the starting position, while the spine does NOT move. Monitoring the amount of spinal movement can be challenging, which is why the Stabilizer is a perfect tool for the job.
Prone Isometric Plank + Side Planking
The prone plank is a progressed abdominal exercise that is used once control of pelvic tilt is learned. This exercise is performed for static holds of 10 seconds to 30 seconds for multiple reps, depending on strength level. The rest between reps is taken with the knees bent and resting on the ground.
Side planks are helpful as well, as they shift the focus on the obliques and quadratus lumborum, which is a frequent location of trigger points.
Glutes and Hamstrings The glutes and hamstrings also contribute to posterior pelvic tilt, and additionally, are powerful extensors of the hip. Frequently they suffer from deconditioning. It seems everyone in the gym these days has forgotten the importance of exercises such as squats, lunges and deadlifts, which are the key exercises for strengthening these muscles. Not only must these muscle groups be strengthened moving forward (as in a front lunge), but the side-stepping function can’t be ignored. Lateral movements are encouraged to develop good movement control and stability in those motions. That said, the starting point can be as simple as straight-on hip extensions.
Supine Hip Extension

Learn More About Sam’s Protocols at: www.SamVisnic.com or www.Endyourbackpainnow.com/blog Copyright 2011. Sam Visnic. Page 12
The hip extension is a great fundamental exercise for strengthening the glutes. However, like other initial movements, it must be progressed in order to increase the resistance applied to the muscles to force them to develop strength. This exercise may be performed on the floor or with your back on a swiss ball. The focus is to use the glutes to perform the movement, and avoid extending into the lower back at the top of the movement. Be sure to perform the Kneeling Hip Flexor stretch above prior to doing this movement. A tight psoas and/or rectus femoris will limit your ability to achieve the full hip extension position at the top of the range of motion, and is frequently the reason why this exercise is felt in the lumbar spine for some.
Romanian Deadlift (Hip Hinging)
This movement is commonly overlooked in many therapeutic programs. In addition, it is challenging for some to learn, but is a cornerstone to further progress in a therapeutic movement program. As you can see from the picture, the goal is to bend from the hips, while maintaining the lumbar spine curve. In addition, the knees must be slightly unlocked. This drill will strengthen the entire posterior chain, while teaching the lumbar muscles, glutes, and hamstrings to work as a unit. Lastly, it is the most preferable way to restore normal hamstring length, which are commonly “tight” simply because they are overworked, while the glutes are underworked.

Learn More About Sam’s Protocols at: www.SamVisnic.com or www.Endyourbackpainnow.com/blog Copyright 2011. Sam Visnic. Page 13
Putting It All Together This PDF is not designed to be a stand-alone program, but instead a guide to assist with helping you understand the direction a therapeutic exercise approach to sacroiliac joint should take. This may assist you, your PT, medical doctor, or chiropractor with some potential options on how to support your process for restoring health and function.
For further resources on how to perform the exercises, stretches and more from this document, be sure to visit my website to learn more about my DVD set, or consultations. http://www.Endyourbackpainnow.com, or http://www.SamVisnic.com.
As always, I am open to your feedback and appreciate knowing about your successes with this program. I would love to hear from you, so send me an email letting me know how this program has helped you, or if you have questions you would like me to answer via my blog. Sincerely, Sam Visnic Neuromuscular Therapist [email protected]