30 40 - official site of the a11 offense · this offensive package is a perfect compliment to the...
TRANSCRIPT
241
play cards
playbook
30
30
40
40
50
50
40
40
30
30
142
241 PLAY PACKAGE
conforms to numbering requirements at every level of football
A11 OFFENSE

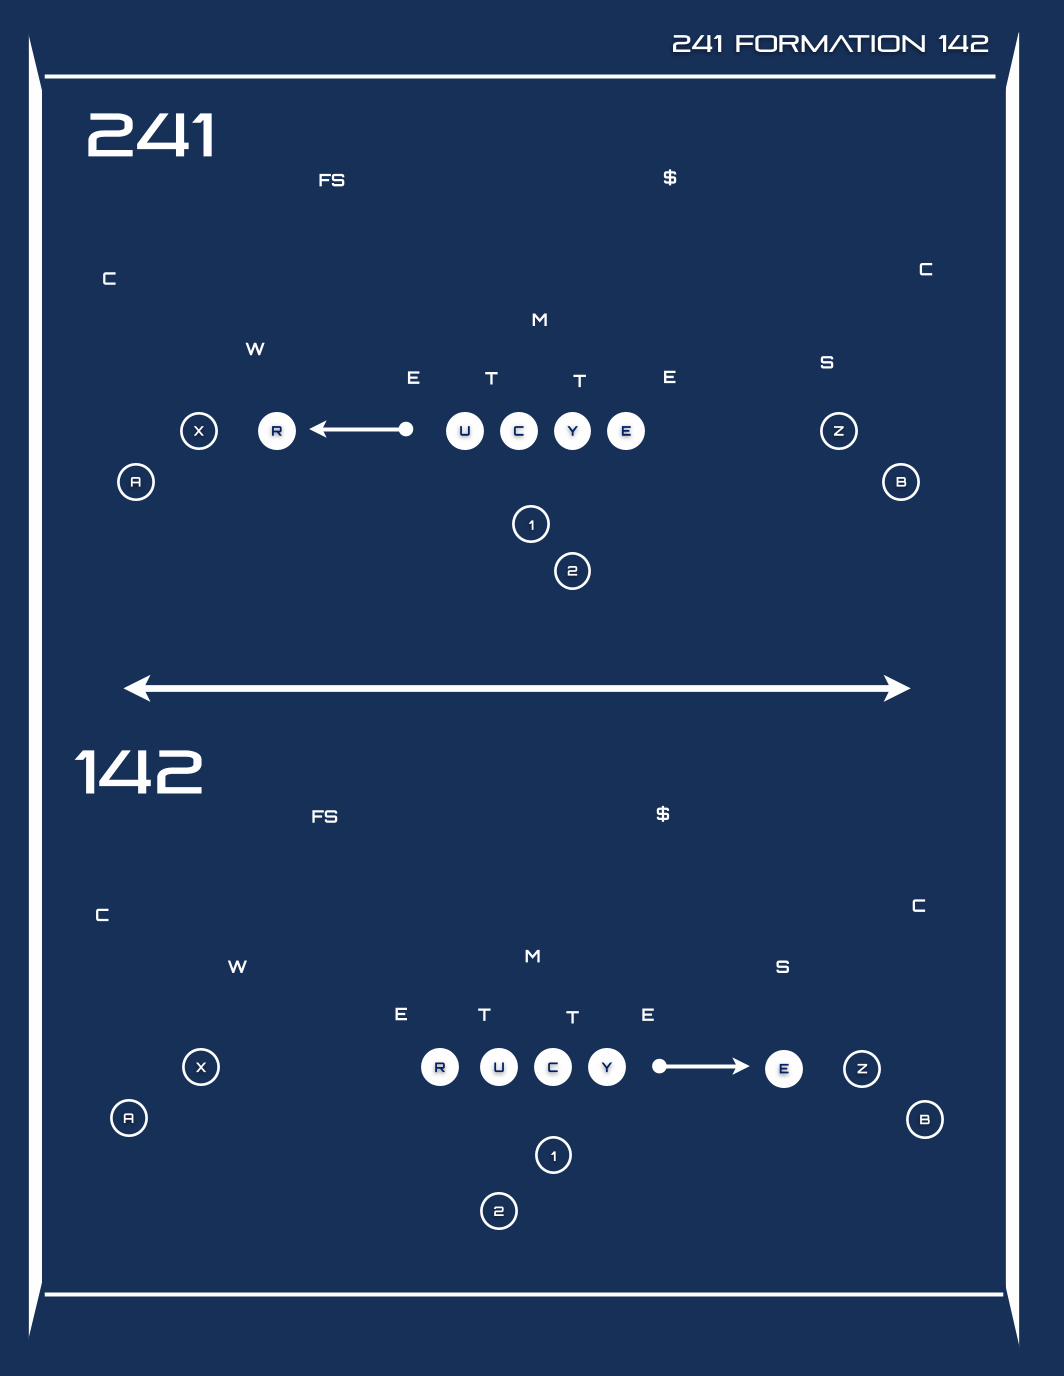
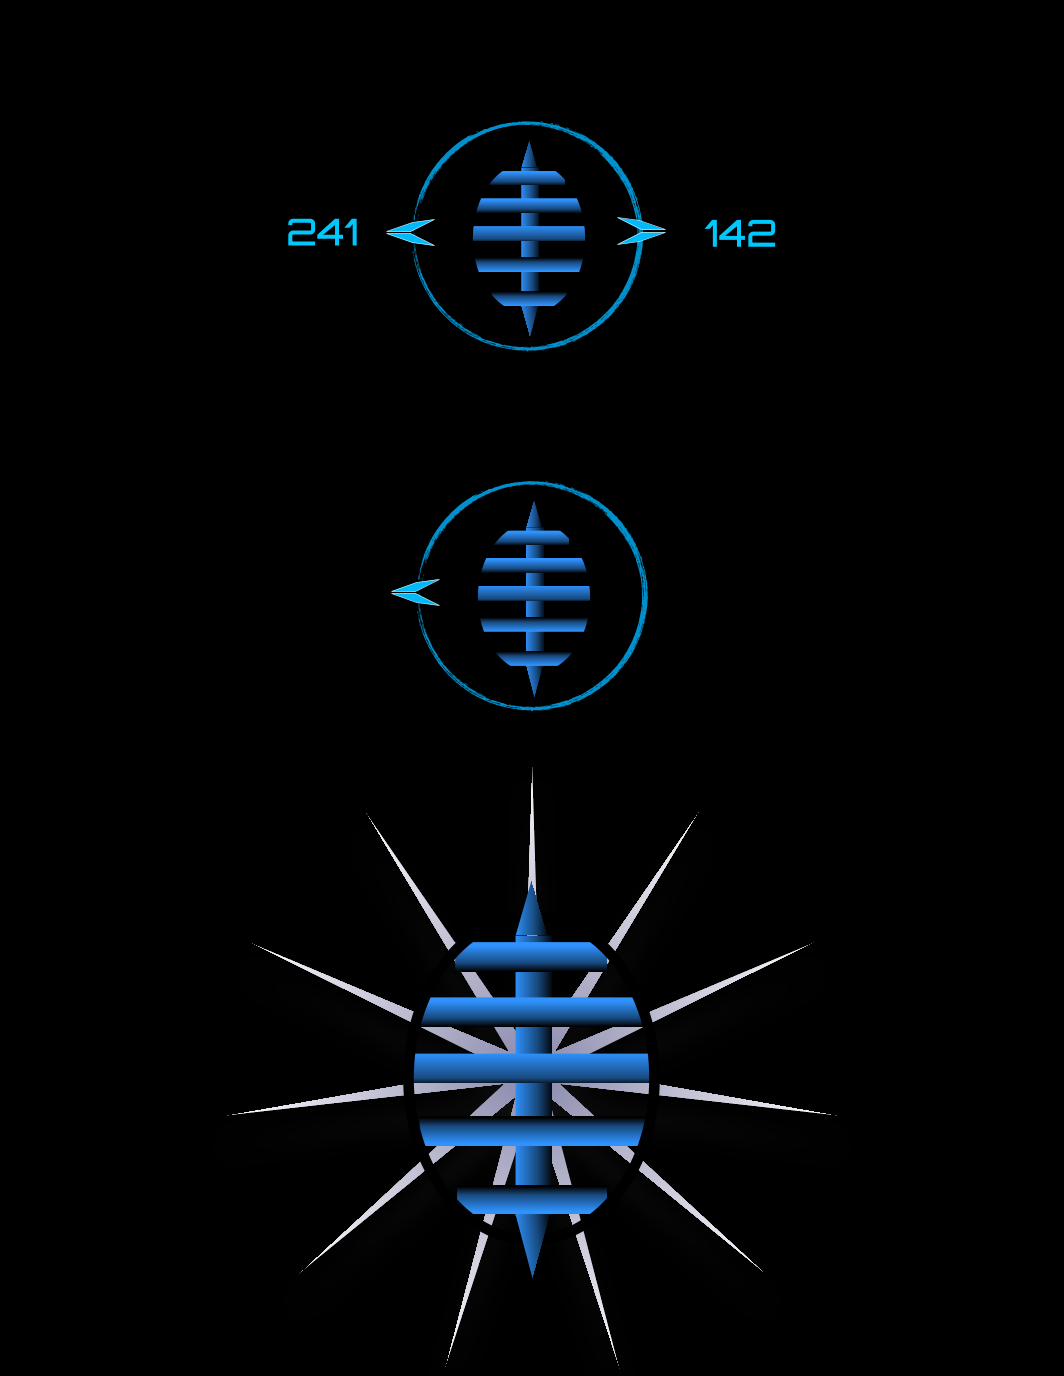
241 FORMATION 142
Introducing the latest formation package from the A11 Offense which presents defenses with a difficult unbalanced core box and versatile edges that can quickly morph into a 2x2 and 1x3 passing game.
This offensive package is a perfect compliment to the popular spread offense, giving your team a contrarian formation advantage while remaining true to your core play concepts.
The 241 will give opposing defensive coordinators nightmares with the overload advantages presented by quick shifts and motions. Flipping plays creates the opposite 142 formation for maximum advantage.
© COPYRIGHT 2013 A11 OFFENSE. ALL RIGHTS RESERVED.
X
A
R C
B
ZU Y
1
E
2
E ET T
M
FS $
CC
WS
X
A
R C
B
ZU Y
1
E
2
E ET T
M
FS $
CC
W S
142
241
241 FORMATION 142
3 WWW.FACEBOOK.COM / A11OFFENSE
241 PA
CKA
GE
INTRO
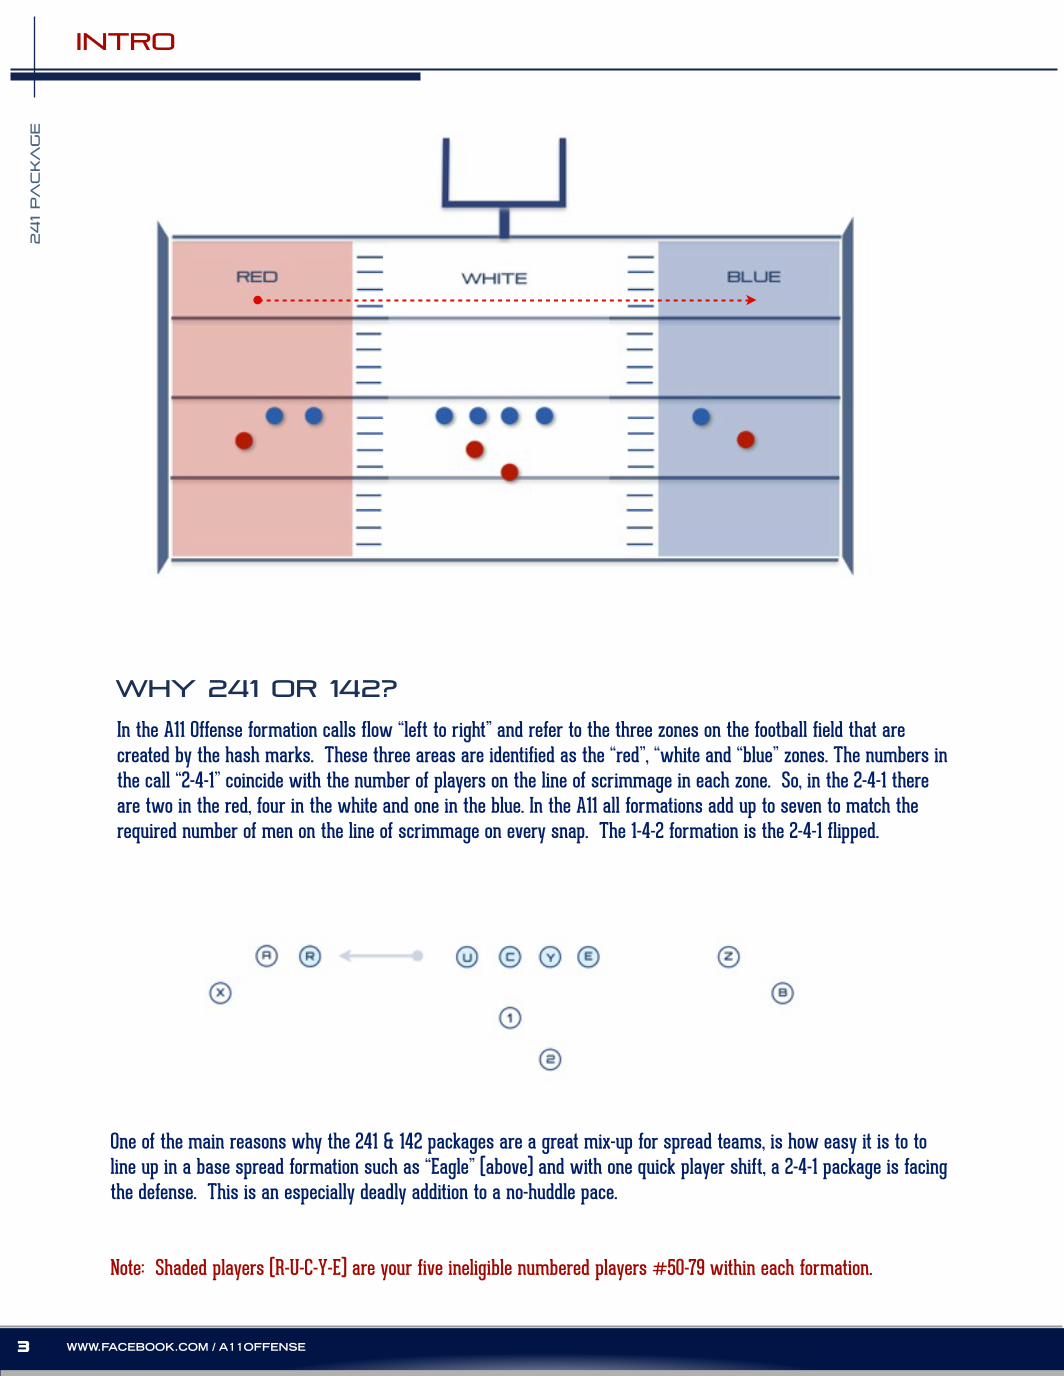
why 241 or 142?
In the A11 Offense formation calls flow “left to right” and refer to the three zones on the football field that are created by the hash marks. These three areas are identified as the “red”, “white and “blue” zones. The numbers in the call “2-4-1” coincide with the number of players on the line of scrimmage in each zone. So, in the 2-4-1 there are two in the red, four in the white and one in the blue. In the A11 all formations add up to seven to match the required number of men on the line of scrimmage on every snap. The 1-4-2 formation is the 2-4-1 flipped.
One of the main reasons why the 241 & 142 packages are a great mix-up for spread teams, is how easy it is to to line up in a base spread formation such as “Eagle” (above) and with one quick player shift, a 2-4-1 package is facing the defense. This is an especially deadly addition to a no-huddle pace.
Note: Shaded players (R-U-C-Y-E) are your five ineligible numbered players #50-79 within each formation.
241 P
ACKA
GE
4WWW.A11OFFENSE.COM
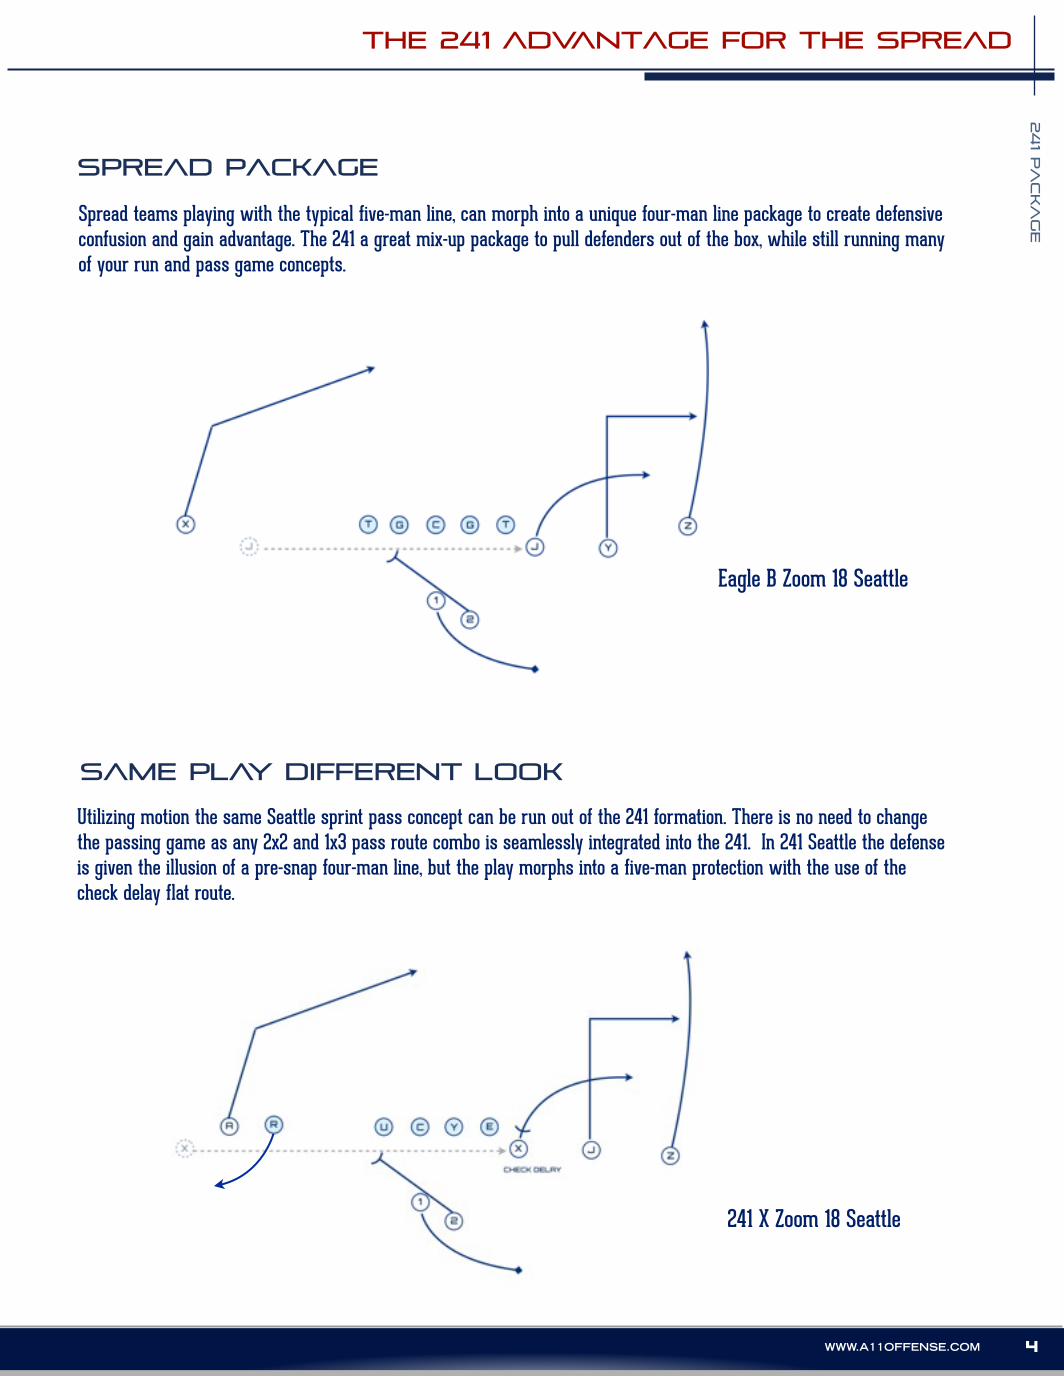
the 241 advantage for the spread
Spread teams playing with the typical five-man line, can morph into a unique four-man line package to create defensive confusion and gain advantage. The 241 a great mix-up package to pull defenders out of the box, while still running many of your run and pass game concepts.
spread package
same play different look
Utilizing motion the same Seattle sprint pass concept can be run out of the 241 formation. There is no need to change the passing game as any 2x2 and 1x3 pass route combo is seamlessly integrated into the 241. In 241 Seattle the defense is given the illusion of a pre-snap four-man line, but the play morphs into a five-man protection with the use of the check delay flat route.
241 X Zoom 18 Seattle
Eagle B Zoom 18 Seattle

5 WWW.FACEBOOK.COM / A11OFFENSE
241 PA
CKA
GE
LINE & QB TIPS
Teams can create blocking and protection advantages with the unbalanced line, especially in hurry up mode because defensive linemen tend to put their hand on the ground as fast as possible to get into position. In the A11 interior players always approach the line of scrimmage and say 1 yard off, until they step on to the line of scrimmage at the right point in the cadence. This gives offensive linemen a great advantage of being able to step on the line of scrimmage at any angle to create advantage.
In diagram (A) below, the line can approach with the U acting as the center. As the pod steps on, they step at a 45 degree angle and now the C is over the ball creating a possible unbalanced advantage. This “step on” concept is also used to adjust splits for maximum leverage advantage on any play (B).
LINE PLAY
X
RA U C Y E Z
B1
2
1
QUARTERBACK PLAY
Quarterback shifting can wreak havoc on defenses and disrupt tendencies, especially since most defenses expect the quarterback behind the center in shotgun to receive the snap. In the A11, the off-set quarterback can also shift to an under center position, even while the #2 is calling the cadence. This is a great way to “spring” quick screens and fast hitting veer/midline run concepts on the defense. The angle of being under center is also best for backwards passes to get uncovered R & E players involved on the edge. These “ineligible by formation” players may legally receive a backwards pass by rule.
R U C Y
E ET T
M
R U C Y
R U C Y
E T T
M
R U C
BA
E
Y
241 142

7 WWW.FACEBOOK.COM / A11OFFENSE
241 PA
CKA
GE
241 WIDE (x) zoom quick screen left
assignments
X
RA U C Y E Z
B1
2
E ET T
M
FS$
CC
WS
X - ZOOM MOTION, 3 YD FLAT ROUTE
A - BLOCK CORNER, WALL INSIDE
R - NEGATIVE HITCH, CATCH & RUN UP SIDELINE. good backward pass target
u - FIRE OUT INTO WAIST OF (E)
c - SCOOP
y - MAN BLOCK
E - MAN BLOCK
b - 5 YARD SLANT
z - 3 YARD SLANT
1 - START IN SHOTGUN, JUMP UNDER CENTER, QUICK SCREEN LEFT TO (R)
2 - SWING ROUTE RIGHT
11

241 P
ACKA
GE
8WWW.A11OFFENSE.COM
assignments
X - block corner
A - work with (R) to identify block. if WLB inside (R) work to next level
R - work with (A) to identify block. if WLB inside shade wall off
u - SCOOP
c - SCOOP
y - man
E - man
b - zoom motion, pivot behind (a) and face qb, read (x) block on Corner
z - 5 step slant look for backside safety
1 - catch and quick throw to (B), z slant 2nd read
2 - back side pass pro, first threat
241 WIDE (B) zoom Spot pass left
X
RA U C Y E Z
B
1
2
E ET T
M
FS$
CC
WS
1
B
2
9 WWW.FACEBOOK.COM / A11OFFENSE
241 PA
CKA
GE
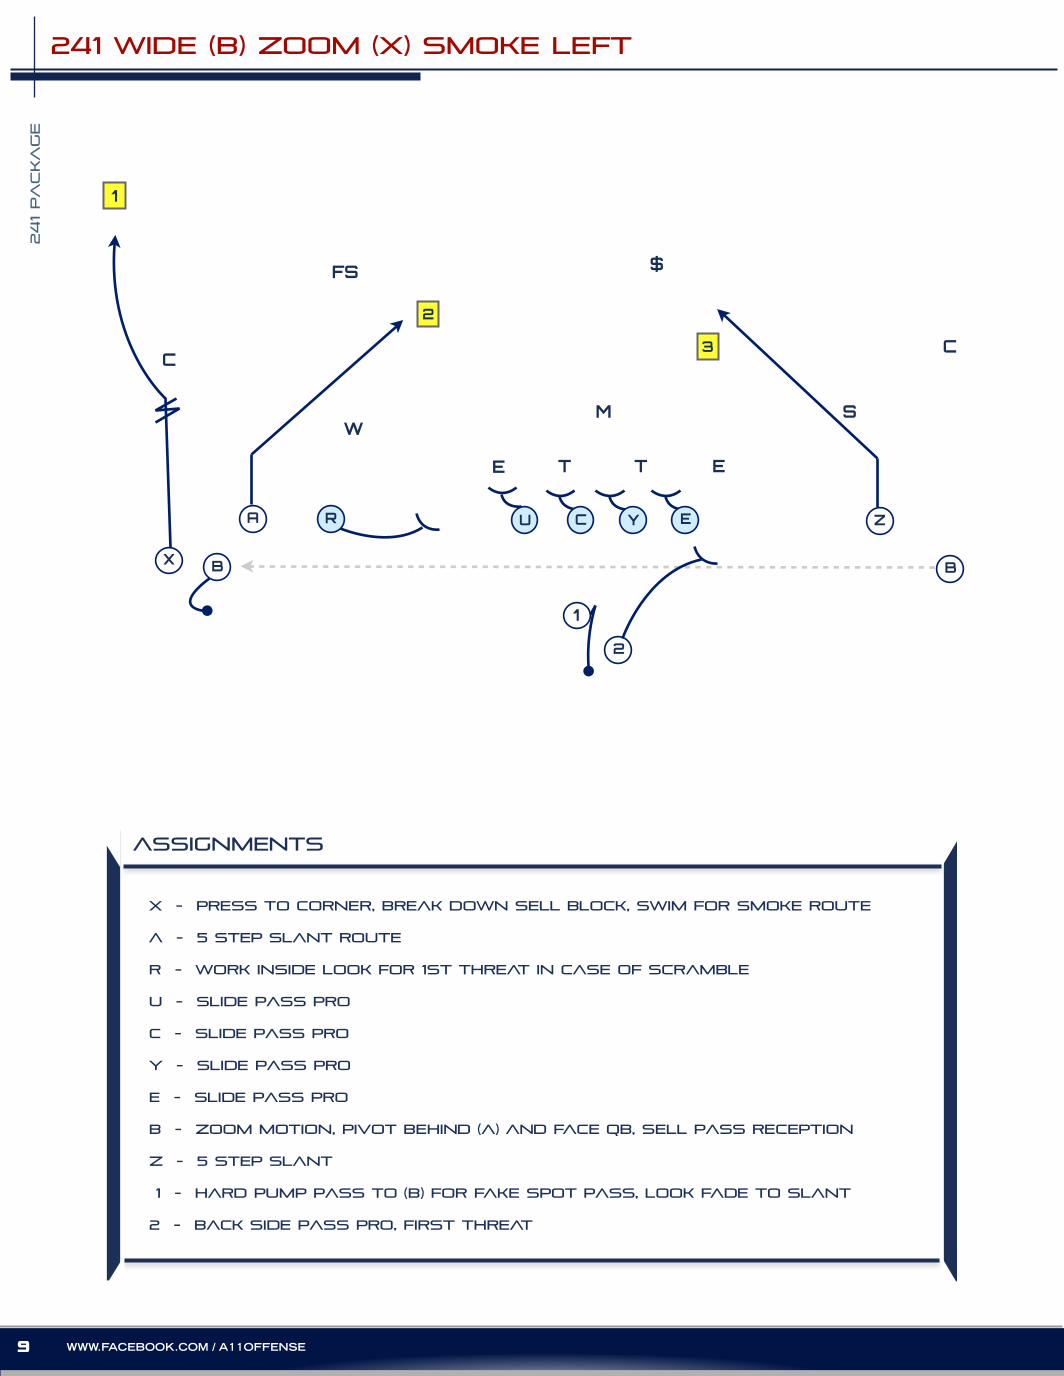
241 WIDE (b) zoom (x) smoke left
assignments
X - press to corner, break down sell block, swim for smoke route
A - 5 step slant route
R - work inside look for 1st threat in case of scramble
u - Slide pass pro
c - Slide pass pro
y - Slide pass pro
E - Slide pass pro
b - zoom motion, pivot behind (a) and face qb, sell pass reception
z - 5 step slant
1 - hard pump pass to (b) for fake spot pass, look fade to slant
2 - back side pass pro, first threat
X
RA U C Y E Z
B
1
2
E ET T
M
FS $
CC
WS
1
B
2
3
241 P
ACKA
GE
10WWW.A11OFFENSE.COM
assignments
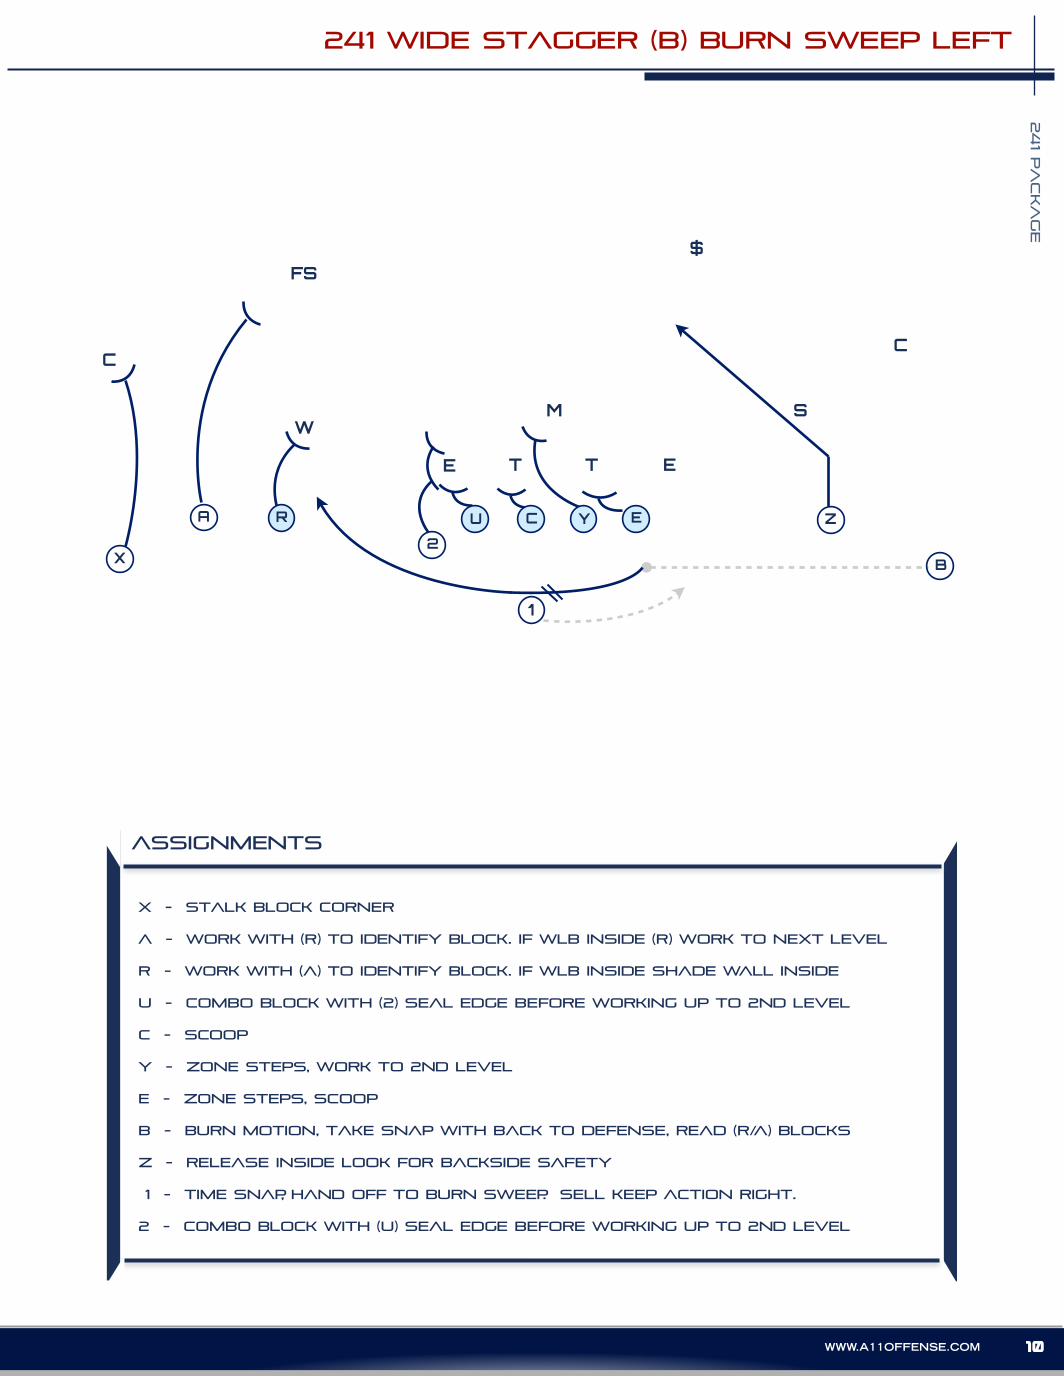
X - stalk block corner
A - work with (R) to identify block. if WLB inside (R) work to next level
R - work with (A) to identify block. if WLB inside shade wall inside
u - combo block with (2) seal edge before working up to 2nd level
c - SCOOP
y - zone steps, work to 2nd level
E - zone steps, scoop
b - burn motion, take snap with back to defense, read (r/a) blocks
z - release inside look for backside safety
1 - time snap, hand off to burn sweep. sell keep action right.
2 - combo block with (u) seal edge before working up to 2nd level
241 WIDE stagger (B) burn sweep left
X
RA U C Y E Z
1
2
E ET T
M
FS$
CC
WS
B
11 WWW.FACEBOOK.COM / A11OFFENSE
241 PA
CKA
GE
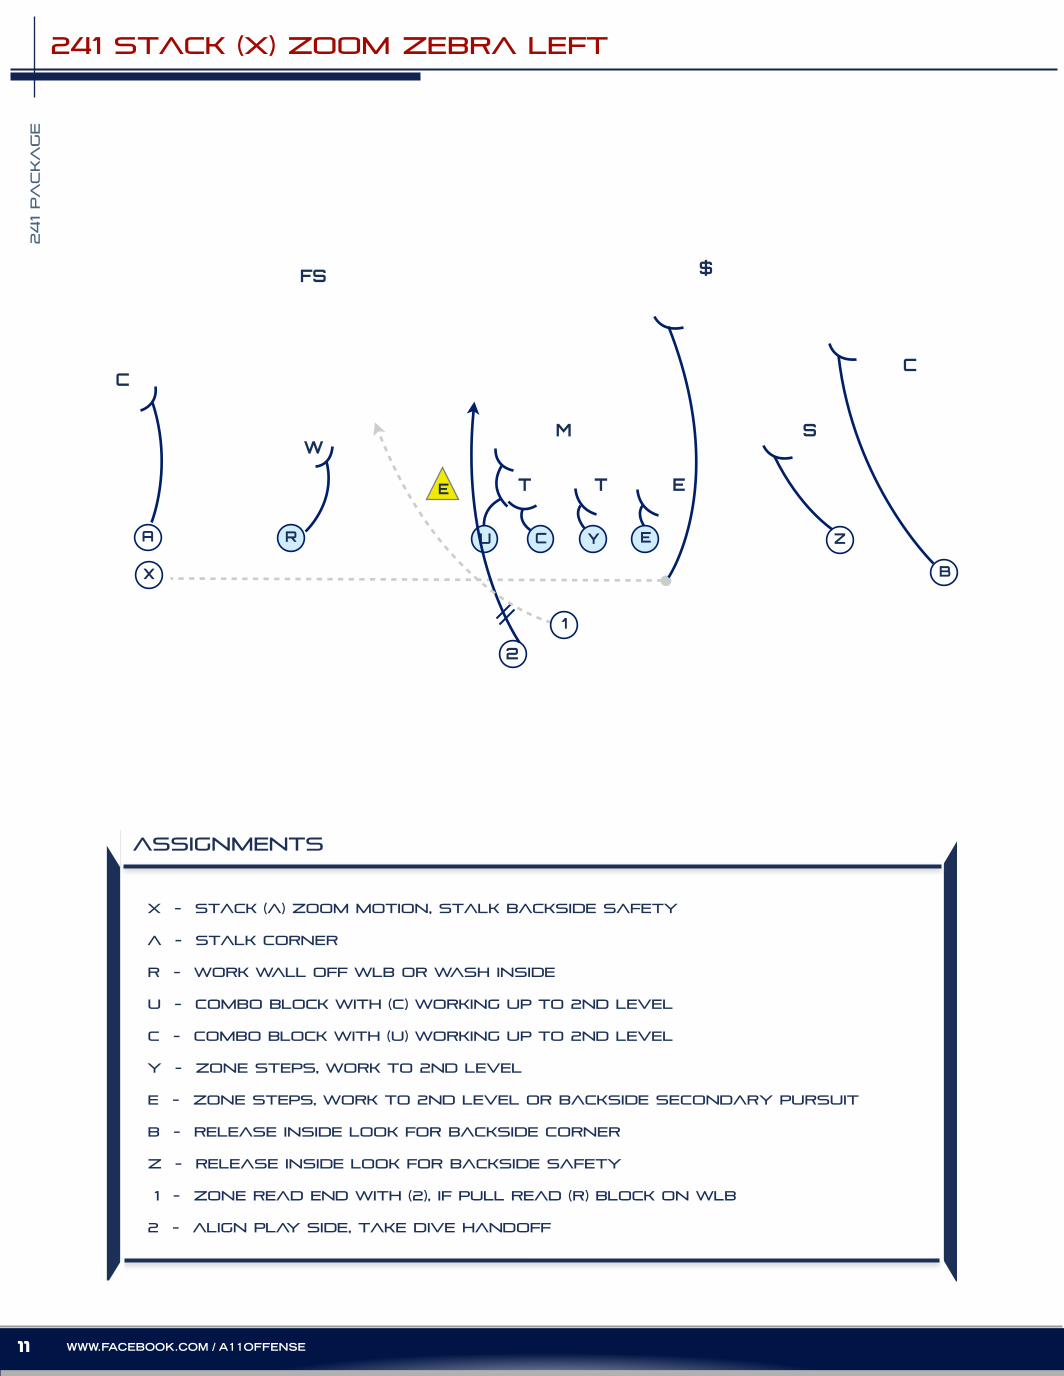
241 stack (x) zoom zebra left
assignments
X - stack (a) zoom motion, stalk backside safety
A - stalk corner
R - work wall off wlb or wash inside
u - combo block with (c) working up to 2nd level
c - combo block with (U) working up to 2nd level
y - zone steps, work to 2nd level
E - zone steps, work to 2nd level or backside secondary pursuit
b - release inside look for backside corner
z - release inside look for backside safety
1 - zone read end with (2), if pull read (r) block on WLB
2 - align play side, take dive handoff
X
RA U C Y E Z
2
ET T
M
FS $
CC
WS
B
E
1
241 P
ACKA
GE
12WWW.A11OFFENSE.COM
assignments
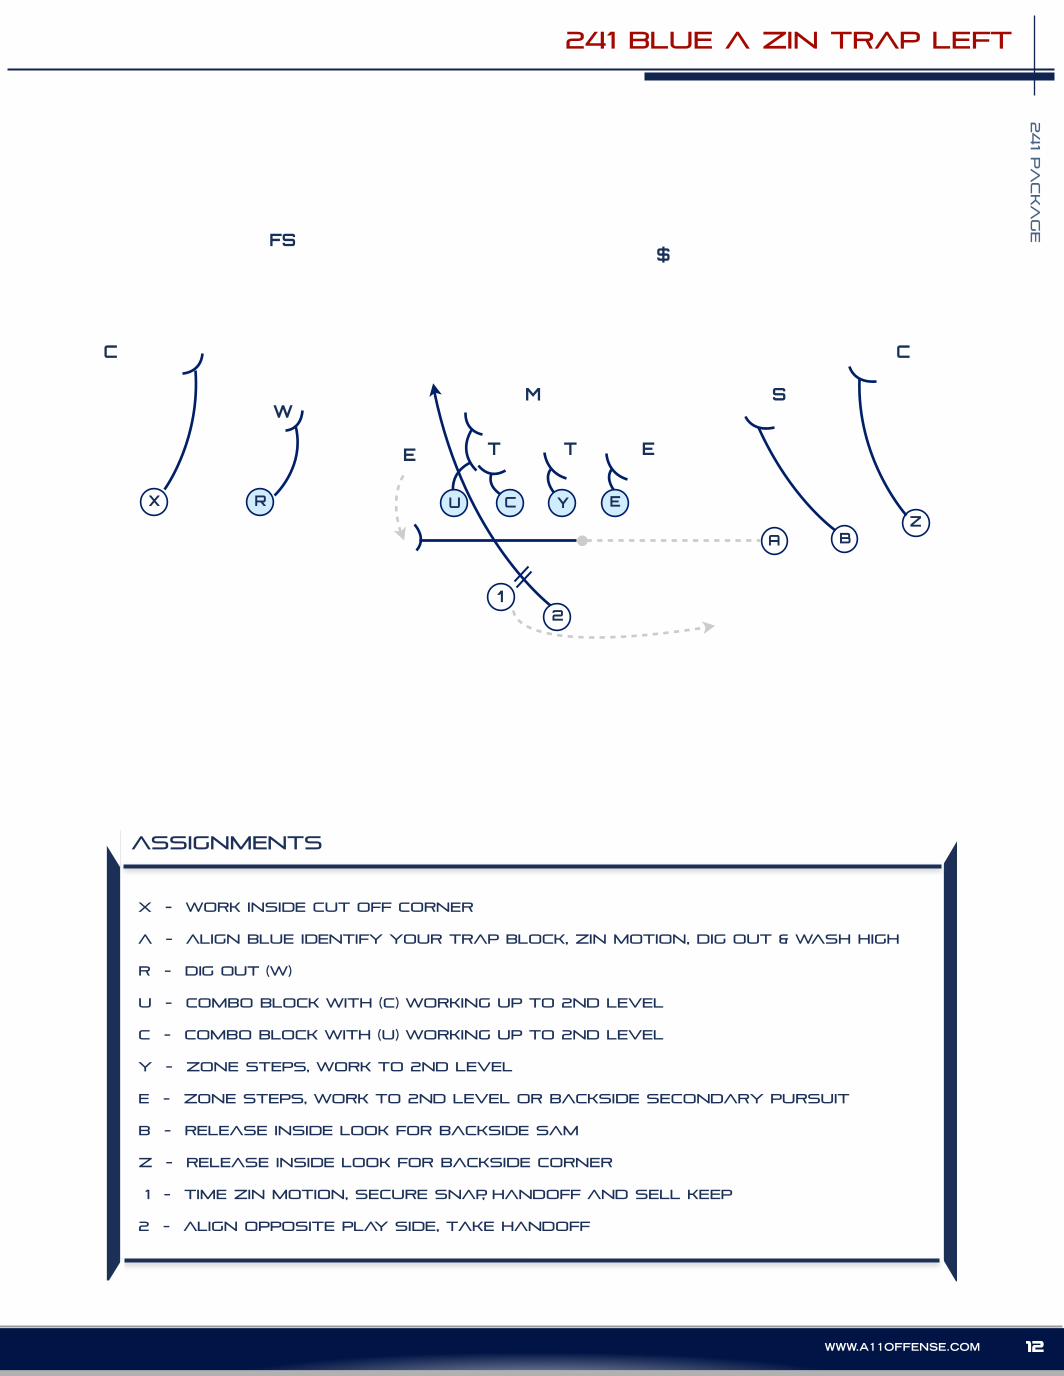
X - work inside cut off corner
A - align blue identify your trap block, zin motion, dig out & wash high
R - DIG OUT (W)
u - combo block with (c) working up to 2nd level
c - combo block with (U) working up to 2nd level
y - zone steps, work to 2nd level
E - zone steps, work to 2nd level or backside secondary pursuit
b - release inside look for backside sam
z - release inside look for backside corner
1 - time zin motion, secure snap, handoff and sell keep
2 - align opposite play side, take handoff
241 blue a zin trap left
X R
A
U C Y E
12
ET T
M
FS
C
WS
B
E
Z
$
C
13 WWW.FACEBOOK.COM / A11OFFENSE
241 PA
CKA
GE
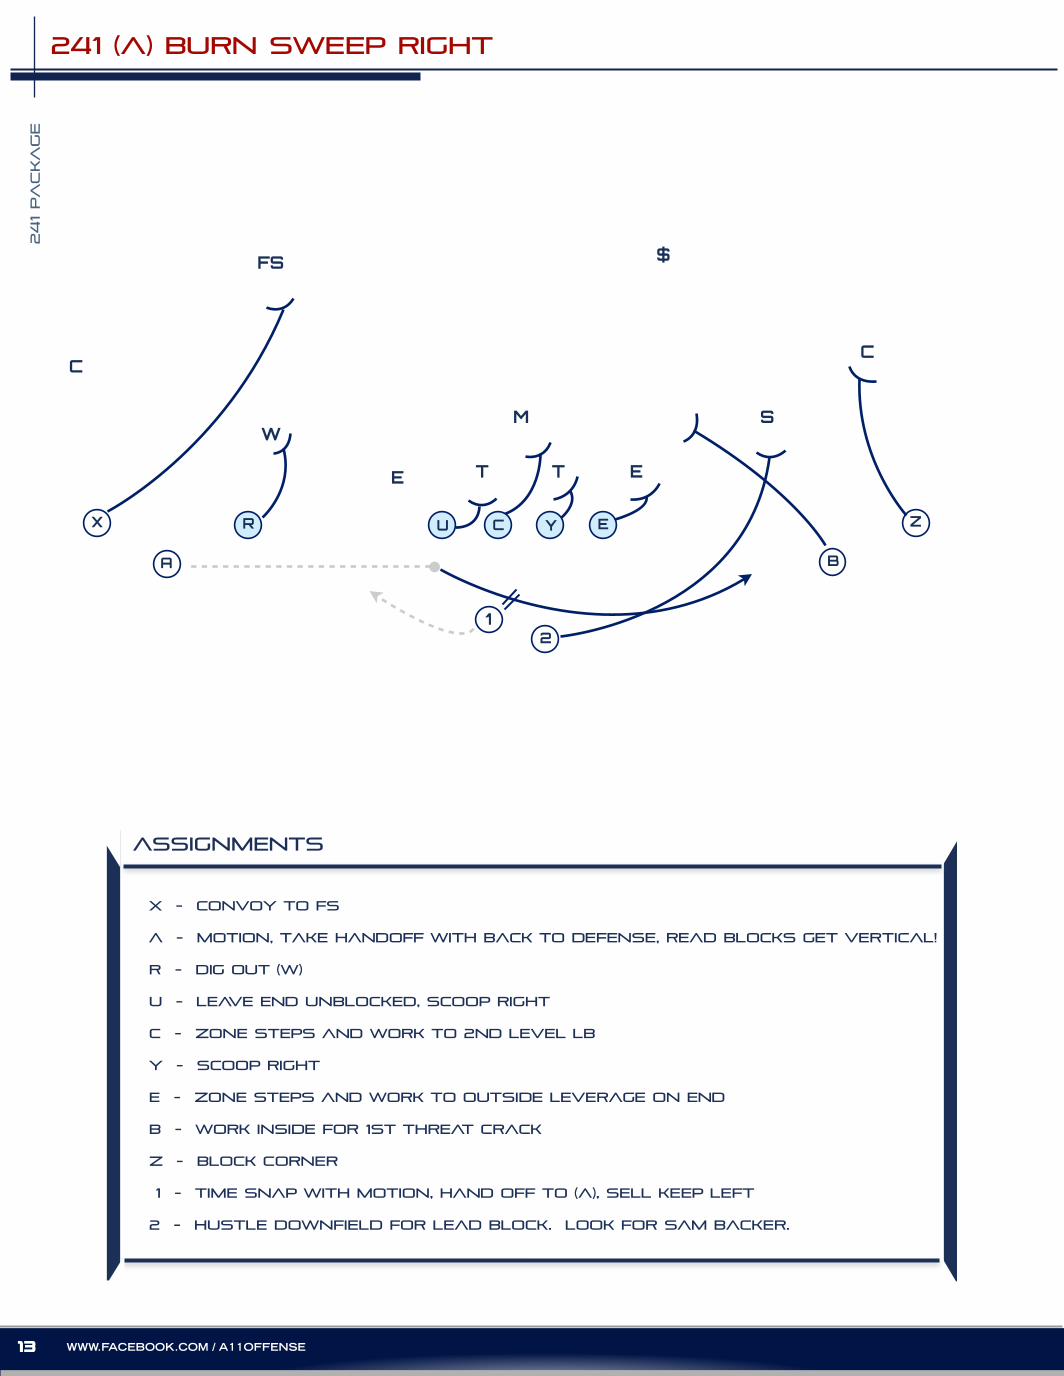
241 (A) burn sweep right
assignments
X - CONVOY to fs
A - motion, take handoff with back to defense, read blocks get vertical!
R - DIG OUT (W)
u - leave end unblocked, SCOOP right
c - zone steps and work to 2nd level LB
y - SCOOP right
E - zone steps and work to outside leverage on end
b - Work inside for 1st threat crack
z - block corner
1 - time snap with motion, hand off to (A), sell keep left
2 - hustle downfield for lead block. look for sam backer.
X R
A
U C Y E Z
12
ET T
M
FS $
CC
WS
B
E
241 P
ACKA
GE
14WWW.A11OFFENSE.COM
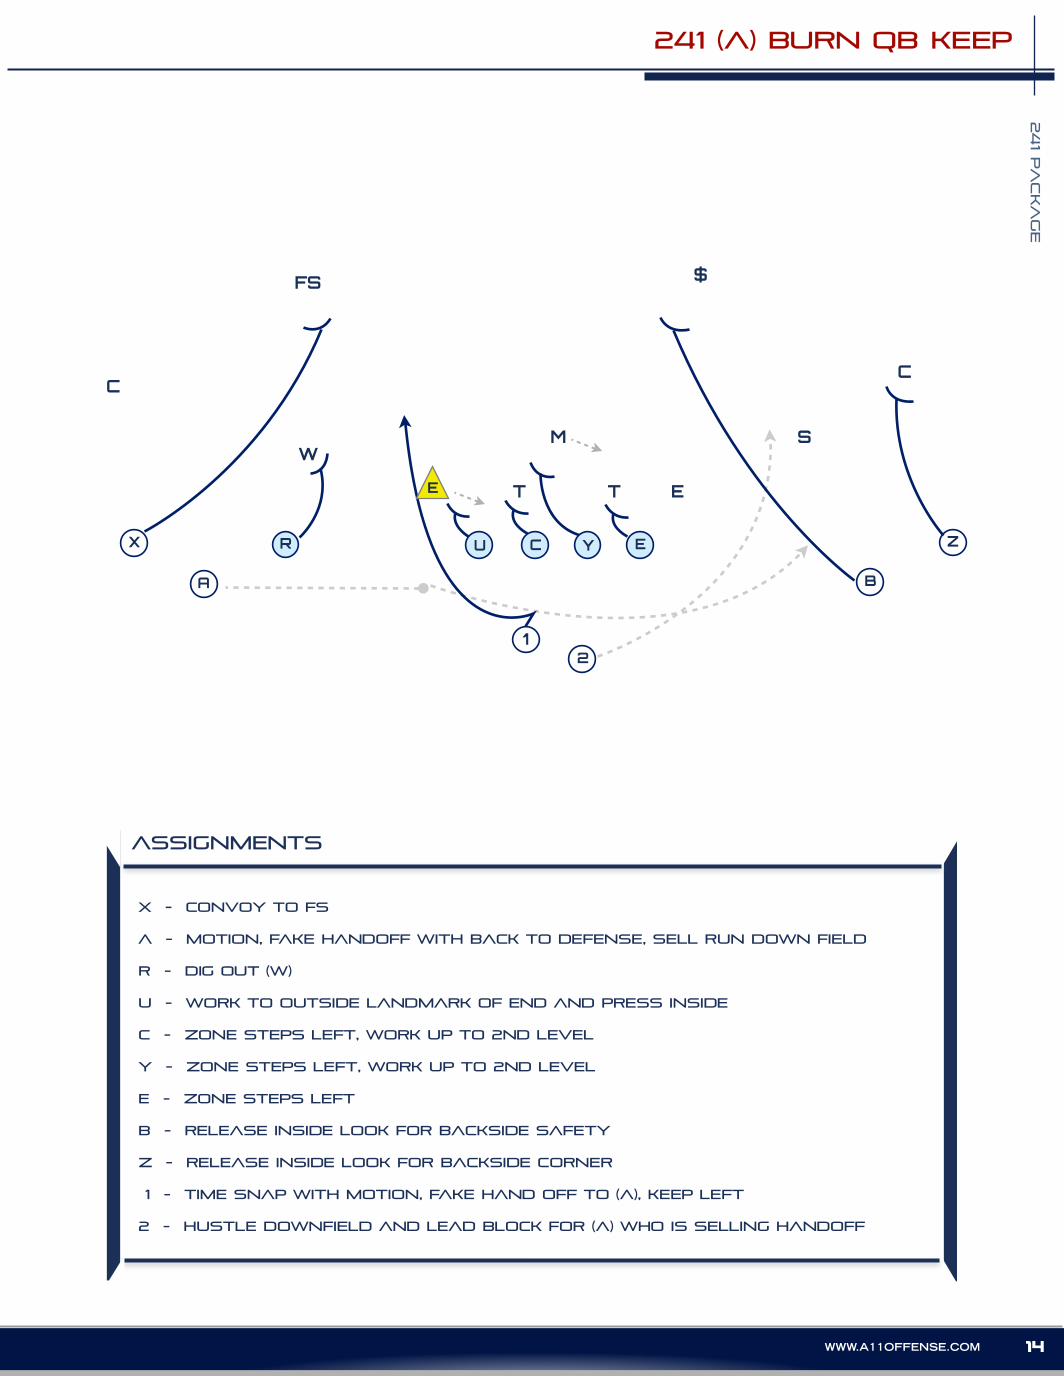
assignments
X - CONVOY to fs
A - motion, fake handoff with back to defense, sell run down field
R - DIG OUT (W)
u - work to outside landmark of end and press inside
c - zone steps left, work up to 2nd level
y - zone steps left, work up to 2nd level
E - zone steps left
b - release inside look for backside safety
z - release inside look for backside corner
1 - time snap with motion, fake hand off to (A), keep left
2 - hustle downfield and lead block for (A) who is selling handoff
241 (a) burn qb keep
X R
A
U C Y E Z
12
ET T
M
FS $
CC
WS
B
E
15 WWW.FACEBOOK.COM / A11OFFENSE
241 PA
CKA
GE
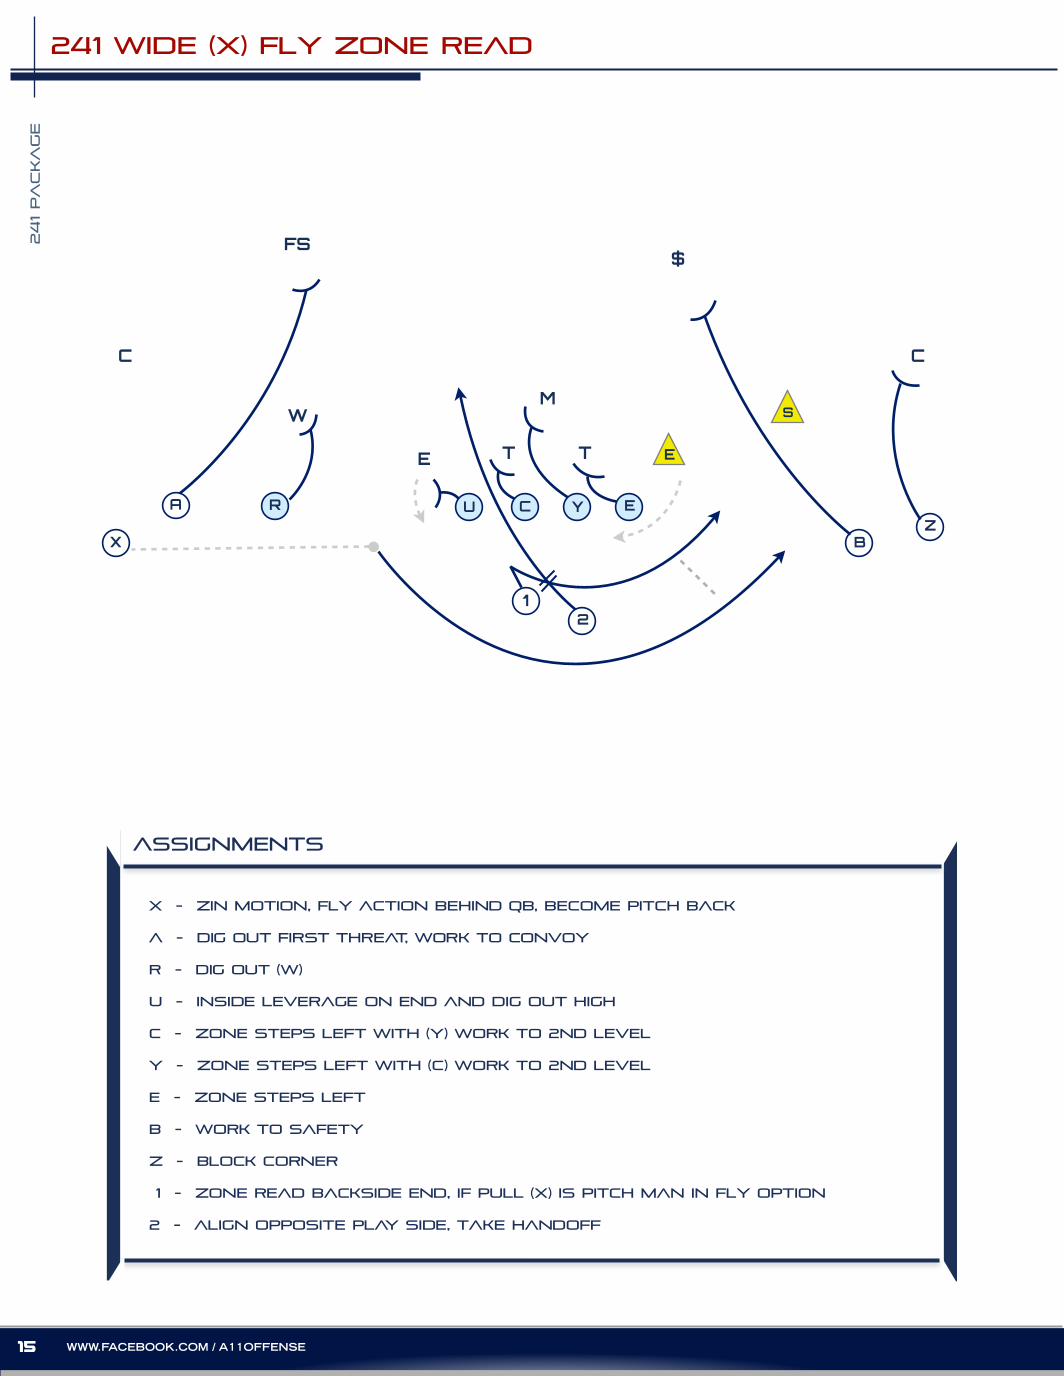
241 WIDE (X) FLY ZONE READ
assignments
X - zin motion, fly action behind qb, become pitch back
A - DIG OUT FIRST THREAT, WORK TO CONVOY
R - DIG OUT (W)
u - inside leverage on end and dig out high
c - zone steps left with (Y) work to 2nd level
y - zone steps left with (c) work to 2nd level
E - zone steps left
b - work to safety
z - block corner
1 - zone read backside end, if pull (X) is pitch man in fly option
2 - align opposite play side, take handoff
E
S
X
RA U C Y E
12
T T
M
FS
C
W
B
E
Z
$
C
241 P
ACKA
GE
16WWW.A11OFFENSE.COM
assignments
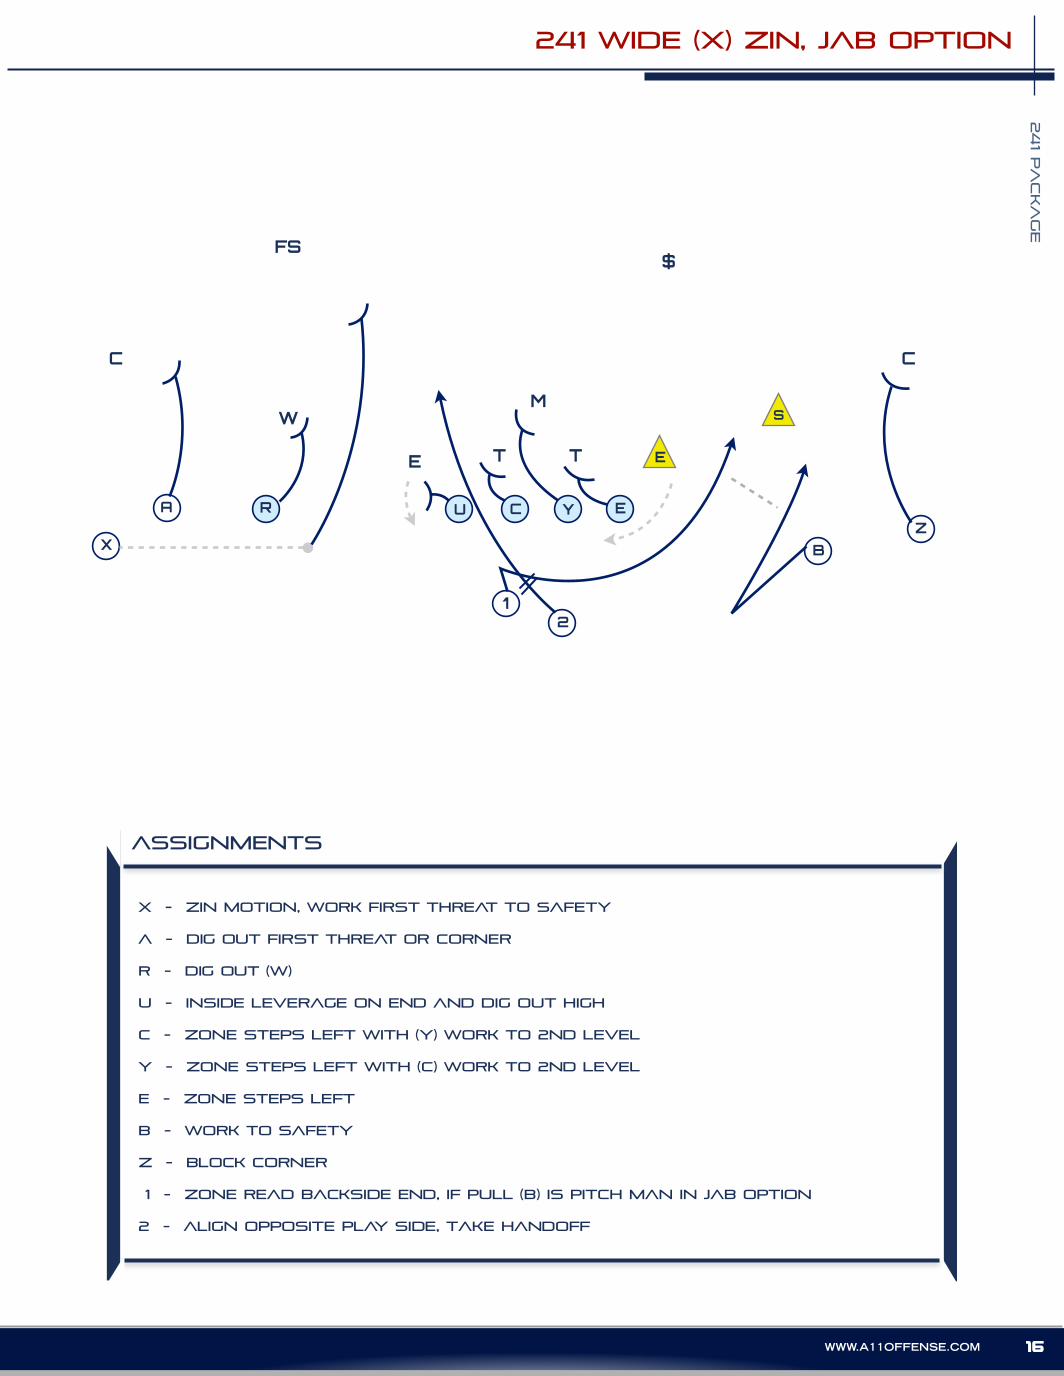
X - zin motion, work first threat to safety
A - DIG OUT FIRST THREAT or corner
R - DIG OUT (W)
u - inside leverage on end and dig out high
c - zone steps left with (Y) work to 2nd level
y - zone steps left with (c) work to 2nd level
E - zone steps left
b - work to safety
z - block corner
1 - zone read backside end, if pull (b) is pitch man in jab option
2 - align opposite play side, take handoff
241 WIDE (X) ZIN, JAB OPTION
E
S
X
RA U C Y E
12
T T
M
FS
C
W
B
E
Z
$
C
17 WWW.FACEBOOK.COM / A11OFFENSE
241 PA
CKA
GE
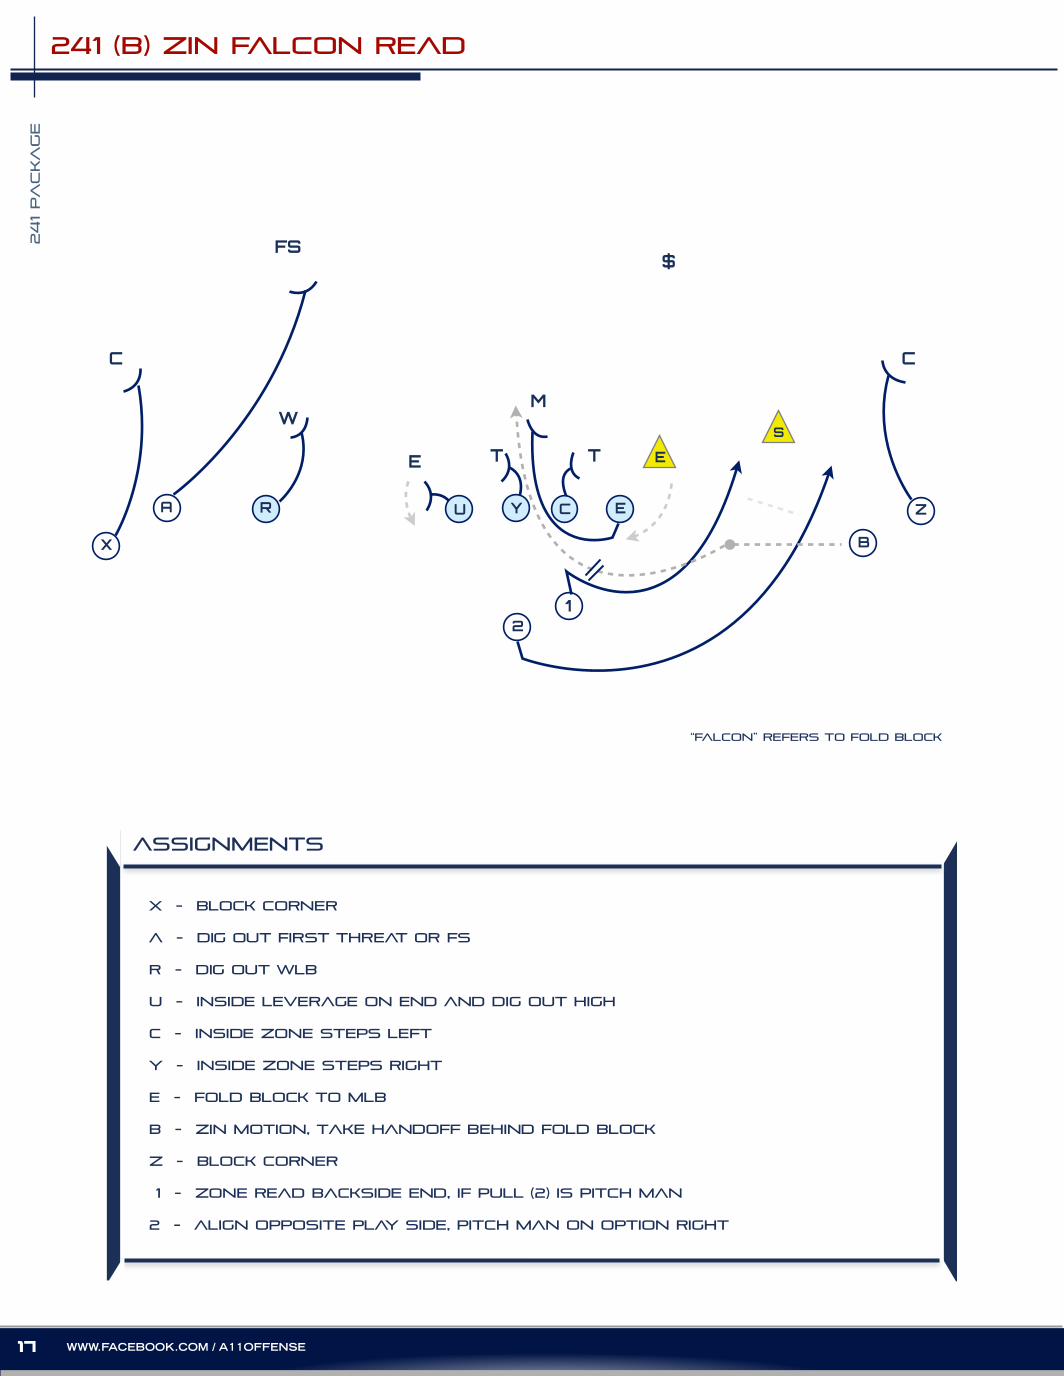
241 (B) zin falcon read
assignments
X - block corner
A - DIG OUT FIRST THREAT or fs
R - DIG OUT wlb
u - inside leverage on end and dig out high
c - inside zone steps left
y - inside zone steps right
E - fold block to MLB
b - zin motion, take handoff behind fold block
z - block corner
1 - zone read backside end, if pull (2) is pitch man
2 - align opposite play side, pitch man on option right
E
S
X
RA U CY E
12
T T
M
FS
C
W
B
E
Z
$
C
“falcon” refers to fold block
241 P
ACKA
GE
18WWW.A11OFFENSE.COM
assignments
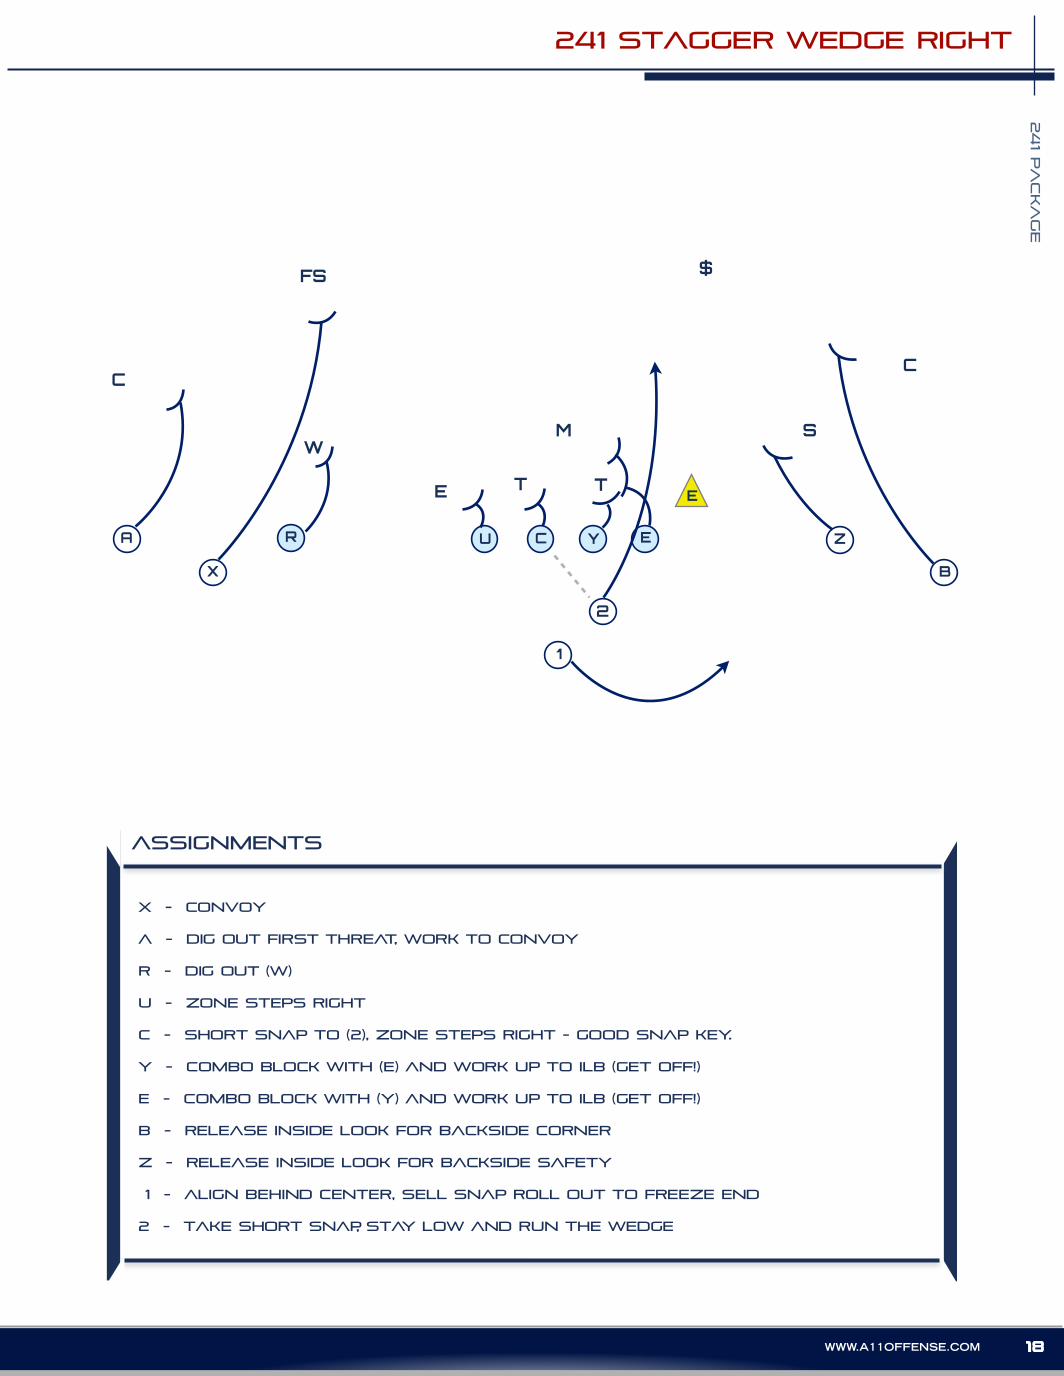
X - CONVOY
A - DIG OUT FIRST THREAT, WORK TO CONVOY
R - DIG OUT (W)
u - zone steps right
c - short snap to (2), zone steps right - good snap key.
y - combo block WITH (e) AND WORK UP TO ILB (get off!)
E - combo block WITH (y) AND WORK UP TO ILB (get off!)
b - release inside look for backside corner
z - release inside look for backside safety
1 - align behind center, sell snap roll out to freeze end
2 - take short snap, stay low and run the wedge
241 stagger wedge right
X
RA U C Y E Z
2
1
E T
M
FS $
CC
WS
B
ET
19 WWW.FACEBOOK.COM / A11OFFENSE
241 PA
CKA
GE
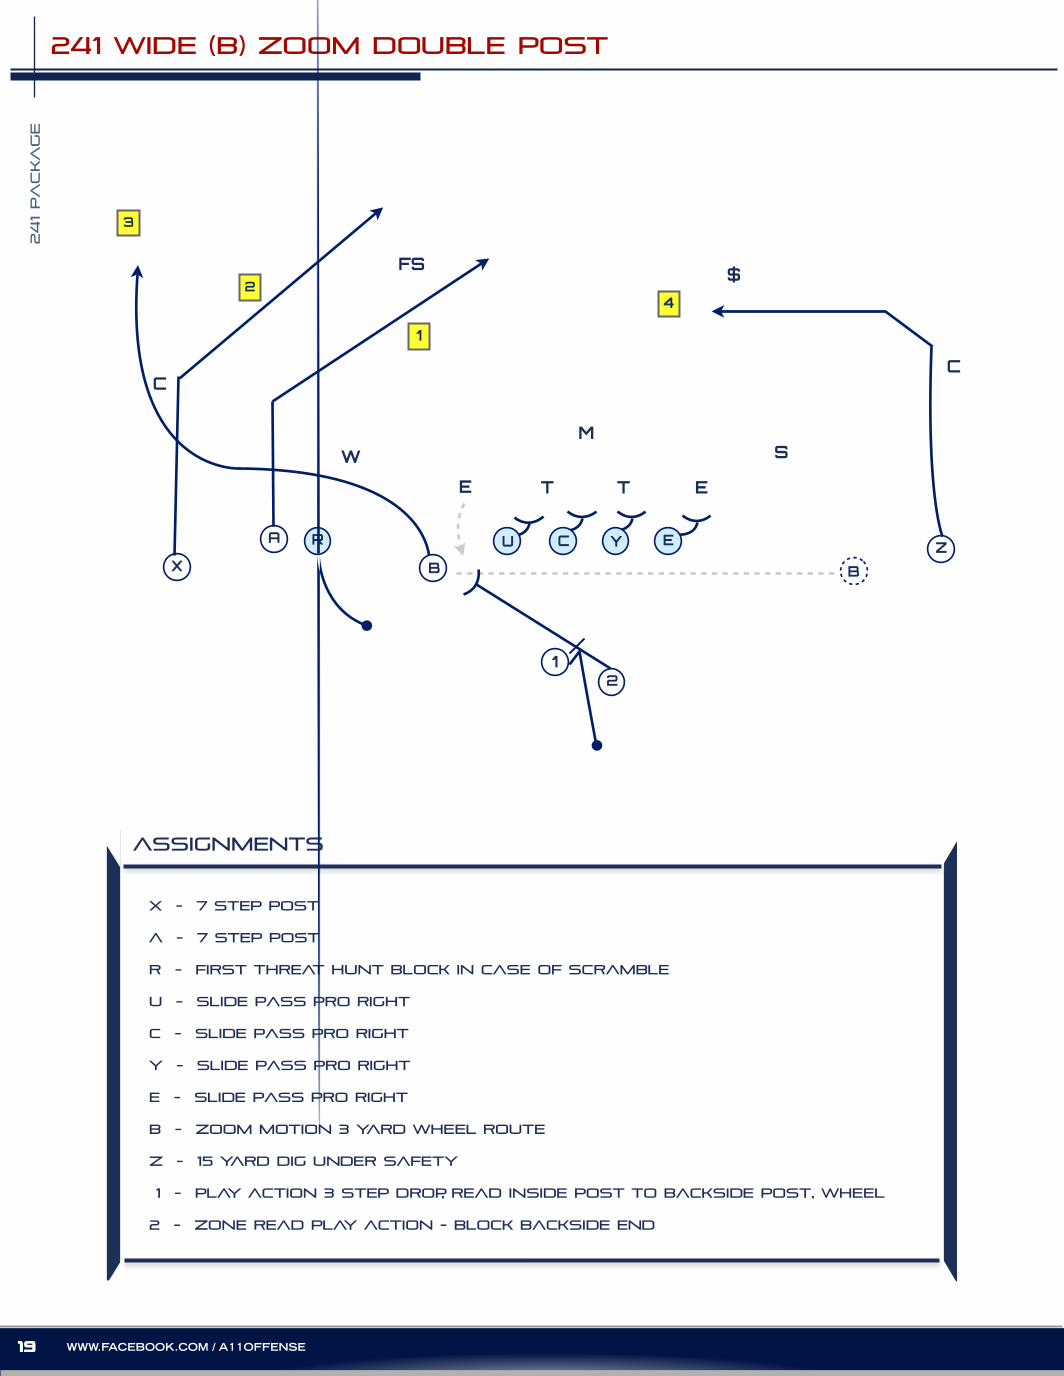
241 WIDE (B) ZOOM DOUBLE POST
assignments
X - 7 step post
A - 7 step post
R - first threat hunt block in case of scramble
u - slide pass pro right
c - slide pass pro right
y - slide pass pro right
E - slide pass pro right
b - zoom motion 3 yard wheel route
z - 15 yard dig under safety
1 - play action 3 step drop, read inside post to backside post, wheel
2 - zone read play action - block backside end
X
RA U C Y E Z
E ET T
M
FS $
CC
W
1
2
S
12
B
3
B
4
241 P
ACKA
GE
20WWW.A11OFFENSE.COM
assignments
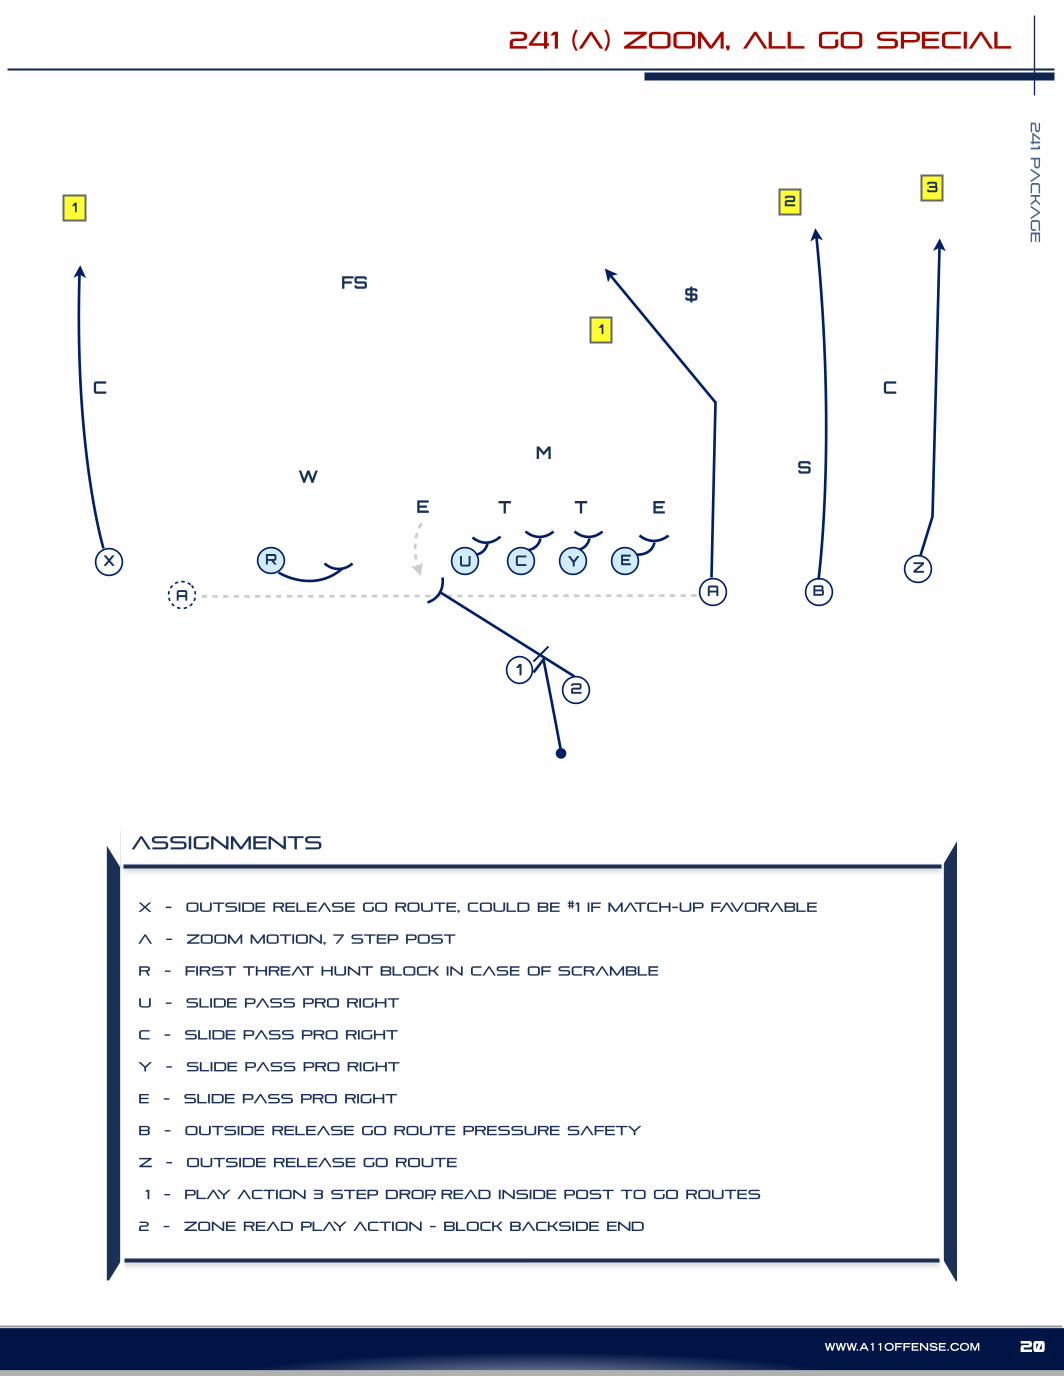
X - outside release go route, could be #1 if match-up favorable
A - zoom motion, 7 step post
R - first threat hunt block in case of scramble
u - slide pass pro right
c - slide pass pro right
y - slide pass pro right
E - slide pass pro right
b - outside release go route pressure safety
z - outside release go route
1 - play action 3 step drop, read inside post to go routes
2 - zone read play action - block backside end
241 (a) zoom, all go special
X R
A
U C Y E
BZ
E ET T
M
FS$
CC
W
2
1
3
S
1
A
12
21 WWW.FACEBOOK.COM / A11OFFENSE
241 PA
CKA
GE
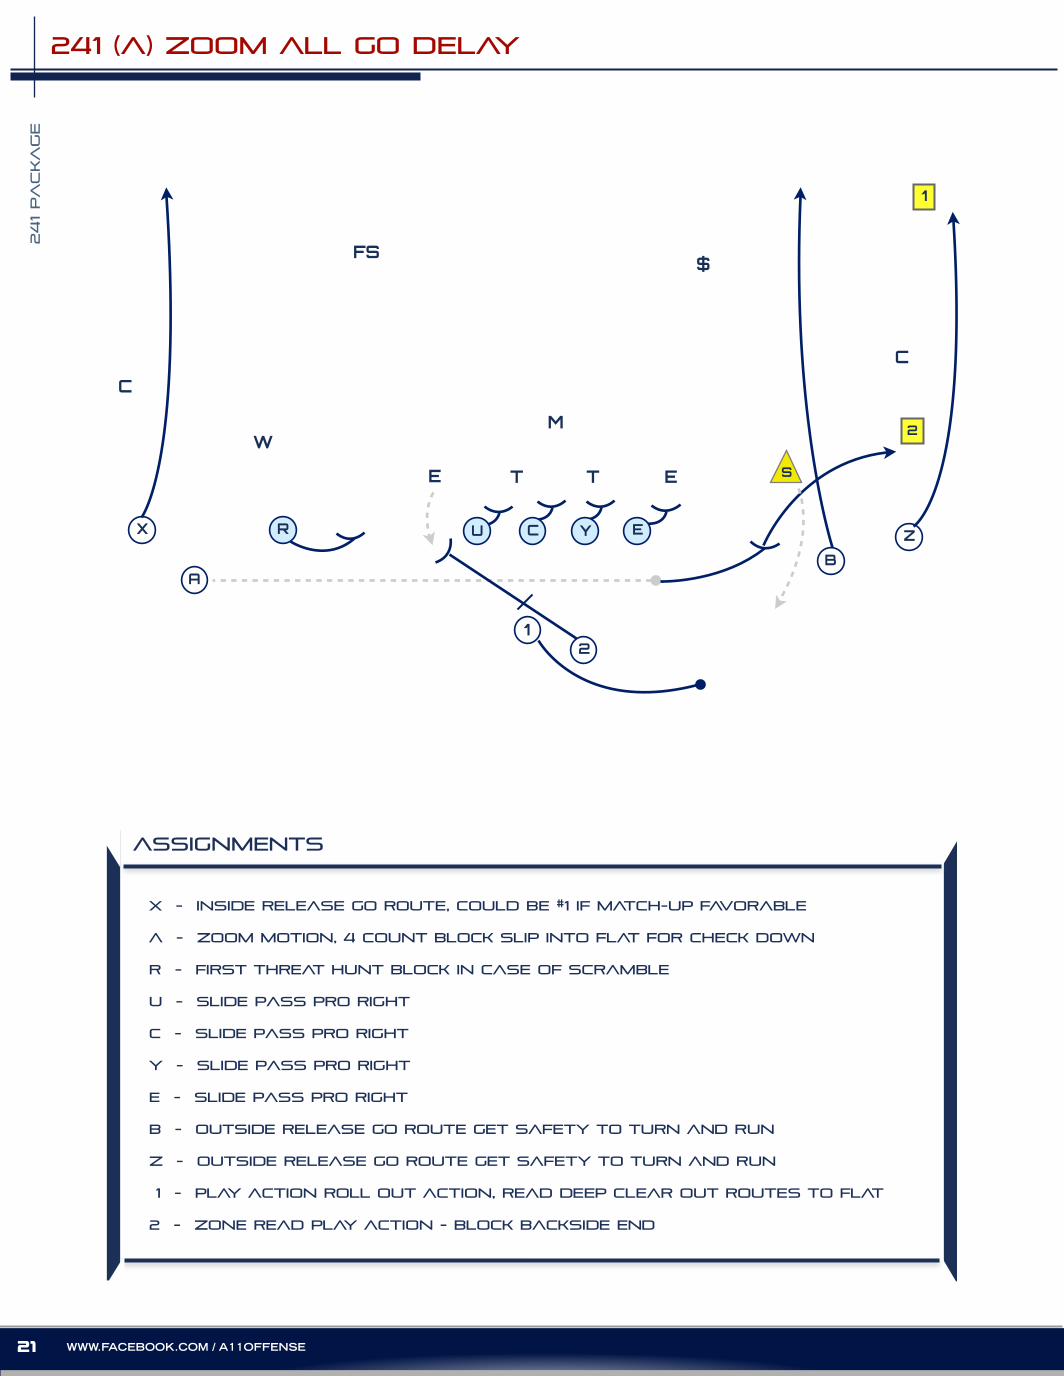
241 (A) ZOOM ALL GO DELAY
assignments
X - inside release go route, could be #1 if match-up favorable
A - zoom motion, 4 count block slip into flat for check down
R - first threat hunt block in case of scramble
u - slide pass pro right
c - slide pass pro right
y - slide pass pro right
E - slide pass pro right
b - outside release go route get safety to turn and run
z - outside release go route get safety to turn and run
1 - play action roll out action, read deep clear out routes to flat
2 - zone read play action - block backside end
S
X R
A
U C Y E
B
Z
E ET T
M
FS$
C
C
W
1
12
2
241 P
ACKA
GE
22WWW.A11OFFENSE.COM
assignments
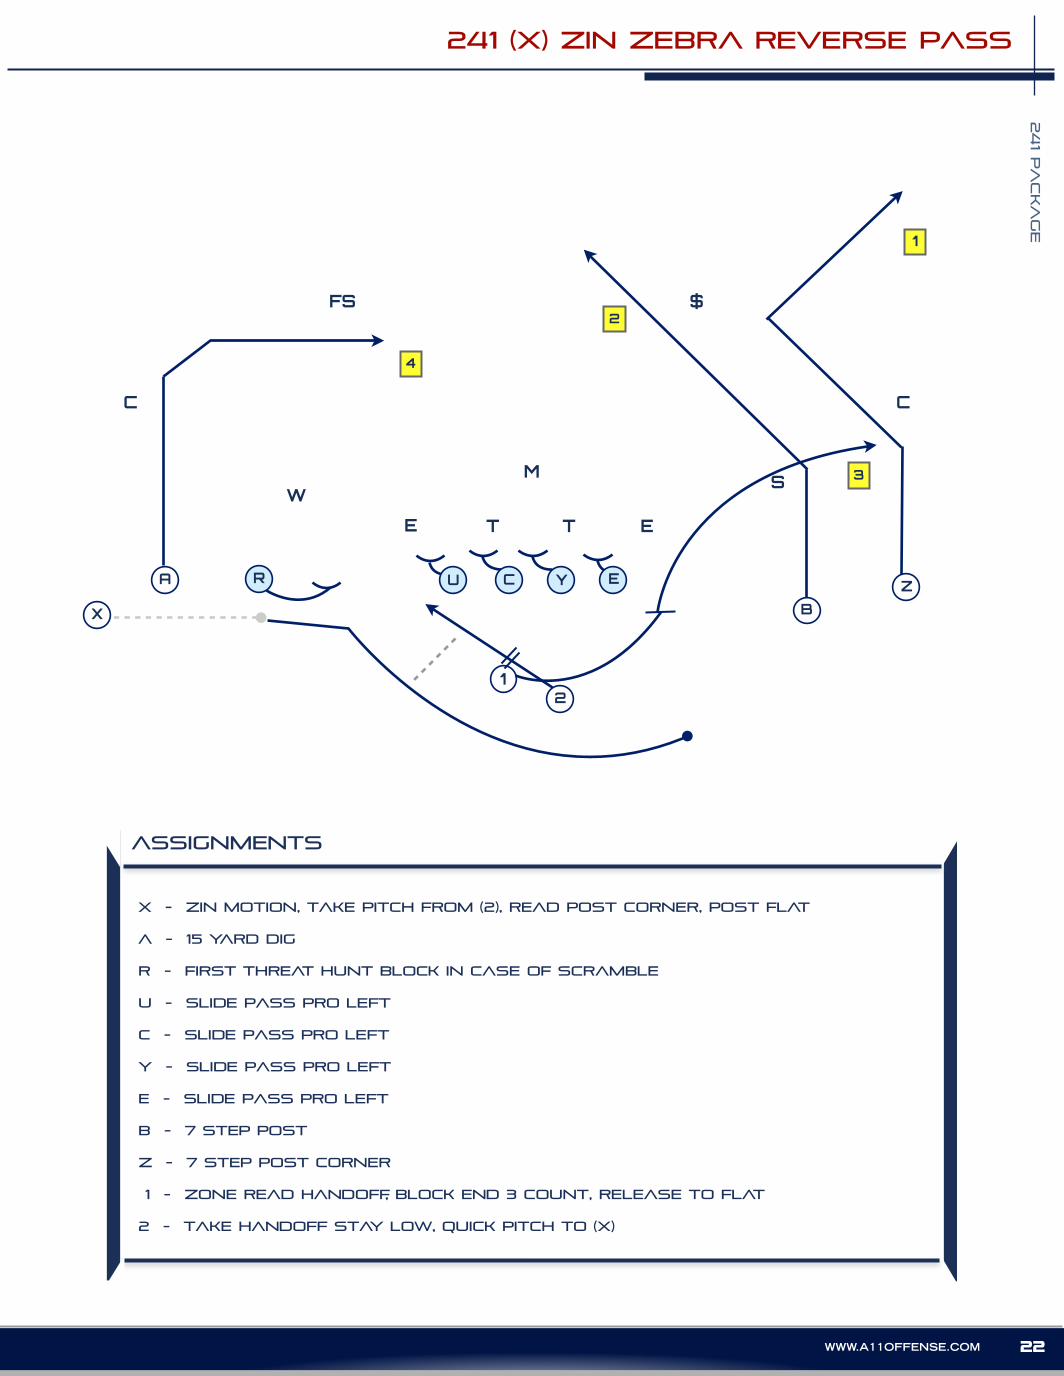
X - zin motion, take pitch from (2), read post corner, post flat
A - 15 yard dig
R - first threat hunt block in case of scramble
u - slide pass pro left
c - slide pass pro left
y - slide pass pro left
E - slide pass pro left
b - 7 step post
z - 7 step post corner
1 - zone read handoff, block end 3 count, release to flat
2 - take handoff stay low, quick pitch to (X)
241 (X) zin zebra reverse pass
X
RA U C Y E
BZ
E ET T
M
FS $
CC
W
1
12
2
S
4
3
23 WWW.FACEBOOK.COM / A11OFFENSE
241 PA
CKA
GE
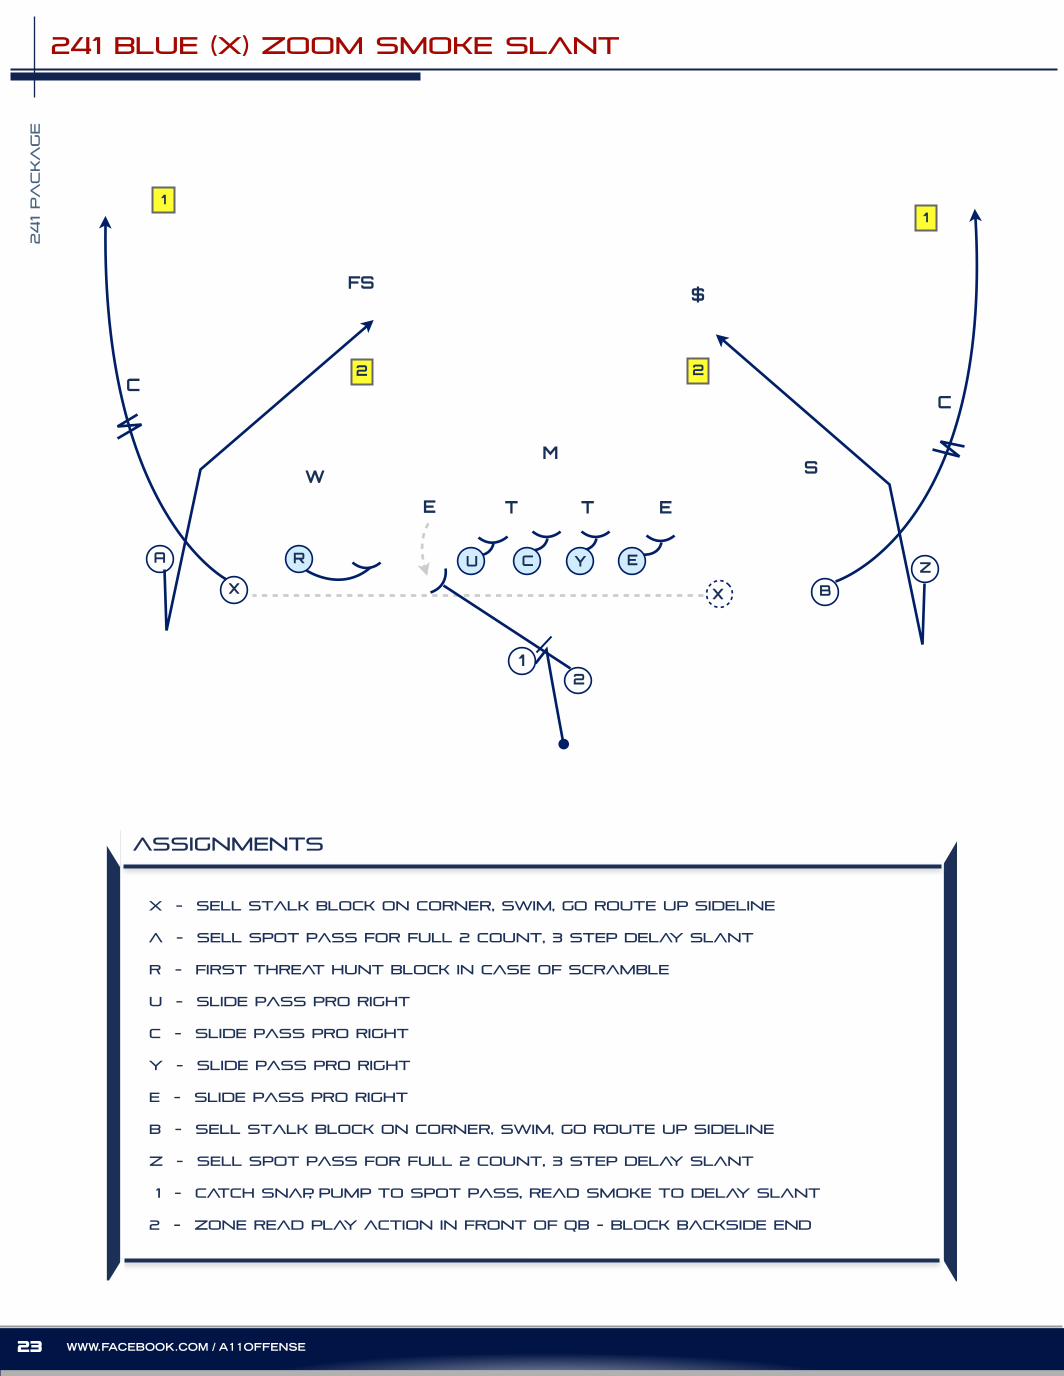
241 blue (X) zoom smoke slant
assignments
X - sell stalk block on corner, swim, go route up sideline
A - sell spot pass for full 2 count, 3 step delay slant
R - first threat hunt block in case of scramble
u - slide pass pro right
c - slide pass pro right
y - slide pass pro right
E - slide pass pro right
b - sell stalk block on corner, swim, go route up sideline
z - sell spot pass for full 2 count, 3 step delay slant
1 - catch snap, pump to spot pass, read smoke to delay slant
2 - zone read play action in front of qb - block backside end
X
RA U C Y E
BZ
E ET T
M
FS$
CC
W
2
12
1
S
1
X
2
241 P
ACKA
GE
24WWW.A11OFFENSE.COM
assignments
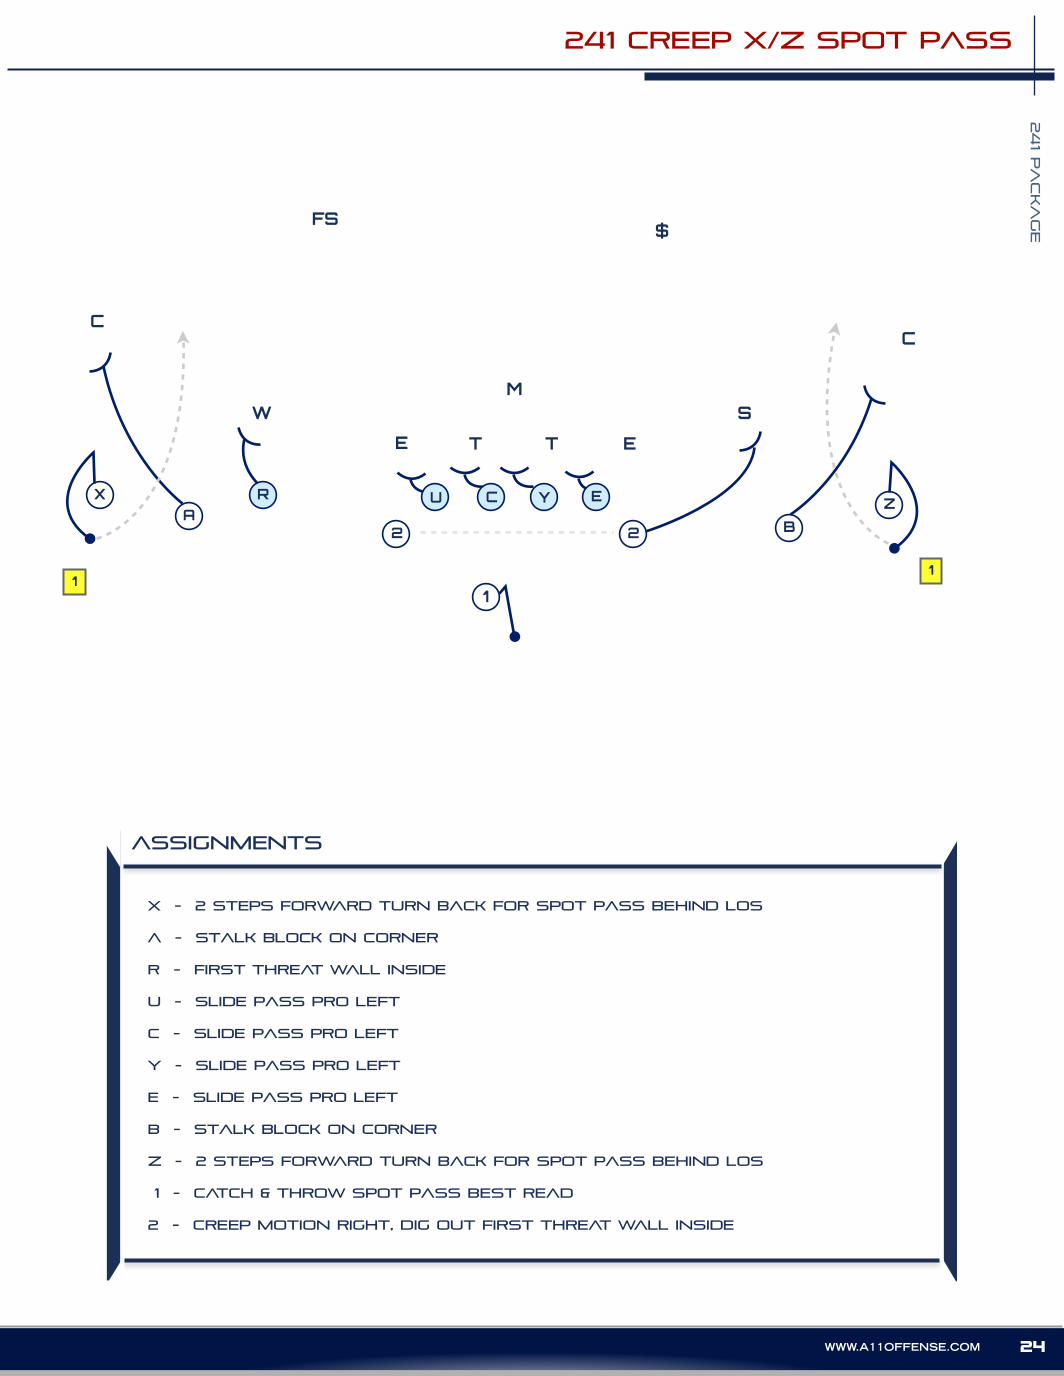
X - 2 steps forward turn back for spot pass behind LOS
A - stalk block on corner
R - first threat wall inside
u - slide pass pro left
c - slide pass pro left
y - slide pass pro left
E - slide pass pro left
b - stalk block on corner
z - 2 steps forward turn back for spot pass behind LOS
1 - catch & throw spot pass best read
2 - creep motion right, dig out first threat wall inside
241 creep X/Z SPOT PASS
X RA
U C Y E
BZ
E ET T
M
FS$
CC
W
1
2
1
S
1
2
25 WWW.FACEBOOK.COM / A11OFFENSE
241 PA
CKA
GE
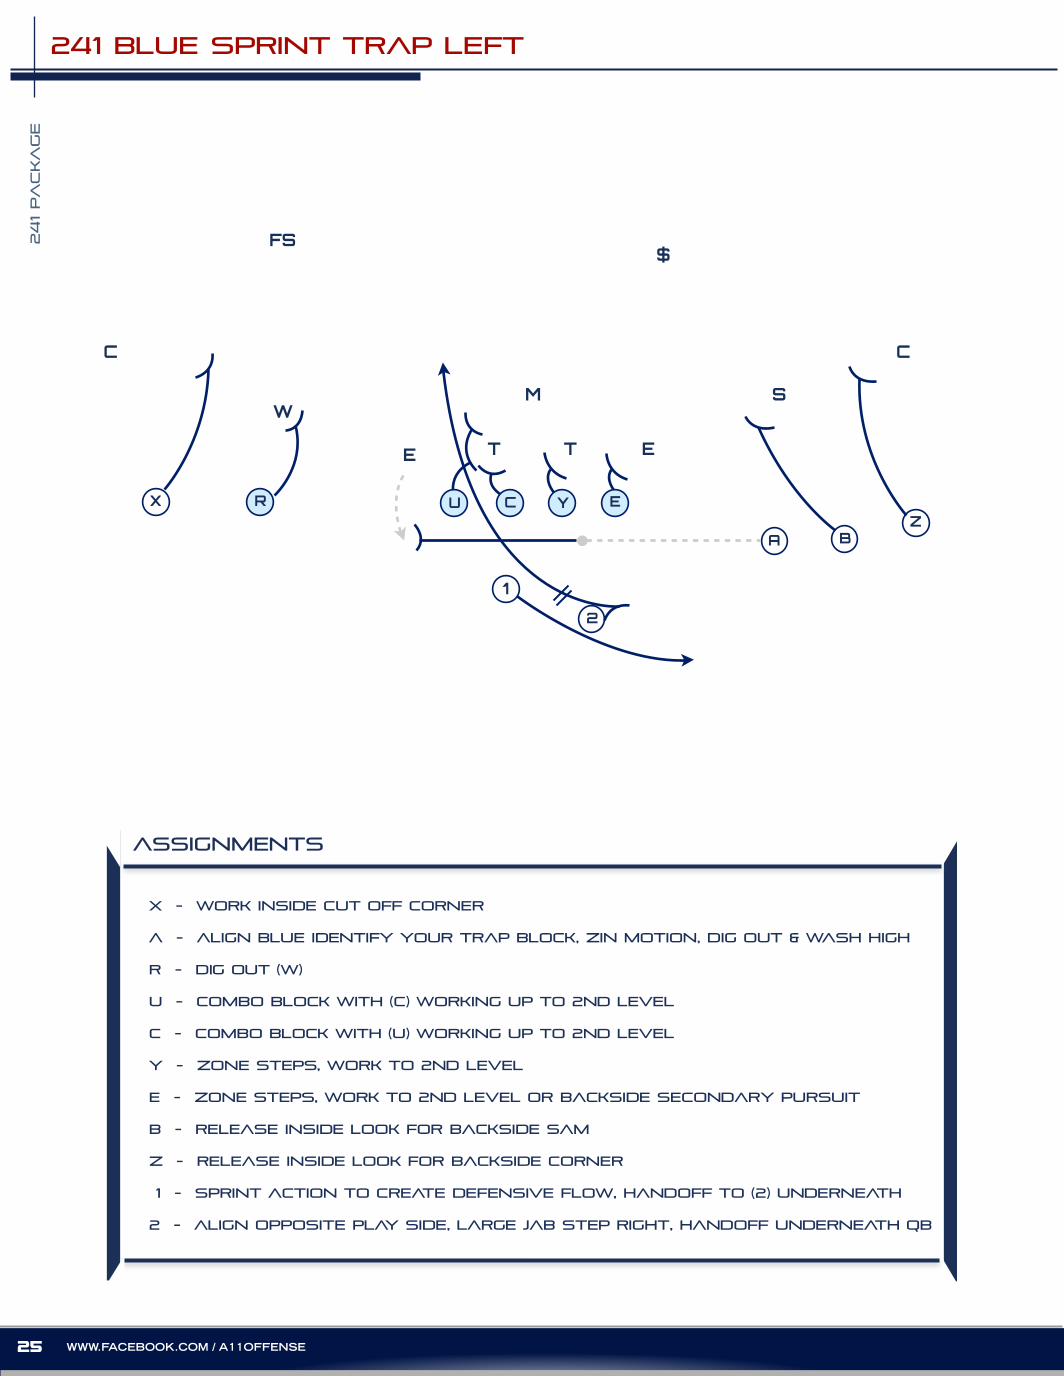
241 blue sprint trap left
assignments
X - work inside cut off corner
A - align blue identify your trap block, zin motion, dig out & wash high
R - DIG OUT (W)
u - combo block with (c) working up to 2nd level
c - combo block with (U) working up to 2nd level
y - zone steps, work to 2nd level
E - zone steps, work to 2nd level or backside secondary pursuit
b - release inside look for backside sam
z - release inside look for backside corner
1 - sprint action to create defensive flow, handoff to (2) underneath
2 - align opposite play side, large jab step right, handoff underneath qb
X R
A
U C Y E
1
2
ET T
M
FS
C
WS
B
E
Z
$
C
241 P
ACKA
GE
26WWW.A11OFFENSE.COM
assignments
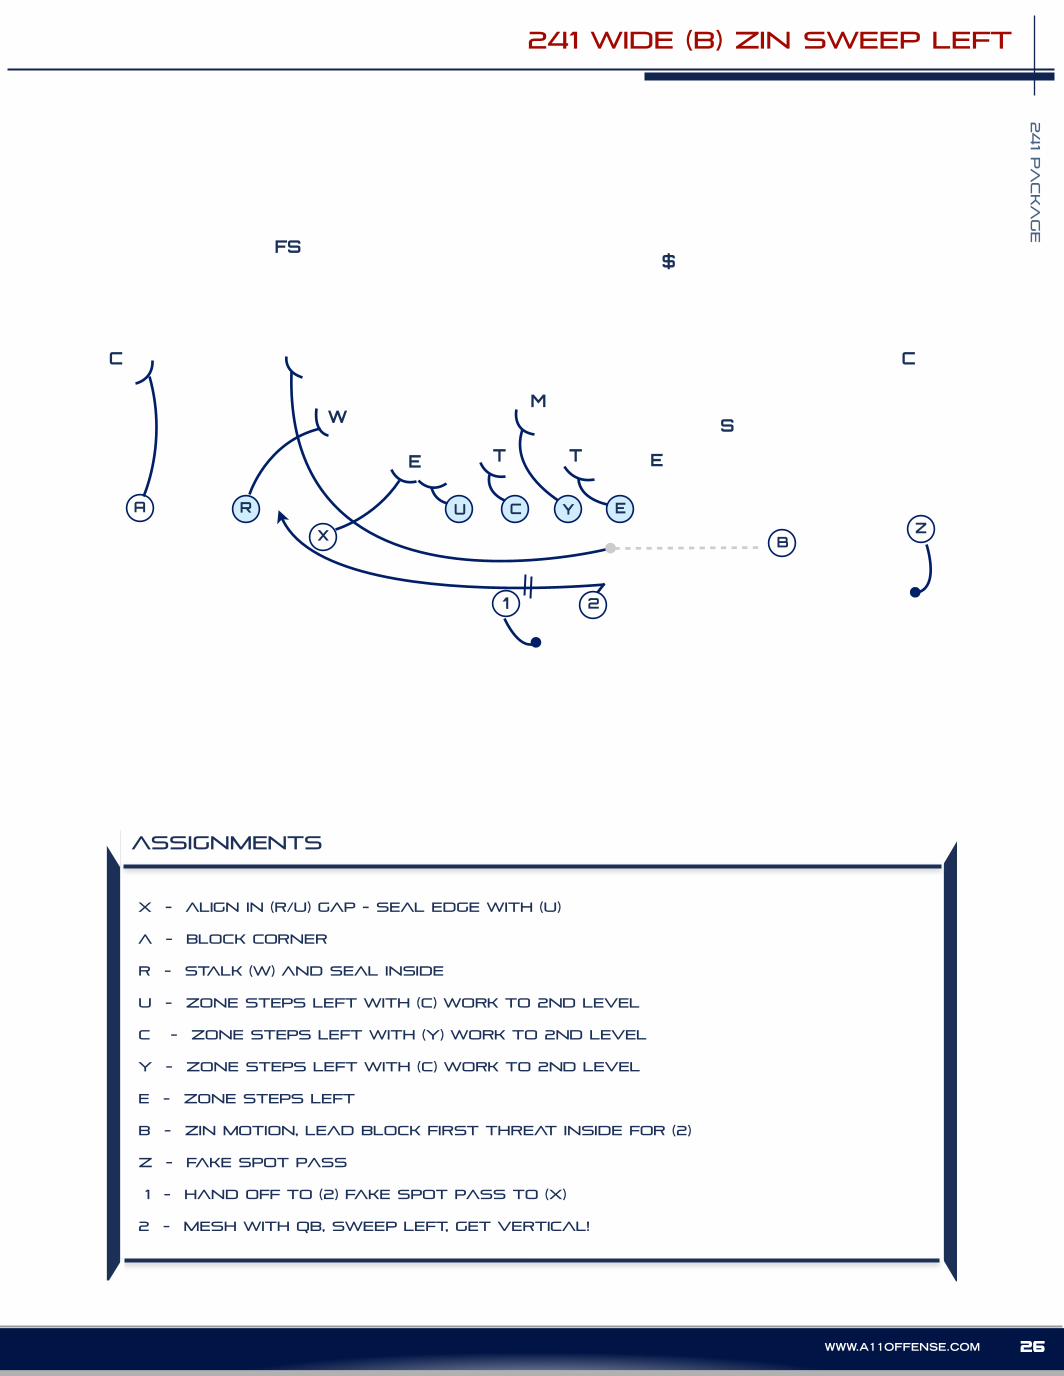
X - ALIGN IN (R/U) GAP - SEAL EDGE WITH (U)
A - BLOCK CORNER
R - STALK (W) AND SEAL INSIDE
u - zone steps left with (C) work to 2nd level
C - zone steps left with (Y) work to 2nd level
y - zone steps left with (c) work to 2nd level
E - zone steps left
b - ZIN MOTION, LEAD BLOCK FIRST THREAT INSIDE FOR (2)
z - FAKE SPOT PASS
1 - HAND OFF TO (2) FAKE SPOT PASS TO (X)
2 - MESH WITH QB, SWEEP LEFT, GET VERTICAL!
241 WIDE (B) ZIN SWEEP LEFT
X
RA U C Y E
1 2
T T
M
FS
C
W
B
E
Z
$
C
S
E
27 WWW.FACEBOOK.COM / A11OFFENSE
241 PA
CKA
GE
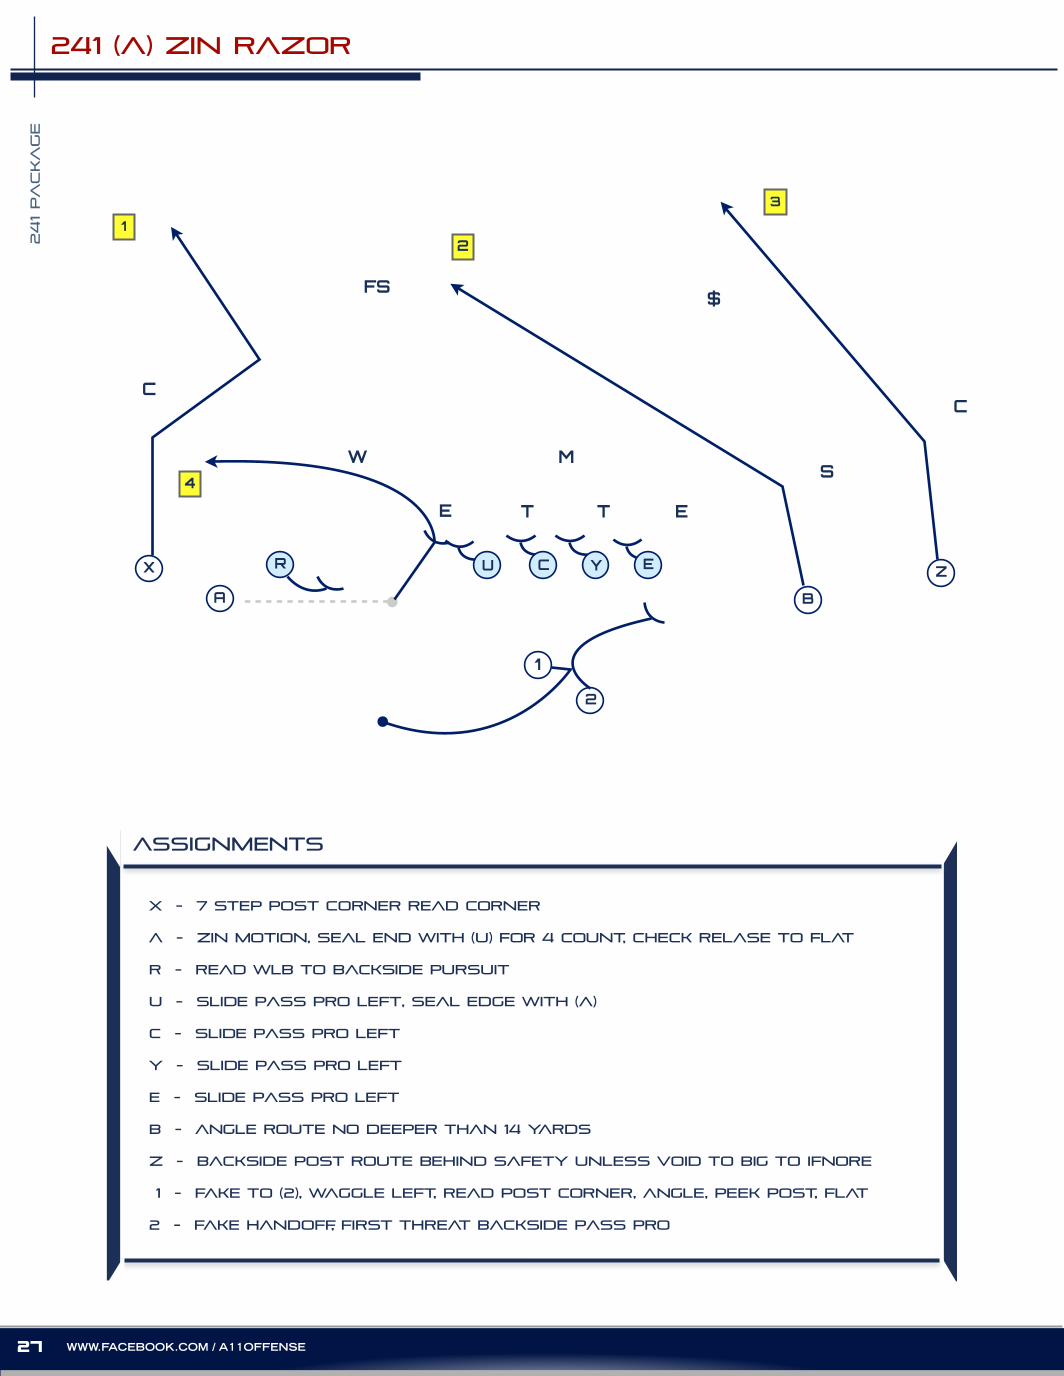
241 (A) zin RAZOR
assignments
X - 7 STEP post corner READ CORNER
A - ZIN MOTION, SEAL END WITH (U) FOR 4 COUNT, CHECK RELASE TO FLAT
R - READ WLB TO BACKSIDE PURSUIT
u - slide pass pro left, SEAL EDGE WITH (A)
c - slide pass pro left
y - slide pass pro left
E - slide pass pro left
b - ANGLE ROUTE NO DEEPER THAN 14 YARDS
z - BACKSIDE POST ROUTE BEHIND SAFETY UNLESS VOID TO BIG TO IFNORE
1 - FAKE TO (2), WAGGLE LEFT, READ POST CORNER, ANGLE, PEEK POST, FLAT
2 - FAKE HANDOFF, FIRST THREAT BACKSIDE PASS PRO
X R
A
U C Y E
B
Z
E ET T
M
FS$
CC
W4
1
2
3
S
12
X
A
R C
B
U Y
1
E
2
T
W
N T
M
FS $
CC
B
S
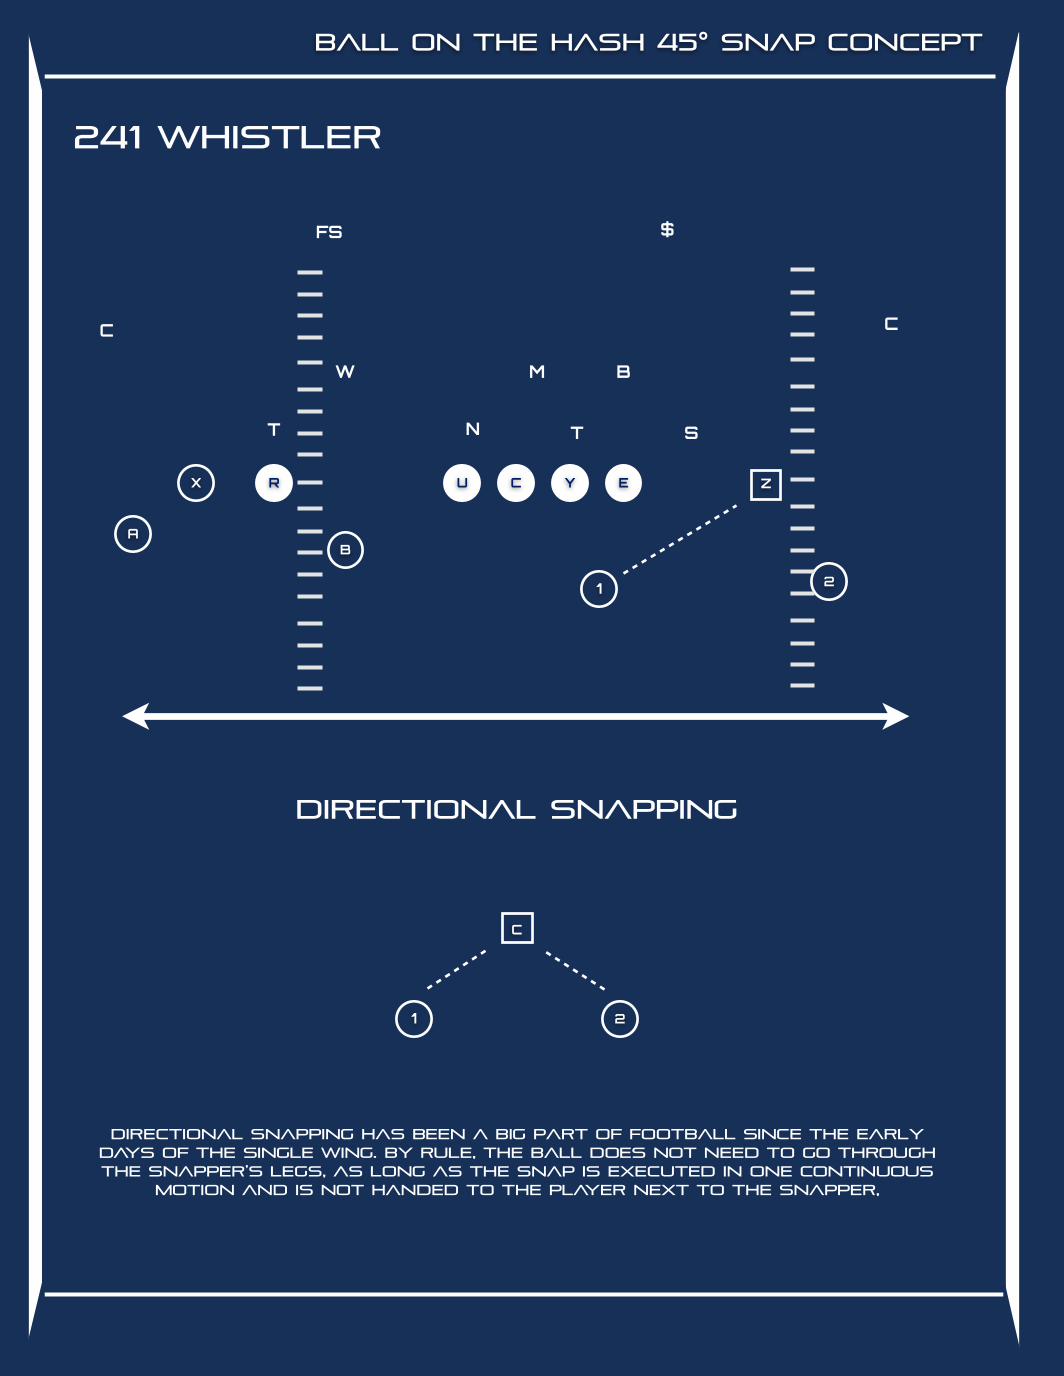
241 whistler
ball on the hash 45° snap concept
Z
1 2
C
DIRECTIONAL SNAPPING
DIRECTIONAL SNAPPING HAS BEEN A BIG PART OF FOOTBALL SINCE THE EARLY DAYS OF THE SINGLE WING. BY RULE, THE BALL DOES NOT NEED TO GO THROUGH THE SNAPPER’S LEGS, AS LONG AS THE SNAP IS EXECUTED IN ONE CONTINUOUS
MOTION AND IS NOT HANDED TO THE PLAYER NEXT TO THE SNAPPER,
29 WWW.FACEBOOK.COM / A11OFFENSE
241 PA
CKA
GE
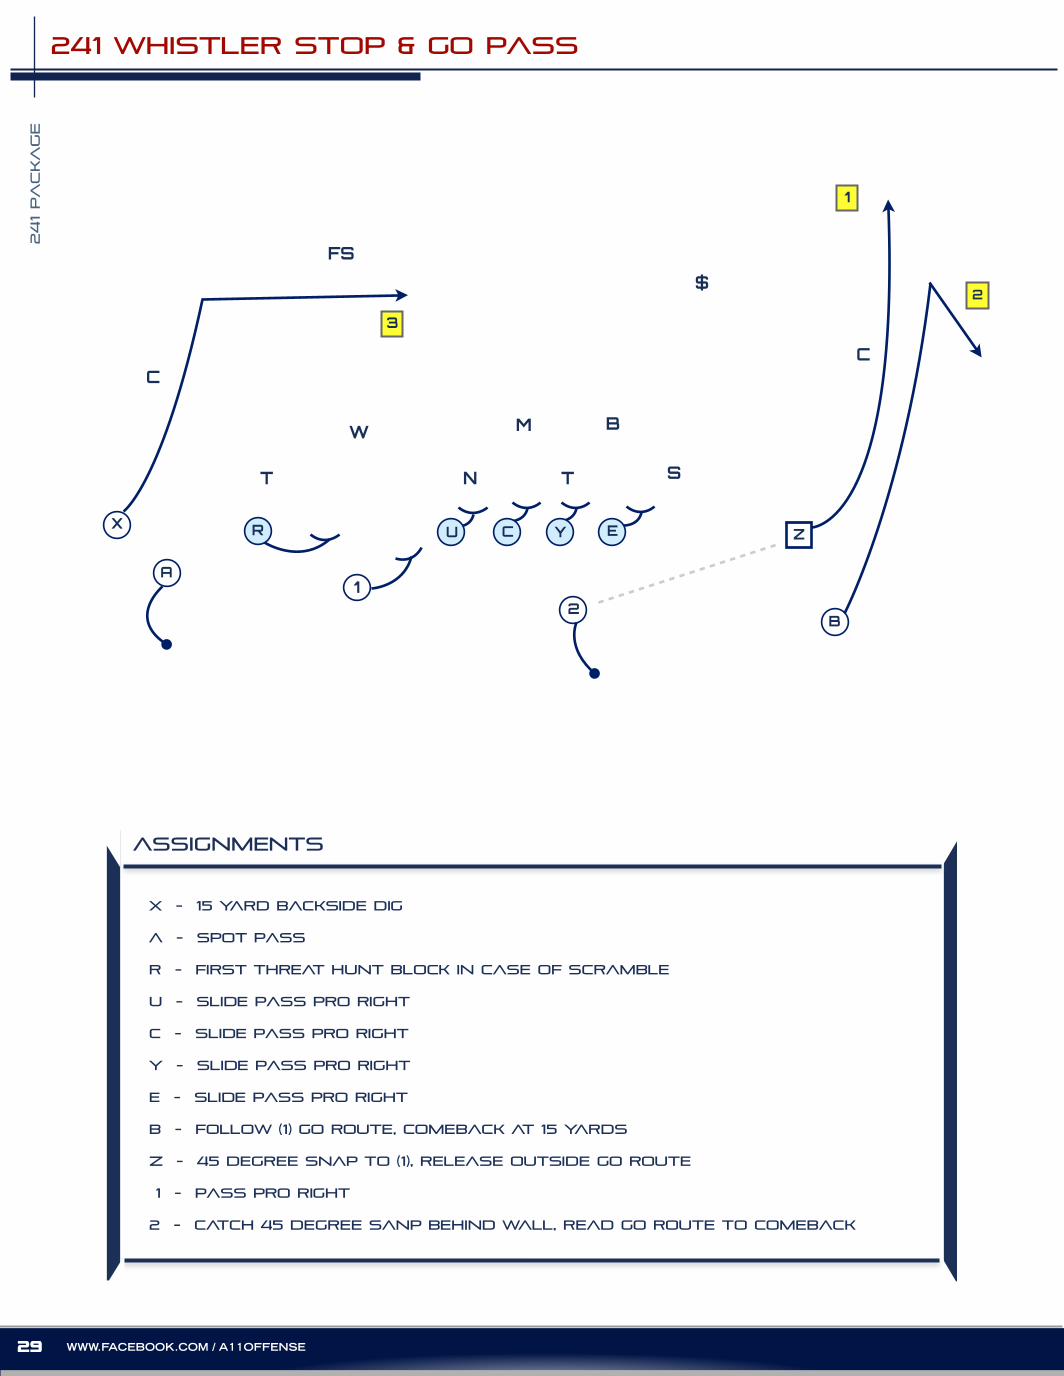
241 whistler stop & go pass
assignments
X - 15 YARD BACKSIDE DIG
A - SPOT PASS
R - first threat hunt block in case of scramble
u - slide pass pro right
c - slide pass pro right
y - slide pass pro right
E - slide pass pro right
b - FOLLOW (1) GO ROUTE, COMEBACK AT 15 YARDS
z - 45 DEGREE SNAP TO (1), RELEASE OUTSIDE GO ROUTE
1 - PASS PRO RIGHT
2 - CATCH 45 DEGREE SANP BEHIND WALL, READ GO ROUTE TO COMEBACK
X R
A
U C Y E
B
W
T N T
M
FS
$
CC
B
1
12
2
Z
S
3
241 P
ACKA
GE
30WWW.A11OFFENSE.COM
assignments
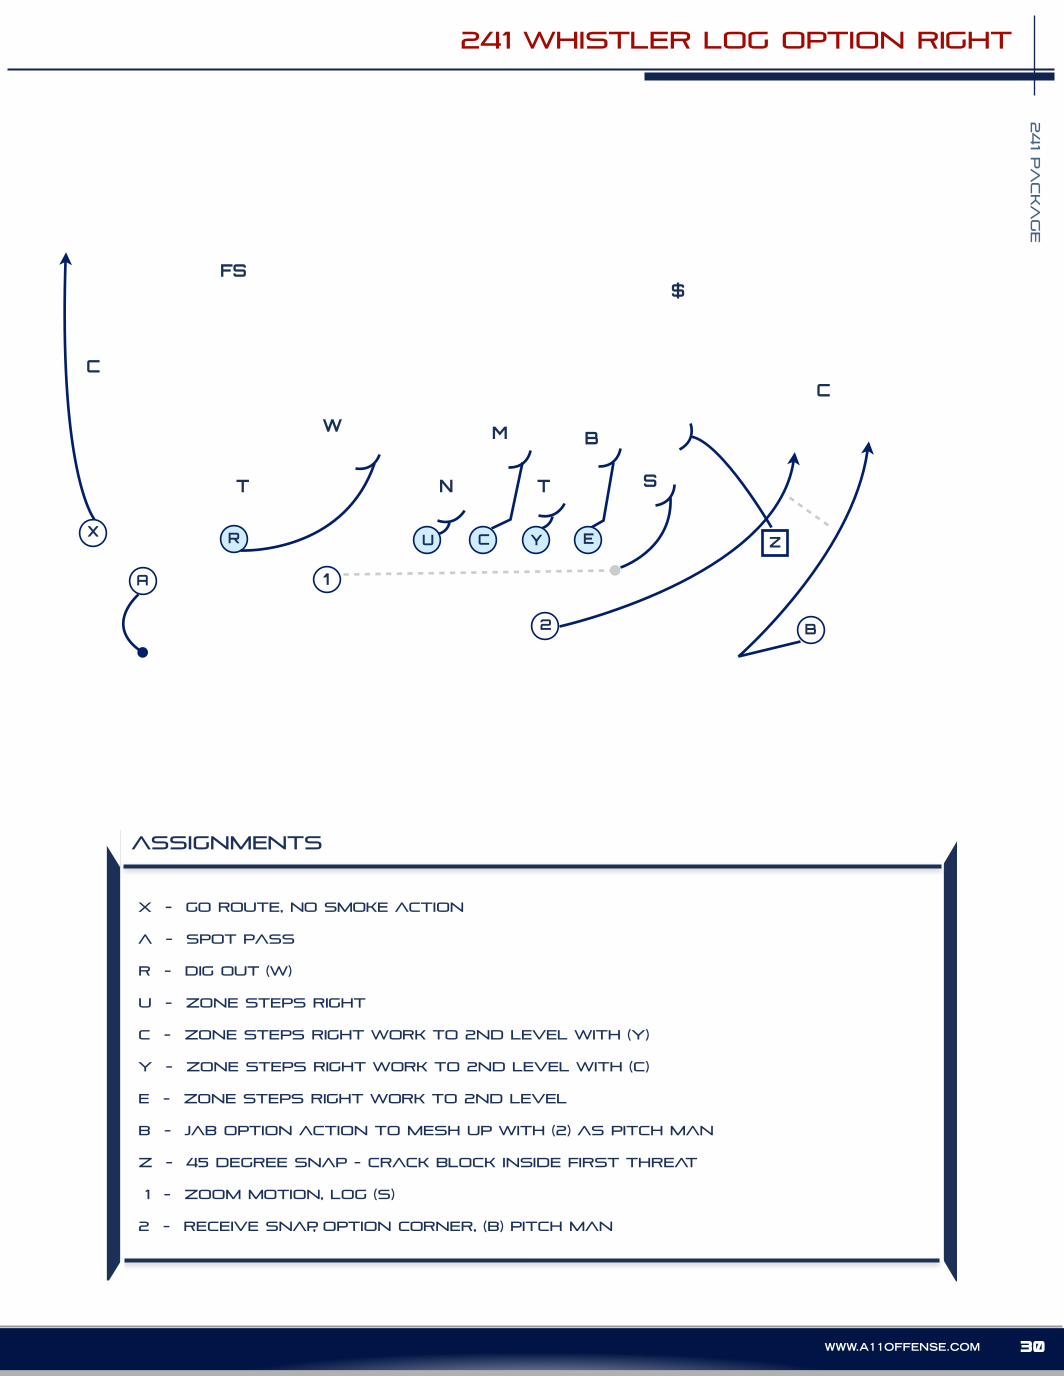
X - GO ROUTE, NO SMOKE ACTION
A - SPOT PASS
R - DIG OUT (W)
u - ZONE STEPS RIGHT
c - ZONE STEPS RIGHT WORK TO 2ND LEVEL WITH (Y)
y - ZONE STEPS RIGHT WORK TO 2ND LEVEL WITH (C)
E - ZONE STEPS RIGHT WORK TO 2ND LEVEL
b - JAB OPTION ACTION TO MESH UP WITH (2) AS PITCH MAN
z - 45 DEGREE SNAP - CRACK BLOCK INSIDE FIRST THREAT
1 - ZOOM MOTION, LOG (S)
2 - RECEIVE SNAP, OPTION CORNER, (B) PITCH MAN
241 WHISTLER LOG OPTION RIGHT
X R
A
U C Y E
B
W
T N T
M
FS$
CC
B
1
2
Z
S

www
@
@a11offense
www.a11offense.com
download all playbooks at:
facebook.com/a11offense