2016 outlook tips and tricks open office apps in different ... · 2016 outlook tips and tricks open...
TRANSCRIPT
1 Colorado State University Technology Training Center ©
2016 Outlook Tips and Tricks
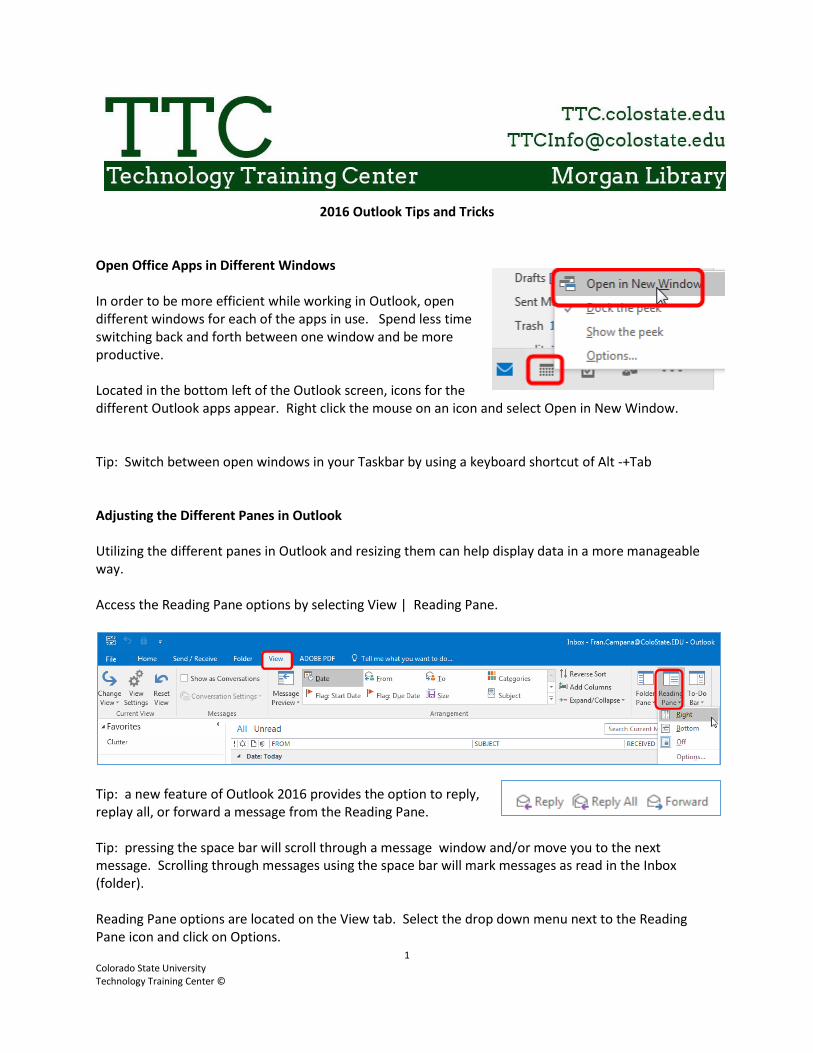
Open Office Apps in Different Windows In order to be more efficient while working in Outlook, open different windows for each of the apps in use. Spend less time switching back and forth between one window and be more productive. Located in the bottom left of the Outlook screen, icons for the different Outlook apps appear. Right click the mouse on an icon and select Open in New Window. Tip: Switch between open windows in your Taskbar by using a keyboard shortcut of Alt -+Tab Adjusting the Different Panes in Outlook Utilizing the different panes in Outlook and resizing them can help display data in a more manageable way. Access the Reading Pane options by selecting View | Reading Pane.
Tip: a new feature of Outlook 2016 provides the option to reply, replay all, or forward a message from the Reading Pane. Tip: pressing the space bar will scroll through a message window and/or move you to the next message. Scrolling through messages using the space bar will mark messages as read in the Inbox (folder). Reading Pane options are located on the View tab. Select the drop down menu next to the Reading Pane icon and click on Options.

2 Colorado State University Technology Training Center ©
3 Colorado State University Technology Training Center ©
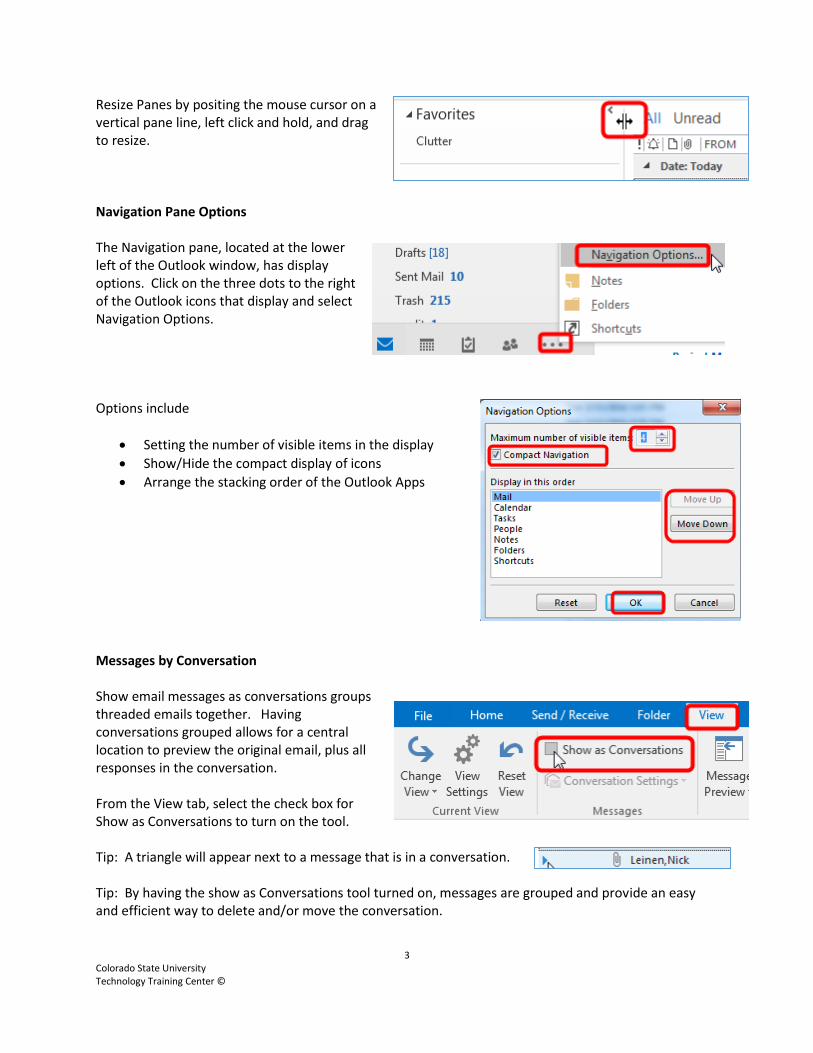
Resize Panes by positing the mouse cursor on a vertical pane line, left click and hold, and drag to resize. Navigation Pane Options The Navigation pane, located at the lower left of the Outlook window, has display options. Click on the three dots to the right of the Outlook icons that display and select Navigation Options. Options include
Setting the number of visible items in the display
Show/Hide the compact display of icons
Arrange the stacking order of the Outlook Apps Messages by Conversation Show email messages as conversations groups threaded emails together. Having conversations grouped allows for a central location to preview the original email, plus all responses in the conversation. From the View tab, select the check box for Show as Conversations to turn on the tool. Tip: A triangle will appear next to a message that is in a conversation. Tip: By having the show as Conversations tool turned on, messages are grouped and provide an easy and efficient way to delete and/or move the conversation.
4 Colorado State University Technology Training Center ©
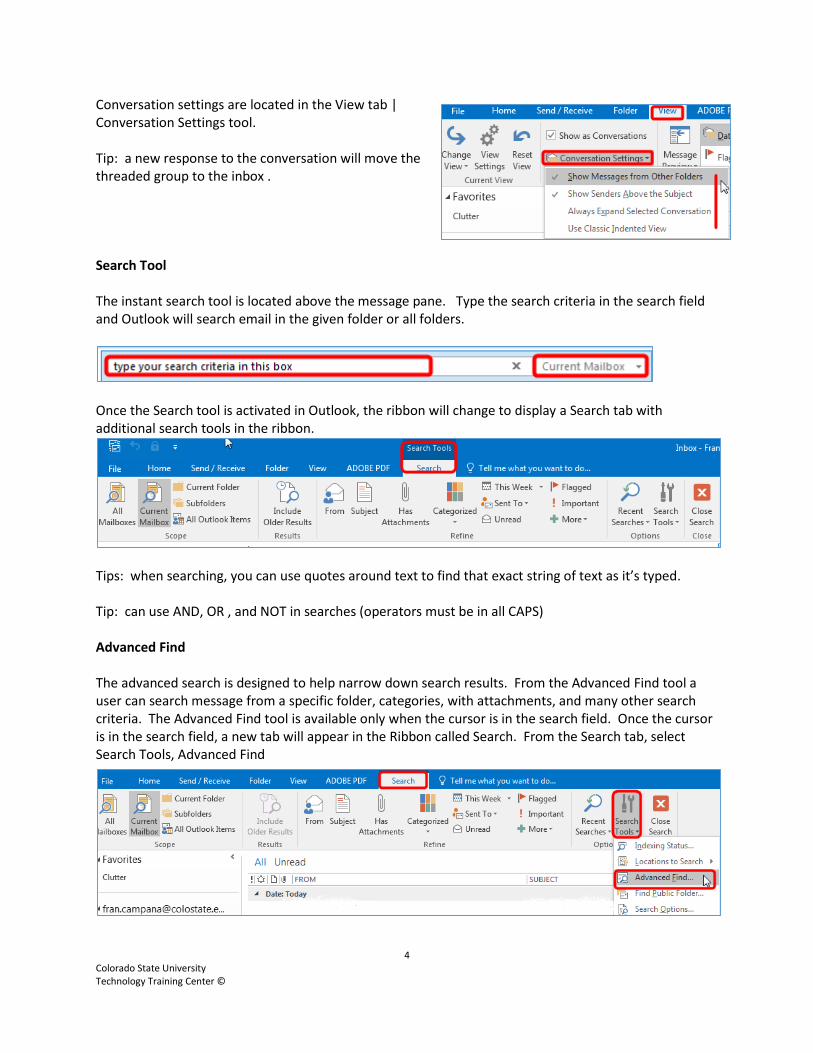
Conversation settings are located in the View tab | Conversation Settings tool. Tip: a new response to the conversation will move the threaded group to the inbox . Search Tool The instant search tool is located above the message pane. Type the search criteria in the search field and Outlook will search email in the given folder or all folders.
Once the Search tool is activated in Outlook, the ribbon will change to display a Search tab with additional search tools in the ribbon.
Tips: when searching, you can use quotes around text to find that exact string of text as it’s typed. Tip: can use AND, OR , and NOT in searches (operators must be in all CAPS) Advanced Find The advanced search is designed to help narrow down search results. From the Advanced Find tool a user can search message from a specific folder, categories, with attachments, and many other search criteria. The Advanced Find tool is available only when the cursor is in the search field. Once the cursor is in the search field, a new tab will appear in the Ribbon called Search. From the Search tab, select Search Tools, Advanced Find
5 Colorado State University Technology Training Center ©
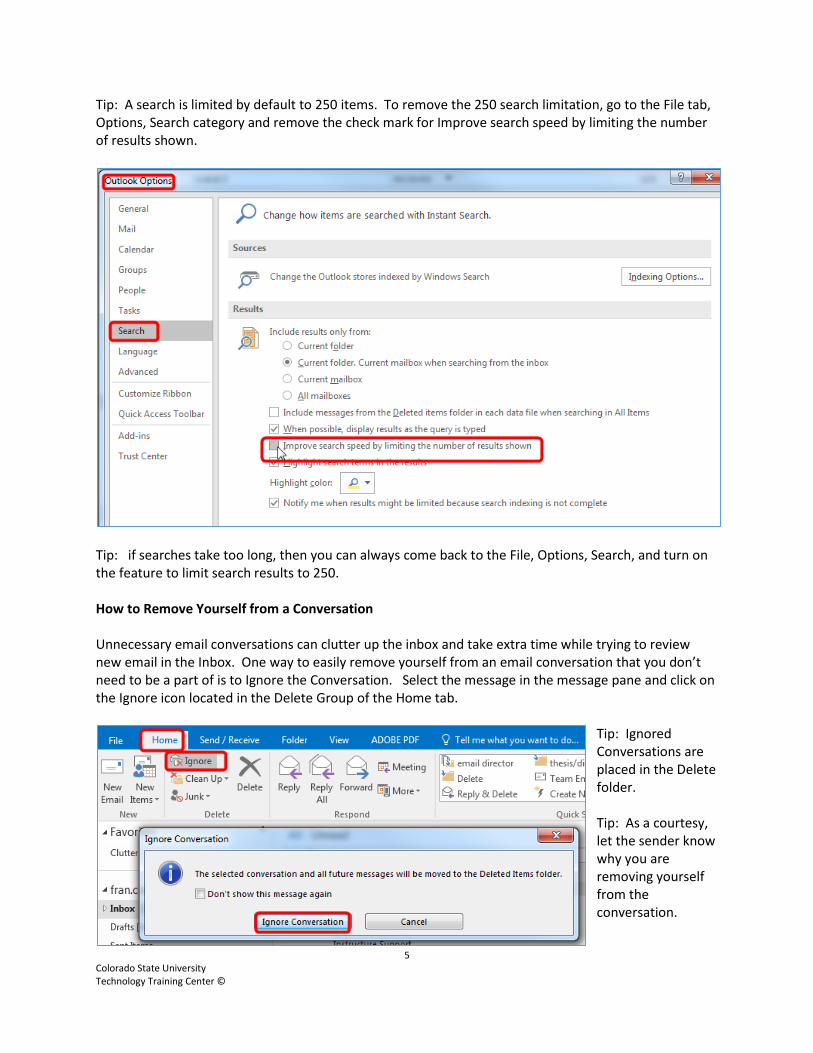
Tip: A search is limited by default to 250 items. To remove the 250 search limitation, go to the File tab, Options, Search category and remove the check mark for Improve search speed by limiting the number of results shown.
Tip: if searches take too long, then you can always come back to the File, Options, Search, and turn on the feature to limit search results to 250. How to Remove Yourself from a Conversation Unnecessary email conversations can clutter up the inbox and take extra time while trying to review new email in the Inbox. One way to easily remove yourself from an email conversation that you don’t need to be a part of is to Ignore the Conversation. Select the message in the message pane and click on the Ignore icon located in the Delete Group of the Home tab.
Tip: Ignored Conversations are placed in the Delete folder. Tip: As a courtesy, let the sender know why you are removing yourself from the conversation.
6 Colorado State University Technology Training Center ©
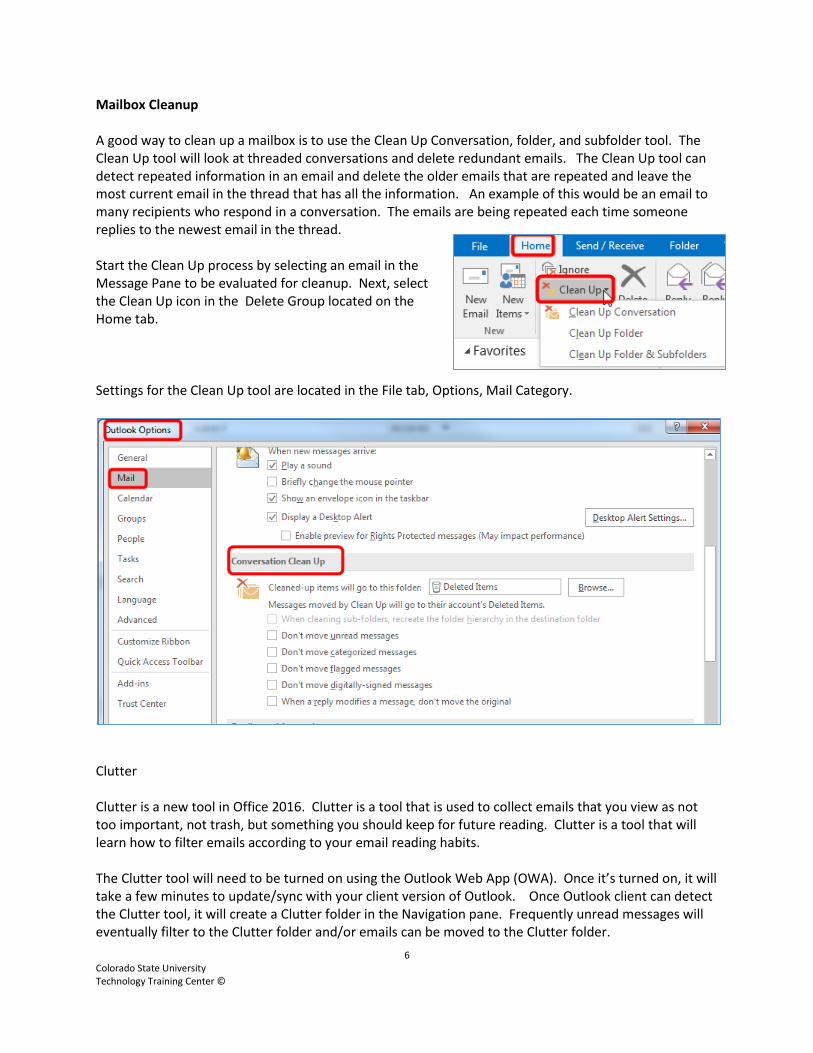
Mailbox Cleanup A good way to clean up a mailbox is to use the Clean Up Conversation, folder, and subfolder tool. The Clean Up tool will look at threaded conversations and delete redundant emails. The Clean Up tool can detect repeated information in an email and delete the older emails that are repeated and leave the most current email in the thread that has all the information. An example of this would be an email to many recipients who respond in a conversation. The emails are being repeated each time someone replies to the newest email in the thread. Start the Clean Up process by selecting an email in the Message Pane to be evaluated for cleanup. Next, select the Clean Up icon in the Delete Group located on the Home tab. Settings for the Clean Up tool are located in the File tab, Options, Mail Category.
Clutter Clutter is a new tool in Office 2016. Clutter is a tool that is used to collect emails that you view as not too important, not trash, but something you should keep for future reading. Clutter is a tool that will learn how to filter emails according to your email reading habits. The Clutter tool will need to be turned on using the Outlook Web App (OWA). Once it’s turned on, it will take a few minutes to update/sync with your client version of Outlook. Once Outlook client can detect the Clutter tool, it will create a Clutter folder in the Navigation pane. Frequently unread messages will eventually filter to the Clutter folder and/or emails can be moved to the Clutter folder.
7 Colorado State University Technology Training Center ©
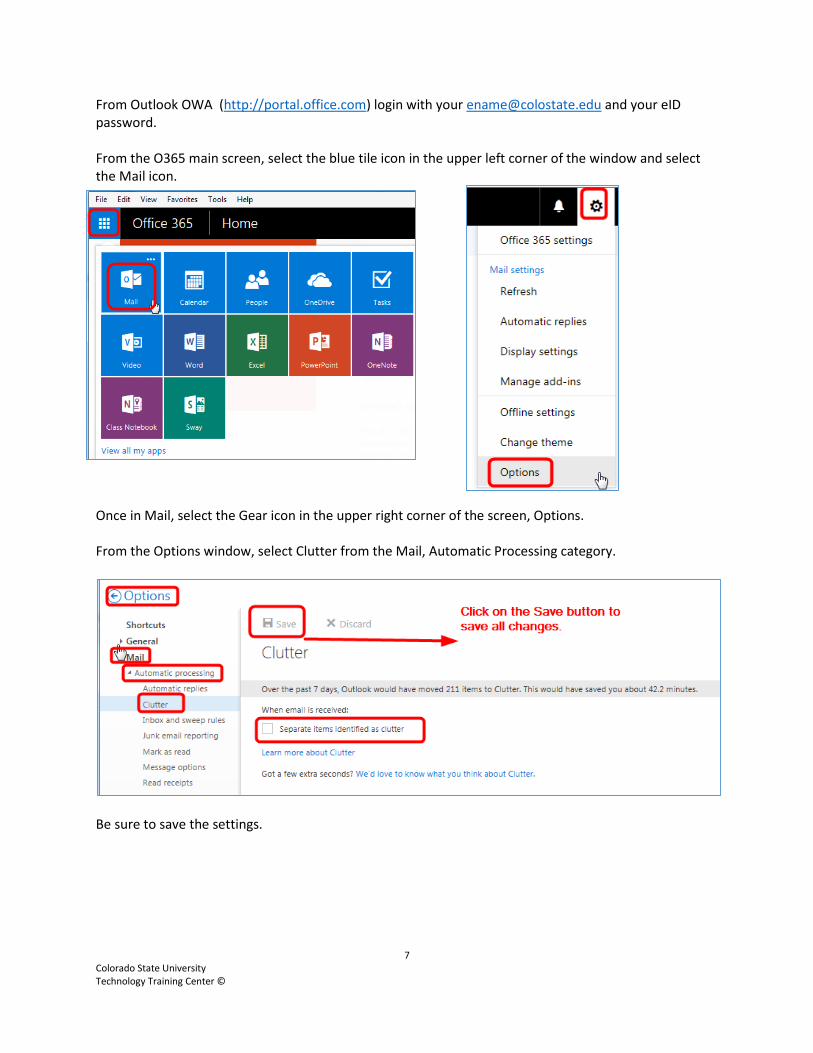
From Outlook OWA (http://portal.office.com) login with your [email protected] and your eID password. From the O365 main screen, select the blue tile icon in the upper left corner of the window and select the Mail icon.
Once in Mail, select the Gear icon in the upper right corner of the screen, Options. From the Options window, select Clutter from the Mail, Automatic Processing category.
Be sure to save the settings.
8 Colorado State University Technology Training Center ©
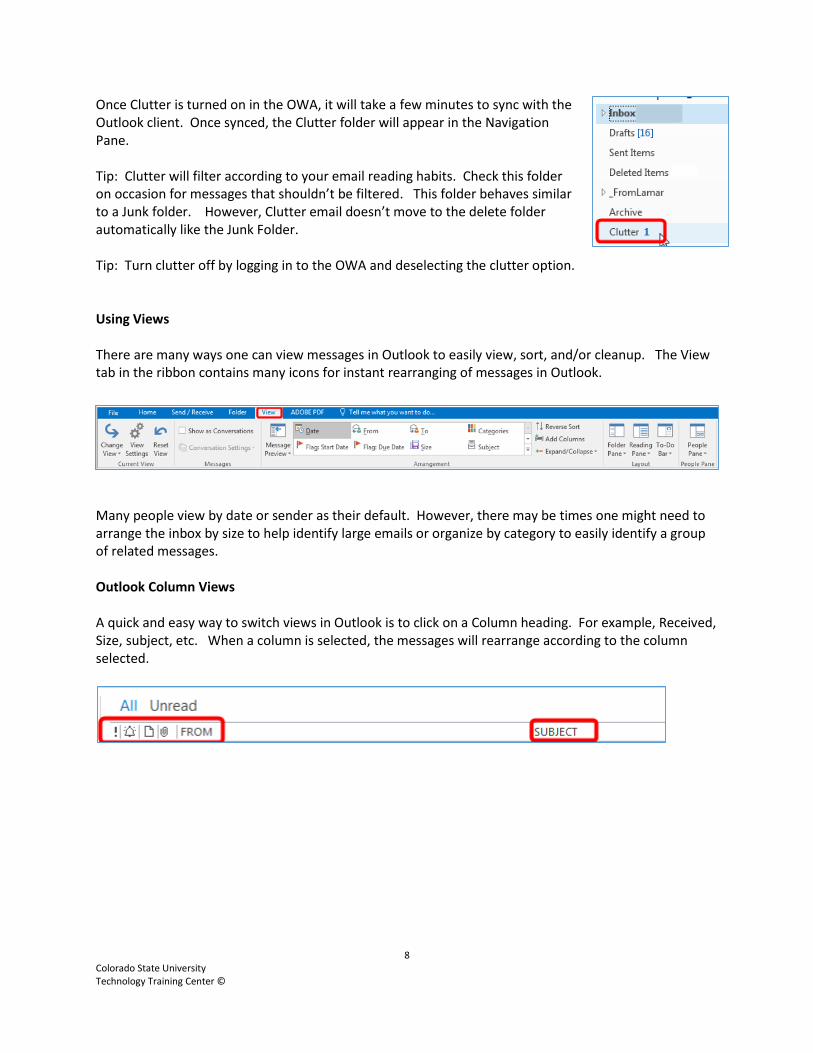
Once Clutter is turned on in the OWA, it will take a few minutes to sync with the Outlook client. Once synced, the Clutter folder will appear in the Navigation Pane. Tip: Clutter will filter according to your email reading habits. Check this folder on occasion for messages that shouldn’t be filtered. This folder behaves similar to a Junk folder. However, Clutter email doesn’t move to the delete folder automatically like the Junk Folder. Tip: Turn clutter off by logging in to the OWA and deselecting the clutter option. Using Views There are many ways one can view messages in Outlook to easily view, sort, and/or cleanup. The View tab in the ribbon contains many icons for instant rearranging of messages in Outlook.
Many people view by date or sender as their default. However, there may be times one might need to arrange the inbox by size to help identify large emails or organize by category to easily identify a group of related messages. Outlook Column Views A quick and easy way to switch views in Outlook is to click on a Column heading. For example, Received, Size, subject, etc. When a column is selected, the messages will rearrange according to the column selected.
9 Colorado State University Technology Training Center ©
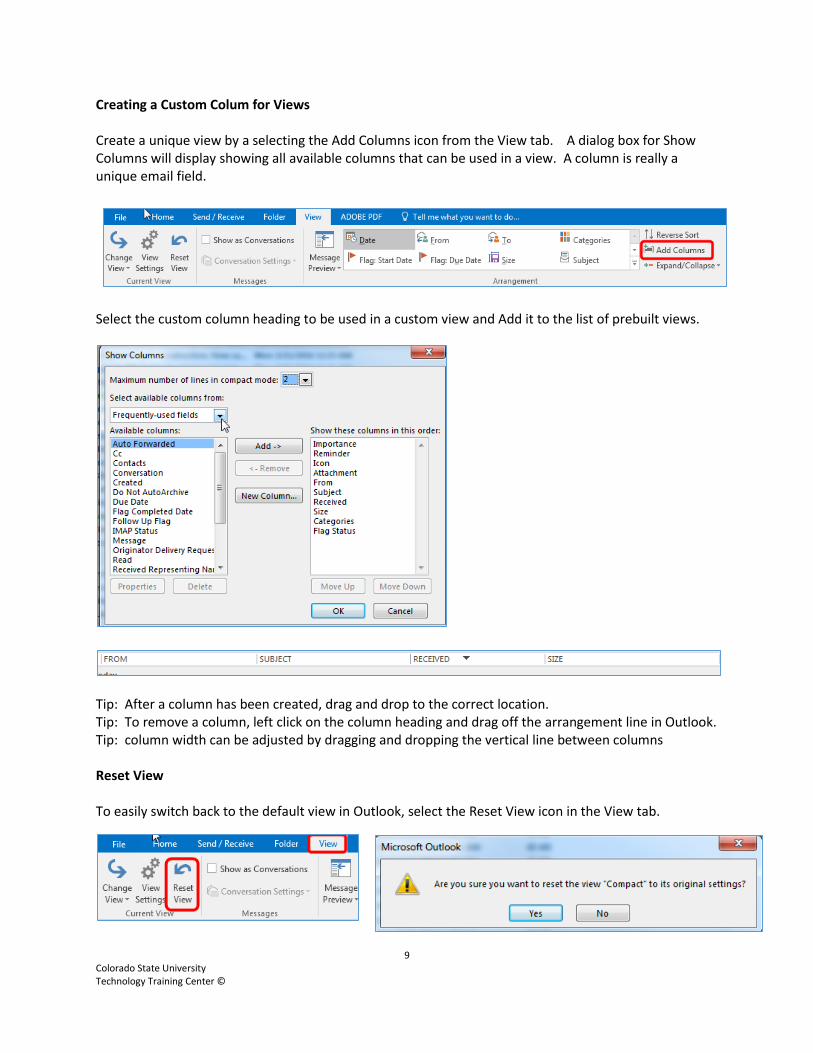
Creating a Custom Colum for Views Create a unique view by a selecting the Add Columns icon from the View tab. A dialog box for Show Columns will display showing all available columns that can be used in a view. A column is really a unique email field.
Select the custom column heading to be used in a custom view and Add it to the list of prebuilt views.
Tip: After a column has been created, drag and drop to the correct location. Tip: To remove a column, left click on the column heading and drag off the arrangement line in Outlook. Tip: column width can be adjusted by dragging and dropping the vertical line between columns Reset View To easily switch back to the default view in Outlook, select the Reset View icon in the View tab.
10 Colorado State University Technology Training Center ©
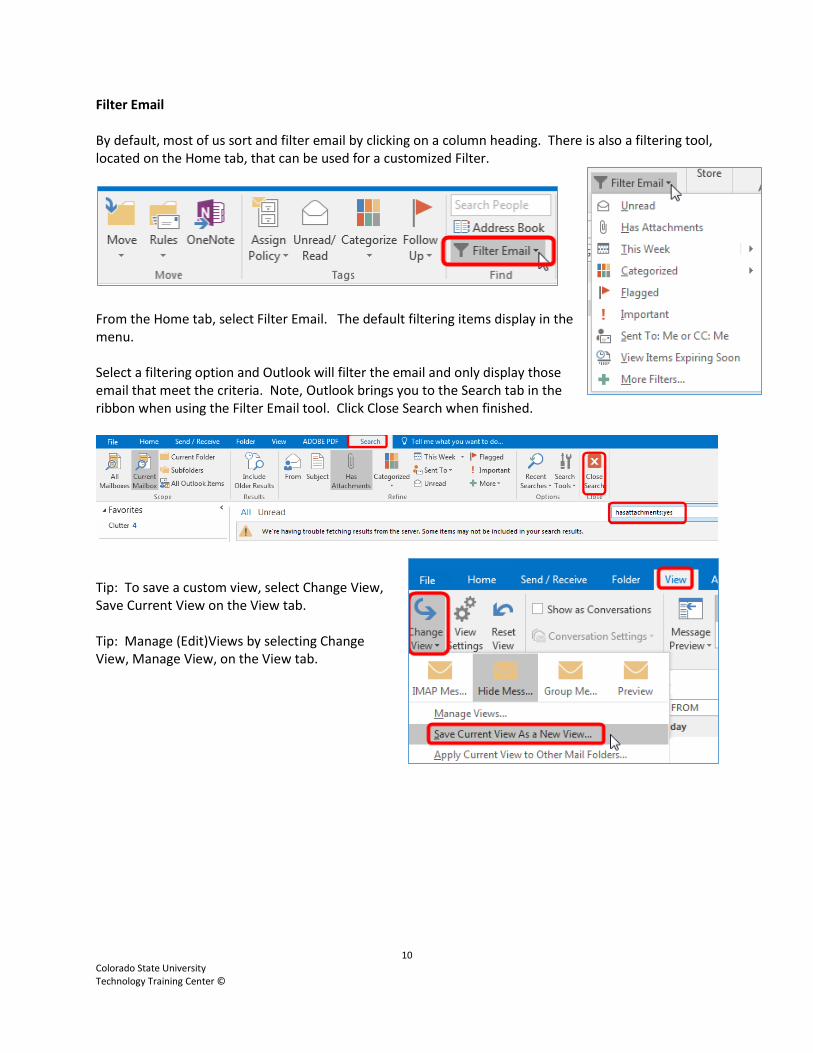
Filter Email By default, most of us sort and filter email by clicking on a column heading. There is also a filtering tool, located on the Home tab, that can be used for a customized Filter.
From the Home tab, select Filter Email. The default filtering items display in the menu. Select a filtering option and Outlook will filter the email and only display those email that meet the criteria. Note, Outlook brings you to the Search tab in the ribbon when using the Filter Email tool. Click Close Search when finished.
Tip: To save a custom view, select Change View, Save Current View on the View tab. Tip: Manage (Edit)Views by selecting Change View, Manage View, on the View tab.

11 Colorado State University Technology Training Center ©
Conditional Formatting for Email Conditional Formatting is a rule that can be applied to incoming email messages. For example, when an email is received from a specific sender, have the message appear in a certain color, font size, and font style. Rules can be created by selecting the View tab, View Settings, Conditional Formatting or by selecting the View tab, Change View, Manage Views, Modify, Conditional Formatting.
From the Conditional Formatting window, select the Add button. Provide a unique name for the conditional formatting rule, select your font preferences, and the conditions. Click OK when finished.
12 Colorado State University Technology Training Center ©
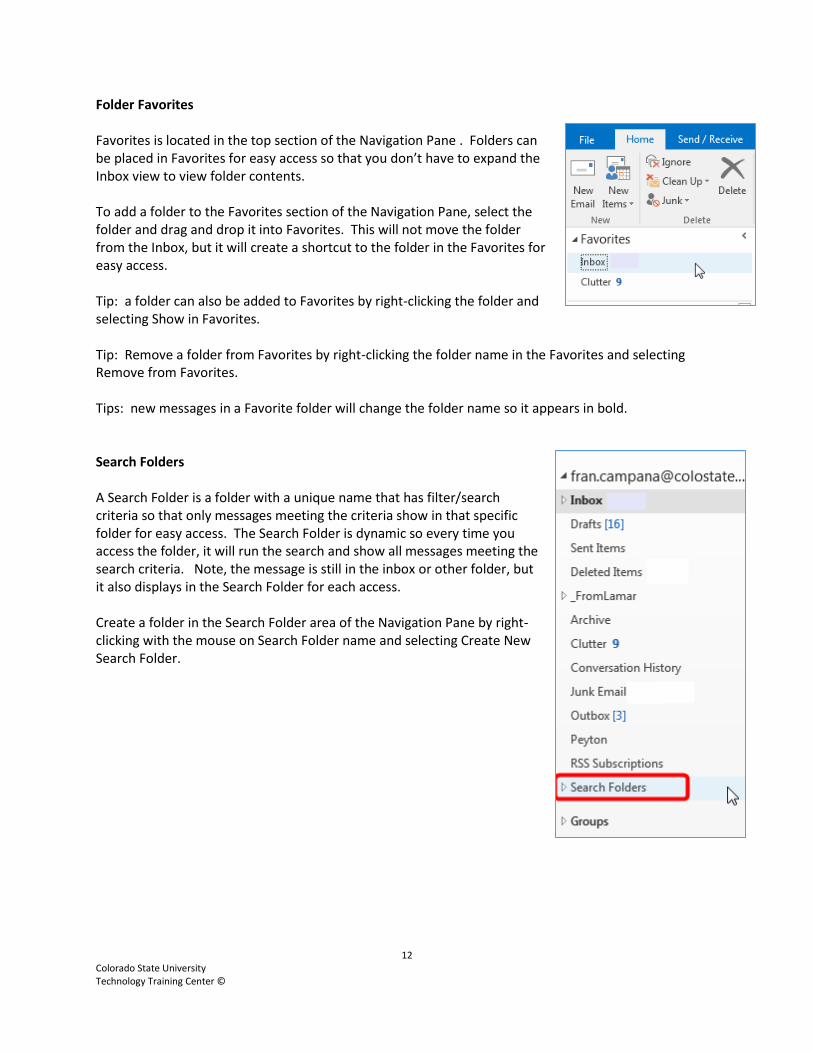
Folder Favorites Favorites is located in the top section of the Navigation Pane . Folders can be placed in Favorites for easy access so that you don’t have to expand the Inbox view to view folder contents. To add a folder to the Favorites section of the Navigation Pane, select the folder and drag and drop it into Favorites. This will not move the folder from the Inbox, but it will create a shortcut to the folder in the Favorites for easy access. Tip: a folder can also be added to Favorites by right-clicking the folder and selecting Show in Favorites. Tip: Remove a folder from Favorites by right-clicking the folder name in the Favorites and selecting Remove from Favorites. Tips: new messages in a Favorite folder will change the folder name so it appears in bold. Search Folders A Search Folder is a folder with a unique name that has filter/search criteria so that only messages meeting the criteria show in that specific folder for easy access. The Search Folder is dynamic so every time you access the folder, it will run the search and show all messages meeting the search criteria. Note, the message is still in the inbox or other folder, but it also displays in the Search Folder for each access. Create a folder in the Search Folder area of the Navigation Pane by right-clicking with the mouse on Search Folder name and selecting Create New Search Folder.
13 Colorado State University Technology Training Center ©
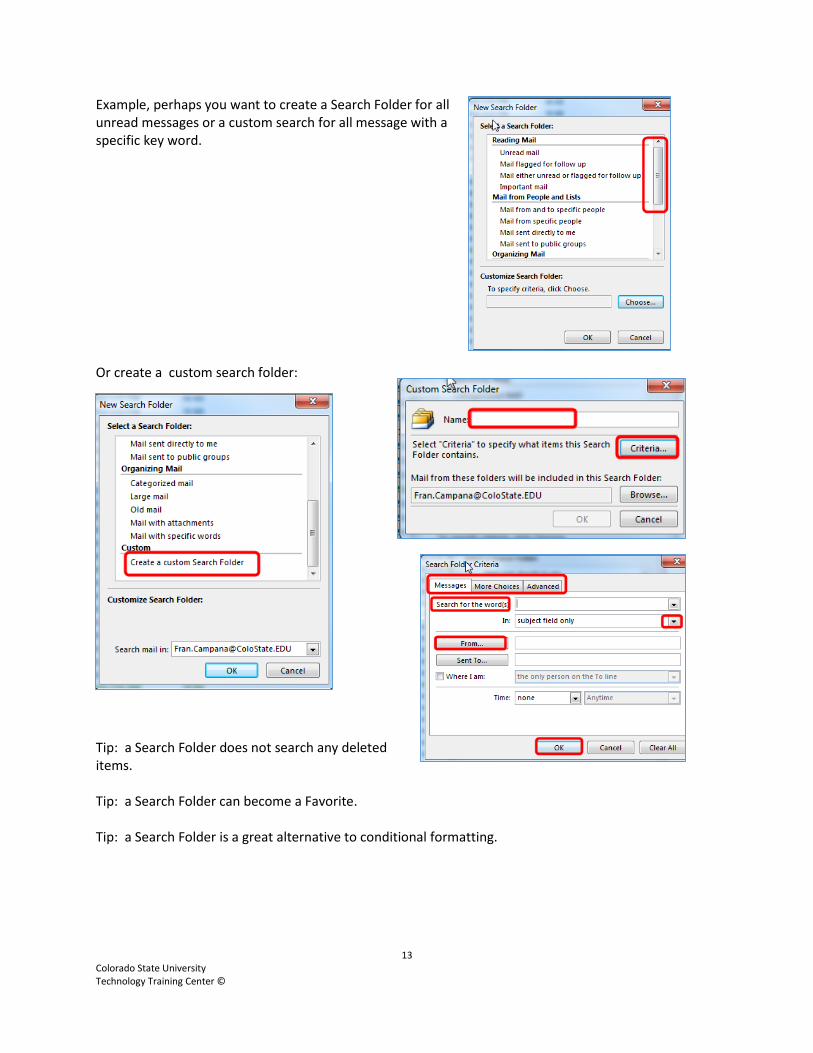
Example, perhaps you want to create a Search Folder for all unread messages or a custom search for all message with a specific key word. Or create a custom search folder:
Tip: a Search Folder does not search any deleted items. Tip: a Search Folder can become a Favorite. Tip: a Search Folder is a great alternative to conditional formatting.
14 Colorado State University Technology Training Center ©
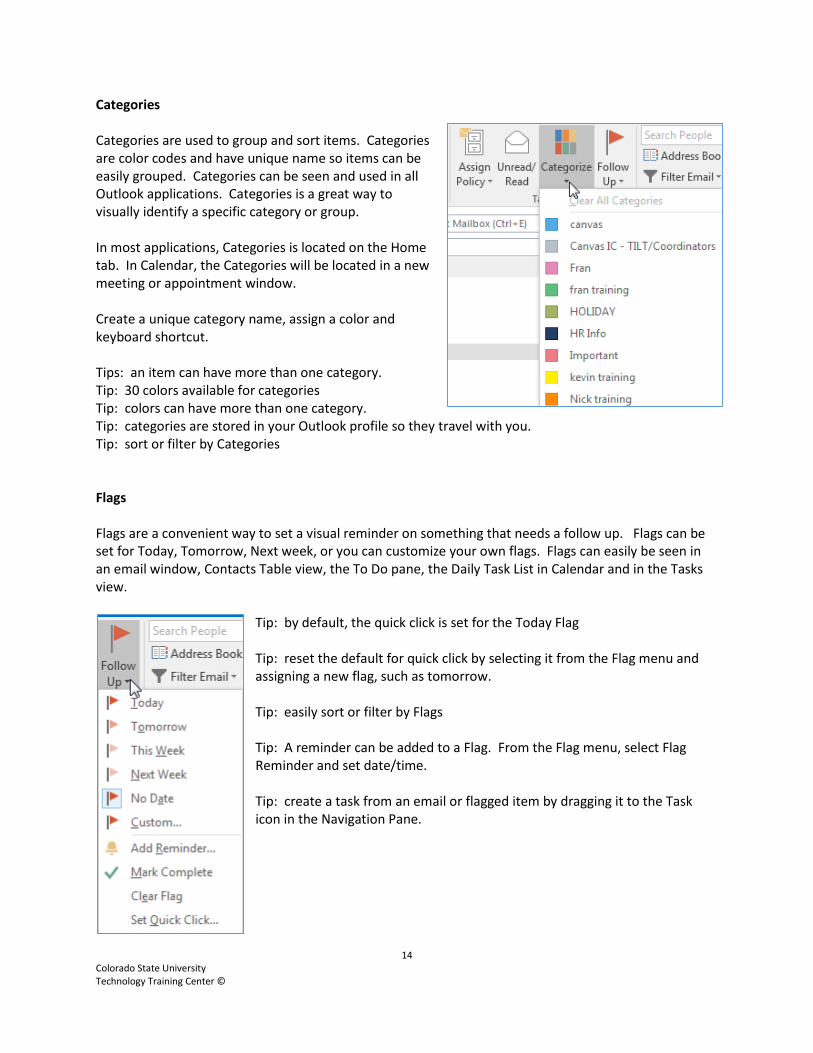
Categories Categories are used to group and sort items. Categories are color codes and have unique name so items can be easily grouped. Categories can be seen and used in all Outlook applications. Categories is a great way to visually identify a specific category or group. In most applications, Categories is located on the Home tab. In Calendar, the Categories will be located in a new meeting or appointment window. Create a unique category name, assign a color and keyboard shortcut. Tips: an item can have more than one category. Tip: 30 colors available for categories Tip: colors can have more than one category. Tip: categories are stored in your Outlook profile so they travel with you. Tip: sort or filter by Categories Flags Flags are a convenient way to set a visual reminder on something that needs a follow up. Flags can be set for Today, Tomorrow, Next week, or you can customize your own flags. Flags can easily be seen in an email window, Contacts Table view, the To Do pane, the Daily Task List in Calendar and in the Tasks view.
Tip: by default, the quick click is set for the Today Flag Tip: reset the default for quick click by selecting it from the Flag menu and assigning a new flag, such as tomorrow. Tip: easily sort or filter by Flags Tip: A reminder can be added to a Flag. From the Flag menu, select Flag Reminder and set date/time. Tip: create a task from an email or flagged item by dragging it to the Task icon in the Navigation Pane.
15 Colorado State University Technology Training Center ©
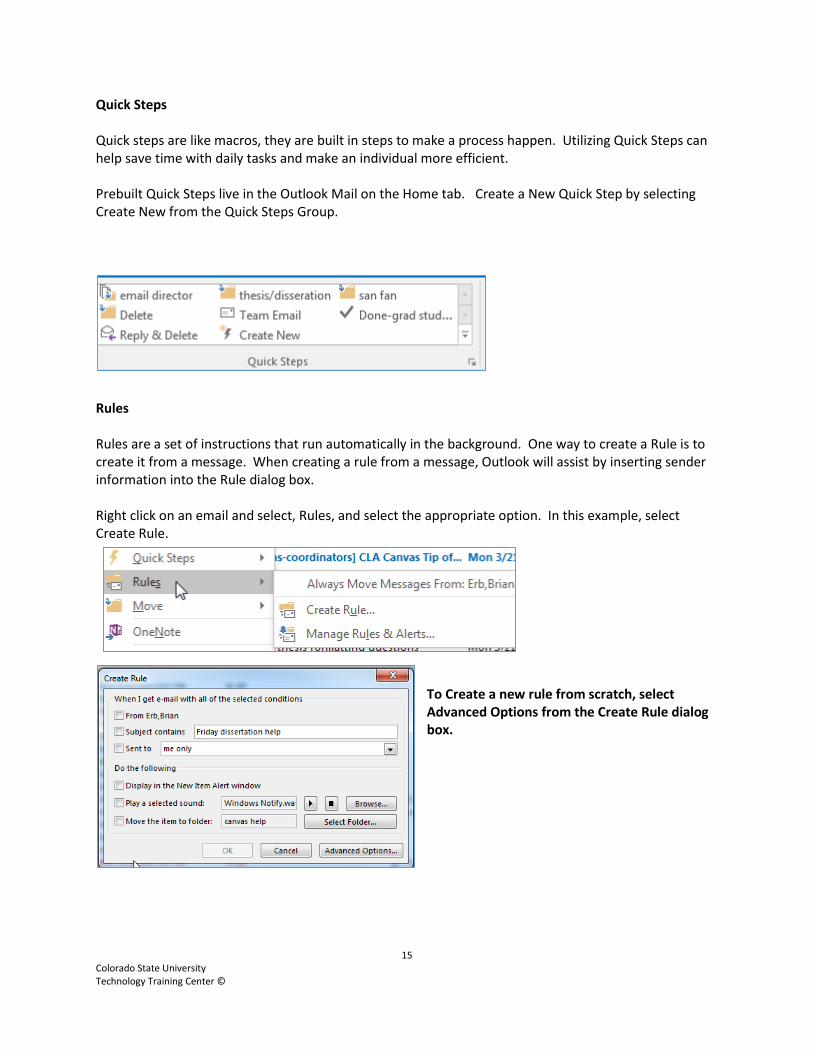
Quick Steps Quick steps are like macros, they are built in steps to make a process happen. Utilizing Quick Steps can help save time with daily tasks and make an individual more efficient. Prebuilt Quick Steps live in the Outlook Mail on the Home tab. Create a New Quick Step by selecting Create New from the Quick Steps Group.
Rules Rules are a set of instructions that run automatically in the background. One way to create a Rule is to create it from a message. When creating a rule from a message, Outlook will assist by inserting sender information into the Rule dialog box. Right click on an email and select, Rules, and select the appropriate option. In this example, select Create Rule.
To Create a new rule from scratch, select Advanced Options from the Create Rule dialog box.
16 Colorado State University Technology Training Center ©
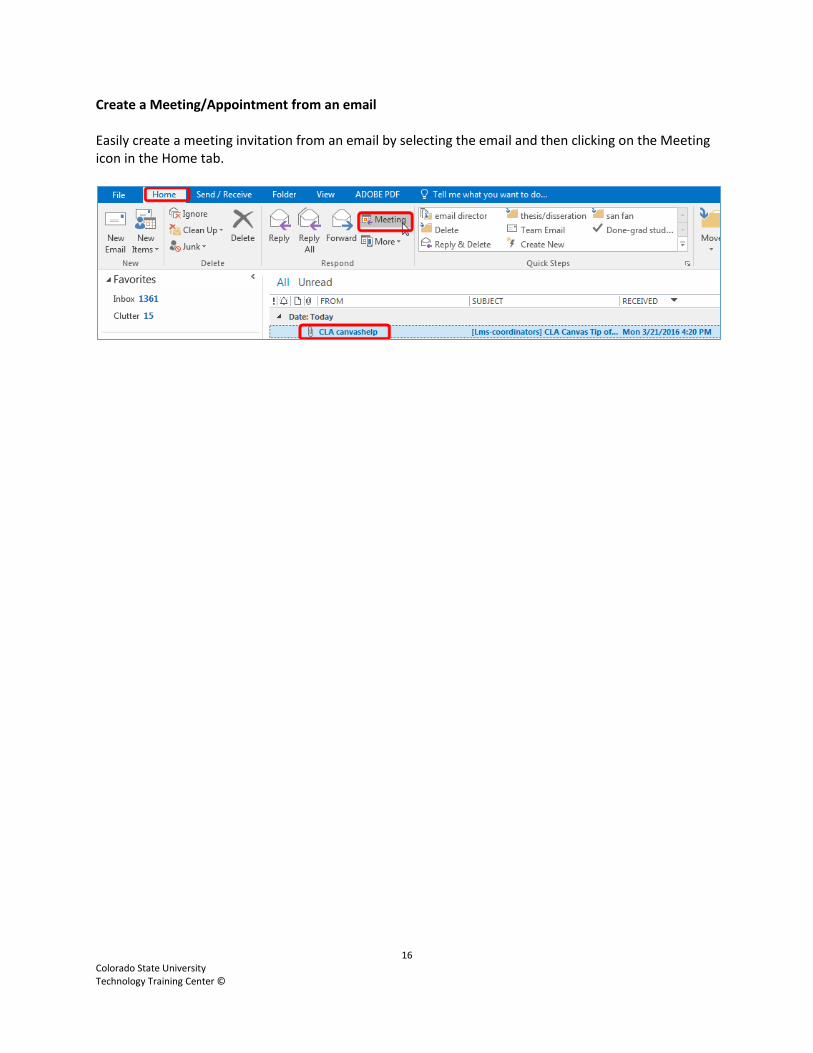
Create a Meeting/Appointment from an email Easily create a meeting invitation from an email by selecting the email and then clicking on the Meeting icon in the Home tab.