17dof humonoid robot - robokits india, easy to use ... · pdf fileafter assembling the...
TRANSCRIPT
http://www.robokits.co.in
http://www.robokitsworld.com Page 1
Overview:
17 DOF Humanoid Robot from Robokits comes with 17 degrees of freedom joints. Its actuated using
17 Metal Gear Standard Servo (or) Servo Economy. This Humanoid Robot is controlled by ARDUINO
UNO R3 BASED USB 18 SERVO CONTROLLER (Optionally available with Bluetooth). It can also be
controlled by PC using USB 18 Servo Controller Software. The software helps to develop the complex
sequences in real time on the hardware. It also generates Arduino based code for the developed sequence
which can be deployed on the controller on board thereby making the robot autonomous.
The power requirement for this robot is 5 to 6V DC 10 Amp power supply. It could be either battery or a
AC power supply rated at 5-6VDC. You can also use a modified computer SMPS supply, it is available for
sale on Robokits website. The detailed features of the Servo Controller are:
• Control 18 hobby servos from PC and Microcontroller
• USB interface
• Comes Pre-loaded Arduino Uno bootloader
• Software exports servo sequences to Arduino Uno for running servo sequences
• Independent range setting for each servo
• Independent offset, Maximum, Minimum and Direction setting for each servo
• 0.5-microsecond resolution
• 50 Hz update rate
• Small size of 80 X 47 mm
• Plug and Play, Auto detection of hardware
• Easy to use software
• Servo sequencer with speed, delay, goto and many other features
• Home and neutral position setting
• Easy to install USB driver and Application software
• Bluetooth interface for wireless control of robots (Optionally available)
After assembling the Humanoid Robot you will be able to control it from a Windows PC. You can also
develop your own sequences in real time on hardware and can generate the code for Arduino which will be
deployed onto the board making robot autonomous.
Let’s start with the basic assembly of Humanoid Robot. Some basic tools like screw drivers, pliers, small
spanners, soldering iron, wire cutter, nipper, stripper are required to complete the assembly.

http://www.robokits.co.in
http://www.robokitsworld.com Page 2
The notations used in this document for screws, nuts, bolts and other parts are like these:
1. M4 x 12 Screw - M4 Screw
2. M4 x 12 Screw Nut - M4 Nut
3. 3 x 6 Servo Screw - Servo Screw
4. Miniature Ball Radial Bearing - Bearing
5. 3 mm Nylock Nut - Lock nut
6. 3 mm Nut - Nut
7. 3 x 6 Button Head Screw - Small Button Screw
8. 3 x 10 Button Head Screw - Big Button Screw
9. 3 x 6 CSK Screw - CSK Screw
10. M3 x 8 Screw - M3 Mid Screw
11. Metal Horn for Servo 25T - Servo Horn
12. Metal Gear Standard Servo (or) Servo Economy - Servo Motor
13. Multipurpose Aluminium Standard Servo Bracket - Multipurpose Bracket
14. Short U Shape Aluminium Servo Bracket - Short U Bracket
15. Long U Aluminium Servo Bracket - Long U Bracket
16. Oblique U Shape Aluminium Servo Bracket - Oblique U Bracket
17. Interconnect Aluminium Servo Bracket - Interconnect Bracket
18. L Shaped Interconnect Servo Bracket - L Shaped Bracket
19. Large U Beam Aluminium Servo Bracket - Large U Bracket
20. Robot feet Aluminium Servo Bracket - Robot Feet

http://www.robokits.co.in
http://www.robokitsworld.com Page 3
Steps to Assemble Humanoid Robot:
Step 1: As Shown in Image below take 2 x Robot Feets, 2 x Multipurpose Brackets, 8 x Lock Nuts and 8 x
CSK Screws.
Fix the Multipurpose Brackets on the Robot Feets with the help of CSK Screws and Lock Nuts. The
assembly will look as shown in the following Image.

http://www.robokits.co.in
http://www.robokitsworld.com Page 4
Step 2: Now take 2 x Short U Brackets, 2 x Servo Horns, 8 x Servo Screws as shown in the following
Image.
Fix the Servo Horns with the help of Servo Screws. Following image shows how it looks after fixing.

http://www.robokits.co.in
http://www.robokitsworld.com Page 5
Step 3: Fix the Short U Brackets on the Multipurpose Brackets as shown in following image by using
2 x M3 Mid Screws, 2 x Lock Nuts, and 2 x Bearings shown in the Black Boxes in below image.

http://www.robokits.co.in
http://www.robokitsworld.com Page 6
Step 4: Now take 2 x Servo Motors, 8 x M4 Screws and 8 x M4 Nuts as shown below.
Fix the Servo Motors in the assembly as shown below with the help of M4 Mid Screws and M4 Nuts. Now
the Black Box in the below image shows the Servo Screw which is to be fixed to Servo Motor Shaft after
Neutralizing the Servo Motor. To Neutralize connect the Servo Motor to Servo Controller. Power up Servo
Controller with 5 to 6 VDC power supply and connect to PC software with USB or Bluetooth connection.
Neutralize the servo (Put the servo to center position) using software. After that tight the Servo Screw
(Shown in Black Box) to the Shaft of the Servo Motor as shown in the below image.

http://www.robokits.co.in
http://www.robokitsworld.com Page 7
Step 5: Now take 2 x Multipurpose Brackets, 8 x Big Button Screws, and 8 x Lock Nuts.
Fix the Multipurpose Brackets as shown below with Big Button Screws and Lock Nuts.

http://www.robokits.co.in
http://www.robokitsworld.com Page 8
Step 6: Now take 2 x Oblique U Brackets, 2 x Short U Brackets, 8 x Big Button Screws and 8 x Lock Nuts
as shown below.
Fix the Oblique U Bracket with Short U Bracket as shown below with Big Button Screws and Lock Nuts.

http://www.robokits.co.in
http://www.robokitsworld.com Page 9
Step 7: Now take both the structures assembled as shown below, 2 x Servo Horns, 8 x Servo Screws, 2 x
M3 Mid Screws, 2 x Lock Nuts and 2 x Bearings as shown below.
Assemble the structure as shown in the following image.

http://www.robokits.co.in
http://www.robokitsworld.com Page 10
Step 8: Now take 2 x Servo Motors, 8 x M4 Screws, 8 x M4 Nuts and the structure assembled in previous
step. This Servos are to be fixed on the Multipurpose Brackets seen in the following image.

http://www.robokits.co.in
http://www.robokitsworld.com Page 11
Fix the Servo Motor on the Multipurpose Brackets as seen in the below image. Neutralize the Motor and
then tight the Servo Screw on the Motor Shaft. The Servo Screws are shown in the Black Boxes.

http://www.robokits.co.in
http://www.robokitsworld.com Page 12
Step 9: Now take 4 x Multipurpose Brackets, 2 x Interconnect Brackets, 16 x Small Button Screws and 16
x Nuts as seen in the below image.
The assembled structure will look as seen in the below image after connecting the Multipurpose Brackets
and Interconnect Brackets.

http://www.robokits.co.in
http://www.robokitsworld.com Page 13
Step 10: The following image shows the two structures that we have assembled. To connect both of them
we need 2 x M3 Mid Screws, 2 x Lock Nuts (image shows nuts but you can use Lock Nuts), 2 x Bearings.
Also we need 8 x Servo Screws and 2 x Servo Horns for further assembly.
Fix the both the structures as seen in the below image with the help of M3 Mid Screws, Nuts and Bearings.
Also fix the Servo Horns.

http://www.robokits.co.in
http://www.robokitsworld.com Page 14
Step 11: Now take 2 x Long U Brackets, 2 x Servo Horns, 8 x Servo Screws, 2 x M3 Mid Screws,
2 x Lock Nuts and 2 x Bearings as seen the below image along with the assembled structure.
Fix the Long U Brackets to the Structure as seen in the below image with the help of M3 Mid Screws and
Lock Nuts. Also fix the Servo Horns.
http://www.robokits.co.in
http://www.robokitsworld.com Page 15
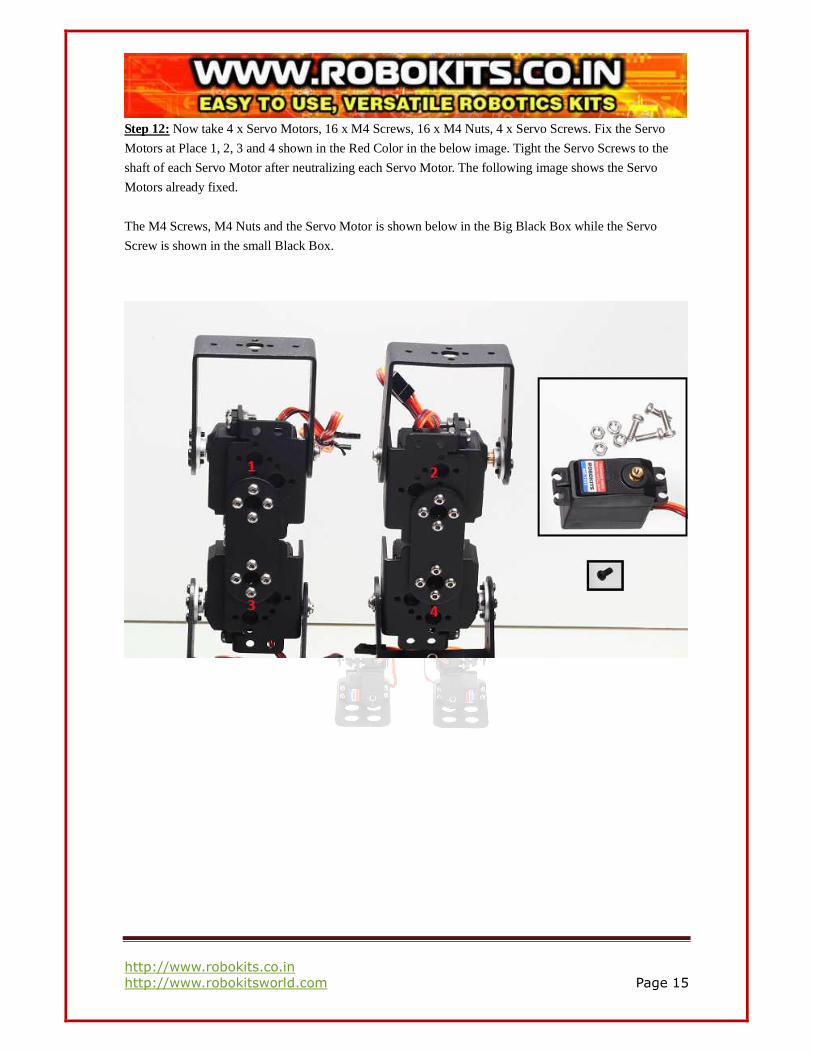
Step 12: Now take 4 x Servo Motors, 16 x M4 Screws, 16 x M4 Nuts, 4 x Servo Screws. Fix the Servo
Motors at Place 1, 2, 3 and 4 shown in the Red Color in the below image. Tight the Servo Screws to the
shaft of each Servo Motor after neutralizing each Servo Motor. The following image shows the Servo
Motors already fixed.
The M4 Screws, M4 Nuts and the Servo Motor is shown below in the Big Black Box while the Servo
Screw is shown in the small Black Box.

http://www.robokits.co.in
http://www.robokitsworld.com Page 16
Step 13: Take 2 x Short U Brackets, 8 x Big Button Screws and 8 x Lock Nuts. Fix the Short U Brackets
on the top of Long U Brackets with the help of Big Button Screws and Lock Nuts. The structure after
fixing the Short U Brackets is shown in the main image below. The Short U Brackets, Big Button Screws
and Lock Nuts is shown in the Black Box in the below image.
Step 14: Now take 2 x Multipurpose Brackets, 2 x L Shaped Brackets, 1 x Long U Bracket, 1 x Large U
Bracket, 20 x Big Button Screws and 20 x Lock Nuts as shown in the following image.

http://www.robokits.co.in
http://www.robokitsworld.com Page 17
The structure assembled will look like the one shown in the below two images.

http://www.robokits.co.in
http://www.robokitsworld.com Page 18
Step 15: Now we will connect the two structures that we have already assembled in previous steps and
they are also shown below. To connect them take 2 x M3 Mid Screws, 2 x Lock Nuts and 2 x Bearings.
Also take 2 x Servo Horns and 8 x Servo Screws for fixing the Servo Motors.
After connecting the two structures the assembly will look as shown in the following image.

http://www.robokits.co.in
http://www.robokitsworld.com Page 19
Step 16: Now take 2 x Servo Motors, 8 x M4 Screws, 8 x M4 Nuts and 2 x Servo Screws. The Servo
Motors are to be fixed at place 1 and 2 shown in the below image.
The Servo Screws is to be fixed at the shaft of both Servo Motors after neutralizing the Servo Motors.

http://www.robokits.co.in
http://www.robokitsworld.com Page 20
Step 17: Now take 2 x Multipurpose Brackets, 8 x Big Button Screws and 8 x Lock Nuts which are shown
in the Black Box in the following image.
These Multipurpose Brackets are to be fixed at the places 1 and 2 Shown in the below image with the help
of Screws and Nuts taken.

http://www.robokits.co.in
http://www.robokitsworld.com Page 21
Step 18: Now take 2 x Servo Motors, 8 x M4 Screws and 8 x M4 Nuts and fix them at place 1 and 2.

http://www.robokits.co.in
http://www.robokitsworld.com Page 22
Step 19: Now remove the Long U Bracket from the top of the structure shown in the below image and fix
the Servo Horn on the top of Long U Bracket with the help of Servo Screws. Below image shows the
already fixed Servo Horn. Now before fixing the Long U Bracket on the same place from where it was
removed, fix the Servo Motor on the Servo Horn and tight the Servo Screw on the Servo Motor Shaft.
After fixing Servo Motor the structure will look like the below image.

http://www.robokits.co.in
http://www.robokitsworld.com Page 23
Step 20: Now let’s assemble both the hands of Humanoid Robot. Take 2 x Oblique U Brackets,
2 x Multipurpose Brackets, 2 x Servo Horns, 8 x Servo Screws, 2 x M3 Mid Screws, 2 x Lock Nuts and
2 x Bearings. Below sequence of images shows the assembly.
After doing so you will get two structures shown below one for Right Hand and another for Left Hand.

http://www.robokits.co.in
http://www.robokitsworld.com Page 24
Step 21: Now take the two structures assembled in previous step along with 2 x L Shaped Brackets,
2 x Servo Horns, 8 x Servo Screws, 8 Small Button Screws, and 8 Nuts as shown in the below image.
Now after fixing the Servo Horns and L Shaped Brackets you will have the following two structures.

http://www.robokits.co.in
http://www.robokitsworld.com Page 25
Step 22: Now take 2 x Long U Brackets, 8 x Small Button Screws, 8 x Nuts along with already assembled
structures as shown in following Image.
.
After fixing Long U Brackets you will have the below structures.

http://www.robokits.co.in
http://www.robokitsworld.com Page 26
Step 23: Now take 2 x Multipurpose Brackets, 2 x Interconnect Brackets, 8 x Small Button Screws,
8 x Nuts, 2 x M3 Mid Screws, 2 x Lock Nuts and 2 x Bearings as shown below.
After fixing Multipurpose Brackets and Interconnect Brackets you will have the below two structures one
for right hand and another for left hand.

http://www.robokits.co.in
http://www.robokitsworld.com Page 27
Step 24: Now we will fix the Servo Motor in the two hands. Take 4 x Servo Motors, 16 x M4 Screws and
16 x M4 Nuts as seen in the below Image.
After fixing the Servo Motors, both the hands will look as seen in the below image.

http://www.robokits.co.in
http://www.robokitsworld.com Page 28
Step 25: Now take 2 x Servo Horns and 8 x Servo Screws to fix the Servo Horns for the last two Servo
Motors.
After fixing the Servo Motors neutralize all the four Motors and tight the Servo Horns Screws shown in the
Small Black Box on the Shaft of all the Servo Motors.

http://www.robokits.co.in
http://www.robokitsworld.com Page 29
Step 26: Now we have both the Hands ready as shown in the below Image and also the Middle Structure.
Now we will fix both the hands with the Middle Structure to complete the Assembly. For fixing we take
2 x Servo Screws which are shown in the Black Box in the below Image. Now Neutralize both the Servo
Motors and tight the Servo Screws on the Shaft of both the Motors.
After fixing the both the hands top portion of the Humanoid will look as seen in the below Image.

http://www.robokits.co.in
http://www.robokitsworld.com Page 30
Following all the above steps assembly of the Humanoid Robot will complete and Humanoid Robot will
look as below: