1000 2000 3200 5000 · 1 espaÑol 1000 – 2000 – 3200 - 5000 dadas las exigencias cada vez...
TRANSCRIPT

Español 1 - 8
English 9 - 16
Deutsch 17 - 24
1000200032005000
1
ESPAÑOL
1000 – 2000 – 3200 - 5000
Dadas las exigencias cada vez mayores del mercado profesional del audio, queremos agradecerle la compra de un producto MASTER AUDIO DESIGN. En Amate Electroacústica, hemos dotado a nuestros fabricados de la más alta tecnología, con la seguridad de que el producto que tiene ante usted le ofrecerá un óptimo rendimiento y funcionalidad por duras que sean las condiciones de trabajo a las que usted le someta. Para conseguir el mayor rendimiento y un correcto funcionamiento, es importante leer detenidamente el presente manual de instrucciones antes de cualquier conexión. INDICE
1. CARACTERÍSTICAS GENERALES 2. PANEL FRONTAL 3. PANEL POSTERIOR 4. CONEXIÓN A LA RED 5. CONEXIÓN DE ALTAVOCES 6. MODO STEREO 7. MODO MONO (BRIDGE) 8. MODO PARALELO 9. CONEXIÓN DE PREVIOS
10. TARJETAS DE PROCESAMIENTO 11. VENTILACIÓN 12. FUNCIONAMIENTO Y PUESTA EN MARCHA 13. CLIP / LIMITER - INDICADORES REMOTOS 14. CARACTERÍSTICAS TÉCNICAS 15. CERTIFICADO DE GARANTÍA
2
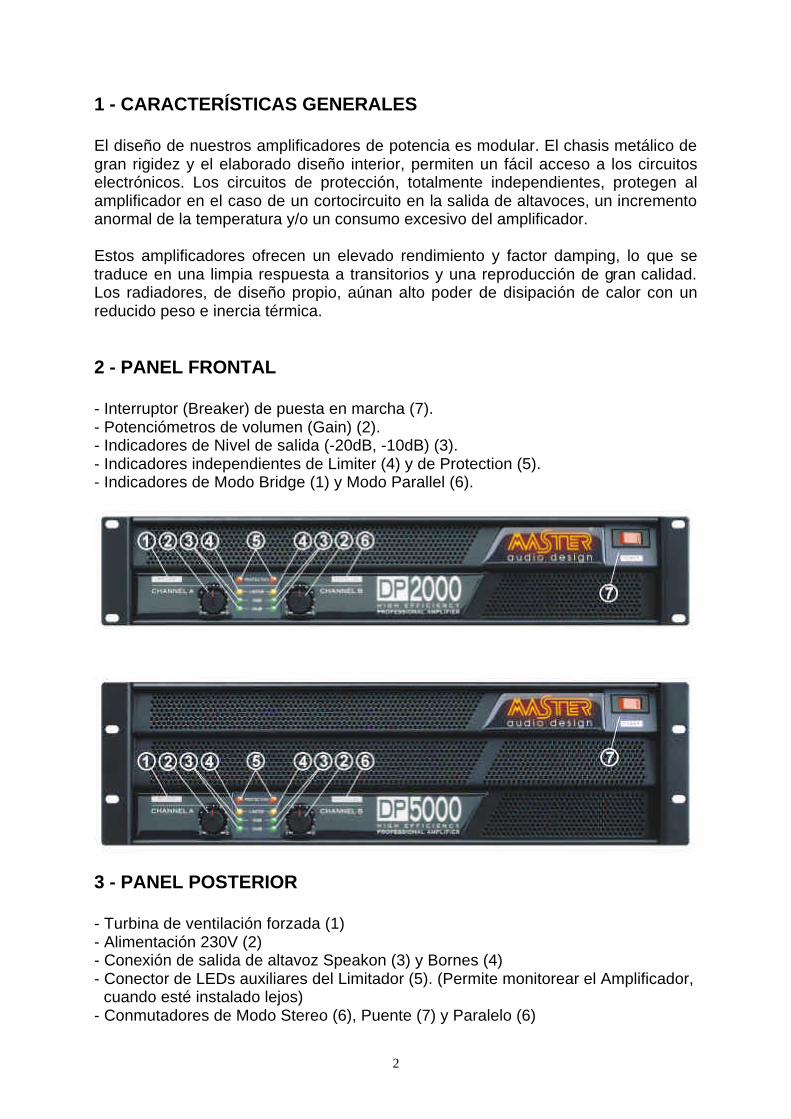
1 - CARACTERÍSTICAS GENERALES El diseño de nuestros amplificadores de potencia es modular. El chasis metálico de gran rigidez y el elaborado diseño interior, permiten un fácil acceso a los circuitos electrónicos. Los circuitos de protección, totalmente independientes, protegen al amplificador en el caso de un cortocircuito en la salida de altavoces, un incremento anormal de la temperatura y/o un consumo excesivo del amplificador. Estos amplificadores ofrecen un elevado rendimiento y factor damping, lo que se traduce en una limpia respuesta a transitorios y una reproducción de gran calidad. Los radiadores, de diseño propio, aúnan alto poder de disipación de calor con un reducido peso e inercia térmica. 2 - PANEL FRONTAL - Interruptor (Breaker) de puesta en marcha (7). - Potenciómetros de volumen (Gain) (2). - Indicadores de Nivel de salida (-20dB, -10dB) (3). - Indicadores independientes de Limiter (4) y de Protection (5). - Indicadores de Modo Bridge (1) y Modo Parallel (6).
3 - PANEL POSTERIOR - Turbina de ventilación forzada (1) - Alimentación 230V (2) - Conexión de salida de altavoz Speakon (3) y Bornes (4) - Conector de LEDs auxiliares del Limitador (5). (Permite monitorear el Amplificador,
cuando esté instalado lejos) - Conmutadores de Modo Stereo (6), Puente (7) y Paralelo (6)

3
- Conmutadores de Baja Frecuencia (8). (Bass Boost, mejora el rendimiento de bajas frecuencias en los sistemas Bass Reflex)
- Entrada para Tarjetas de Procesamiento (9). (Para adaptarse a sus aplicaciones específicas)
- Zócalo Interior (10). (Para ajustar la sensibilidad del sistema) - Entradas de señal XLR (11)
4 - CONEXIÓN A LA RED En primer lugar es necesario asegurarse de que el voltaje de red corresponde al del equipo. No es conveniente conectar y desconectar el cable de red sin asegurarse de que el interruptor de puesta en marcha está en posición apagado, para evitar en lo posible ruidos molestos.
PRECAUCIÓN; la conexión a un voltaje diferente del especificado puede dañar inmediatamente al amplificador.

4
5 - CONEXIÓN DE ALTAVOCES El sistema de cajas acústicas debe conectarse a la base Speakon o a los bornes, asegurándose de que la polaridad sea la correcta. Es muy importante utilizar el cable adecuado a la potencia del amplificador para mantener el elevado factor damping que estas unidades ofrecen. A título orientativo, ofrecemos una tabla de valores de la sección mínima versus la distancia:
- Hasta 10m de longitud, 2,5mm2 de sección. - De 11m a 20m de longitud, 4mm2 de sección. - De 21m a 30m de longitud, 6mm2 de sección. - De 31m en adelante aumentar la sección proporcionalmente.
Estas secciones se corresponden para impedancia de 8 Ohms. Para impedancia de 4 Ohms deben incrementarse. Con cargas muy bajas (2 Ohm) la sección del cable cumple una función muy importante en la calidad del sonido.
Capacidad de carga: Los amplificadores DP Series tienen capacidad de corriente suficiente para aceptar cargas muy bajas (hasta 2 Ohms). Hay que tener en cuenta que muchos altavoces de impedancia nominal 8 Ohms que utilizan filtros pasivos, a ciertas frecuencias presentan impedancias mucho más bajas de la nominal, por lo tanto, es recomendable usar cargas de 2 Ohms solo cuando se conoce perfectamente la curva de impedancia de los sistemas de altavoces a conectar. 6 - MODO STEREO Primero asegurarse de que el Selector de Modo BRIDGE OFF/ON, situado en la sección de Entradas (Inputs) y en medio de los dos puntos de conexión, se encuentra en la posición OFF. Y que el Selector de Modo STEREO/PARALLEL, se encuentre en la posición STEREO. Se dispone de dos salidas para altavoces. CH A para el canal izquierdo y CH B para el derecho, provistas de un conector Speakon, o un par de Bornes para cada una. Cada conector Speakon, dispone de 4 puntos de conexión denominados +1, -1, +2, -2. Se utilizarán solamente los pines +1 para el polo Positivo, y -1 para el Negativo. Para fijar el cable (Sección 4mm máx.) se precisa una llave Allen 1,5.

5
Para aplicaciones móviles puede además soldarse el contacto para asegurar su fijación. Si se prefiere conectar mediante los Bornes, se utilizará el Borne Rojo para el polo positivo, y el Negro para el Negativo. 7 - MODO MONO (BRIDGE) Para su utilización en modo MONO, debe posicionarse el conmutador BRIDGE OFF/ON antes mencionado, en ON. Ahora se iluminará el indicador correspondiente situado en el panel frontal y en medio de los dos controles de volumen (BRIDGE). Téngase en cuenta que en esta posición la potencia de salida de ambos canales es sumada sobre una sola salida (mono). Para trabajar en este modo se utilizará la siguiente conexión: El polo + del altavoz se conectará al pin +1 del Speakon, o al Borne Rojo del CH A. Y el polo – del altavoz, al pin +1 del Speakon, o al Borne Rojo del CH B. La potencia entregada por el amplificador será la resultante de la suma de los dos canales (a 4 Ohm), pero la impedancia de carga será de 8 Ohm. No se recomiendan instalaciones permanentes en modo Bridge con impedancias inferiores a 8 Ohm. 8 - MODO PARALLEL Para su utilización, debe posicionarse el conmutador STEREO/PARALLEL, en modo PARALLEL. Esta función puentea interiormente las dos entradas (CHA y CHB) sin necesitar cables exteriores de interconexión. Esta opción es interesante en el caso de que el Amplificador se utilice para alimentar un mismo sistema de altavoces en biamplificación, mediante el uso de las Tarjetas de Procesamiento. 9 - CONEXIÓN DE PREVIOS Las entradas (inputs) permiten la posibilidad de conexión mediante XLR-3.. Los amplificadores, incorporan entradas balanceadas para un elevado rechazo de los parásitos generados por cables de señal largos o cercanos a cables eléctricos o fuentes que los provoquen, y garantizar así, una perfecta respuesta frecuencial a largas distancias.

6
Entradas BALANCEADAS: 1. Masa 2. (+) Vivo 3. (–) Retorno
Entradas DESBALANCEADAS:
1. Masa 2. (+) Vivo 3. Neutro
10 - TARJETAS DE PROCESAMIENTO Las tarjetas de procesamiento (Accesorio opcional) han sido diseñadas: - Para delimitar la frecuencia de trabajo del Amplificador, con el corte y la pendiente más adecuada a cada Sistema. - Para evitar la presencia de oscilaciones externas o zumbidos inaudibles que pueden destruir los altavoces (mediante sus Filtros Sónicos). - Para optimizar la respuesta en frecuencia, adaptada a las necesidades y características de cada transductor. - Y para ajustar la fase cuando una instalación asimétrica así lo requiera. Dichas Tarjetas se introducen por la parte posterior del Amplificador, quitando las coberturas metálicas llamadas “PROCESSING CARD SLOT”.

7
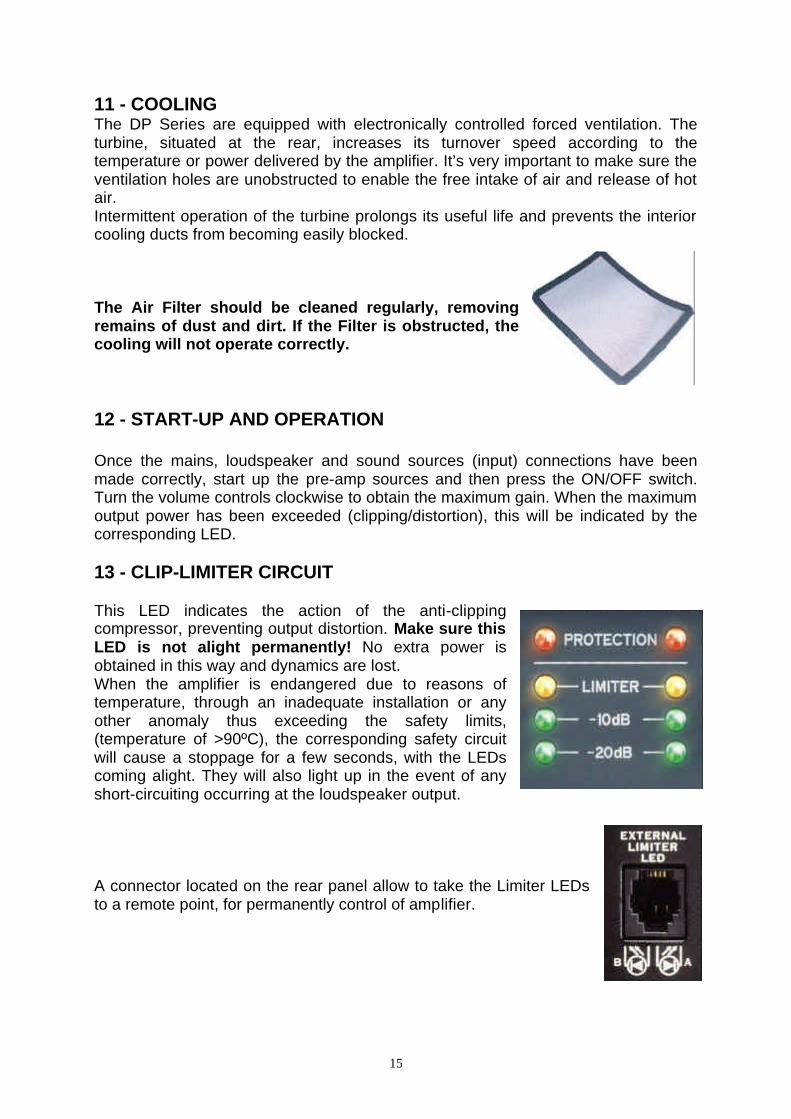
11 - VENTILACIÓN Los amplificadores DP Series están dotados de ventilación forzada controlada electrónicamente; la turbina situada en la parte posterior, aumenta su velocidad de giro en función de la temperatura o de la potencia entregada por el amplificador. Es muy importante dejar libre la entrada y salida de ventilación del equipo para que pueda evacuar el aire caliente sin obstrucciones. El funcionamiento intermitente del ventilador, alarga la vida útil del mismo y evita que los conductos interiores de refrigeración se obstruyan con facilidad. Deberá realizarse una operación de limpieza del filtro de ventilación regularmente, eliminando los restos de polvo y suciedad. Si el filtro está obstruido, la ventilación no se produce correctamente. 12 - FUNCIONAMIENTO Y PUESTA EN MARCHA Una vez que se ha realizado correctamente el conexionado de red, altavoces y fuentes de sonido (entradas), poner en marcha primero las fuentes previas y a continuación pulsar el interruptor. Luego giraremos los controles de volumen en el sentido de las agujas del reloj, obteniendo así la máxima ganancia. Si se supera el nivel máximo de salida (Limiter), lo indicará el LED correspondiente. 13 – CLIP / LIMITER - INDICADORES REMOTOS Este LED indica la actuación del compresor anti-clipping, evitando la distorsión a la salida. ¡Evítese mantener este LED continuamente encendido!. No se obtiene mayor potencia y se pierde dinámica. Cuando por razones de temperatura se ponga en peligro la vida del amplificador, por una instalación inadecuada o por cualquier otra anomalía, rebasando los limites de seguridad (temperatura >90ºC) el circuito de protección correspondiente provocará una parada durante unos segundos, iluminándose los LEDs “PROTECTION”. También se iluminarán en caso de cortocircuito a la salida de altavoces. Un conector situado en la parte posterior del amplificador, nos permite llevar los LEDs indicadores de Limiter de ambos canales, a un punto remoto para un control permanente de su estado.

8
14 - CARACTERÍSTICAS TÉCNICAS Características Técnicas 1000 2000 3200 5000Potencia de salida (1KHz - 1% THD) (Nota 1)
Stereo 2 Ohm 480 W 980 W 1510 W 2600 W
Stereo 4 Ohm 325 W 700 W 1150 W 1750 W
Stereo 8 Ohm 190 W 480 W 720 W 950 W
Stereo 16 Ohm 100 W 270 W 390 W 520 W
Bridge 4 Ohm 960 W 1960 W 3020 W 5200 W
Bridge 8 Ohm 650 W 960 W 2300 W 3500 W
Respuesta en frecuencia (Nota 2) 20Hz - 30KHz (-3dB)
Impedancua de entrada > 15KOhm
Sensibilidad (Nota 3) 1,2 V +4dBm
Distorsión armónica + Ruido 0,08% 0,08% 0,08% 0,10%
Relación Señal/Ruido > 102 > 104 > 107 > 108
Diafonía > 65dB > 65dB > 65dB > 70dB
Damping Factor > 300 > 300 > 350 > 350
Alimentación AC 230V 50 / 60 Hz
Consumo a max. Potencia (Nota 4) 6 A 8 A 10 A 12 A
Dimensiones (Al x An x Pr) 88x44 2x454 mm 132x44 2x454 mm
Peso neto 11,46 Kg 12 Kg 19,8 Kg 20 Kg
Nota 1: Tono Burst continuo de 20 ms (0 dB) / 480 ms (-20 dB) de acuerdo con EIA RS-490 y IEC 60268-3 (IHF A-202)
Nota 2: Limitado internamente por filtro activo subsónico y ultrasónico
Nota 3: Variable internamente mediante una resistencia, desde 0,775V hasta 2,40V
Nota 4: Programa musical - Interruptor automatico de consumo
Especificaciones sujetas a variación sin aviso previo. ENE 2002.
Siguiendo las instrucciones y recomendaciones expuestas, tendremos la seguridad de que el amplificador funcionará siempre dentro de los parámetros establecidos, con lo cual queda asegurada su longevidad y total eficacia. 15 - CERTIFICADO DE GARANTÍA
Las Condiciones y Observaciones para la aplicación del presente Contrato de Garantía son para todos los territorios del Estado Español.
Para otros países, deberán observarse las particularidades de cada país, siendo el Responsable de su Aplicación el propio Delegado o Importador nacional. Para cualquier reclamación de tipo Legal, serán únicamente válidos los Tribunales Ordinarios correspondientes a la ciudad de Terrassa (BCN-Spain).
Por favor siga las instrucciones de la ultima hoja de este manual.

9
ENGLISH
1000 – 2000 – 3200 - 5000
In view of the fact that the requirements of audio professionals are increasingly greater, we would like to thank you for choosing a MASTER AUDIO DESIGN product. At AMATE ELECTROACÚSTICA, we have incorporated the highest technology into our products with the conviction that what you have purchased will give you optimum performance and operation, however adverse the working conditions to which you may submit it. In order to achieve the best performance and correct operation, it is important that you read the instructions manual carefully before making any connections. INDEX
1- GENERAL FEATURES 2- FRONT PANEL FEATURES 3- REAR PANEL FEATURES 4- CONNECTION TO THE MAINS 5- CONNECTION OF THE LOUDSPEAKERS 6- CONNECTION IN STEREO MODE 7- CONNECTION IN BRIDGE MODE 8- CONNECTION IN PARALLEL MODE 9- PRE-AMP CONNECTION
10- CONNECTION OF THE PROCESSING CARDS 11- COOLING 12- START-UP AND OPERATION 13- CLIP-LIMITER CIRCUIT 14- TECHNICAL FEATURES 15- CERTIFICATE OF WARRANTY
10
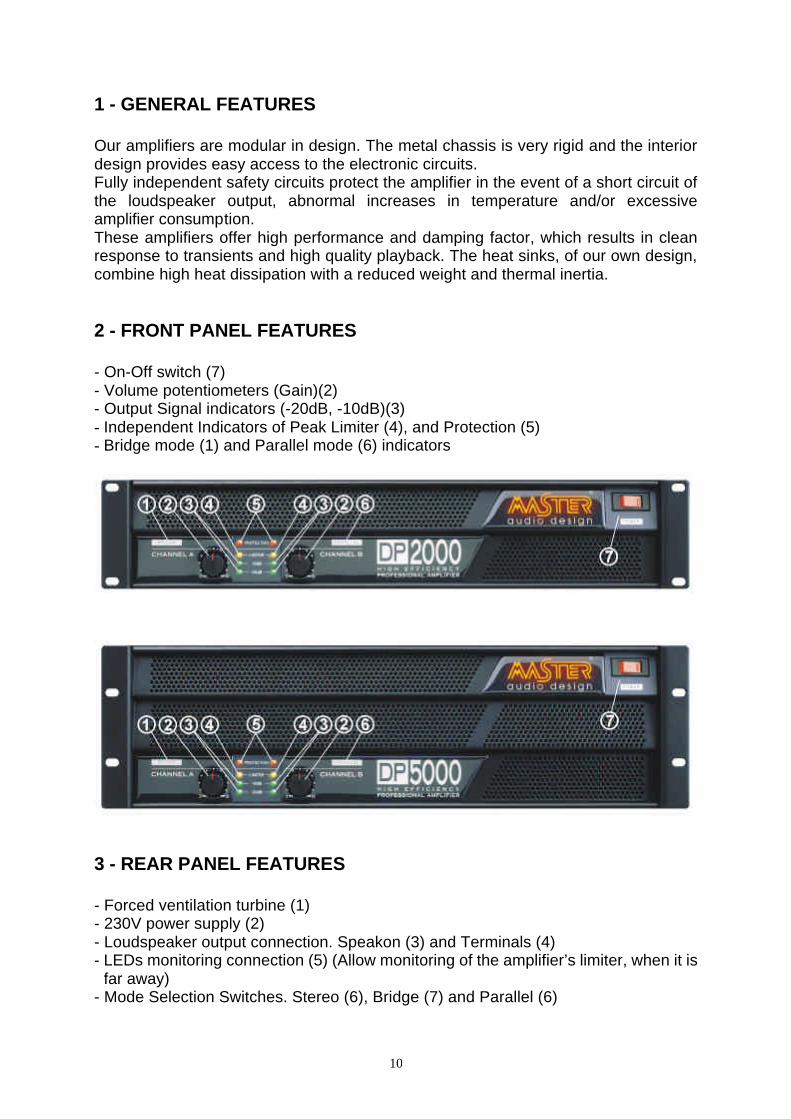
1 - GENERAL FEATURES Our amplifiers are modular in design. The metal chassis is very rigid and the interior design provides easy access to the electronic circuits. Fully independent safety circuits protect the amplifier in the event of a short circuit of the loudspeaker output, abnormal increases in temperature and/or excessive amplifier consumption. These amplifiers offer high performance and damping factor, which results in clean response to transients and high quality playback. The heat sinks, of our own design, combine high heat dissipation with a reduced weight and thermal inertia. 2 - FRONT PANEL FEATURES - On-Off switch (7) - Volume potentiometers (Gain)(2) - Output Signal indicators (-20dB, -10dB)(3) - Independent Indicators of Peak Limiter (4), and Protection (5) - Bridge mode (1) and Parallel mode (6) indicators
3 - REAR PANEL FEATURES - Forced ventilation turbine (1) - 230V power supply (2) - Loudspeaker output connection. Speakon (3) and Terminals (4) - LEDs monitoring connection (5) (Allow monitoring of the amplifier’s limiter, when it is
far away) - Mode Selection Switches. Stereo (6), Bridge (7) and Parallel (6)

11
- Bass-Boost Switch (8) (To improve the low frequency performance on Bass Reflex speaker systems)
- Processing Card Inputs (9) (To meet specific user requirements) - XLR input signal connectors (11)
4 - CONNECTION TO THE MAINS First, it is essential to ensure that the main voltage corresponds to the apparatus voltage. It is not advisable to connect and disconnect the mains wire without first making sure that the switch is in its OFF position in order to avoid bothersome noises.
CAUTION: the connection to any other voltage different from the one specified can damage the amplifier immediately.

12
5 - CONNECTION OF THE LOUDSPEAKERS The loudspeaker system should be connected to the Speakon or Terminal connectors ensuring that the polarity is correct. It is very important to use a cable fitting to the power of the amplifier in order to maintain the high damping factor these units provide. As a general guideline, we offer a table of the minimum cross section values according to the distance:
- Up to 10m in length: cross section of 2.5mm2 - From 11m to 20m in length: cross section of 4mm2 - From 21m to 30m in length: cross section of 6 mm2 - For more than 30m in length, the cross section should be increased
proportionately.
These cross-sections correspond to impedance of 8 Ohms; they should be increased for impedance of 4 Ohms. If you use very low loads (2 Ohm) the cross section has a very important role in the sound quality.
Load Capacity: The DP amplifiers have a sufficient current capacity to admit very low loads (up to 2 Ohms). It should be taken into account that many loudspeakers using passive filters and whose nominal impedance is of 8 Ohm do in fact present impedance much lower than the nominal one, at certain frequencies. Therefore, it is advisable to use 2 Ohm loads only when one is perfectly aware of the impedance curve of the loudspeaker system to be connected. 6 - CONNECTION IN STEREO MODE First make sure that the BRIDGE OFF/ON mode selector, located in the input section between the two connection points is in the OFF position. Also make sure that the STEREO/PARALLEL mode is in the STEREO position. There are two speaker output connectors. CH A for the left channel and CH B for the right channel, both are fitted with Speakon type connectors, or Terminal connectors. Each Speakon connector has 4 terminal points labeled as +1, -1, +2 and -2. Only use the pins +1 for the Positive pole, and -1 for the Negative pole. Use a 1.5 Allen key to firmly attach the cable (maximum section 4mm).

13
In mobile applications this connection may also be soldered to guarantee better contact. The other way to connect the Speaker Output is by Terminal connectors. Use the Red Terminal for the Positive Pole, and the Black Terminal for the Negative Pole. 7 - CONNECTION IN BRIDGE MODE To use MONO mode, place the BRIDGE OFF/ON selector switch in ON. The corresponding indicator located on the front panel will light up (BRIDGE). IMPORTANT: In this position the output power of both channels is directed to a single output (mono). In this operational mode the connections are made as follows: The + Pole of the speaker is connected to the Speakon Pin +1 of CH A, or the Red Terminal of the CH A. The – Pole of the speaker is connected to the Speakon Pin +1 of CH B, or the Red Terminal of the CH B. The power delivered by the amplifier will be the sum of both channels (at 4 Ohm), but the Load Impedance will be 8 Ohm. Permanent installations in Bridge Mode are not recommended for impedance below 8 Ohm. 8 - CONNECTION IN PARALLEL MODE To use Parallel Mode, place the STEREO/PARALLEL selector switch in PARALLEL mode. This mode produces an internal bridge between the two Inputs (CHA and CHB) without the need for external connecting cables. This option is useful for a Bi-amplified configuration system, using the Processing Cards. 9 - PRE-AMP CONNECTION The input enables connection through XLR-3. The amplifiers incorporate balanced input for a high rejection of parasites generated by long signal cables, proximity to electric wires or sources causing them.

14
BALANCED Inputs: 1. Ground 2. (+) Live 3. (–) Return
UNBALANCED Inputs:
1. Ground 2. (+) Live 3. Ground
10 - CONNECTION OF THE PROCESSING CARDS The Processing Cards (Optional Accessory) have been designed to control the output frequency of the amplifier, with the Cut and the Slope most suitable for each System. Also to prevent the presence of external oscillations or imperceptible buzzing that could destroy the loudspeakers (Sonic Filter). To optimize the frequency response adapted to the needs and features of each transducer. And to control over the Phase alignment when this is required by the installation. The Processing Card Inputs are located in the rear panel, by removing the metallic covers “PROCESSING CARD SLOT”.
15
11 - COOLING The DP Series are equipped with electronically controlled forced ventilation. The turbine, situated at the rear, increases its turnover speed according to the temperature or power delivered by the amplifier. It’s very important to make sure the ventilation holes are unobstructed to enable the free intake of air and release of hot air. Intermittent operation of the turbine prolongs its useful life and prevents the interior cooling ducts from becoming easily blocked. The Air Filter should be cleaned regularly, removing remains of dust and dirt. If the Filter is obstructed, the cooling will not operate correctly. 12 - START-UP AND OPERATION Once the mains, loudspeaker and sound sources (input) connections have been made correctly, start up the pre-amp sources and then press the ON/OFF switch. Turn the volume controls clockwise to obtain the maximum gain. When the maximum output power has been exceeded (clipping/distortion), this will be indicated by the corresponding LED. 13 - CLIP-LIMITER CIRCUIT This LED indicates the action of the anti-clipping compressor, preventing output distortion. Make sure this LED is not alight permanently! No extra power is obtained in this way and dynamics are lost. When the amplifier is endangered due to reasons of temperature, through an inadequate installation or any other anomaly thus exceeding the safety limits, (temperature of >90ºC), the corresponding safety circuit will cause a stoppage for a few seconds, with the LEDs coming alight. They will also light up in the event of any short-circuiting occurring at the loudspeaker output. A connector located on the rear panel allow to take the Limiter LEDs to a remote point, for permanently control of amplifier.

16
14 - TECHNICAL FEATURES Technical Features 1000 2000 3200 5000Output power (1KHz - 1% THD) (Note 1)
Stereo 2 Ohm 480 W 980 W 1510 W 2600 W
Stereo 4 Ohm 325 W 700 W 1150 W 1750 W
Stereo 8 Ohm 190 W 480 W 720 W 950 W
Stereo 16 Ohm 100 W 270 W 390 W 520 W
Bridged 4 Ohm 960 W 1960 W 3020 W 5200 W
Bridged 8 Ohm 650 W 960 W 2300 W 3500 W
Frequency response (Note 2) 20Hz - 30KHz (-3dB)
Input impedance > 15KOhm
Sensitivity (Note 3) 1,2 V +4dBm
Harmonic distortion + Noise 0,08% 0,08% 0,08% 0,10%
Signal/Noise ratio > 102 > 104 > 107 > 108
Crosstalk > 65dB > 65dB > 65dB > 70dB
Damping Factor > 300 > 300 > 350 > 350
Supply AC 230V 50 / 60 Hz
Max. Power consumption (Note 4) 6 A 8 A 10 A 12 A
Size (H x W x D) 88x44 2x454 mm 132x44 2x454 mm
Net weight 11,46 Kg 12 Kg 19,8 Kg 20 Kg
Note 1: Continuous burst tone 20 ms (0 dB) / 480 ms (-20 dB) in accordance with EIA RS-490 and IEC 60268-3 (IHF A-202)
Note 2: Internally limited by subsonic and ultrasonic active filters
Note 3: Internally variable through resistor-jumper from 0,775V to 2,40V
Note 4: Musical program - Switch breaker limiter
All specifications and features are subject to change without prior notice. JAN 2002
If you follow the instruction manual and recommendations, we are sure that this amplifier will always perform within the predetermined parameters, ensuring its long life and total efficiency. 15 - CERTIFICATE OF WARRANTY
The Conditions and Observations for the application of this Contract of Warranty are for all the territories of the Spanish State.
For other countries, the specifications of each country must be complied with, as only the Representative or National importer themselves can be held responsible for warranty terms. For any claim of a Legal type, only the Ordinary Courts corresponding to the city of Terrassa (Barcelona-Spain) will be valid.
Please follow the instructions on the last page of this manual.

17
DEUSTCH
1000 – 2000 – 3200 - 5000
Angesichts der Tatsache, daß die Anforderungen der professionellen Audioanwender ständig steigen, möchten wir uns bedanken, daß Sie Sich für ein Produkt von MASTER AUDIO DESIGN entschieden haben. AMATE ELECTROACUSTICA setzt bei allen Produkten immer auf die bestmögliche Technologie in der Überzeugung, daß das von Ihnen erworbene Produkt Ihnen jederzeit einen optimalen Betrieb unter den von Ihnen gewählten Bedingungen bietet. Um einen optimalen Betrieb zu gewährleisten, ist es sehr wichtig, daß Sie diese Bedienungsanleitung sorgfältig studieren, bevor Sie das Gerät in Betrieb nehmen. INDEX
1 – BESCHREIBUNG 2 - BESCHREIBUNG FRONTPLATTE 3 - BESCHREIBUNG RÜCKSEITE 4 – NETZANSCHLUSS 5 – LAUTSPRECHERANSCHLUSS 6 - STEREO – BETRIEB 7 - BRIDGE – BETRIEB 8 - PARALLEL – BETRIEB 9 – VORVERSTÄRKERANSCHLUSS
10 - ANSCHLUSS DER PROZESSORKARTEN 11 – KÜHLUNG 12 - START UND BETRIEB 13 - CLIP LIMITER 14 - TECHNISCHE DATEN 15 – GARANTIEKARTE
18
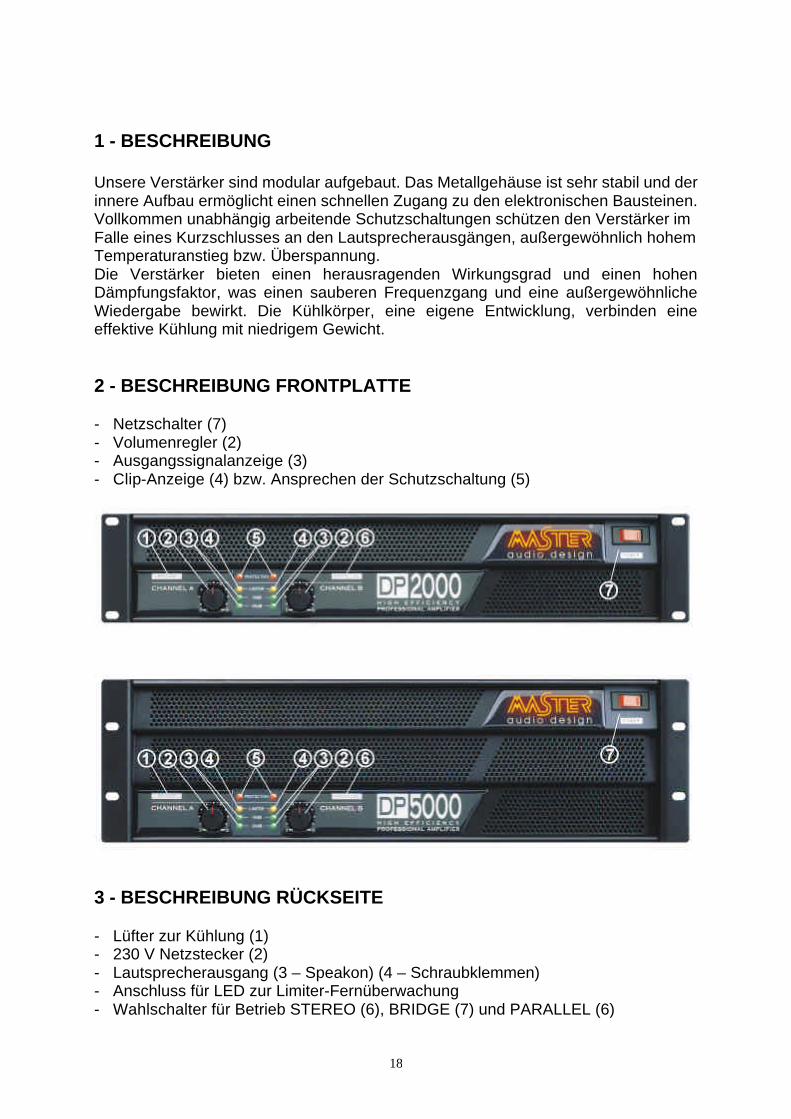
1 - BESCHREIBUNG Unsere Verstärker sind modular aufgebaut. Das Metallgehäuse ist sehr stabil und der innere Aufbau ermöglicht einen schnellen Zugang zu den elektronischen Bausteinen. Vollkommen unabhängig arbeitende Schutzschaltungen schützen den Verstärker im Falle eines Kurzschlusses an den Lautsprecherausgängen, außergewöhnlich hohem Temperaturanstieg bzw. Überspannung. Die Verstärker bieten einen herausragenden Wirkungsgrad und einen hohen Dämpfungsfaktor, was einen sauberen Frequenzgang und eine außergewöhnliche Wiedergabe bewirkt. Die Kühlkörper, eine eigene Entwicklung, verbinden eine effektive Kühlung mit niedrigem Gewicht. 2 - BESCHREIBUNG FRONTPLATTE - Netzschalter (7) - Volumenregler (2) - Ausgangssignalanzeige (3) - Clip-Anzeige (4) bzw. Ansprechen der Schutzschaltung (5)
3 - BESCHREIBUNG RÜCKSEITE - Lüfter zur Kühlung (1) - 230 V Netzstecker (2) - Lautsprecherausgang (3 – Speakon) (4 – Schraubklemmen) - Anschluss für LED zur Limiter-Fernüberwachung - Wahlschalter für Betrieb STEREO (6), BRIDGE (7) und PARALLEL (6)

19
- Bass-Boost Schalter (8) (Zur Anhebung tiefer Frequenzen bei Bassreflex-Systemen)
- Einschub für Prozessorkarten (9) - Signaleingang (11)
4 - NETZANSCHLUSS Vergewissern Sie Sich, daß Ihre Netzspannung mit der des Verstärkers übereinstimmt. Es ist nicht ratsam, den Verstärker von der Netzleitung zu trennen ohne daß der Netzschalter in OFF Position gebracht wurde.
VORSICHT: Jede Netzspannung, die nicht mit der des Verstärkers übereinstimmt, kann diesen sofort zerstören.

20
5 - ANSCHLUSS DER LAUTSPRECHER Beim Anschließen der Lautsprecher ist unbedingt auf die richtige Polung zu achten. Es ist außerdem sehr wichtig, Kabel mit ausreichendem Querschnitt zu verwenden, um den hohen Dämpfungsfaktor des Verstärkers zu erhalten. Zur Orientierung hier einige Hinweise:
- bis 10m Kabellänge: Querschnitt 2.5mm² - bis 20m Kabellänge: Querschnitt 4mm² - bis 30m Kabellänge: Querschnitt 6mm² - über 30m Kabellänge:Querschnitt entsprechend höher
Diese Empfehlungen gelten für Impedanzen von 8 Ohm. Bei 4 Ohm sollten die Werte verdoppelt werden.
Ausgangslast: Die Verstärker der DP Serie haben ausreichende Kapazitäten um Lasten bis zu 2 Ohm zu erlauben. Dabei sollte nie vergessen werden, daß bei der Verwendung von passiven Frequenzweichen bei bestimmten Frequenzen deutlich niederere Impedanzen vorliegen. Deshalb sollte eine Last von 2 Ohm nur benutzt werden, wenn die Impedanzkurve des Lautsprechers dies ermöglicht. 6 - STEREOBETRIEB Vergewissern Sie Sich, daß der BRIDGE / STEREO Schalter zwischen den Eingängen für das Eingangssignal sich in STEREO Position befindet. Für Kanal A und Kanal B gibt es jeweils zwei verschiedene Lautsprecherausgänge, Speakon-Buchsen und Schraubklemmen. Benutzen Sie bei den Speakon-Steckern nur die Pole +1 für den positiven und -1 für den negativen Pol. +2 und -2 bleiben unbelegt. Bei den Schraubklemmen benutzen

21
Sie den roten Terminal für den positiven, den schwarzen Terminal für den negativen Pol. 7 - BRIDGE - BETRIEB Um den Verstärker im BRIDGE Mode zu betreiben, bringen Sie den Schalter auf der Rückseite zwischen den Eingangsbuchsen in die entsprechende Position ON. Der BRIDGE Mode wird angezeigt durch Aufleuchten des Wortes BRIDGE auf der Frontseite. Die Lautsprecher werden im BRIDGE Mode folgendermaßen angeschlossen: Der + Pol des Lautsprechers wird an Pin +1 des Speakon-Steckers von Kanal A oder an den roten Terminal von Kanal A angeschlossen. Der – Pol des Lautsprechers wird an Pin +1 des Speakon-Steckers von Kanal B oder an den roten Terminal von Kanal B angeschlossen. Im Bridge Mode liefert der Verstärker als Monosignal die Summe der Leistung beider Kanäle bei 4 Ohm, die Impedanz beträgt aber 8 Ohm. Festinstallationen im BRIDGE Mode mit einer Impedanz von unter 8 Ohm sind nicht empfohlen. 8 - PARALLEL - BETRIEB Für diese Betriebsart setzen Sie den Wahlschalter auf PARALLEL. Dadurch wird intern Kanal A mit Kanal B verbunden. Diese Option ist hilfreich für einen 2-Weg Aktiv – Betrieb in Verbindung mit Prozessorkarten. 9 - VORVERSTÄRKERANSCHLUSS Das Eingangssignal wird mit XLR-Steckern angeschlossen. Bitte befolgen Sie die nachfolgend genannten Hinweise zur Steckerbelegung. Die Verstärker haben symmetrische Eingänge zur Vermeidung von lästigen Geräuschen durch lange Signalkabel.

22
BALANCED Inputs: 4. Ground 5. (+) Live 6. (–) Return
UNBALANCED Inputs:
4. Ground 5. (+) Live 6. Ground
10 - EINSATZ DER PROZESSORKARTEN Die Prozessorkarten (Zubehör) wurden entwickelt um die Frequenz des Ausgangssignals an ein angeschlossenes Lautsprechersystem zu kontrollieren. Dabei kann z.B. der Frequenzgang der angeschlossenen Lautsprecher optimiert werden, die Phase kontrolliert Oder eine Unterstützung für eine B 6 Abstimmung realisiert werden. Sie finden die Einschuböffnungen, wenn Sie die Schutzschilder mit der Aufschrift „PROCESSING CARD SLOT“ abschrauben.

23
11 - KÜHLUNG Verstärker der DP Serie sind mit einem elektronisch kontrollierten Ventilator ausgerüstet, dessen Drehzahl durch die gemessene Temperatur bzw. die zugeführte Leistung bestimmt wird. Bitte achten Sie unbedingt darauf, dass diese Öffnung nicht bedeckt ist und die Luft gut zirkulieren kann. Der Luftfilter sollte regelmäßig von Staub und Schmutz gereinigt werden. Im Falle einer Verschmutzung arbeitet die Kühlung nicht korrekt! Abhängig von den Arbeitsbedingungen bzw. von der Installation des Verstärkers ist es ratsam, den Verstärker regelmäßig zu reinigen. Dazu muß der Deckel des Verstärkers abgenommen werden und das Innere von Staub und Schmutz gereinigt werden. Es ist empfehlenswert, dies von einem autorisierten Service durchführen zu lassen. 12 - START UND BETRIEB Nachdem die Netzverbindung, die Lautsprecher und die Tonquellen korrekt verbunden wurden, starten Sie den Vorverstärker (Mischpult) und betätigen Sie den ON / OFF Schalter. Drehen Sie die Volumenregler im Uhrzeigersinn um die maximale Leistung zu erhalten. Wenn die Maximalleistung überschritten wird (Clipping / Verzerrung), wird dies durch die LED auf der Frontplatte angezeigt. 13 - CLIP LIMITER Bei den Verstärkern der DP Serie zeigt eine LED das Ansprechen des Limiters an, der kein verzerrtes Signal an den Ausgang zuläßt. Achten Sie darauf, daß diese LED nicht permanent leuchtet. Sie gewinnen keine Mehrleistung und verlieren Dynamik. Sollte die Betriebssicherheit des Verstärkers wegen zu hoher Temperatur (>90°), einer fehlerhaften Installation oder aus anderen Gründen gefährdet sein, veranlaßt die Schutzschaltung ein kurzes Abschalten und die LED’s leuchten auf. Sie leuchten ebenfalls bei einem Kurzschluß am Lautsprecherausgang auf.
24
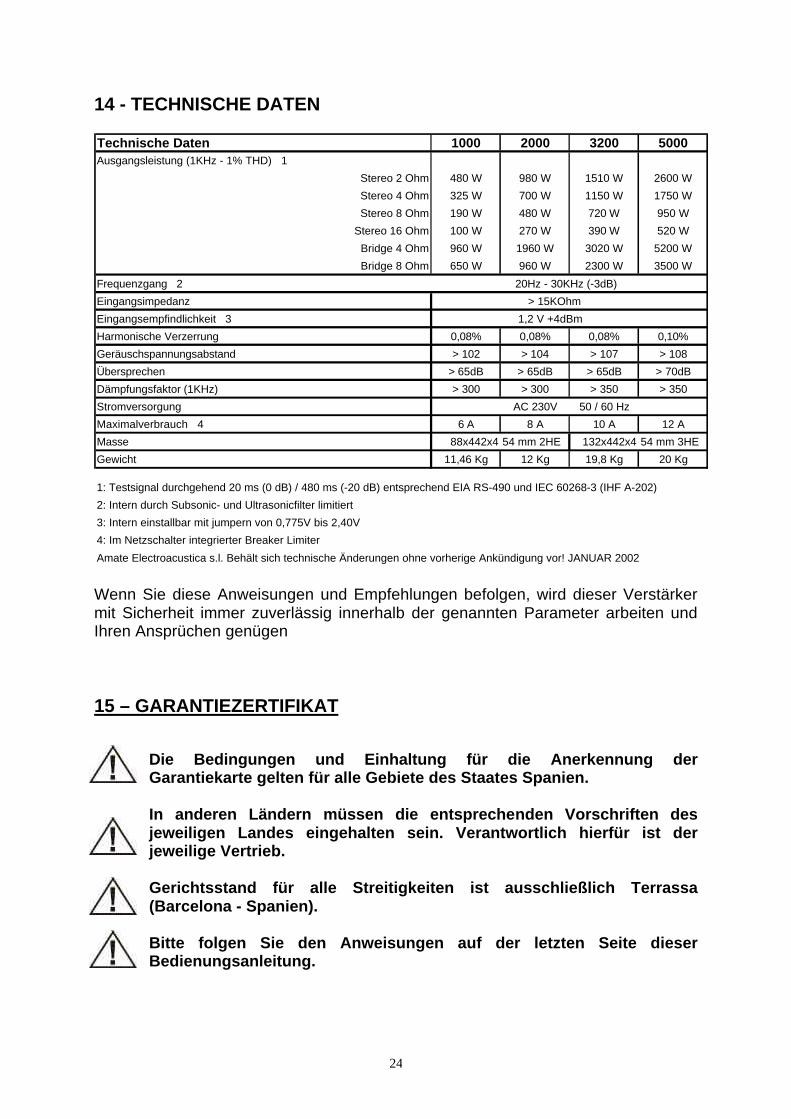
14 - TECHNISCHE DATEN Technische Daten 1000 2000 3200 5000Ausgangsleistung (1KHz - 1% THD) 1
Stereo 2 Ohm 480 W 980 W 1510 W 2600 W
Stereo 4 Ohm 325 W 700 W 1150 W 1750 W
Stereo 8 Ohm 190 W 480 W 720 W 950 W
Stereo 16 Ohm 100 W 270 W 390 W 520 W
Bridge 4 Ohm 960 W 1960 W 3020 W 5200 W
Bridge 8 Ohm 650 W 960 W 2300 W 3500 W
Frequenzgang 2 20Hz - 30KHz (-3dB)
Eingangsimpedanz > 15KOhm
Eingangsempfindlichkeit 3 1,2 V +4dBm
Harmonische Verzerrung 0,08% 0,08% 0,08% 0,10%
Geräuschspannungsabstand > 102 > 104 > 107 > 108
Übersprechen > 65dB > 65dB > 65dB > 70dB
Dämpfungsfaktor (1KHz) > 300 > 300 > 350 > 350
Stromversorgung AC 230V 50 / 60 Hz
Maximalverbrauch 4 6 A 8 A 10 A 12 A
Masse 88x442x4 54 mm 2HE 132x442x4 54 mm 3HE
Gewicht 11,46 Kg 12 Kg 19,8 Kg 20 Kg
1: Testsignal durchgehend 20 ms (0 dB) / 480 ms (-20 dB) entsprechend EIA RS-490 und IEC 60268-3 (IHF A-202)
2: Intern durch Subsonic- und Ultrasonicfilter limitiert
3: Intern einstallbar mit jumpern von 0,775V bis 2,40V
4: Im Netzschalter integrierter Breaker Limiter
Amate Electroacustica s.l. Behält sich technische Änderungen ohne vorherige Ankündigung vor! JANUAR 2002
Wenn Sie diese Anweisungen und Empfehlungen befolgen, wird dieser Verstärker mit Sicherheit immer zuverlässig innerhalb der genannten Parameter arbeiten und Ihren Ansprüchen genügen 15 – GARANTIEZERTIFIKAT
Die Bedingungen und Einhaltung für die Anerkennung der Garantiekarte gelten für alle Gebiete des Staates Spanien.
In anderen Ländern müssen die entsprechenden Vorschriften des jeweiligen Landes eingehalten sein. Verantwortlich hierfür ist der jeweilige Vertrieb. Gerichtsstand für alle Streitigkeiten ist ausschließlich Terrassa (Barcelona - Spanien). Bitte folgen Sie den Anweisungen auf der letzten Seite dieser Bedienungsanleitung.