1 manual handling marija buttery version 7, 2012
TRANSCRIPT

11
Manual HandlingManual Handling
QuickTime™ and a decompressor
are needed to see this picture.
Marija Buttery Version 7, 2012
22
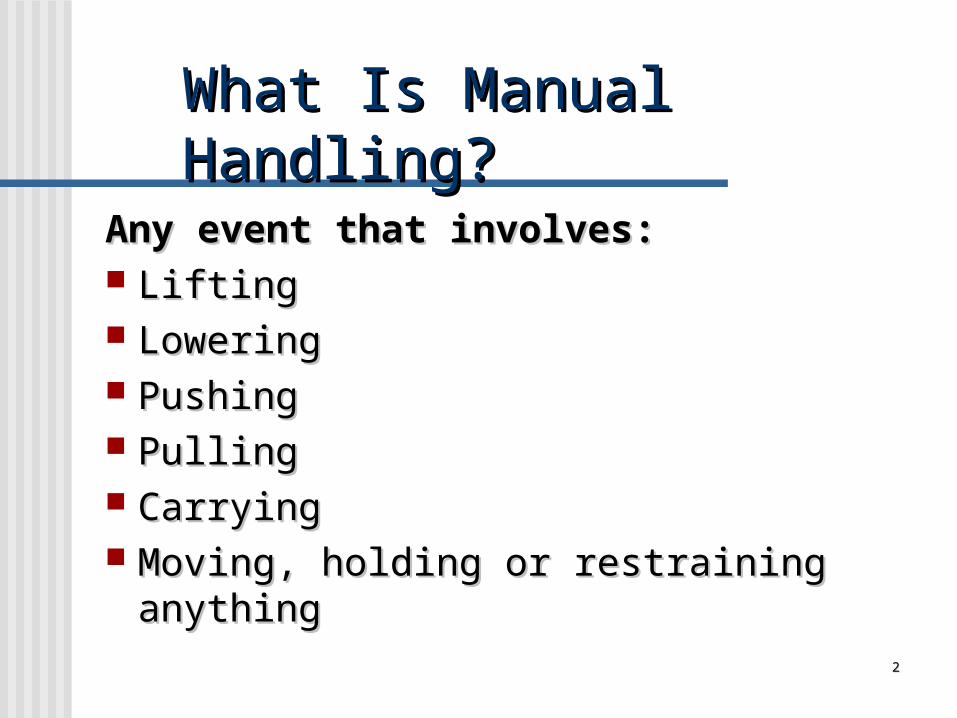
What Is Manual Handling?What Is Manual Handling?
Any event that involves:Any event that involves: LiftingLifting LoweringLowering PushingPushing PullingPulling CarryingCarrying Moving, holding or restraining anythingMoving, holding or restraining anything

Look, Think and PlanLook, Think and Plan
44
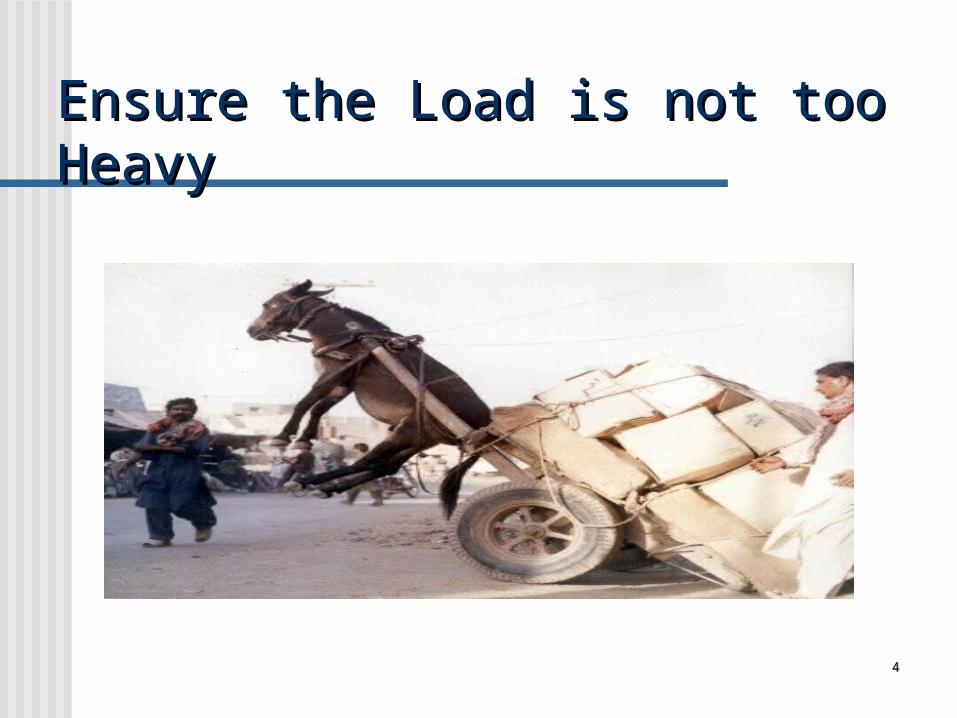
Ensure the Load is not too HeavyEnsure the Load is not too Heavy

55
Why is it important?Why is it important?
Because you do not want to injure yourself, a colleague or a patient!!
66
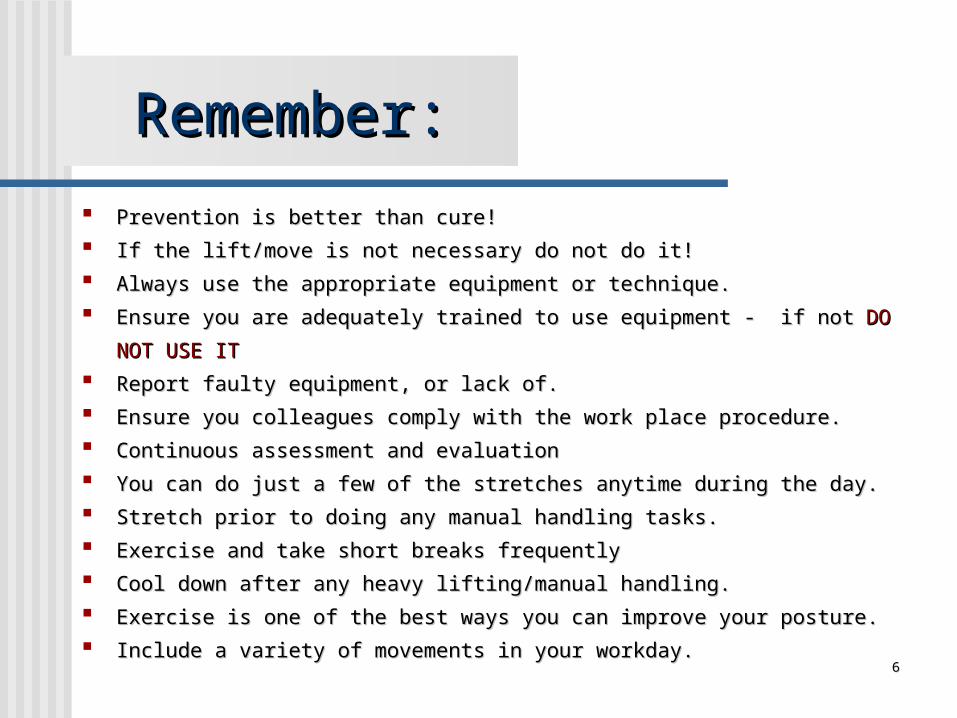
Remember:Remember:
Prevention is better than cure!Prevention is better than cure!
If the lift/move is not necessary do not do it!If the lift/move is not necessary do not do it!
Always use the appropriate equipment or technique.Always use the appropriate equipment or technique.
Ensure you are adequately trained to use equipment - if not Ensure you are adequately trained to use equipment - if not DO NOT DO NOT
USE ITUSE IT
Report faulty equipment, or lack of.Report faulty equipment, or lack of.
Ensure you colleagues comply with the work place procedure. Ensure you colleagues comply with the work place procedure.
Continuous assessment and evaluation Continuous assessment and evaluation
You can do just a few of the stretches anytime during the day. You can do just a few of the stretches anytime during the day.
Stretch prior to doing any manual handling tasks.Stretch prior to doing any manual handling tasks.
Exercise and take short breaks frequently Exercise and take short breaks frequently
Cool down after any heavy lifting/manual handling.Cool down after any heavy lifting/manual handling.
Exercise is one of the best ways you can improve your posture. Exercise is one of the best ways you can improve your posture.
Include a variety of movements in your workday. Include a variety of movements in your workday.

77
Manual HandlingManual Handling
Types of patient transfersTypes of patient transfers
Turn client using a slide sheet * Move client up a bed with slide sheet * Getting client out of bed * Standing client * Assisting client to walk * Assist client form floor to Chair (Verbal Instruction) * Getting client out of bed (Stand Hoist) Getting client bed to chair (Sling Hoist) Assisting client from floor (Sling hoist) Move client from bed to bed using slide board
* Assessed* Assessed
Manual Handling Legislation
99
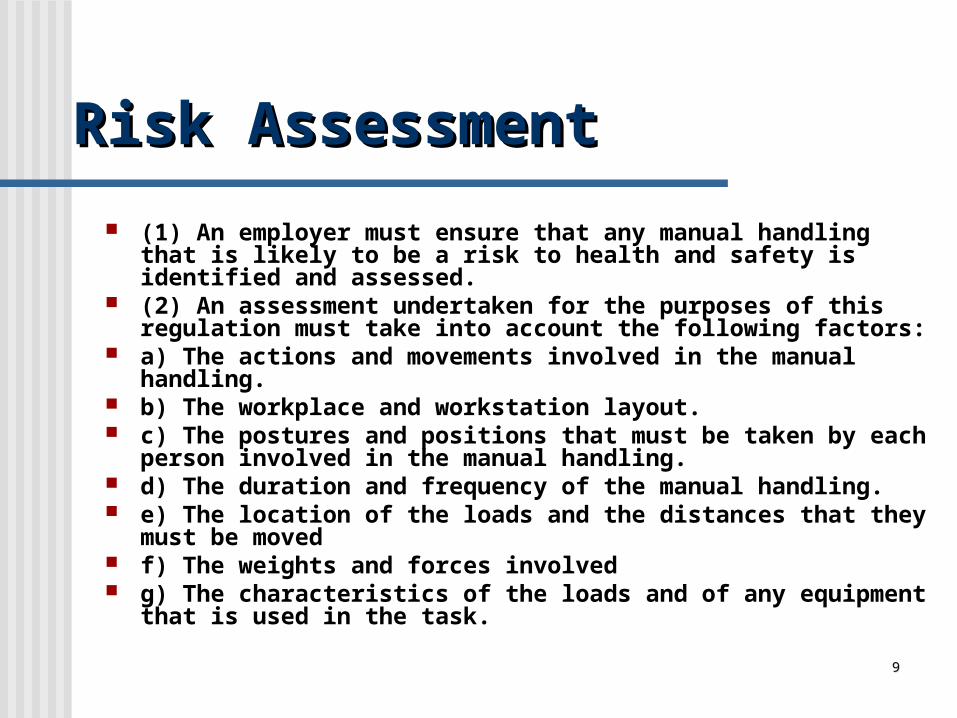
Risk AssessmentRisk Assessment
(1) An employer must ensure that any manual handling that is likely to be a risk to health and safety is identified and assessed.
(2) An assessment undertaken for the purposes of this regulation must take into account the following factors:
a) The actions and movements involved in the manual handling. b) The workplace and workstation layout. c) The postures and positions that must be taken by each person
involved in the manual handling. d) The duration and frequency of the manual handling. e) The location of the loads and the distances that they must be
moved f) The weights and forces involved g) The characteristics of the loads and of any equipment that is used
in the task.
1010
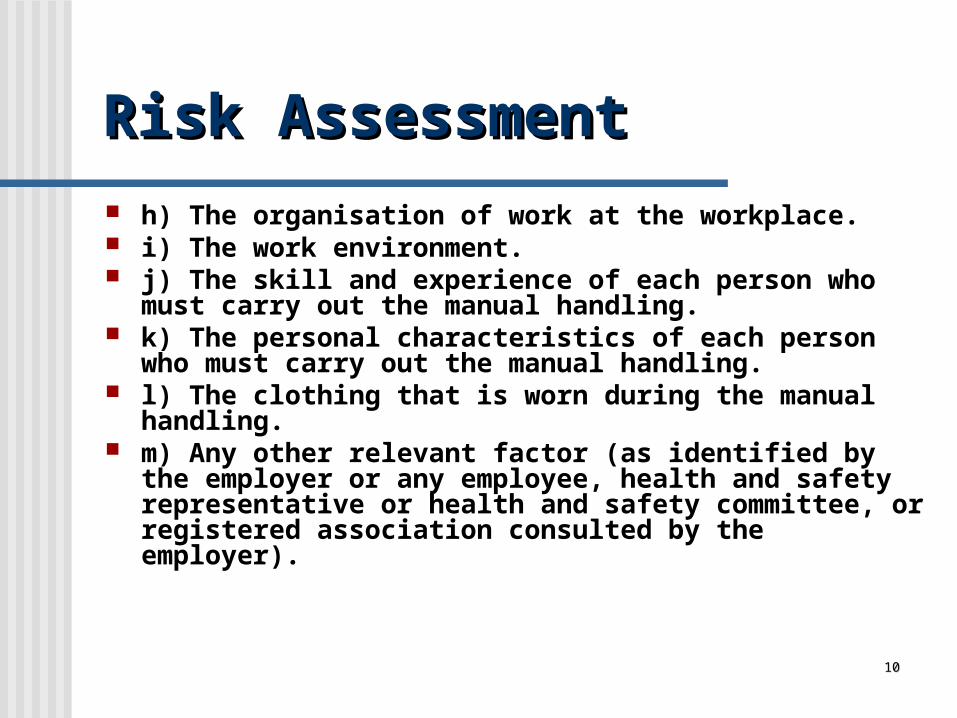
Risk AssessmentRisk Assessment
h) The organisation of work at the workplace. i) The work environment. j) The skill and experience of each person who must carry out
the manual handling. k) The personal characteristics of each person who must carry
out the manual handling. l) The clothing that is worn during the manual handling. m) Any other relevant factor (as identified by the employer or
any employee, health and safety representative or health and safety committee, or registered association consulted by the employer).
1111
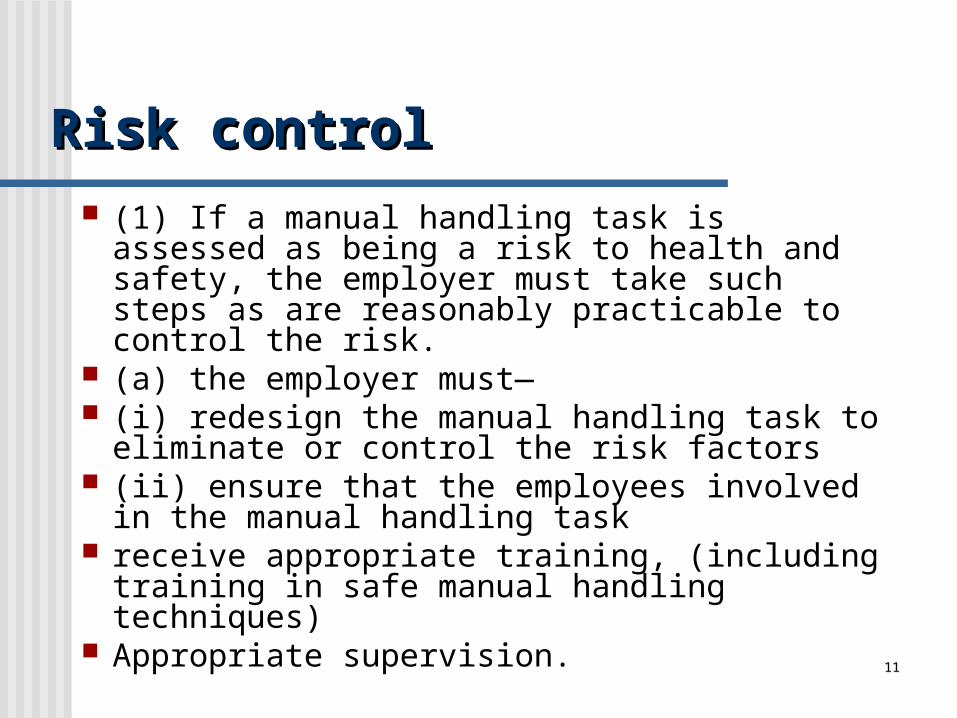
Risk controlRisk control
(1) If a manual handling task is assessed as being a risk to health and safety, the employer must take such steps as are reasonably practicable to control the risk.
(a) the employer must— (i) redesign the manual handling task to
eliminate or control the risk factors (ii) ensure that the employees involved in the
manual handling task receive appropriate training, (including training
in safe manual handling techniques) Appropriate supervision.

1212
Risk controlRisk control (b) where redesign is not reasonably practicable, or as a short-term or
temporary measure, the employer must— (i) take one, or a combination of two or more, of the following measures
as may be appropriate: (A) provide mechanical aids (B) provide personal protective equipment (C) arrange for team lifting (ii) Ensure that the employees receive appropriate training, supervision
in: Correct use or application of any mechanical aids Personal protective equipment. Team lifting procedures.
1313
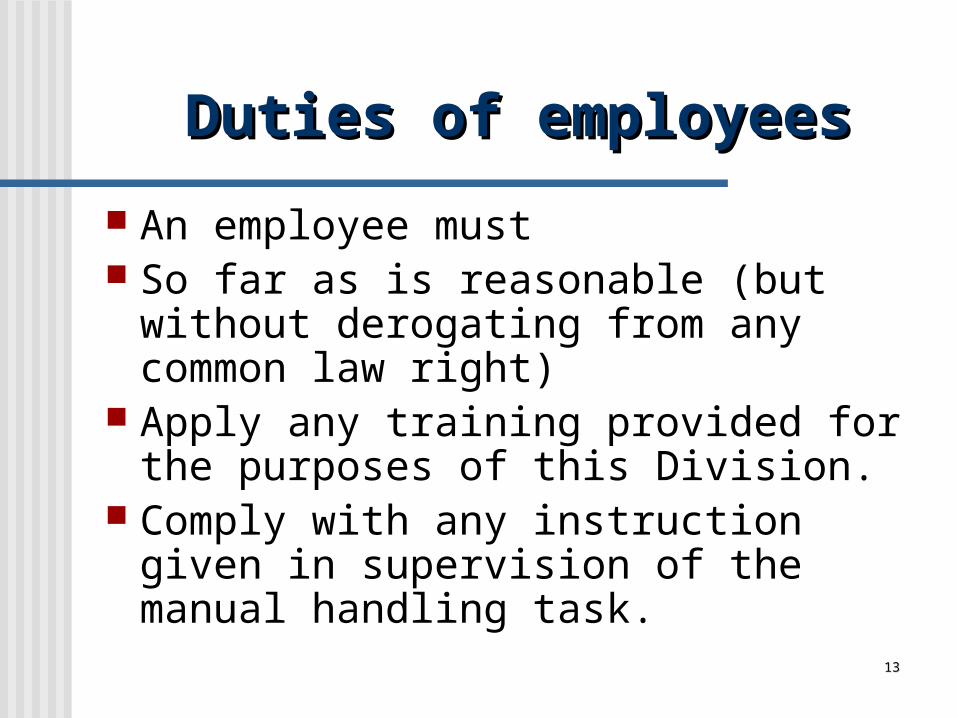
Duties of employeesDuties of employees
An employee must So far as is reasonable (but without
derogating from any common law right) Apply any training provided for the
purposes of this Division. Comply with any instruction given in
supervision of the manual handling task.
Manual Handling TechniquesManual Handling Techniques
1515
General HoistGeneral Hoist
General hoist is a mobile device for moving patients. Vary in safe working load (SWL) Hoists can be manual (hydraulic) or electric (battery
powered). Sling is used for attaching the patient to the hoist. Coded for size (S, M, L, XL) and load capacity Two main types of sling: Total body sling with head support Toileting sling.
1616
General HoistGeneral Hoist
Hoists can also be fitted with a variety of attachments.
Used for moving a patient who is incapable of weight bearing for the duration of the task.
Repositioning the patient in bed • Transferring the patient between the items of
origin and destination E.g. Bed/stretcher, Bed/chair, Chair/chair Toileting Lifting the patient from the floor.
1717
General HoistGeneral Hoist
Select the correct sling and place it under patient
Patient in bed or on the floor the sling is applied by rolling the patient.
Patient is sitting, rock patient forwards and then sideways to get the sling under them.
Secure brakes item of origin Secure brakes item of destination Sling breaks off.Sling breaks off.
1818
General HoistGeneral Hoist
Position the hoist, lower boom and attach sling at all points.
Ensure the patient’s arms are either contained within the sling or holding on to the spreader bar.
Actuate the control to raise the patient sufficiently to just clear the item of origin
Check all four points of sling contact. Move the hoist to the point of destination. During movement the patient is kept as low as possible. Point of destination, position the patient accurately and
lower slowly. Use the spreader handle or handles on the sling to
improve patient positioning.
1919
PrecautionsPrecautions
Do not attempt to adjust the sling once the patient is raised.
Use the spreader to increase the width of the hoist and improve stability.
Hoists can tip if pushed over any sloping surfaces. Ensure the weight of the patient does not exceed the
capacity of sling / hoist of sling / hoist Applying the brakes to the hoist prevents the hoist from
adjusting itself to the load. When parking the hoist after use, the brakes should be
activated.
2020
RollingRolling
Rolling over is used for a number of activities. Preparation for a number of nursing care
activities: Changing the bed , , Patients positioning for pressure care, Position slings, slide sheets, slide boards. Preparation for getting out of bed
2121
RollingRolling
Ensure the brakes are on. Take all but one pillow out from behind the head . . Back rest down. Patient to bend up knees or bend one or both up for them. Patient to move arm in the direction of the rolling or place it
for them. Patient to turn head in the direction they are rolling. One nurse stands on destination side and holds the patient Nurse on origin side pushes on the patient’s legs, then
uses the hip and shoulder to roll the patient.
2222
PrecautionsPrecautions
If one nurse technique. Ensure that the bedrail is up on the side
that the patient is rolling to. Some orthopaedic conditions require a
patient rolled without twisting.
2323
SlidesheetSlidesheet
Description A rectangle of thin slippery fabric that can either
be used singly or in combination with a second slide sheet or slide board.
The slide sheet is placed under the patient to facilitate moving them in the bed.
2424
SlidesheetSlidesheet
Specific preparation Roll the patient onto their side and place the
partially rolled up sheet under the patient. Position the open side of the slide sheet on the
same side as the pulling action is to occur: for rolling – your side towards the shoulders of the patient for pulling
up the bed.
2525
SlidesheetSlidesheet
Specific preparation. Ensure the slide sheet covers the heaviest part
of the patient (Shoulders to past the hips.) Bed brakes on. Moving the patient up the bed.
Encourage them to assist by bending their legs up and pushing down with their feet.
2626
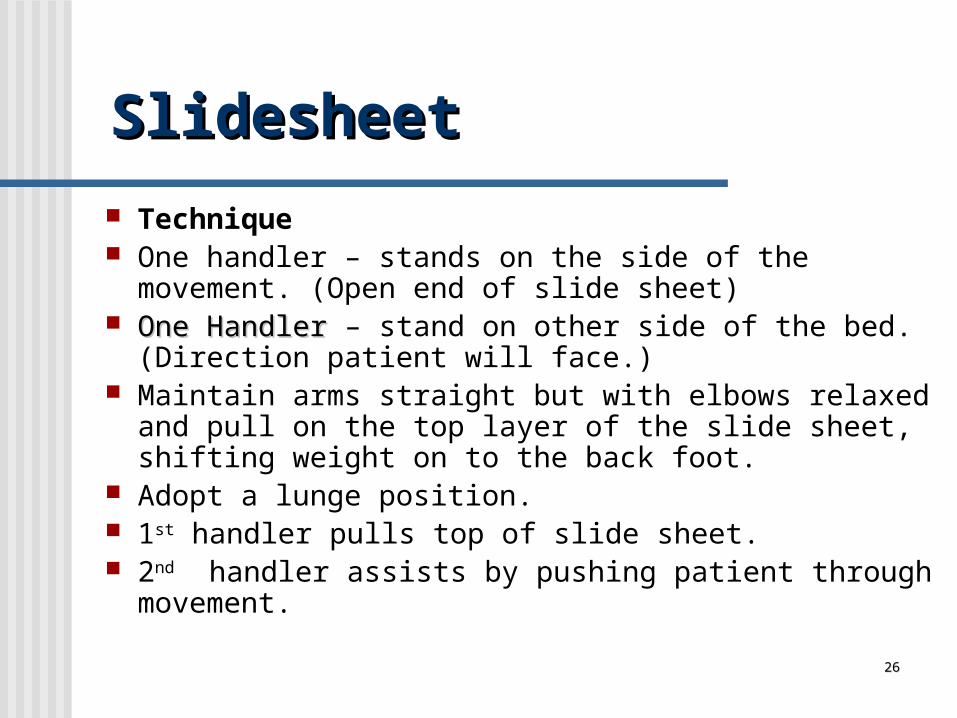
SlidesheetSlidesheet
Technique One handler – stands on the side of the movement. (Open
end of slide sheet) One HandlerOne Handler – stand on other side of the bed. (Direction
patient will face.) Maintain arms straight but with elbows relaxed and pull on
the top layer of the slide sheet, shifting weight on to the back foot.
Adopt a lunge position. 1st handler pulls top of slide sheet. 2nd handler assists by pushing patient through movement.

2727
Slide SheetSlide Sheet
Precautions A single slide sheet is unidirectional. Two slide sheets can be multidirectional - used
to move across, up, down the bed. Variation in slipperiness of the fabric, which can
impact on both noise and forces required to use.
Bed sliding devices can be unpredictably slippery (Be aware of force required!) (Be aware of force required!)
2828
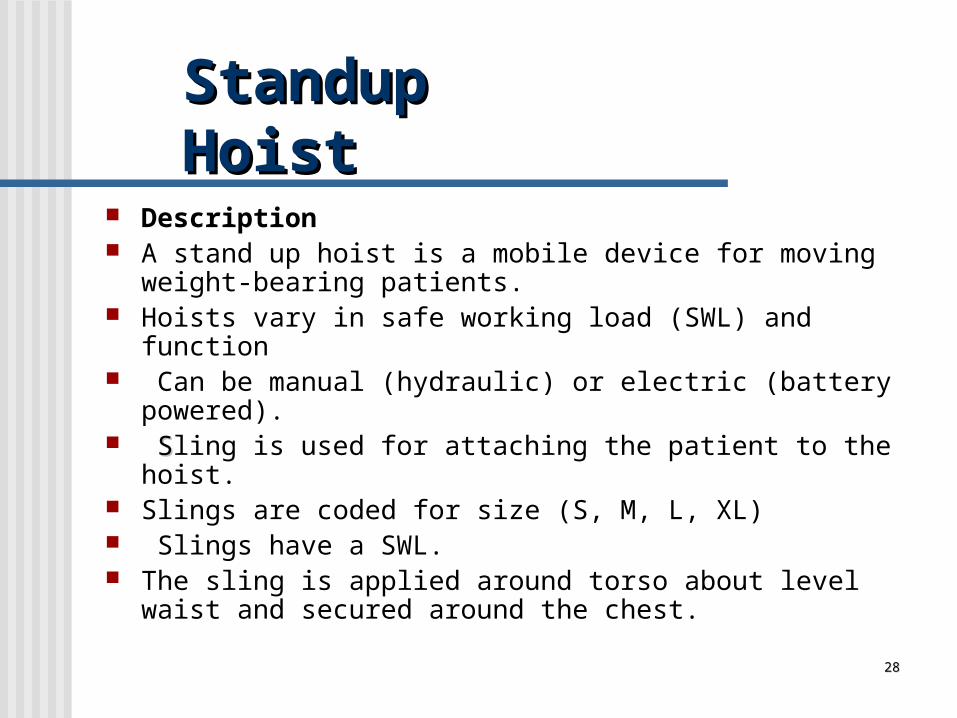
Standup HoistStandup Hoist
Description A stand up hoist is a mobile device for moving weight-bearing
patients. Hoists vary in safe working load (SWL) and function Can be manual (hydraulic) or electric (battery powered). SSling is used for attaching the patient to the hoist. Slings are coded for size (S, M, L, XL) Slings have a SWL. The sling is applied around torso about level waist and secured
around the chest.
2929
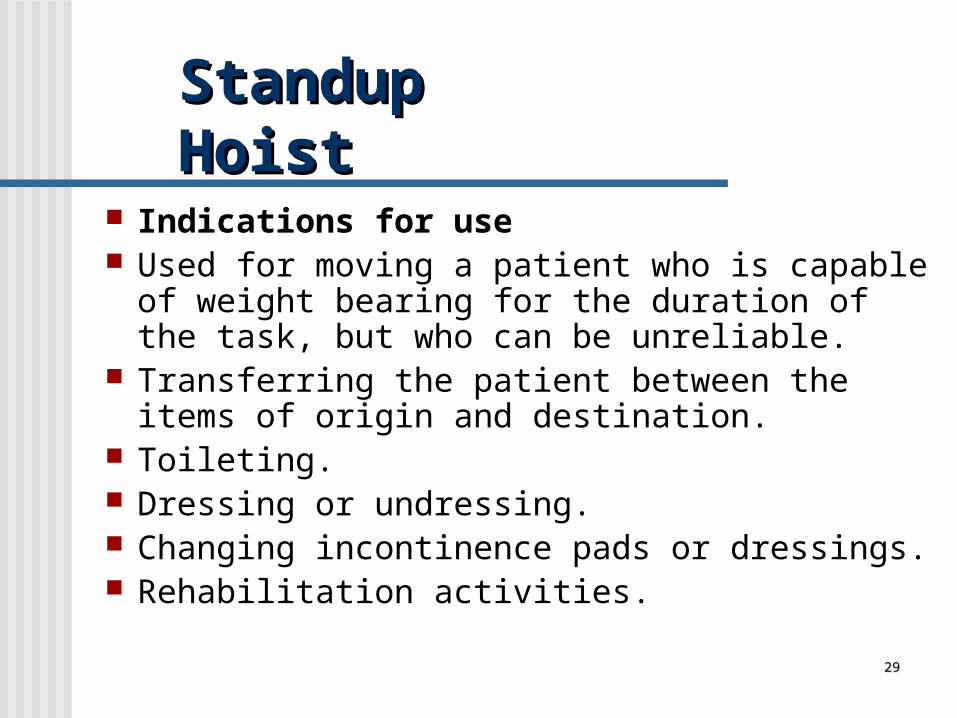
Standup HoistStandup Hoist
Indications for use Used for moving a patient who is capable of
weight bearing for the duration of the task, but who can be unreliable.
Transferring the patient between the items of origin and destination.
Toileting. Dressing or undressing. Changing incontinence pads or dressings. Rehabilitation activities.
3030
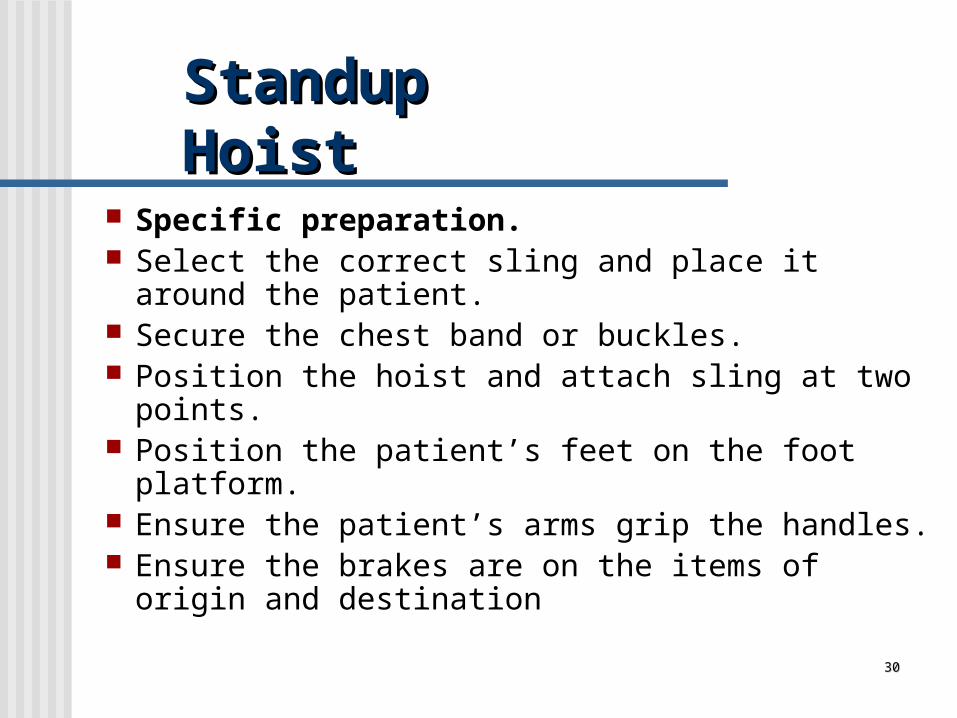
Standup HoistStandup Hoist
Specific preparation. Select the correct sling and place it around the
patient. Secure the chest band or buckles. Position the hoist and attach sling at two points. Position the patient’s feet on the foot platform. Ensure the patient’s arms grip the handles. Ensure the brakes are on the items of origin
and destination
3131
Standup HoistStandup Hoist
Technique Actuate the control to raise the patient
sufficiently to just clear the item of origin.. Raise the patient to clear the supporting
surface. Move the hoist to the point of destination or to
perform the required activity. At the point of destination, position the patient
accurately and lower slowly.
3232
Standup HoistStandup Hoist
Precautions Patient must be cooperative. Able to weight-bear and hang on to the hoist handles for
the duration of the activity. Ensure that the sling is adjusted correctly. correctly. Do not attempt to adjust the sling once the patient is
raised. Use the spreader to increase the width of the hoist and
improve stability. Ensure the weight of the patient does not exceed the
capacity of hoist or sling.

3333
Sit to Stand – Single PersonSit to Stand – Single Person
Technique. (walk belts can be used here.). (walk belts can be used here.) Patient’s feet should be positioned under the chair ie
behind their knees. Patient should slide forwards on the chair. Position your feet and knees outside the patients – you
can block one of the patient’s knees with your own. When the patient is ready Get them to push down on the armrests as you lean
back pulling the patient towards you. Standing slightly to the side to avoid obstructing their
head. Step back as patient approaches the upright position.

3434
Getting up From the Floor -Getting up From the Floor -Able Bodied PatientsAble Bodied Patients
Patient should roll onto their side and flex their knees. Patient then places one hand on the floor and rolls onto their knees. As the other hand frees, the patient should place that on the floor so
they assume a crawl position. Place a chair in front of them. Patient should grab the chair with each arm in turn, then place one
foot on the ground. Instruct the patient to push down (or pull up) on the chair and raise
themselves. Bring another chair in behind patient. Patient raises self just enough to allow second chair to be place
under buttocks. Patient then sits onto second chair
3535
Action: Sit to stand – two Action: Sit to stand – two personspersons
Walk belts can be used here. Patient’s feet should be positioned under the chair ie behind their
knees. Patient should slide forwards on the chair. Patient should move their shoulders forward and position their
hands on the armrest. Each nurse stands either side of the patient Can block the patient’s foot with your own if this is comfortable and
does not compromise your balance. Squat (lunge) and each grasp one handle at the front and one
handle at the back of the walkbelt. (If using) (If using) When the patient is ready and in accordance with your ‘lifting
command’, guide the patient forwards and upwards.
3636
Manual Handling and Manual Handling and StretchingStretching
Simple stretches to reduce the Simple stretches to reduce the risk of suffering an injuryrisk of suffering an injury
By completing the following stretches prior to undertaking any manual handling task, you are
reducing the risk of injury.
If any of the following stretches cause you pain or discomfort, STOP the stretch immediately.
3737
StretchesStretches
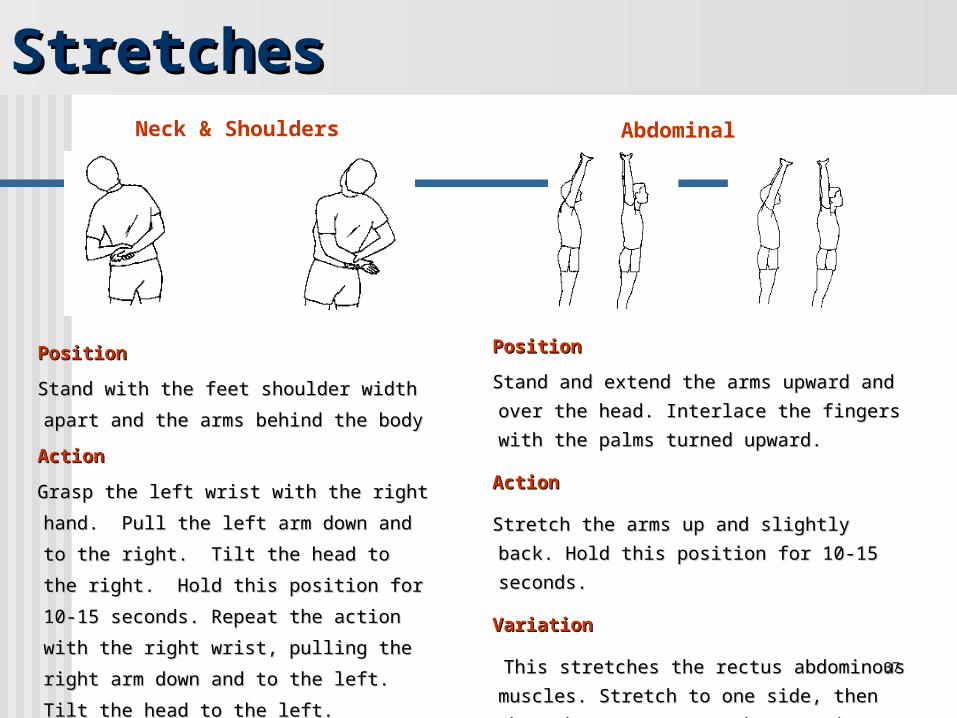
PositionPosition
Stand with the feet shoulder width apart Stand with the feet shoulder width apart
and the arms behind the bodyand the arms behind the body
ActionAction
Grasp the left wrist with the right hand. Grasp the left wrist with the right hand.
Pull the left arm down and to the right. Pull the left arm down and to the right.
Tilt the head to the right. Hold this Tilt the head to the right. Hold this
position for 10-15 seconds. Repeat the position for 10-15 seconds. Repeat the
action with the right wrist, pulling the action with the right wrist, pulling the
right arm down and to the left. Tilt the right arm down and to the left. Tilt the
head to the left.head to the left.
Neck & Shoulders
PositionPosition
Stand and extend the arms upward and over Stand and extend the arms upward and over
the head. Interlace the fingers with the the head. Interlace the fingers with the
palms turned upward.palms turned upward.
ActionAction
Stretch the arms up and slightly back. Hold Stretch the arms up and slightly back. Hold
this position for 10-15 seconds.this position for 10-15 seconds.
VariationVariation
This stretches the rectus abdominous This stretches the rectus abdominous
muscles. Stretch to one side, then the other. muscles. Stretch to one side, then the other.
Return to the starting position.Return to the starting position.
Abdominal
3838
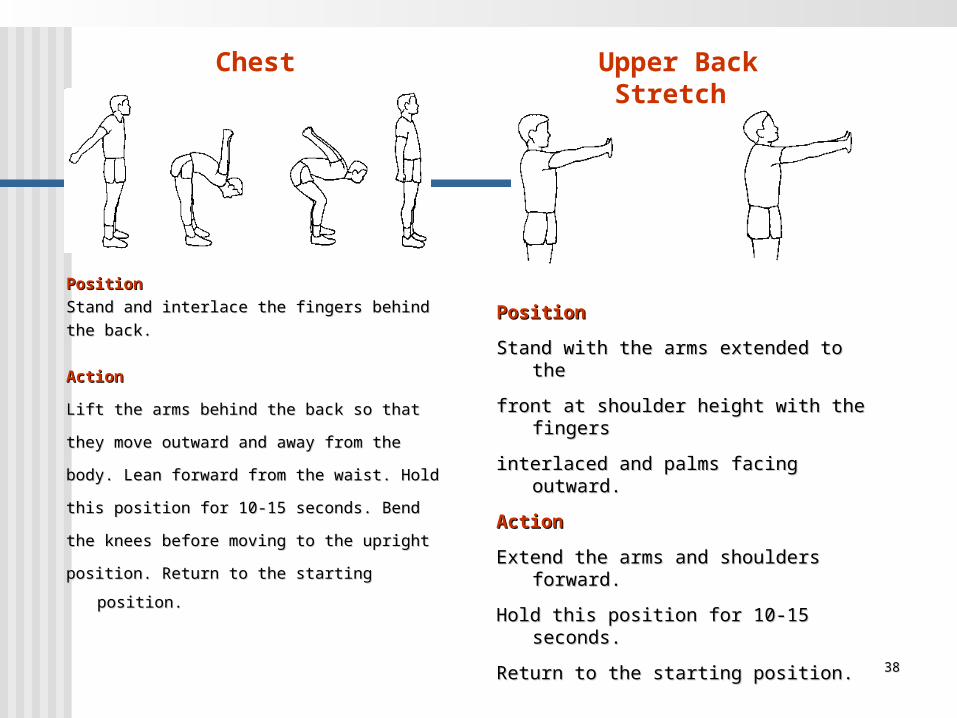
PositionPosition
Stand and interlace the fingers behind Stand and interlace the fingers behind
the back.the back.
Action Action
Lift the arms behind the back so that Lift the arms behind the back so that
they move outward and away from thethey move outward and away from the
body. Lean forward from the waist. Holdbody. Lean forward from the waist. Hold
this position for 10-15 seconds. Bendthis position for 10-15 seconds. Bend
the knees before moving to the uprightthe knees before moving to the upright
position. Return to the starting position.position. Return to the starting position.
PositionPosition
Stand with the arms extended to theStand with the arms extended to the
front at shoulder height with the fingersfront at shoulder height with the fingers
interlaced and palms facing outward.interlaced and palms facing outward.
ActionAction
Extend the arms and shoulders forward.Extend the arms and shoulders forward.
Hold this position for 10-15 seconds.Hold this position for 10-15 seconds.
Return to the starting position.Return to the starting position.
Chest Upper Back Stretch
3939
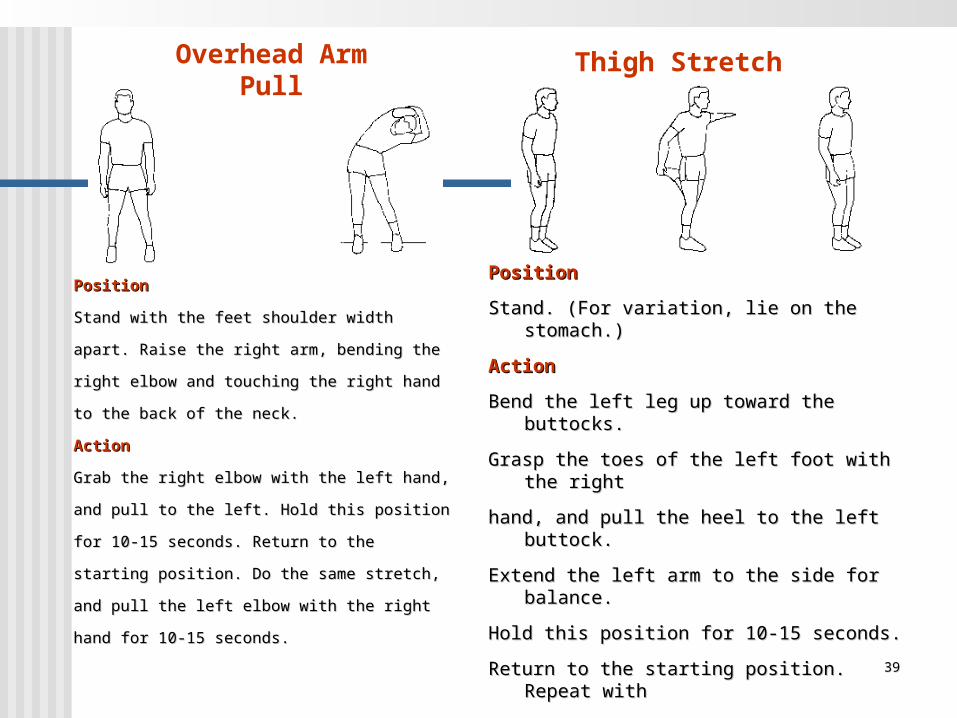
PositionPosition
Stand with the feet shoulder widthStand with the feet shoulder width
apart. Raise the right arm, bending theapart. Raise the right arm, bending the
right elbow and touching the right handright elbow and touching the right hand
to the back of the neck.to the back of the neck.
Action Action
Grab the right elbow with the left hand,Grab the right elbow with the left hand,
and pull to the left. Hold this positionand pull to the left. Hold this position
for 10-15 seconds. Return to thefor 10-15 seconds. Return to the
starting position. Do the same stretch,starting position. Do the same stretch,
and pull the left elbow with the rightand pull the left elbow with the right
hand for 10-15 seconds.hand for 10-15 seconds.
PositionPosition
Stand. (For variation, lie on the stomach.)Stand. (For variation, lie on the stomach.)
ActionAction
Bend the left leg up toward the buttocks.Bend the left leg up toward the buttocks.
Grasp the toes of the left foot with the rightGrasp the toes of the left foot with the right
hand, and pull the heel to the left buttock.hand, and pull the heel to the left buttock.
Extend the left arm to the side for balance.Extend the left arm to the side for balance.
Hold this position for 10-15 seconds.Hold this position for 10-15 seconds.
Return to the starting position. Repeat withReturn to the starting position. Repeat with
the right leg. Extend the right arm forthe right leg. Extend the right arm for
balance. Hold this position for 10-15balance. Hold this position for 10-15
seconds. Return to the starting position.seconds. Return to the starting position.
Overhead Arm Pull
Thigh Stretch
4040
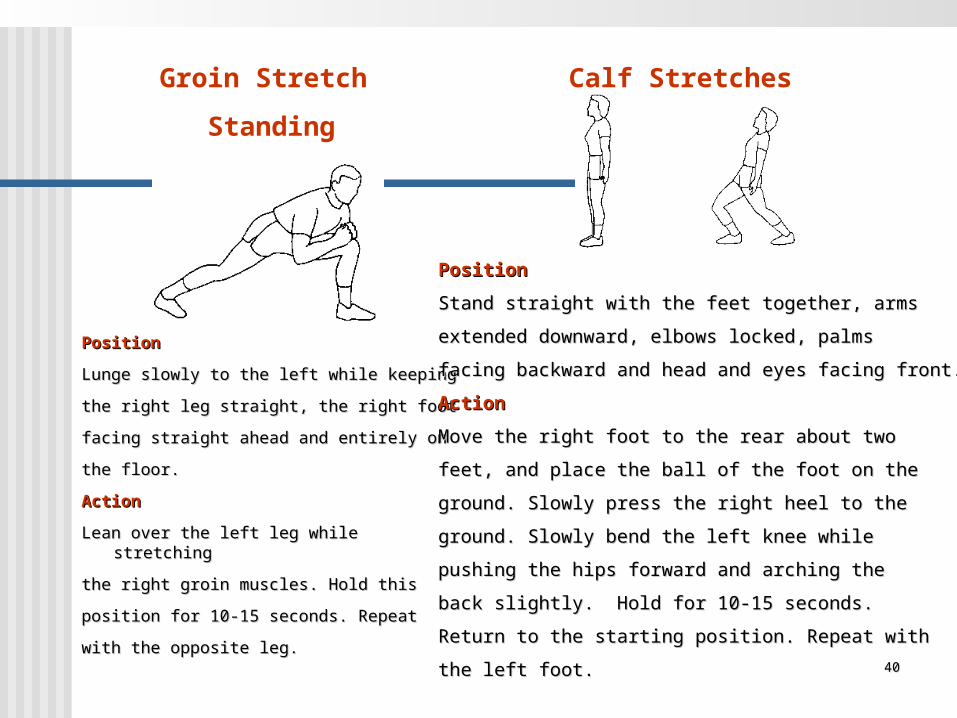
PositionPosition
Lunge slowly to the left while keepingLunge slowly to the left while keeping
the right leg straight, the right footthe right leg straight, the right foot
facing straight ahead and entirely onfacing straight ahead and entirely on
the floor.the floor.
ActionAction
Lean over the left leg while stretchingLean over the left leg while stretching
the right groin muscles. Hold thisthe right groin muscles. Hold this
position for 10-15 seconds. Repeatposition for 10-15 seconds. Repeat
with the opposite leg.with the opposite leg.
Groin Stretch
Standing
Calf Stretches
PositionPosition
Stand straight with the feet together, armsStand straight with the feet together, arms
extended downward, elbows locked, palmsextended downward, elbows locked, palms
facing backward and head and eyes facing front.facing backward and head and eyes facing front.
ActionAction
Move the right foot to the rear about two Move the right foot to the rear about two
feet, and place the ball of the foot on thefeet, and place the ball of the foot on the
ground. Slowly press the right heel to theground. Slowly press the right heel to the
ground. Slowly bend the left knee whileground. Slowly bend the left knee while
pushing the hips forward and arching the pushing the hips forward and arching the
back slightly. Hold for 10-15 seconds. back slightly. Hold for 10-15 seconds.
Return to the starting position. Repeat with Return to the starting position. Repeat with
the left foot. the left foot.
4141
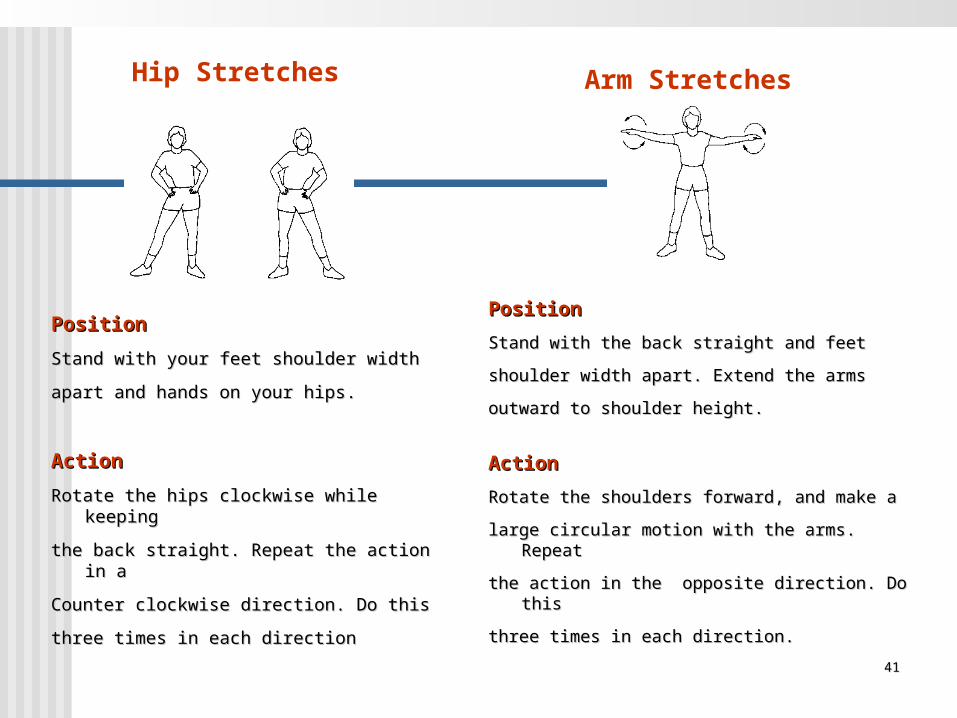
PositionPosition
Stand with the back straight and feetStand with the back straight and feet
shoulder width apart. Extend the armsshoulder width apart. Extend the arms
outward to shoulder height.outward to shoulder height.
ActionAction
Rotate the shoulders forward, and make aRotate the shoulders forward, and make a
large circular motion with the arms. Repeatlarge circular motion with the arms. Repeat
the action in the opposite direction. Do thisthe action in the opposite direction. Do this
three times in each direction.three times in each direction.
PositionPosition
Stand with your feet shoulder widthStand with your feet shoulder width
apart and hands on your hips.apart and hands on your hips.
ActionAction
Rotate the hips clockwise while keeping Rotate the hips clockwise while keeping
the back straight. Repeat the action in a the back straight. Repeat the action in a
Counter clockwise direction. Do this Counter clockwise direction. Do this
three times in each directionthree times in each direction
Arm StretchesHip Stretches
4242
ReferencesReferences
WorkCover NSWHead office phone: 13 10 50Fax: (02) 4325 4145 www.workcover.nsw.gov.au (visited17/02/09) Further Information NSW Nurses’ AssociationPhone: www.nswnurses.asn.au WorkCover SAwww.workcover.com National Occupational Health and Safety Commissionwww.nohsc-
eu.gov.au Design4 Healthwww2.dir.qld.gov.au/design4health/ http://vetvirtual.external.utas.edu.
au/csh/assets/manualhandling/index.htm