0 cpmgmt1and2 virtualenvironment r75
DESCRIPTION
CPMgmt1and2 VirtualEnvironment R75TRANSCRIPT
0-CPMgmt1and2-VirtualEnv-R75 Lezha Publications 2012
Check Point Course Materials - Virtual Environment
Objectives
Understand the network and servers used for the course materials.
Know how to configure the virtual network environment used for the course materials.
Know how to copy virtual machines using a base build and linked clones.
Know the importance of the VNnet network adapter setting.
Prerequisites
Host Computer, Minimum Specification, Core Duo 8GB RAM and 120GB of free disk space.
VMware WorkStation, ESXi or another HyperVisor
Windows 2008R2 ISO to build Virtual Machines
Windows XP Pro or Windows 7 Virtual Machine
Check Point R75.20 or later Windows ISO
Check Point R75.20 or later SPLAT ISO
Release Date 19th
September 2012
Document Number 560012091901
This document applies to the following R75 ebook course materials.
Check Point Management Essentials - Part 1
Check Point Management Essentials - Part 2
www.elearncheckpoint.com
Section 1 Check Point Management Essentials 1 & 2 Virtual Environment
Section 2 Building the Virtual machines
Section 2 Creating the SecurePlatform Virtual Machine Templates
Section 2 Installing Software
Time taken to build the Virtual Machine environment from scratch is about 6-8 hours.
This does not include time required to download any ISO images or software.
The contents of this document cannot be modified without the express permission of an authorized representative of the copyright owner.
0-CPMgmt1and2-VirtualEnv-R75 2 Lezha Publications 2012
Contents
1 Check Point Management Essentials 1 & 2 - Virtual Environment ........................... 3 1.1 Course Environment & Network Diagrams ...................................................... 3
1.1.1 Minimum Hardware & Software Requirements .................................... 3 1.1.2 The Core Environment – Network Diagram ......................................... 3 1.1.3 Firewall HA Environment – Network Diagram ...................................... 4 1.1.4 List of Virtual Machines ........................................................................ 4 1.1.5 Useful Software for the Virtual Windows 2008R2 Servers ................... 6
2 Building the Virtual Machines ......................................................................................... 7 2.1 Virtual Machines – Created in VMware WorkStation ....................................... 7
2.1.1 ISO Images required for the Course .................................................... 7 2.1.2 The Base Machine – Base2008R2Enterprise ...................................... 7 2.1.3 Accessing Files on the Local Host from within a Virtual Machine......... 8
2.2 Create the Server – ADSRV01 (Win2008R2) .................................................. 10 2.2.1 Create a Linked Clone Example – ADSRV01 ...................................... 10 2.2.2 Configure the Linked Clone – ADSRV01 ............................................. 12 2.2.3 Adding Role Active Directory Domain Services.................................... 12 2.2.4 Adding Role Web & FTP Server........................................................... 15 2.2.5 Turn on Remote Access ....................................................................... 17 2.2.6 Add Some Standard Users to the AD Server ....................................... 17
2.3 Configure the Other linked Clones (Win2008R2) ............................................ 19 2.3.1 Configure the Linked Clone – ClassRouter .......................................... 19 2.3.2 Configure the Linked Clone - www-Site2 ............................................. 21 2.3.3 Configure the Linked Clone - smtp-Site1 ............................................. 22 2.3.4 Configure the Linked Clone - www-Site1 ............................................. 22
2.4 Turning off IE Advanced Security 2008R2....................................................... 22 2.5 Creating the XP or Windows 7 Hosts .............................................................. 22
2.5.1 Build a base XP or windows 7 host ...................................................... 23 2.5.2 The Host1 Virtual Machine - Windows XP Pro or Windows 7 .............. 23 2.5.3 The VPNClient Virtual Machine - Windows XP Pro or Windows 7 ....... 24
3 Creating the SecurePlatform Virtual Machine templates ........................................... 25 3.1 fw-Site1 ........................................................................................................... 25
3.1.1 Create the Firewall for Site1 Virtual Machine ....................................... 25 3.2 fw-Site2 ........................................................................................................... 28
3.2.1 Create the Firewall for Site2 Virtual Machine ....................................... 28
3.3 mgmt-Site1 ...................................................................................................... 29 3.3.1 Create the SmartCenter Virutal Machine ............................................. 29
3.4 Cluster Firewalls - fwa & fwb ........................................................................... 29 4 Installing Software ............................................................................................................. 30
4.1 Mail Enable...................................................................................................... 30 4.1.1 Mail enable Installation steps ............................................................... 30
4.2 MM3 WebAssistant ......................................................................................... 34 4.3 NTP Server...................................................................................................... 34 4.4 Resetting the Date and Time – extending the Eval License ............................ 35
4.4.1 Live site Resetting the Date and Time ................................................. 35 4.5 Maintaining the Virtual Machines – Software Updates .................................... 35
0-CPMgmt1and2-VirtualEnv-R75 3 Lezha Publications 2012
1 Check Point Management Essentials 1 & 2 - Virtual Environment
The course materials can be completed using virtual machines or a mixture of VMs and real physical machines. It is recommended that virtual machines are used for these course materials. The course materials assume that you will be using virtual machines. The materials and environment were tested using VMware WorkStation 7.1.
1.1 Course Environment & Network Diagrams
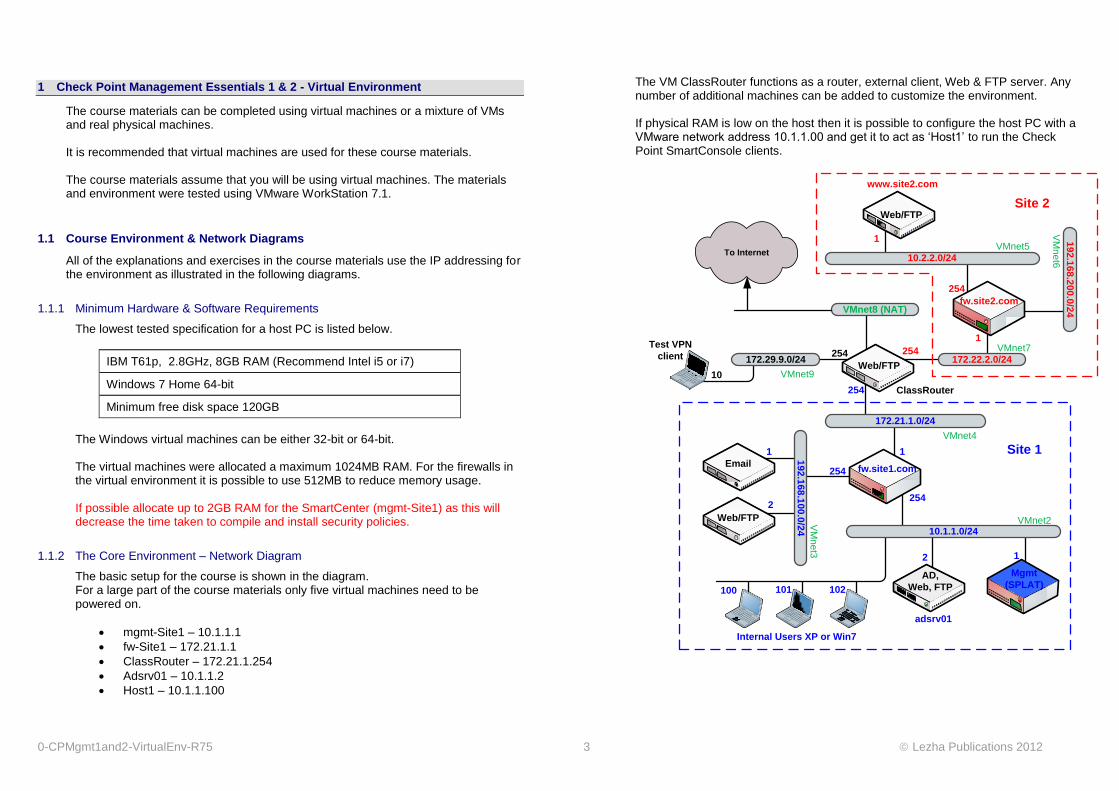
All of the explanations and exercises in the course materials use the IP addressing for the environment as illustrated in the following diagrams.
1.1.1 Minimum Hardware & Software Requirements
The lowest tested specification for a host PC is listed below.
IBM T61p, 2.8GHz, 8GB RAM (Recommend Intel i5 or i7)
Windows 7 Home 64-bit
Minimum free disk space 120GB
The Windows virtual machines can be either 32-bit or 64-bit. The virtual machines were allocated a maximum 1024MB RAM. For the firewalls in the virtual environment it is possible to use 512MB to reduce memory usage. If possible allocate up to 2GB RAM for the SmartCenter (mgmt-Site1) as this will decrease the time taken to compile and install security policies.
1.1.2 The Core Environment – Network Diagram
The basic setup for the course is shown in the diagram. For a large part of the course materials only five virtual machines need to be powered on.
mgmt-Site1 – 10.1.1.1
fw-Site1 – 172.21.1.1
ClassRouter – 172.21.1.254
Adsrv01 – 10.1.1.2
Host1 – 10.1.1.100
The VM ClassRouter functions as a router, external client, Web & FTP server. Any number of additional machines can be added to customize the environment. If physical RAM is low on the host then it is possible to configure the host PC with a VMware network address 10.1.1.00 and get it to act as ‘Host1’ to run the Check Point SmartConsole clients.
To Internet
19
2.1
68
.10
0.0
/24
172.21.1.0/24
172.29.9.0/24
254
11
2
2
254
254
ClassRouter
Web/FTP
fw.site1.com
10.1.1.0/24
254
Internal Users XP or Win7
Web/FTP
1
172.22.2.0/24
254
1
Web/FTP
www.site2.com
fw.site2.com
10.2.2.0/24
254
10
Test VPN
client
Site 2
Site 1
AD,
Web, FTP
adsrv01
VMnet2
VM
ne
t6
VMnet5
VMnet4
VMnet7
VM
ne
t3
VMnet9
19
2.1
68
.20
0.0
/24
1
VMnet8 (NAT)
Mgmt
(SPLAT)100 101 102
0-CPMgmt1and2-VirtualEnv-R75 4 Lezha Publications 2012
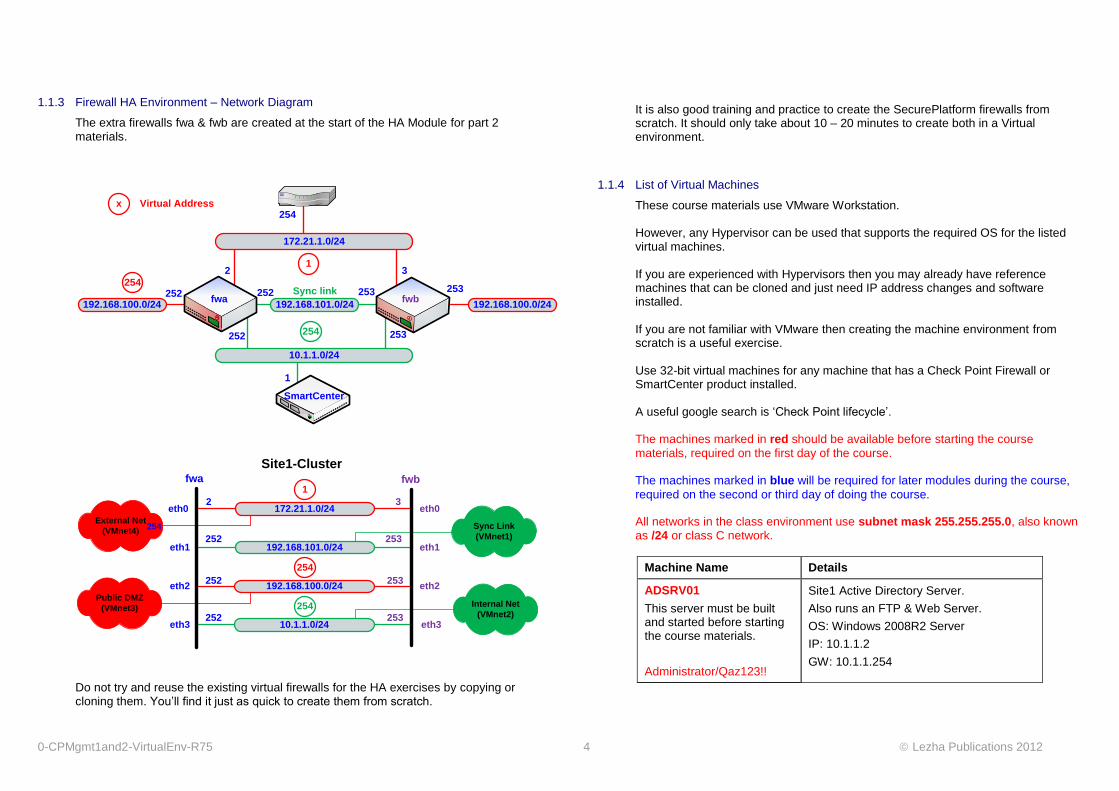
1.1.3 Firewall HA Environment – Network Diagram
The extra firewalls fwa & fwb are created at the start of the HA Module for part 2 materials.
172.21.1.0/24
10.1.1.0/24
SmartCenter
fwa fwb192.168.101.0/24 192.168.100.0/24192.168.100.0/24
Sync link
Virtual Address
21
254
3
253252
252253
1
x
254
254
253252
172.21.1.0/24
192.168.101.0/24
External Net
(VMnet4)
10.1.1.0/24
192.168.100.0/24
254
1
254
eth0
eth2
eth3
eth1
eth0
eth2
eth3
eth1
2 3
252 253
252 253
252 253
fwa fwb
Sync Link
(VMnet1)
Public DMZ
(VMnet3)Internal Net
(VMnet2)
254
Site1-Cluster
Do not try and reuse the existing virtual firewalls for the HA exercises by copying or cloning them. You’ll find it just as quick to create them from scratch.
It is also good training and practice to create the SecurePlatform firewalls from scratch. It should only take about 10 – 20 minutes to create both in a Virtual environment.
1.1.4 List of Virtual Machines
These course materials use VMware Workstation. However, any Hypervisor can be used that supports the required OS for the listed virtual machines. If you are experienced with Hypervisors then you may already have reference machines that can be cloned and just need IP address changes and software installed. If you are not familiar with VMware then creating the machine environment from scratch is a useful exercise. Use 32-bit virtual machines for any machine that has a Check Point Firewall or SmartCenter product installed. A useful google search is ‘Check Point lifecycle’. The machines marked in red should be available before starting the course
materials, required on the first day of the course. The machines marked in blue will be required for later modules during the course,
required on the second or third day of doing the course. All networks in the class environment use subnet mask 255.255.255.0, also known as /24 or class C network.
Machine Name Details
ADSRV01
This server must be built and started before starting the course materials.
Administrator/Qaz123!!
Site1 Active Directory Server.
Also runs an FTP & Web Server.
OS: Windows 2008R2 Server
IP: 10.1.1.2
GW: 10.1.1.254
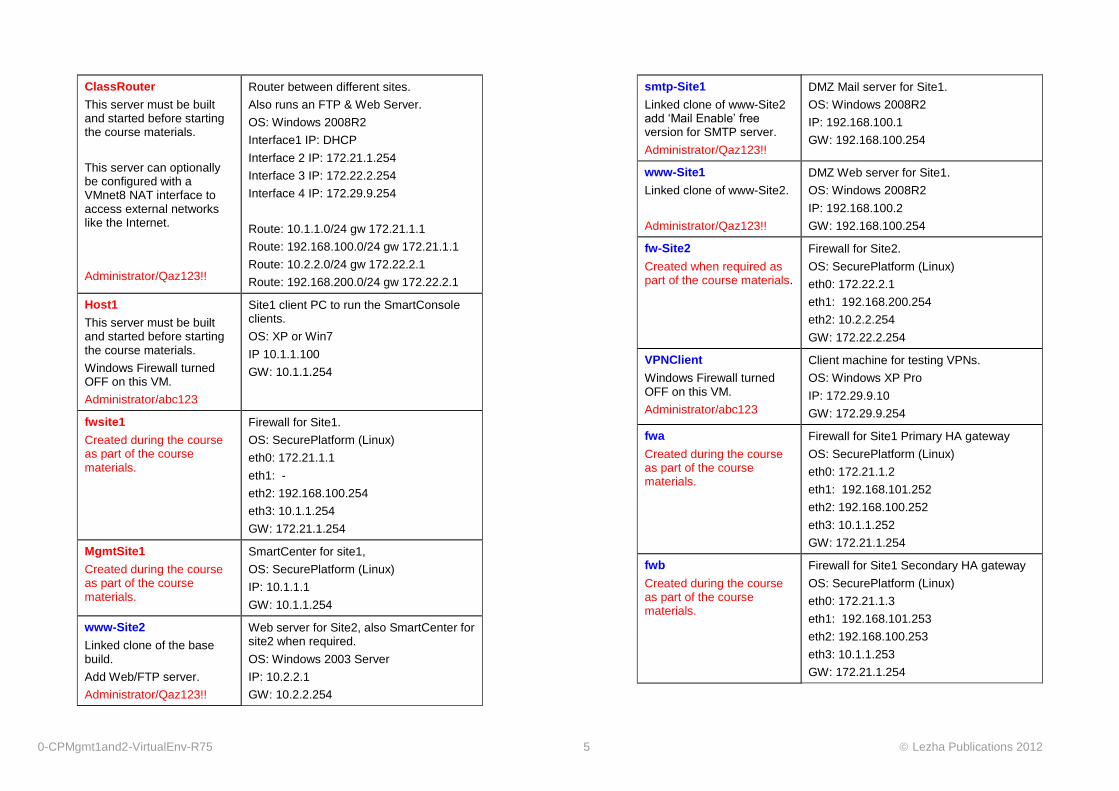
0-CPMgmt1and2-VirtualEnv-R75 5 Lezha Publications 2012
ClassRouter
This server must be built and started before starting the course materials.
This server can optionally be configured with a VMnet8 NAT interface to access external networks like the Internet.
Administrator/Qaz123!!
Router between different sites.
Also runs an FTP & Web Server.
OS: Windows 2008R2
Interface1 IP: DHCP
Interface 2 IP: 172.21.1.254
Interface 3 IP: 172.22.2.254
Interface 4 IP: 172.29.9.254
Route: 10.1.1.0/24 gw 172.21.1.1
Route: 192.168.100.0/24 gw 172.21.1.1
Route: 10.2.2.0/24 gw 172.22.2.1
Route: 192.168.200.0/24 gw 172.22.2.1
Host1
This server must be built and started before starting the course materials.
Windows Firewall turned OFF on this VM.
Administrator/abc123
Site1 client PC to run the SmartConsole clients.
OS: XP or Win7
IP 10.1.1.100
GW: 10.1.1.254
fwsite1
Created during the course as part of the course materials.
Firewall for Site1.
OS: SecurePlatform (Linux)
eth0: 172.21.1.1
eth1: -
eth2: 192.168.100.254
eth3: 10.1.1.254
GW: 172.21.1.254
MgmtSite1
Created during the course as part of the course materials.
SmartCenter for site1,
OS: SecurePlatform (Linux)
IP: 10.1.1.1
GW: 10.1.1.254
www-Site2
Linked clone of the base build.
Add Web/FTP server.
Administrator/Qaz123!!
Web server for Site2, also SmartCenter for site2 when required.
OS: Windows 2003 Server
IP: 10.2.2.1
GW: 10.2.2.254
smtp-Site1
Linked clone of www-Site2 add ‘Mail Enable’ free version for SMTP server.
Administrator/Qaz123!!
DMZ Mail server for Site1.
OS: Windows 2008R2
IP: 192.168.100.1
GW: 192.168.100.254
www-Site1
Linked clone of www-Site2.
Administrator/Qaz123!!
DMZ Web server for Site1.
OS: Windows 2008R2
IP: 192.168.100.2
GW: 192.168.100.254
fw-Site2
Created when required as part of the course materials.
Firewall for Site2.
OS: SecurePlatform (Linux)
eth0: 172.22.2.1
eth1: 192.168.200.254
eth2: 10.2.2.254
GW: 172.22.2.254
VPNClient
Windows Firewall turned OFF on this VM.
Administrator/abc123
Client machine for testing VPNs.
OS: Windows XP Pro
IP: 172.29.9.10
GW: 172.29.9.254
fwa
Created during the course as part of the course materials.
Firewall for Site1 Primary HA gateway
OS: SecurePlatform (Linux)
eth0: 172.21.1.2
eth1: 192.168.101.252
eth2: 192.168.100.252
eth3: 10.1.1.252
GW: 172.21.1.254
fwb
Created during the course as part of the course materials.
Firewall for Site1 Secondary HA gateway
OS: SecurePlatform (Linux)
eth0: 172.21.1.3
eth1: 192.168.101.253
eth2: 192.168.100.253
eth3: 10.1.1.253
GW: 172.21.1.254
0-CPMgmt1and2-VirtualEnv-R75 6 Lezha Publications 2012
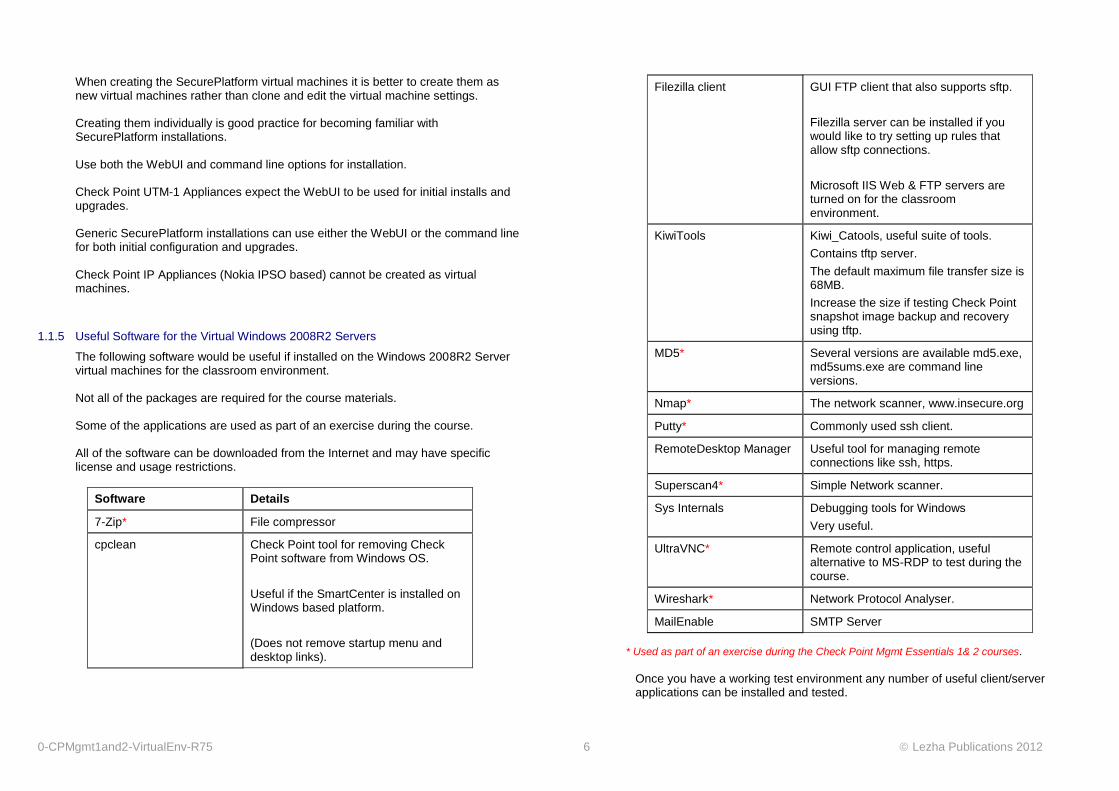
When creating the SecurePlatform virtual machines it is better to create them as new virtual machines rather than clone and edit the virtual machine settings. Creating them individually is good practice for becoming familiar with SecurePlatform installations. Use both the WebUI and command line options for installation. Check Point UTM-1 Appliances expect the WebUI to be used for initial installs and upgrades. Generic SecurePlatform installations can use either the WebUI or the command line for both initial configuration and upgrades. Check Point IP Appliances (Nokia IPSO based) cannot be created as virtual machines.
1.1.5 Useful Software for the Virtual Windows 2008R2 Servers
The following software would be useful if installed on the Windows 2008R2 Server virtual machines for the classroom environment. Not all of the packages are required for the course materials. Some of the applications are used as part of an exercise during the course. All of the software can be downloaded from the Internet and may have specific license and usage restrictions.
Software Details
7-Zip* File compressor
cpclean Check Point tool for removing Check Point software from Windows OS.
Useful if the SmartCenter is installed on Windows based platform.
(Does not remove startup menu and desktop links).
Filezilla client GUI FTP client that also supports sftp.
Filezilla server can be installed if you would like to try setting up rules that allow sftp connections.
Microsoft IIS Web & FTP servers are turned on for the classroom environment.
KiwiTools Kiwi_Catools, useful suite of tools.
Contains tftp server.
The default maximum file transfer size is 68MB.
Increase the size if testing Check Point snapshot image backup and recovery using tftp.
MD5* Several versions are available md5.exe, md5sums.exe are command line versions.
Nmap* The network scanner, www.insecure.org
Putty* Commonly used ssh client.
RemoteDesktop Manager Useful tool for managing remote connections like ssh, https.
Superscan4* Simple Network scanner.
Sys Internals Debugging tools for Windows
Very useful.
UltraVNC* Remote control application, useful alternative to MS-RDP to test during the course.
Wireshark* Network Protocol Analyser.
MailEnable SMTP Server
* Used as part of an exercise during the Check Point Mgmt Essentials 1& 2 courses.
Once you have a working test environment any number of useful client/server applications can be installed and tested.
0-CPMgmt1and2-VirtualEnv-R75 7 Lezha Publications 2012
2 Building the Virtual Machines
2.1 Virtual Machines – Created in VMware WorkStation
The virtual machines were created using VMware WorkStation 7.1. WMware WorkStation allows you to create base reference configurations and then easily clone the base machine and treat it as a template. A full or linked clone can be created. Full clones can be copied to other machines and run independently of the original base machine files. You just need to copy the directory and files related to the full clone. Linked clones use a lot less disk space but require the base machine files to be available when linked clones are copied to another computer. Clones allow you to experiment with the virtual machine without affecting the original. If the clone becomes a mess it can be discarded and a new clone of the original machine created to start again. Linked clones can take less than a few minutes to create. Machines created in VMware WorkStation can be imported to ESXi server using the VMware Converter tool.
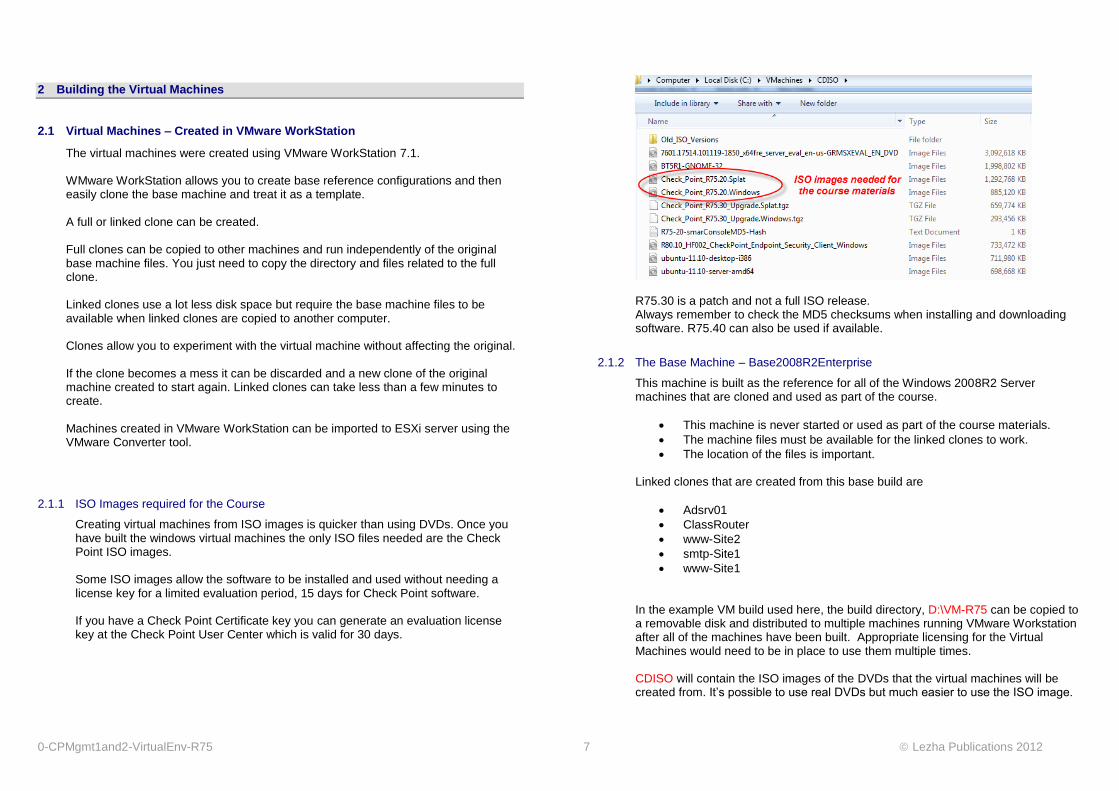
2.1.1 ISO Images required for the Course
Creating virtual machines from ISO images is quicker than using DVDs. Once you have built the windows virtual machines the only ISO files needed are the Check Point ISO images. Some ISO images allow the software to be installed and used without needing a license key for a limited evaluation period, 15 days for Check Point software. If you have a Check Point Certificate key you can generate an evaluation license key at the Check Point User Center which is valid for 30 days.
R75.30 is a patch and not a full ISO release. Always remember to check the MD5 checksums when installing and downloading software. R75.40 can also be used if available.
2.1.2 The Base Machine – Base2008R2Enterprise
This machine is built as the reference for all of the Windows 2008R2 Server machines that are cloned and used as part of the course.
This machine is never started or used as part of the course materials.
The machine files must be available for the linked clones to work.
The location of the files is important. Linked clones that are created from this base build are
Adsrv01
ClassRouter
www-Site2
smtp-Site1
www-Site1 In the example VM build used here, the build directory, D:\VM-R75 can be copied to a removable disk and distributed to multiple machines running VMware Workstation after all of the machines have been built. Appropriate licensing for the Virtual Machines would need to be in place to use them multiple times. CDISO will contain the ISO images of the DVDs that the virtual machines will be created from. It’s possible to use real DVDs but much easier to use the ISO image.
0-CPMgmt1and2-VirtualEnv-R75 8 Lezha Publications 2012
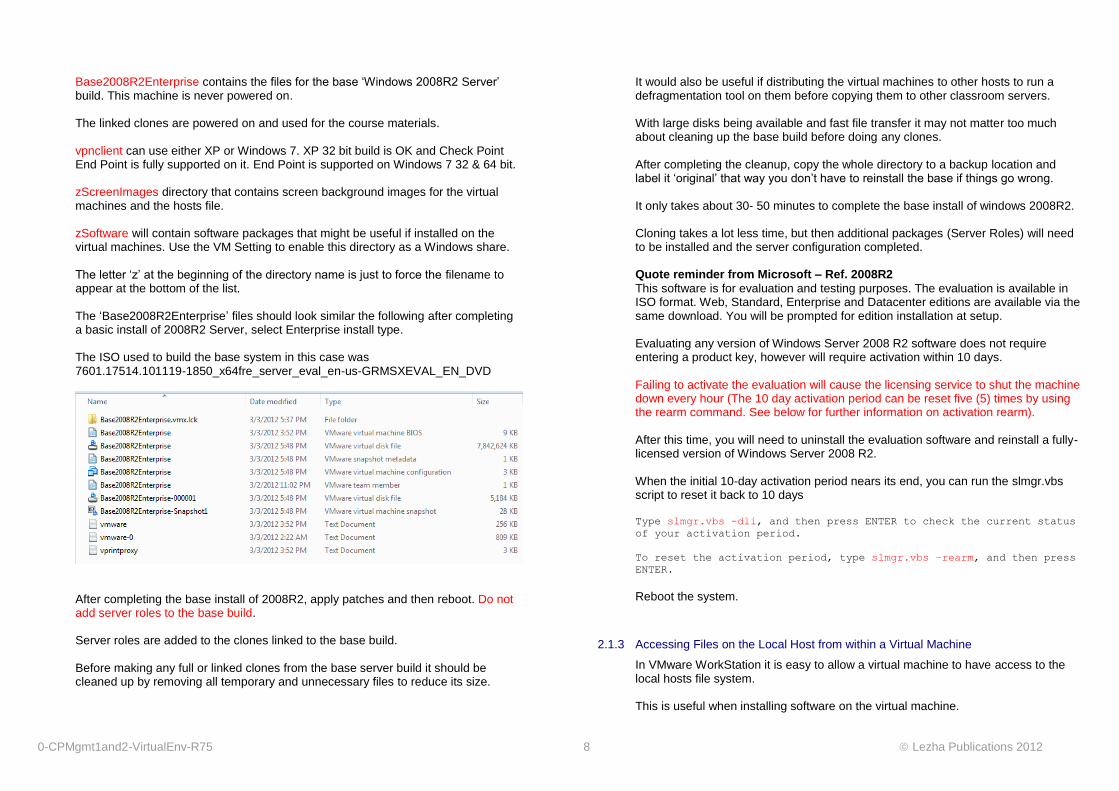
Base2008R2Enterprise contains the files for the base ‘Windows 2008R2 Server’ build. This machine is never powered on. The linked clones are powered on and used for the course materials. vpnclient can use either XP or Windows 7. XP 32 bit build is OK and Check Point End Point is fully supported on it. End Point is supported on Windows 7 32 & 64 bit. zScreenImages directory that contains screen background images for the virtual machines and the hosts file. zSoftware will contain software packages that might be useful if installed on the virtual machines. Use the VM Setting to enable this directory as a Windows share. The letter ‘z’ at the beginning of the directory name is just to force the filename to appear at the bottom of the list. The ‘Base2008R2Enterprise’ files should look similar the following after completing a basic install of 2008R2 Server, select Enterprise install type. The ISO used to build the base system in this case was 7601.17514.101119-1850_x64fre_server_eval_en-us-GRMSXEVAL_EN_DVD
After completing the base install of 2008R2, apply patches and then reboot. Do not add server roles to the base build. Server roles are added to the clones linked to the base build. Before making any full or linked clones from the base server build it should be cleaned up by removing all temporary and unnecessary files to reduce its size.
It would also be useful if distributing the virtual machines to other hosts to run a defragmentation tool on them before copying them to other classroom servers. With large disks being available and fast file transfer it may not matter too much about cleaning up the base build before doing any clones. After completing the cleanup, copy the whole directory to a backup location and label it ‘original’ that way you don’t have to reinstall the base if things go wrong. It only takes about 30- 50 minutes to complete the base install of windows 2008R2. Cloning takes a lot less time, but then additional packages (Server Roles) will need to be installed and the server configuration completed. Quote reminder from Microsoft – Ref. 2008R2
This software is for evaluation and testing purposes. The evaluation is available in ISO format. Web, Standard, Enterprise and Datacenter editions are available via the same download. You will be prompted for edition installation at setup. Evaluating any version of Windows Server 2008 R2 software does not require entering a product key, however will require activation within 10 days. Failing to activate the evaluation will cause the licensing service to shut the machine down every hour (The 10 day activation period can be reset five (5) times by using the rearm command. See below for further information on activation rearm). After this time, you will need to uninstall the evaluation software and reinstall a fully-licensed version of Windows Server 2008 R2. When the initial 10-day activation period nears its end, you can run the slmgr.vbs script to reset it back to 10 days Type slmgr.vbs -dli, and then press ENTER to check the current status
of your activation period.
To reset the activation period, type slmgr.vbs –rearm, and then press
ENTER.
Reboot the system.
2.1.3 Accessing Files on the Local Host from within a Virtual Machine
In VMware WorkStation it is easy to allow a virtual machine to have access to the local hosts file system. This is useful when installing software on the virtual machine.

0-CPMgmt1and2-VirtualEnv-R75 9 Lezha Publications 2012
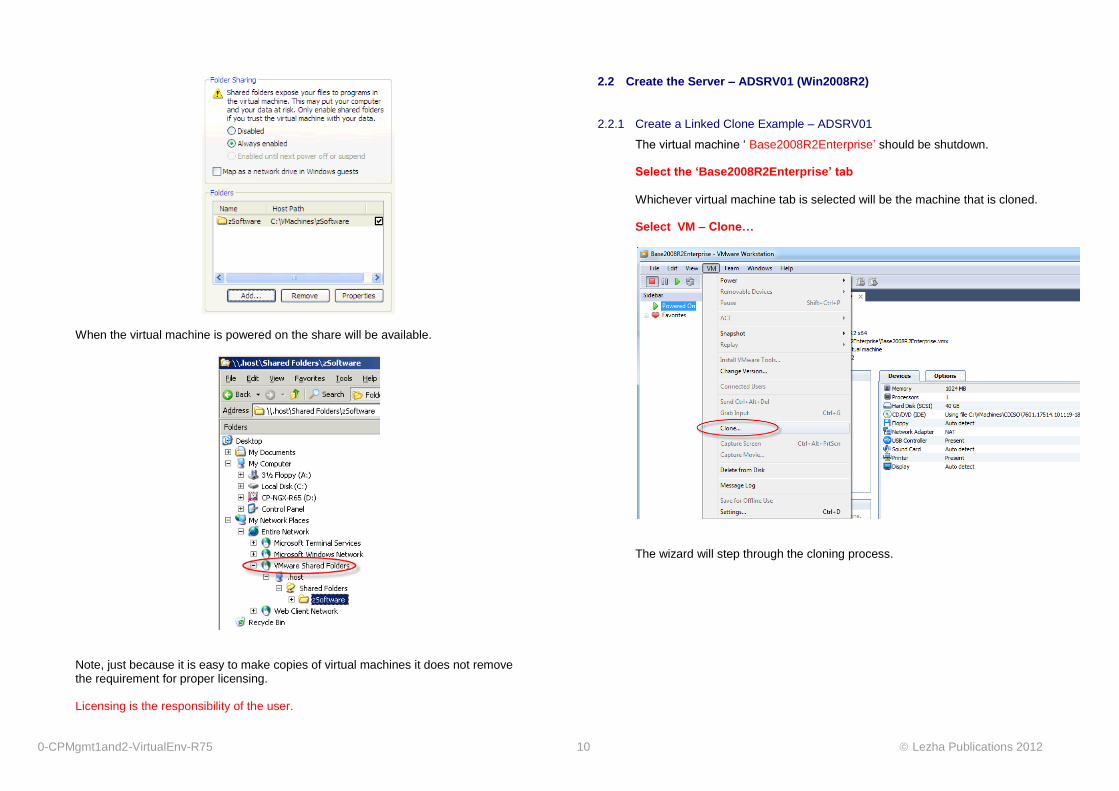
Instead of copying the software onto the virtual machine you can install the software from a share on the host computer. The host computer is the machine running VMware WorkStation. In the virtual machine settings under ‘Options’ shared folders can be added. Shares can be added while the virtual machine is powered on or off. If the virtual machine is not running the only options will be ‘Disabled’ or ‘Always enabled’.
Shares should normally only be enabled when needed. Select ‘Add…’
Select the directory to Share
(Location of the ‘zSoftware’ directory)
The share should be mounted as ‘Read-only’ unless you are copying files from the
virtual machine to the local host. The default allows Read/Write.
The share will be added to the listed of accessible shares.
0-CPMgmt1and2-VirtualEnv-R75 10 Lezha Publications 2012
When the virtual machine is powered on the share will be available.
Note, just because it is easy to make copies of virtual machines it does not remove the requirement for proper licensing. Licensing is the responsibility of the user.
2.2 Create the Server – ADSRV01 (Win2008R2)
2.2.1 Create a Linked Clone Example – ADSRV01
The virtual machine ‘ Base2008R2Enterprise’ should be shutdown. Select the ‘Base2008R2Enterprise’ tab
Whichever virtual machine tab is selected will be the machine that is cloned. Select VM – Clone…
The wizard will step through the cloning process.
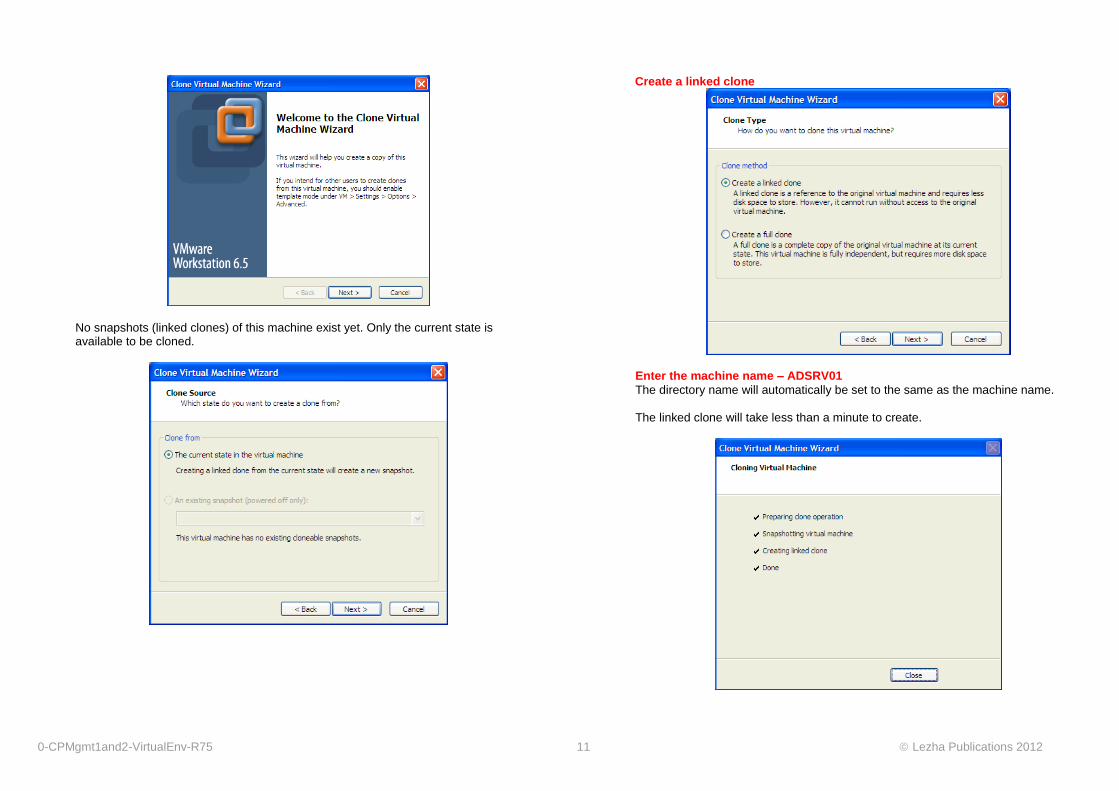
0-CPMgmt1and2-VirtualEnv-R75 11 Lezha Publications 2012
No snapshots (linked clones) of this machine exist yet. Only the current state is available to be cloned.
Create a linked clone
Enter the machine name – ADSRV01
The directory name will automatically be set to the same as the machine name. The linked clone will take less than a minute to create.
0-CPMgmt1and2-VirtualEnv-R75 12 Lezha Publications 2012
Create the other linked clones, ClassRouter & www-site2
2.2.2 Configure the Linked Clone – ADSRV01
Edit the VM Settings and set the network adapter to Custom – VMnet2
ADSRV01
No. Task
1 Set the IP Address and default gateway IP Address: 10.1.1.2 Netmask: 255.255.255.0 Gateway: 10.1.1.254
2 Set the machine name to - ADSRV01
3 Set the Domain to - site1.local Common practice for internal AD server to be part of domain .local.
4 Copy the hosts file from C:\VMachines\zScreenImages to C:\windows\system32\drivers\etc
5 Set the background screen image to - adsrv01.png Location - C:\VMachines\zScreenImages
6 Turn off Automatic updates.
7
Add a Server Role – Active Directory Server Run dcpromo.exe to add ADS & DNS Server Domain Site1.local
8
Add a Server Role – Web & FTP Server Make sure that the Web and FTP server are working. Need to manually add an FTP Server, Web server is added by default. Enable Remote Access
9 Copy the home HTML files for ADSRV01 to the web home directory. Files are located in C:\VMachines\zScreenImages
10
Install any other software required from the zSoftware directory. Putty, md5 (copy into C:\usr\bin, create directory if it does not exist, set environment variable PATH to include C:\usr\bin) Kiwi tools tftp server
You may have to turn off the Windows Firewall for 2008R2 virtual machines in the training environment. When testing services check if the local Windows firewall is a problem, disable if necessary. It might be useful to configure 3 serial ports for Machine ‘ADSRV01’, connect to mgmt-Site1, fw-Site1, fw-Site2. Not essential, needs to be three different named pipes. The serial ports are useful for course development and capturing data. Using SSH is not always available to give access to the same information as a serial link. Use putty for the serial link.
2.2.3 Adding Role Active Directory Domain Services
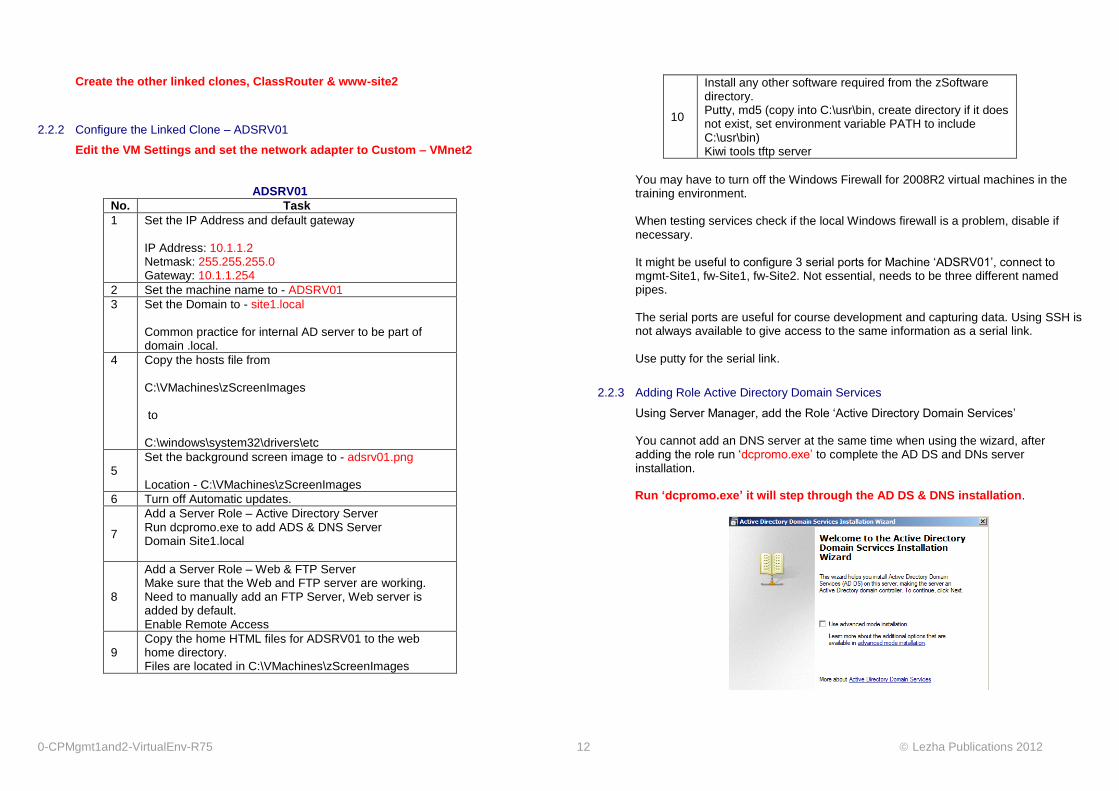
Using Server Manager, add the Role ‘Active Directory Domain Services’ You cannot add an DNS server at the same time when using the wizard, after adding the role run ‘dcpromo.exe’ to complete the AD DS and DNs server installation. Run ‘dcpromo.exe’ it will step through the AD DS & DNS installation.
0-CPMgmt1and2-VirtualEnv-R75 13 Lezha Publications 2012
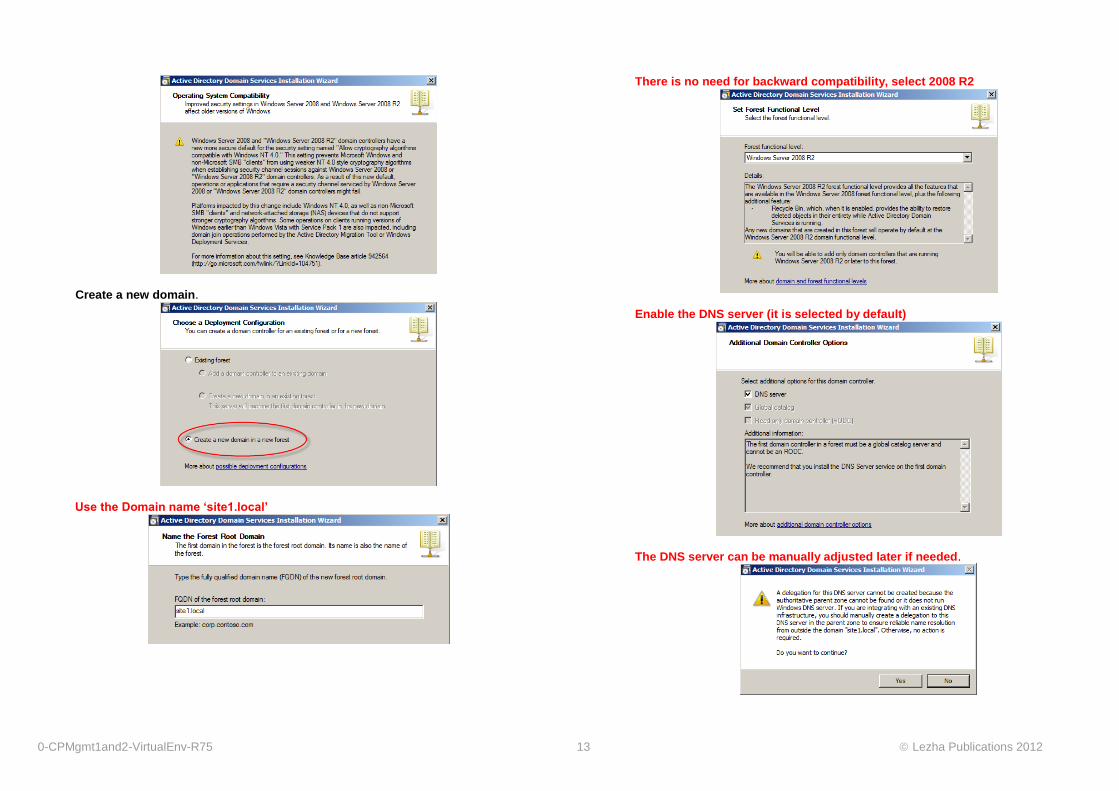
Create a new domain.
Use the Domain name ‘site1.local’
There is no need for backward compatibility, select 2008 R2
Enable the DNS server (it is selected by default)
The DNS server can be manually adjusted later if needed.
0-CPMgmt1and2-VirtualEnv-R75 14 Lezha Publications 2012
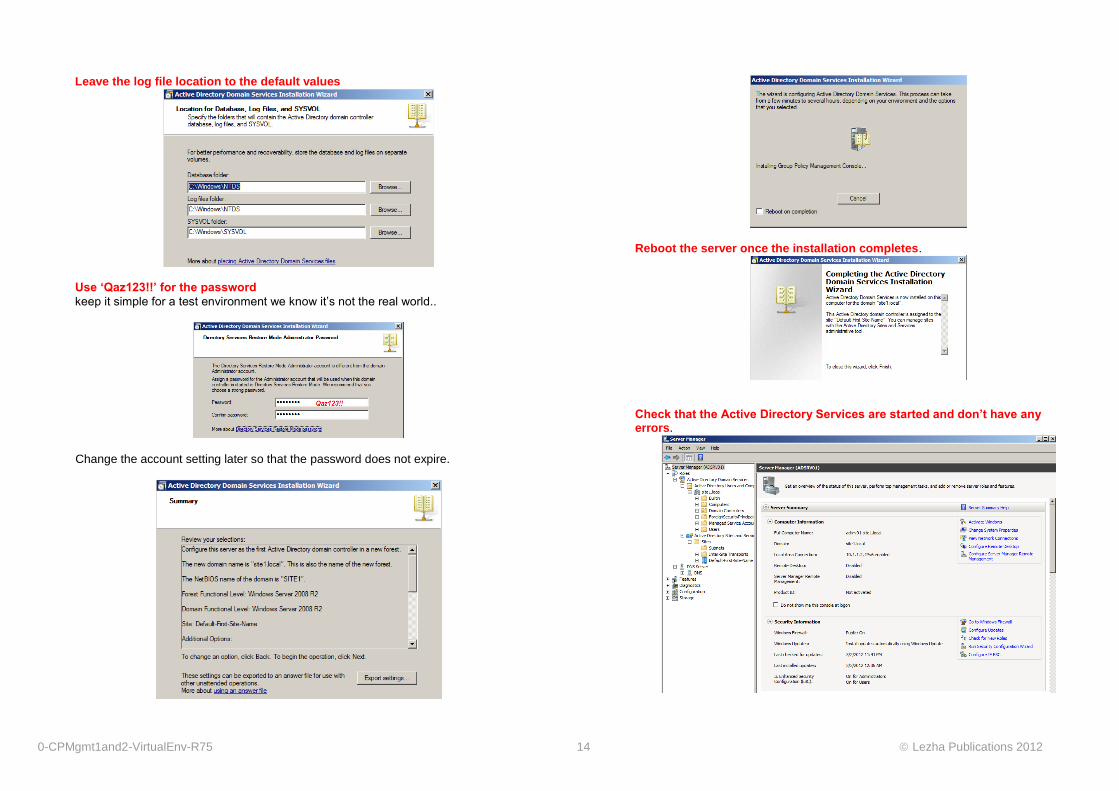
Leave the log file location to the default values
Use ‘Qaz123!!’ for the password
keep it simple for a test environment we know it’s not the real world..
Change the account setting later so that the password does not expire.
Reboot the server once the installation completes.
Check that the Active Directory Services are started and don’t have any errors.
0-CPMgmt1and2-VirtualEnv-R75 15 Lezha Publications 2012
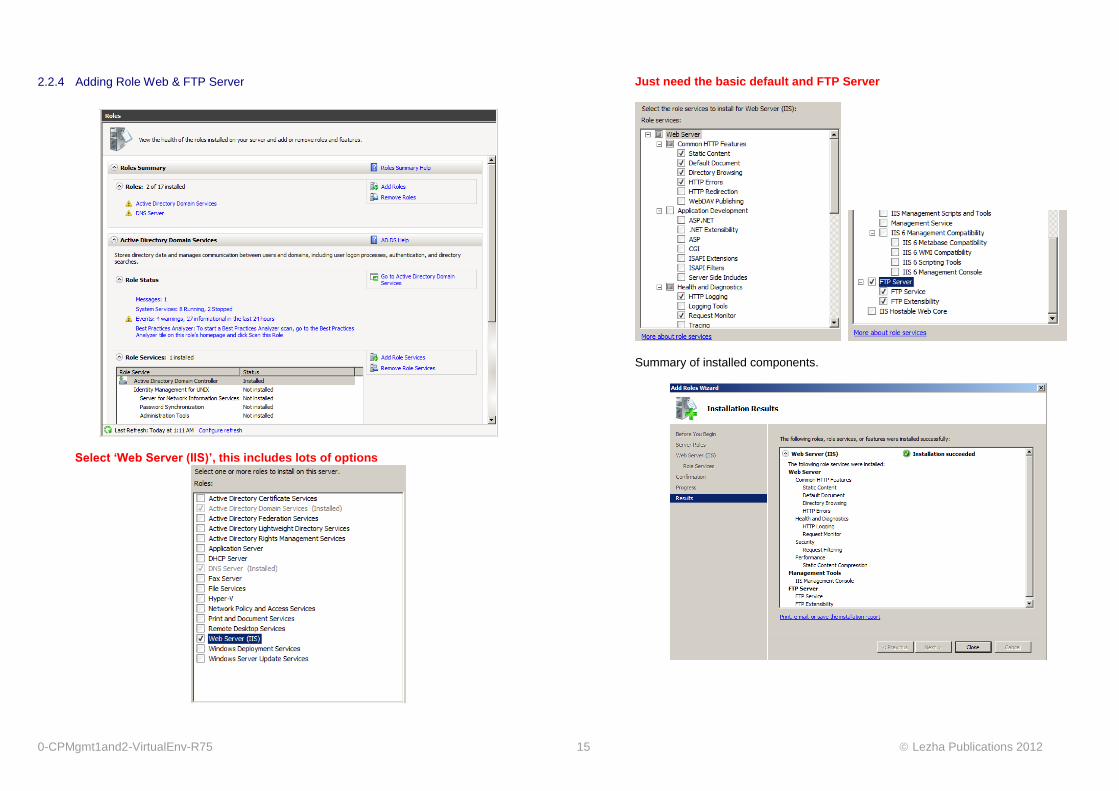
2.2.4 Adding Role Web & FTP Server
Select ‘Web Server (IIS)’, this includes lots of options
Just need the basic default and FTP Server
Summary of installed components.
0-CPMgmt1and2-VirtualEnv-R75 16 Lezha Publications 2012
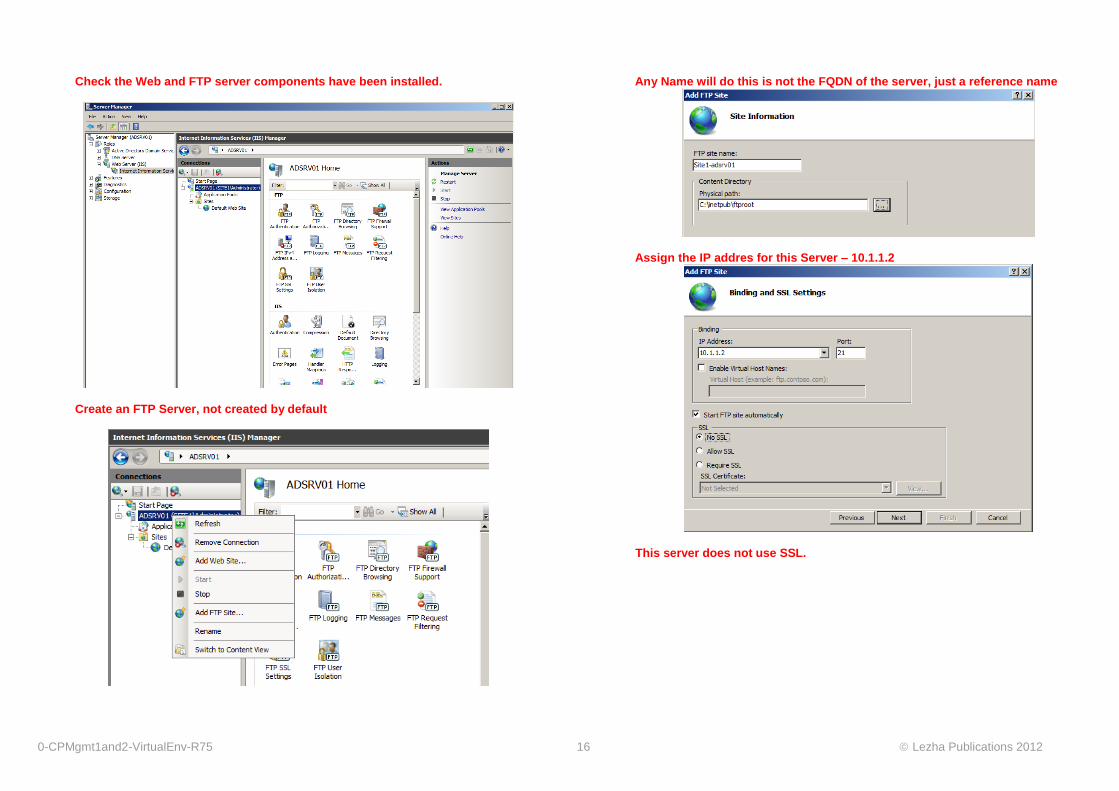
Check the Web and FTP server components have been installed.
Create an FTP Server, not created by default
Any Name will do this is not the FQDN of the server, just a reference name
Assign the IP addres for this Server – 10.1.1.2
This server does not use SSL.
0-CPMgmt1and2-VirtualEnv-R75 17 Lezha Publications 2012
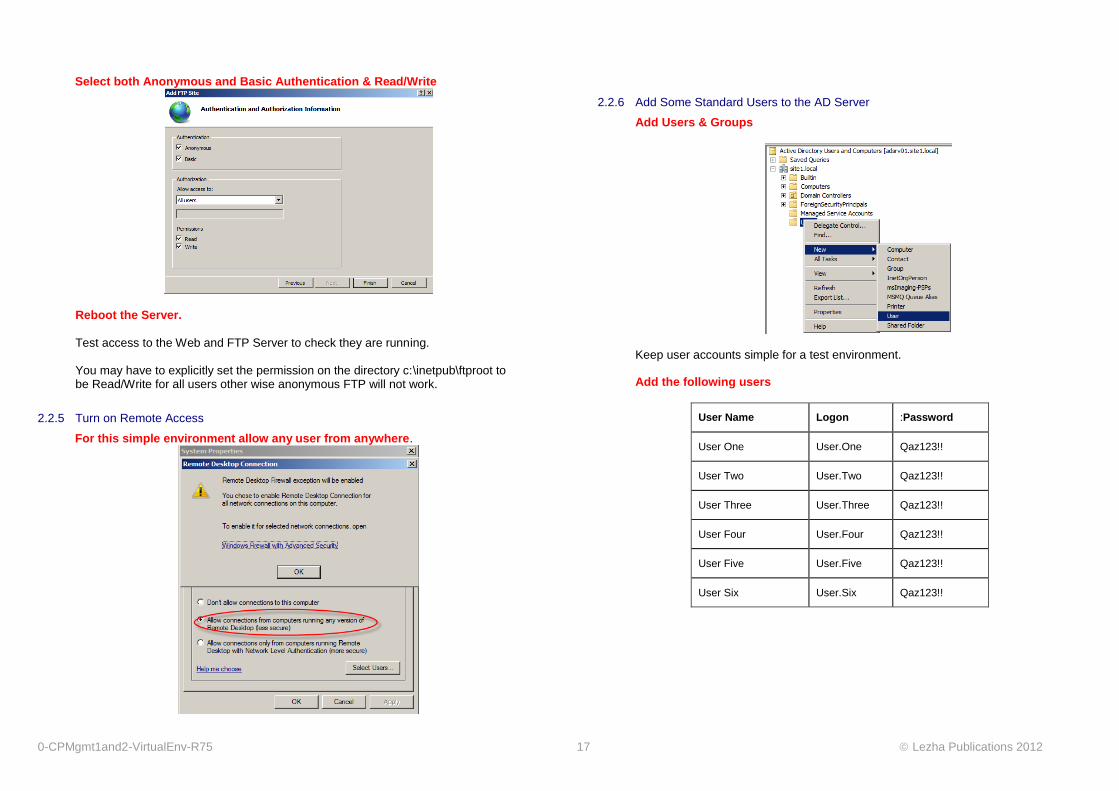
Select both Anonymous and Basic Authentication & Read/Write
Reboot the Server.
Test access to the Web and FTP Server to check they are running. You may have to explicitly set the permission on the directory c:\inetpub\ftproot to be Read/Write for all users other wise anonymous FTP will not work.
2.2.5 Turn on Remote Access
For this simple environment allow any user from anywhere.
2.2.6 Add Some Standard Users to the AD Server
Add Users & Groups
Keep user accounts simple for a test environment. Add the following users
User Name Logon :Password
User One User.One Qaz123!!
User Two User.Two Qaz123!!
User Three User.Three Qaz123!!
User Four User.Four Qaz123!!
User Five User.Five Qaz123!!
User Six User.Six Qaz123!!

0-CPMgmt1and2-VirtualEnv-R75 18 Lezha Publications 2012
Add two Groups, Support & Sales
0-CPMgmt1and2-VirtualEnv-R75 19 Lezha Publications 2012
2.3 Configure the Other linked Clones (Win2008R2)
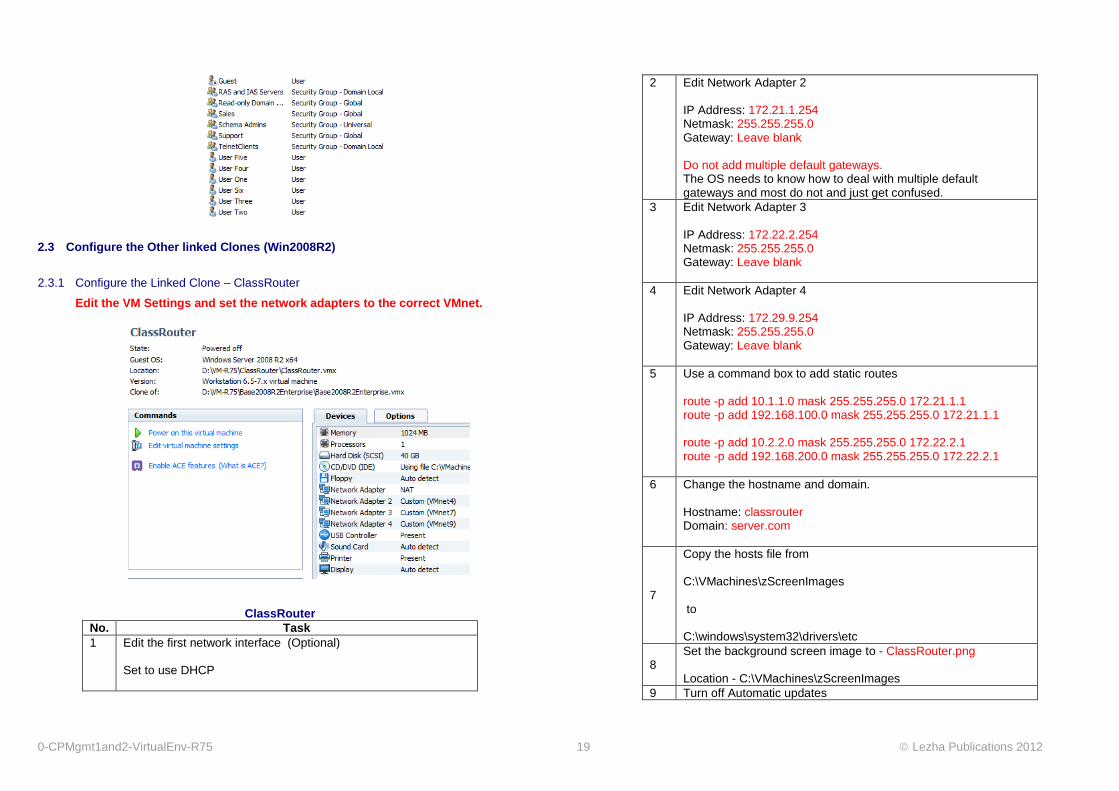
2.3.1 Configure the Linked Clone – ClassRouter
Edit the VM Settings and set the network adapters to the correct VMnet.
ClassRouter
No. Task
1 Edit the first network interface (Optional) Set to use DHCP
2 Edit Network Adapter 2 IP Address: 172.21.1.254 Netmask: 255.255.255.0 Gateway: Leave blank Do not add multiple default gateways. The OS needs to know how to deal with multiple default gateways and most do not and just get confused.
3 Edit Network Adapter 3 IP Address: 172.22.2.254 Netmask: 255.255.255.0 Gateway: Leave blank
4 Edit Network Adapter 4 IP Address: 172.29.9.254 Netmask: 255.255.255.0 Gateway: Leave blank
5 Use a command box to add static routes route -p add 10.1.1.0 mask 255.255.255.0 172.21.1.1 route -p add 192.168.100.0 mask 255.255.255.0 172.21.1.1 route -p add 10.2.2.0 mask 255.255.255.0 172.22.2.1 route -p add 192.168.200.0 mask 255.255.255.0 172.22.2.1
6 Change the hostname and domain. Hostname: classrouter Domain: server.com
7
Copy the hosts file from C:\VMachines\zScreenImages to C:\windows\system32\drivers\etc
8 Set the background screen image to - ClassRouter.png Location - C:\VMachines\zScreenImages
9 Turn off Automatic updates
0-CPMgmt1and2-VirtualEnv-R75 20 Lezha Publications 2012
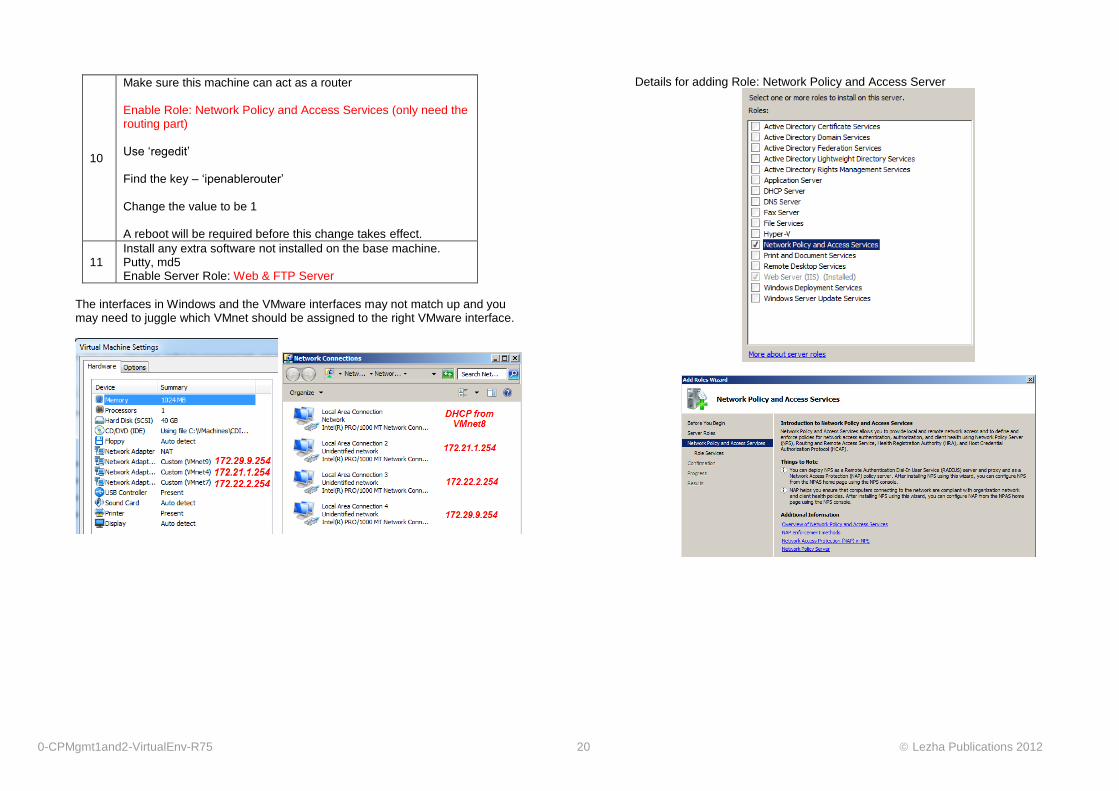
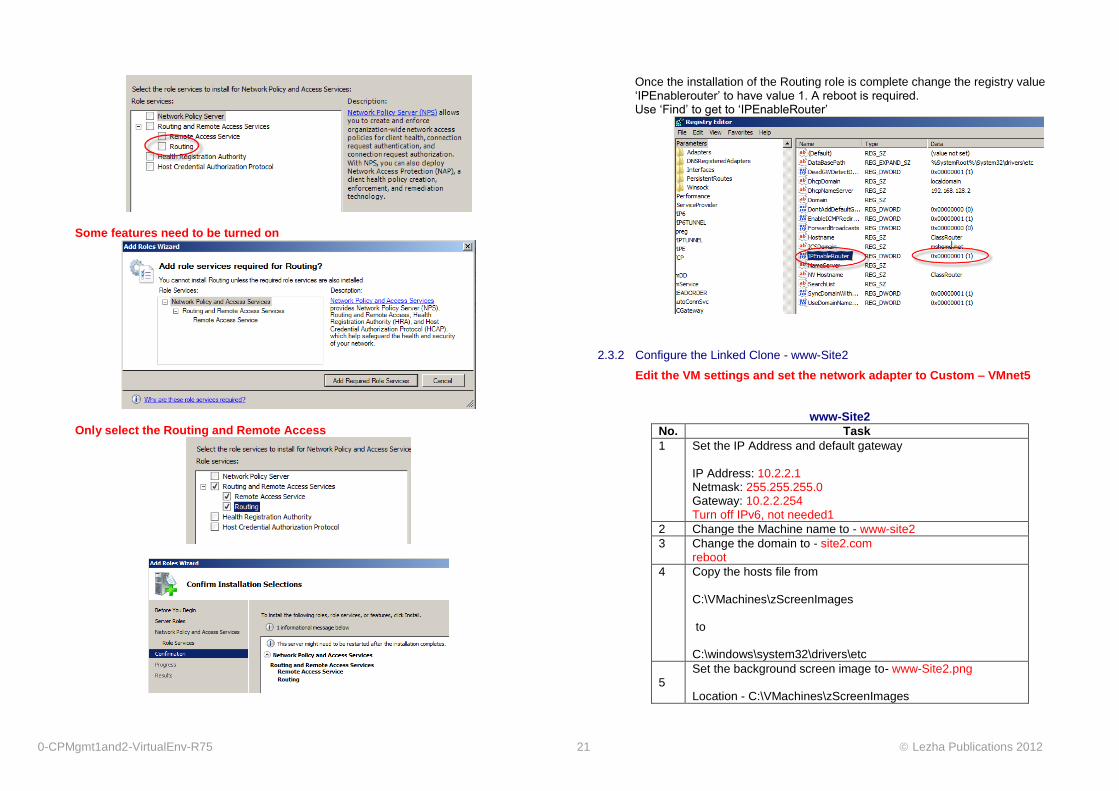
10
Make sure this machine can act as a router Enable Role: Network Policy and Access Services (only need the routing part) Use ‘regedit’ Find the key – ‘ipenablerouter’ Change the value to be 1 A reboot will be required before this change takes effect.
11 Install any extra software not installed on the base machine. Putty, md5 Enable Server Role: Web & FTP Server
The interfaces in Windows and the VMware interfaces may not match up and you may need to juggle which VMnet should be assigned to the right VMware interface.
Details for adding Role: Network Policy and Access Server
0-CPMgmt1and2-VirtualEnv-R75 21 Lezha Publications 2012
Some features need to be turned on
Only select the Routing and Remote Access
Once the installation of the Routing role is complete change the registry value ‘IPEnablerouter’ to have value 1. A reboot is required. Use ‘Find’ to get to ‘IPEnableRouter’
2.3.2 Configure the Linked Clone - www-Site2
Edit the VM settings and set the network adapter to Custom – VMnet5
www-Site2
No. Task
1 Set the IP Address and default gateway IP Address: 10.2.2.1 Netmask: 255.255.255.0 Gateway: 10.2.2.254 Turn off IPv6, not needed1
2 Change the Machine name to - www-site2
3 Change the domain to - site2.com reboot
4 Copy the hosts file from C:\VMachines\zScreenImages to C:\windows\system32\drivers\etc
5 Set the background screen image to- www-Site2.png Location - C:\VMachines\zScreenImages

0-CPMgmt1and2-VirtualEnv-R75 22 Lezha Publications 2012
6 Turn off Automatic updates
7 Install any extra software not installed on the base machine. Putty, md5 Enable Server Role: Web & FTP Server
2.3.3 Configure the Linked Clone - smtp-Site1
Edit the VM settings and set the network adapter to Custom – VMnet3
smtp-Site1
No. Task
1 Set the IP Address and default gateway IP Address: 192.168.100.1 Netmask: 255.255.255.0 Gateway: 192.168.100.254
2 Change the Machine name to - smtp-site1
3 Change the domain to - site1.com
4 Copy the hosts file from C:\VMachines\zScreenImages to C:\windows\system32\drivers\etc
5 Set the background screen image to- smtpSite1.png Location - C:\VMachines\zScreenImages
6 Turn off Automatic updates
7
Install any extra software not installed on the base machine. Enable Server Role: Web & FTP Server Install SMTP Server - Mailenable
2.3.4 Configure the Linked Clone - www-Site1
Edit the VM settings and set the network adapter to Custom – VMnet3
www-Site1
No. Task
1 Set the IP Address and default gateway IP Address: 192.168.100.2 Netmask: 255.255.255.0 Gateway: 192.168.100.254
2 Change the Machine name to - www-site1
3 Change the domain to - site1.com
4 Copy the hosts file from C:\VMachines\zScreenImages to C:\windows\system32\drivers\etc
5 Set the background screen image to- wwwSite1.png Location - C:\VMachines\zScreenImages
6 Turn off Automatic updates
7 Install any extra software not installed on the base machine. Enable Server Role: Web & FTP Server
2.4 Turning off IE Advanced Security 2008R2
Select the root of the Server Manager and scroll to ‘Security Information’ Not a good thing to do on live systems and definitely not for ‘Administrators’.
2.5 Creating the XP or Windows 7 Hosts
Two client machines are required, one for the internal client to run the SmartConsole clients and the other as the VPNclient.
0-CPMgmt1and2-VirtualEnv-R75 23 Lezha Publications 2012
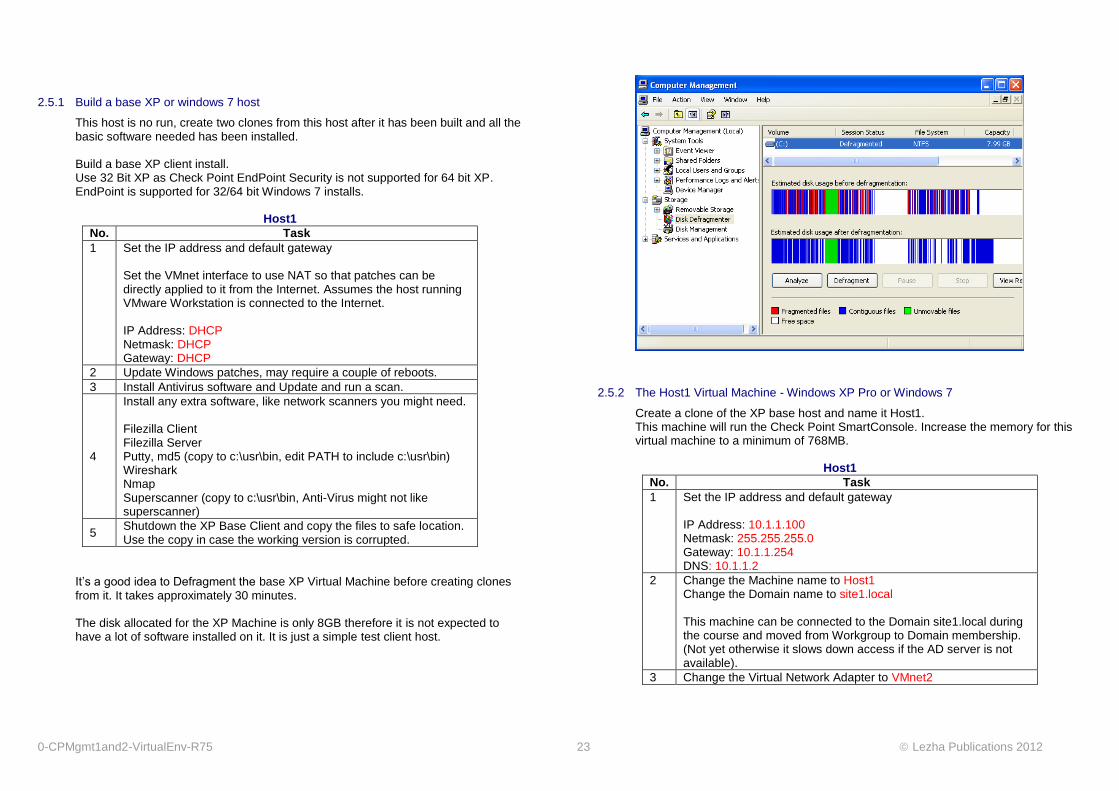
2.5.1 Build a base XP or windows 7 host
This host is no run, create two clones from this host after it has been built and all the basic software needed has been installed. Build a base XP client install. Use 32 Bit XP as Check Point EndPoint Security is not supported for 64 bit XP. EndPoint is supported for 32/64 bit Windows 7 installs.
Host1
No. Task
1 Set the IP address and default gateway Set the VMnet interface to use NAT so that patches can be directly applied to it from the Internet. Assumes the host running VMware Workstation is connected to the Internet. IP Address: DHCP Netmask: DHCP Gateway: DHCP
2 Update Windows patches, may require a couple of reboots.
3 Install Antivirus software and Update and run a scan.
4
Install any extra software, like network scanners you might need. Filezilla Client Filezilla Server Putty, md5 (copy to c:\usr\bin, edit PATH to include c:\usr\bin) Wireshark Nmap Superscanner (copy to c:\usr\bin, Anti-Virus might not like superscanner)
5 Shutdown the XP Base Client and copy the files to safe location. Use the copy in case the working version is corrupted.
It’s a good idea to Defragment the base XP Virtual Machine before creating clones from it. It takes approximately 30 minutes. The disk allocated for the XP Machine is only 8GB therefore it is not expected to have a lot of software installed on it. It is just a simple test client host.
2.5.2 The Host1 Virtual Machine - Windows XP Pro or Windows 7
Create a clone of the XP base host and name it Host1. This machine will run the Check Point SmartConsole. Increase the memory for this virtual machine to a minimum of 768MB.
Host1
No. Task
1 Set the IP address and default gateway IP Address: 10.1.1.100 Netmask: 255.255.255.0 Gateway: 10.1.1.254 DNS: 10.1.1.2
2 Change the Machine name to Host1 Change the Domain name to site1.local This machine can be connected to the Domain site1.local during the course and moved from Workgroup to Domain membership. (Not yet otherwise it slows down access if the AD server is not available).
3 Change the Virtual Network Adapter to VMnet2
0-CPMgmt1and2-VirtualEnv-R75 24 Lezha Publications 2012
4 Set the background screen image to - host1.png Location - C:\VMachines\zScreenImages
5 Turn off Automatic updates
6
Install any extra software, like network scanners you might need. Check Point End Point Security is installed later as part of the course materials when dealing with client VPNs.
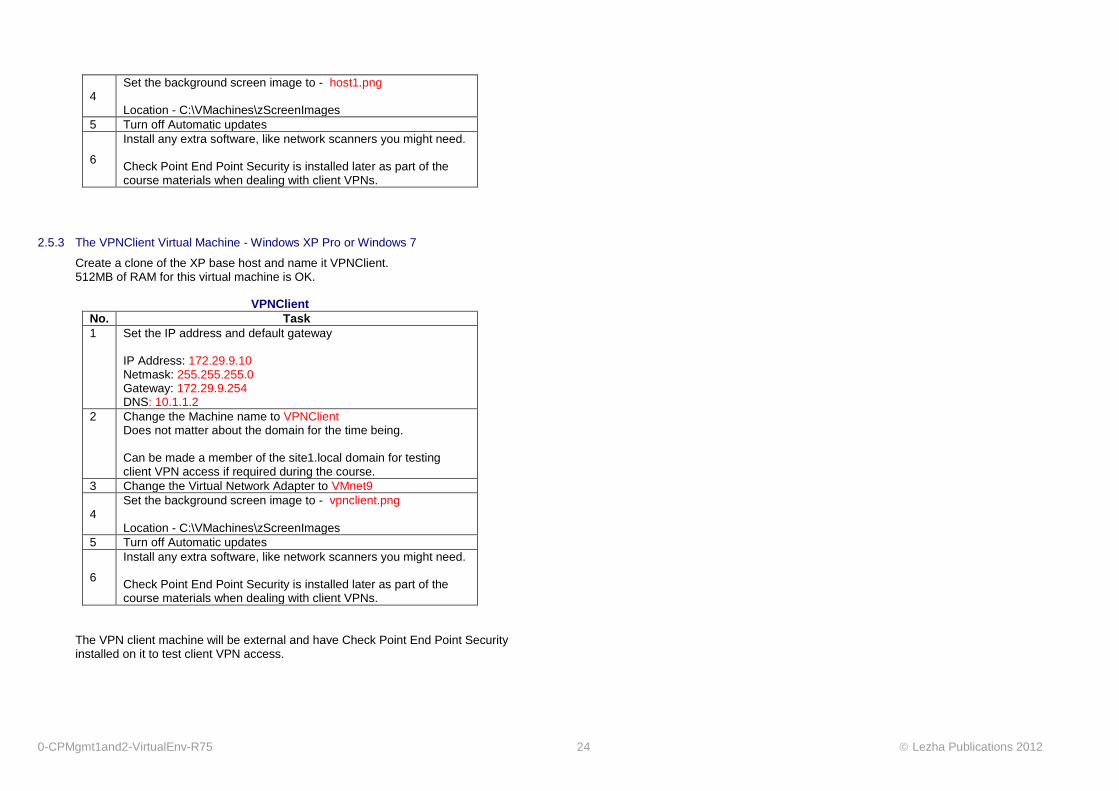
2.5.3 The VPNClient Virtual Machine - Windows XP Pro or Windows 7
Create a clone of the XP base host and name it VPNClient. 512MB of RAM for this virtual machine is OK.
VPNClient
No. Task
1 Set the IP address and default gateway IP Address: 172.29.9.10 Netmask: 255.255.255.0 Gateway: 172.29.9.254 DNS: 10.1.1.2
2 Change the Machine name to VPNClient Does not matter about the domain for the time being. Can be made a member of the site1.local domain for testing client VPN access if required during the course.
3 Change the Virtual Network Adapter to VMnet9
4 Set the background screen image to - vpnclient.png Location - C:\VMachines\zScreenImages
5 Turn off Automatic updates
6
Install any extra software, like network scanners you might need. Check Point End Point Security is installed later as part of the course materials when dealing with client VPNs.
The VPN client machine will be external and have Check Point End Point Security installed on it to test client VPN access.
0-CPMgmt1and2-VirtualEnv-R75 25 Lezha Publications 2012
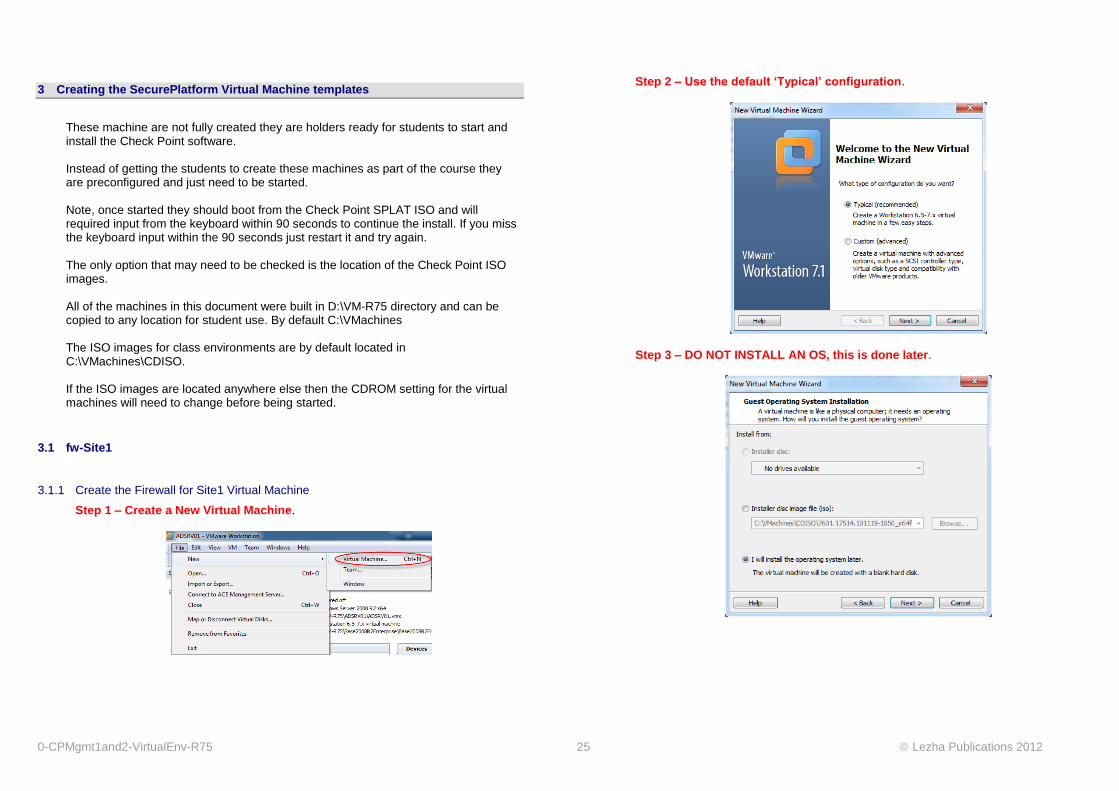
3 Creating the SecurePlatform Virtual Machine templates
These machine are not fully created they are holders ready for students to start and install the Check Point software. Instead of getting the students to create these machines as part of the course they are preconfigured and just need to be started. Note, once started they should boot from the Check Point SPLAT ISO and will required input from the keyboard within 90 seconds to continue the install. If you miss the keyboard input within the 90 seconds just restart it and try again. The only option that may need to be checked is the location of the Check Point ISO images. All of the machines in this document were built in D:\VM-R75 directory and can be copied to any location for student use. By default C:\VMachines The ISO images for class environments are by default located in C:\VMachines\CDISO. If the ISO images are located anywhere else then the CDROM setting for the virtual machines will need to change before being started.
3.1 fw-Site1
3.1.1 Create the Firewall for Site1 Virtual Machine
Step 1 – Create a New Virtual Machine.
Step 2 – Use the default ‘Typical’ configuration.
Step 3 – DO NOT INSTALL AN OS, this is done later.
0-CPMgmt1and2-VirtualEnv-R75 26 Lezha Publications 2012
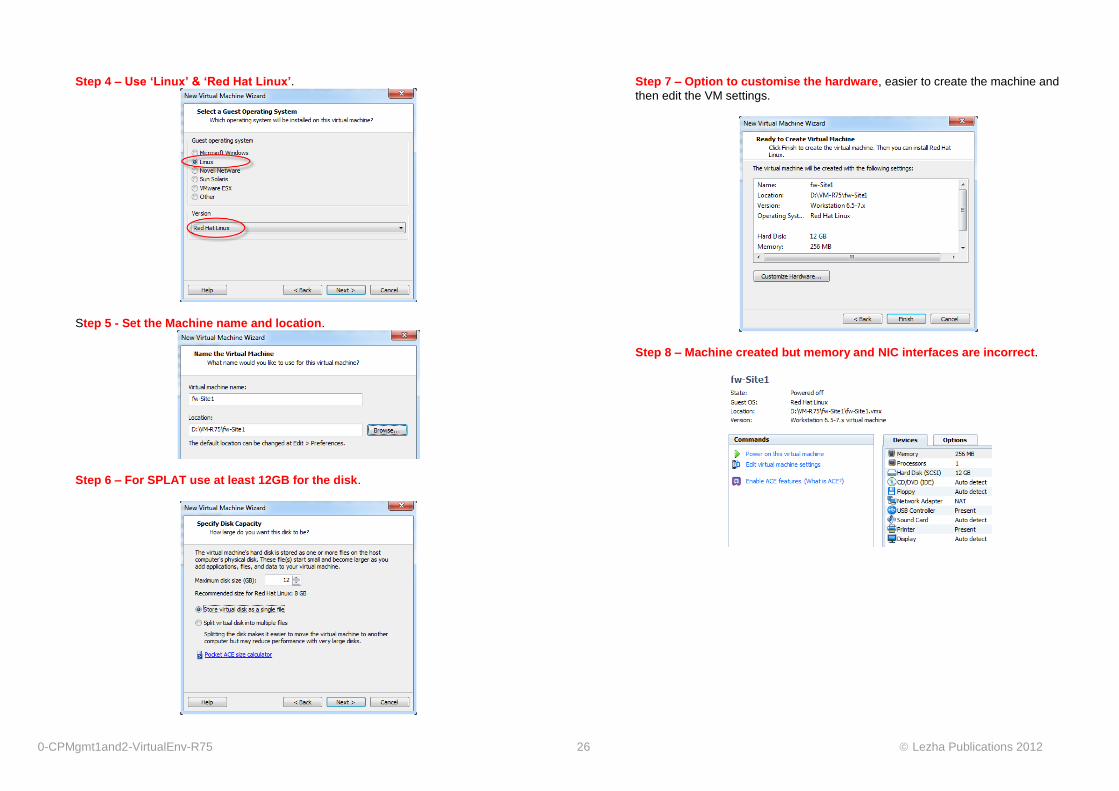
Step 4 – Use ‘Linux’ & ‘Red Hat Linux’.
Step 5 - Set the Machine name and location.
Step 6 – For SPLAT use at least 12GB for the disk.
Step 7 – Option to customise the hardware, easier to create the machine and
then edit the VM settings.
Step 8 – Machine created but memory and NIC interfaces are incorrect.
0-CPMgmt1and2-VirtualEnv-R75 27 Lezha Publications 2012
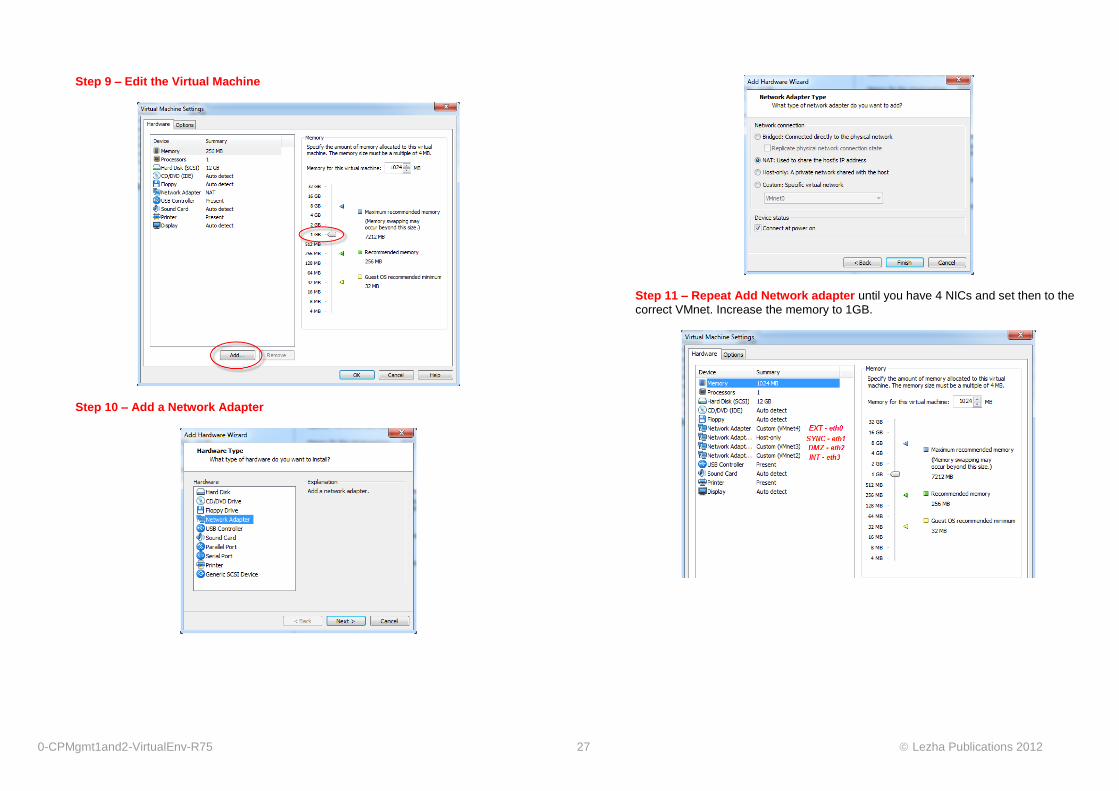
Step 9 – Edit the Virtual Machine
Step 10 – Add a Network Adapter
Step 11 – Repeat Add Network adapter until you have 4 NICs and set then to the
correct VMnet. Increase the memory to 1GB.
0-CPMgmt1and2-VirtualEnv-R75 28 Lezha Publications 2012
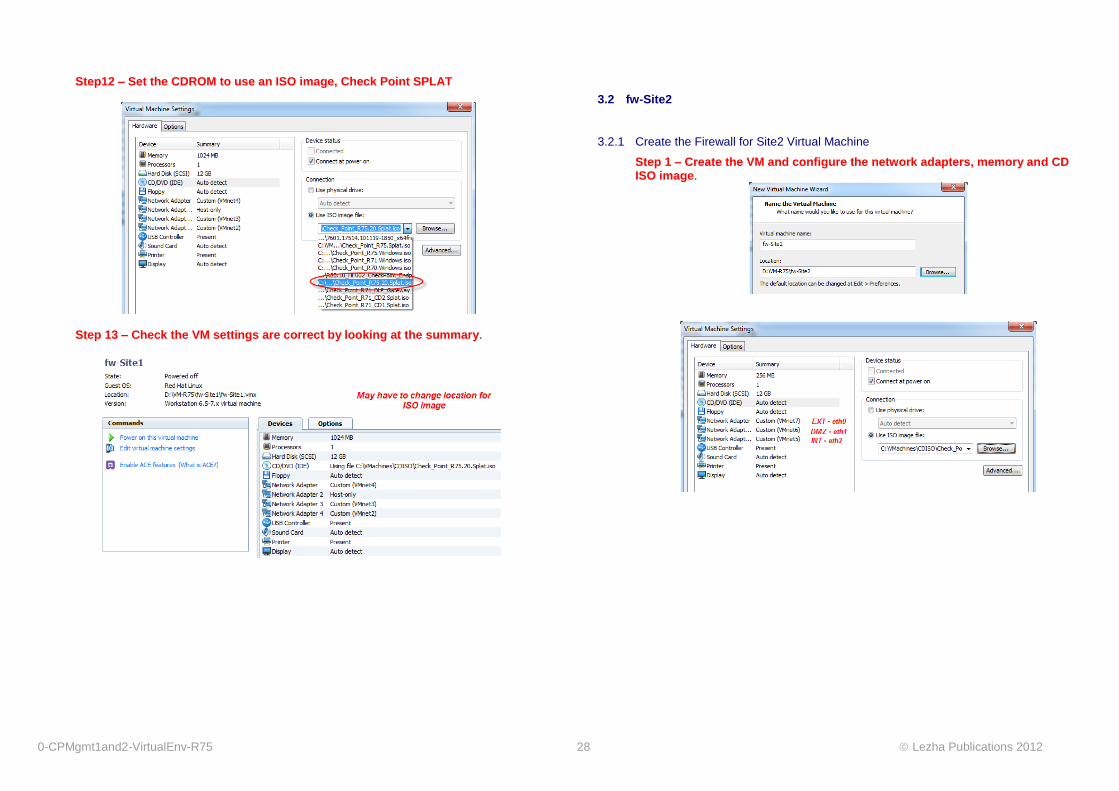
Step12 – Set the CDROM to use an ISO image, Check Point SPLAT
Step 13 – Check the VM settings are correct by looking at the summary.
3.2 fw-Site2
3.2.1 Create the Firewall for Site2 Virtual Machine
Step 1 – Create the VM and configure the network adapters, memory and CD ISO image.
0-CPMgmt1and2-VirtualEnv-R75 29 Lezha Publications 2012
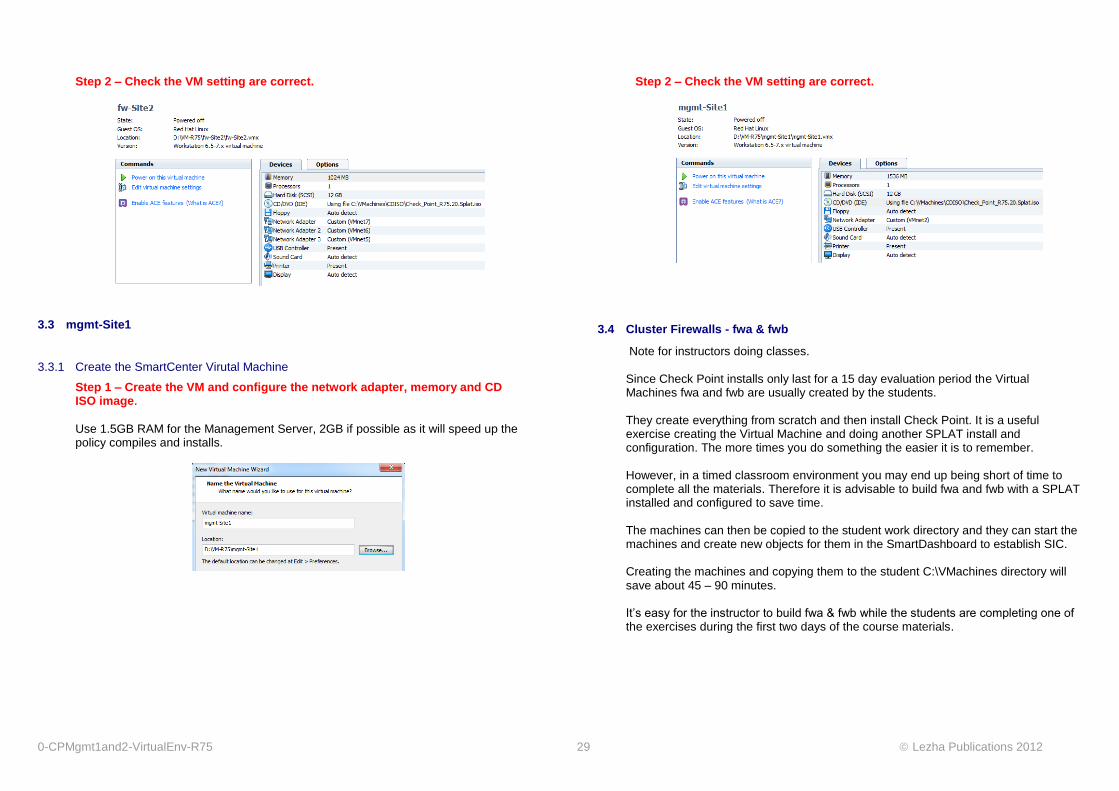
Step 2 – Check the VM setting are correct.
3.3 mgmt-Site1
3.3.1 Create the SmartCenter Virutal Machine
Step 1 – Create the VM and configure the network adapter, memory and CD ISO image.
Use 1.5GB RAM for the Management Server, 2GB if possible as it will speed up the policy compiles and installs.
Step 2 – Check the VM setting are correct.
3.4 Cluster Firewalls - fwa & fwb
Note for instructors doing classes. Since Check Point installs only last for a 15 day evaluation period the Virtual Machines fwa and fwb are usually created by the students. They create everything from scratch and then install Check Point. It is a useful exercise creating the Virtual Machine and doing another SPLAT install and configuration. The more times you do something the easier it is to remember. However, in a timed classroom environment you may end up being short of time to complete all the materials. Therefore it is advisable to build fwa and fwb with a SPLAT installed and configured to save time. The machines can then be copied to the student work directory and they can start the machines and create new objects for them in the SmartDashboard to establish SIC. Creating the machines and copying them to the student C:\VMachines directory will save about 45 – 90 minutes. It’s easy for the instructor to build fwa & fwb while the students are completing one of the exercises during the first two days of the course materials.
0-CPMgmt1and2-VirtualEnv-R75 30 Lezha Publications 2012
4 Installing Software
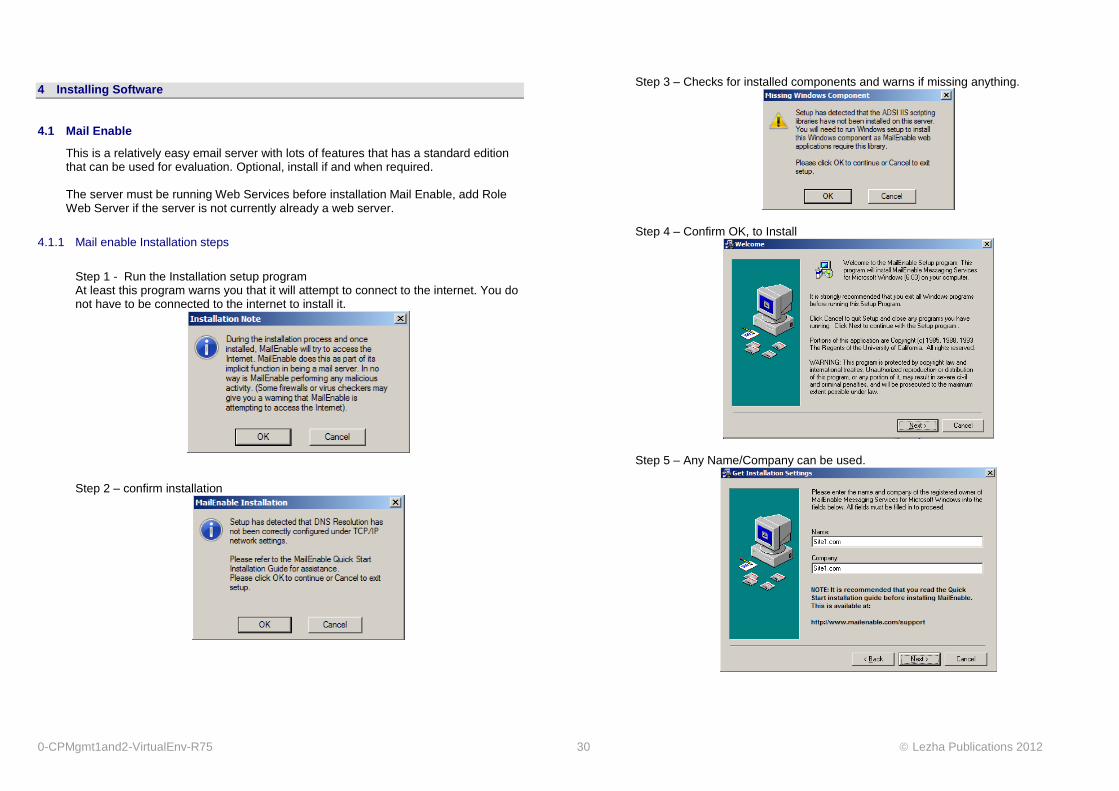
4.1 Mail Enable
This is a relatively easy email server with lots of features that has a standard edition that can be used for evaluation. Optional, install if and when required. The server must be running Web Services before installation Mail Enable, add Role Web Server if the server is not currently already a web server.
4.1.1 Mail enable Installation steps
Step 1 - Run the Installation setup program At least this program warns you that it will attempt to connect to the internet. You do not have to be connected to the internet to install it.
Step 2 – confirm installation
Step 3 – Checks for installed components and warns if missing anything.
Step 4 – Confirm OK, to Install
Step 5 – Any Name/Company can be used.
0-CPMgmt1and2-VirtualEnv-R75 31 Lezha Publications 2012
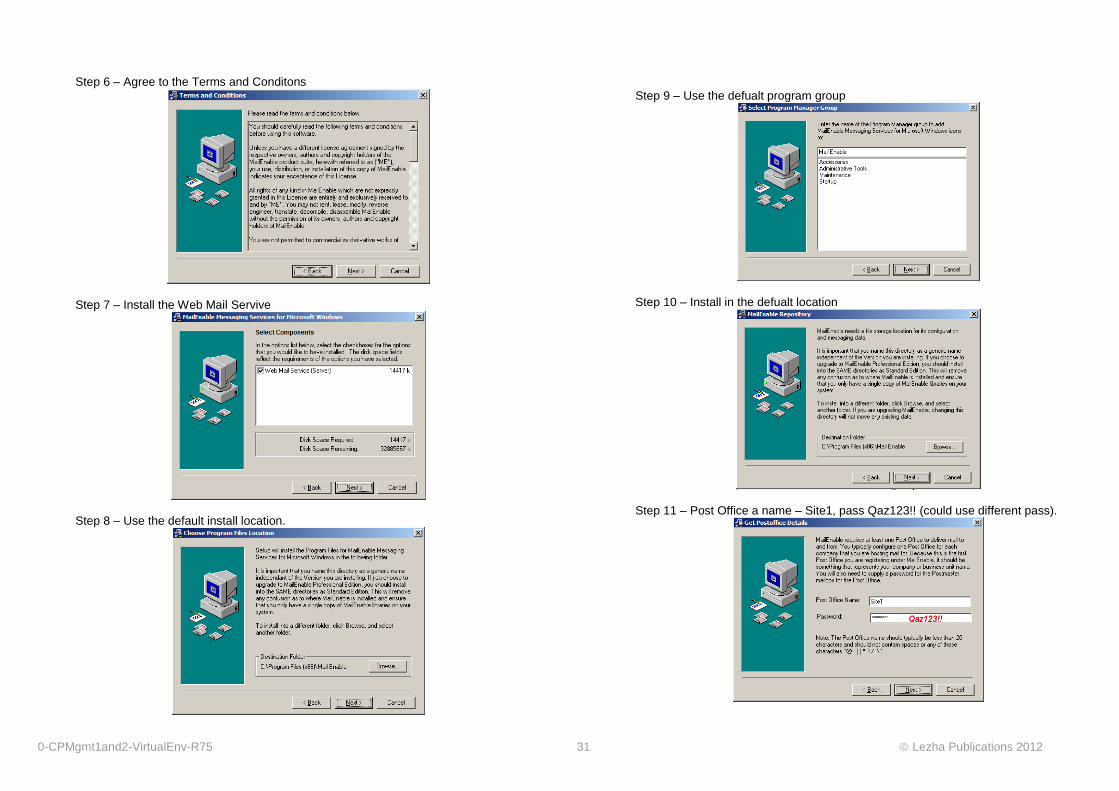
Step 6 – Agree to the Terms and Conditons
Step 7 – Install the Web Mail Servive
Step 8 – Use the default install location.
Step 9 – Use the defualt program group
Step 10 – Install in the defualt location
Step 11 – Post Office a name – Site1, pass Qaz123!! (could use different pass).
0-CPMgmt1and2-VirtualEnv-R75 32 Lezha Publications 2012
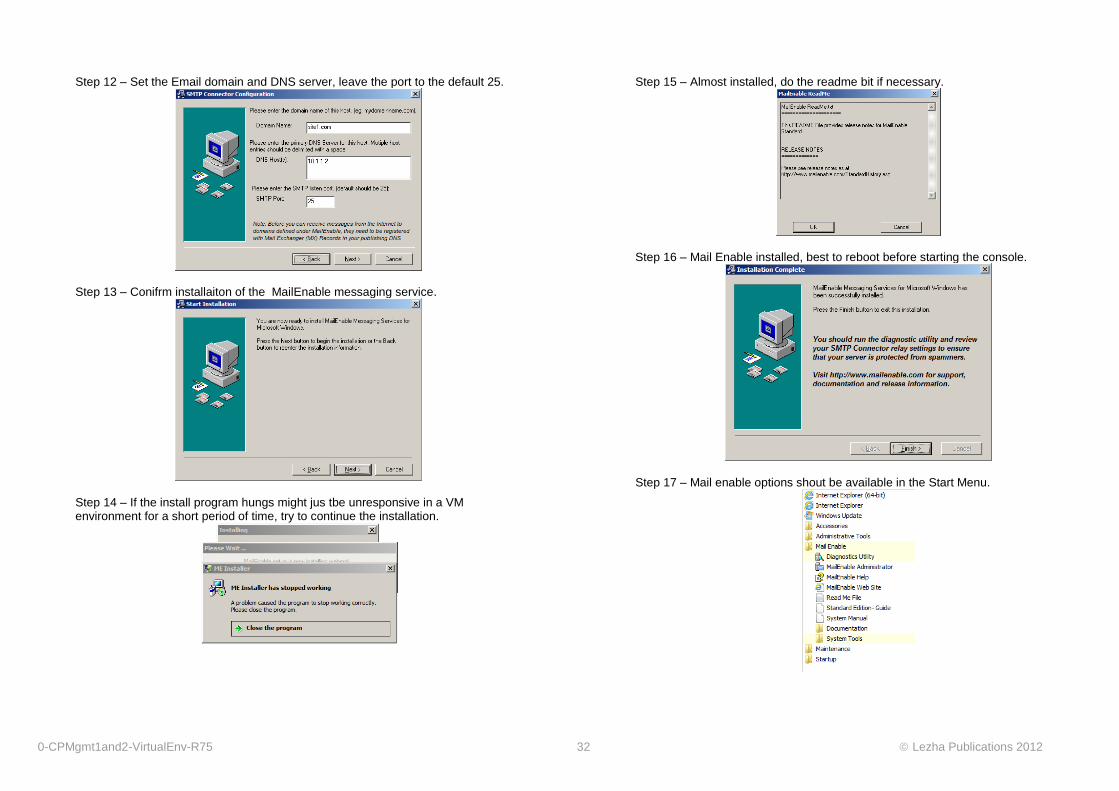
Step 12 – Set the Email domain and DNS server, leave the port to the default 25.
Step 13 – Conifrm installaiton of the MailEnable messaging service.
Step 14 – If the install program hungs might jus tbe unresponsive in a VM environment for a short period of time, try to continue the installation.
Step 15 – Almost installed, do the readme bit if necessary.
Step 16 – Mail Enable installed, best to reboot before starting the console.
Step 17 – Mail enable options shout be available in the Start Menu.
0-CPMgmt1and2-VirtualEnv-R75 33 Lezha Publications 2012
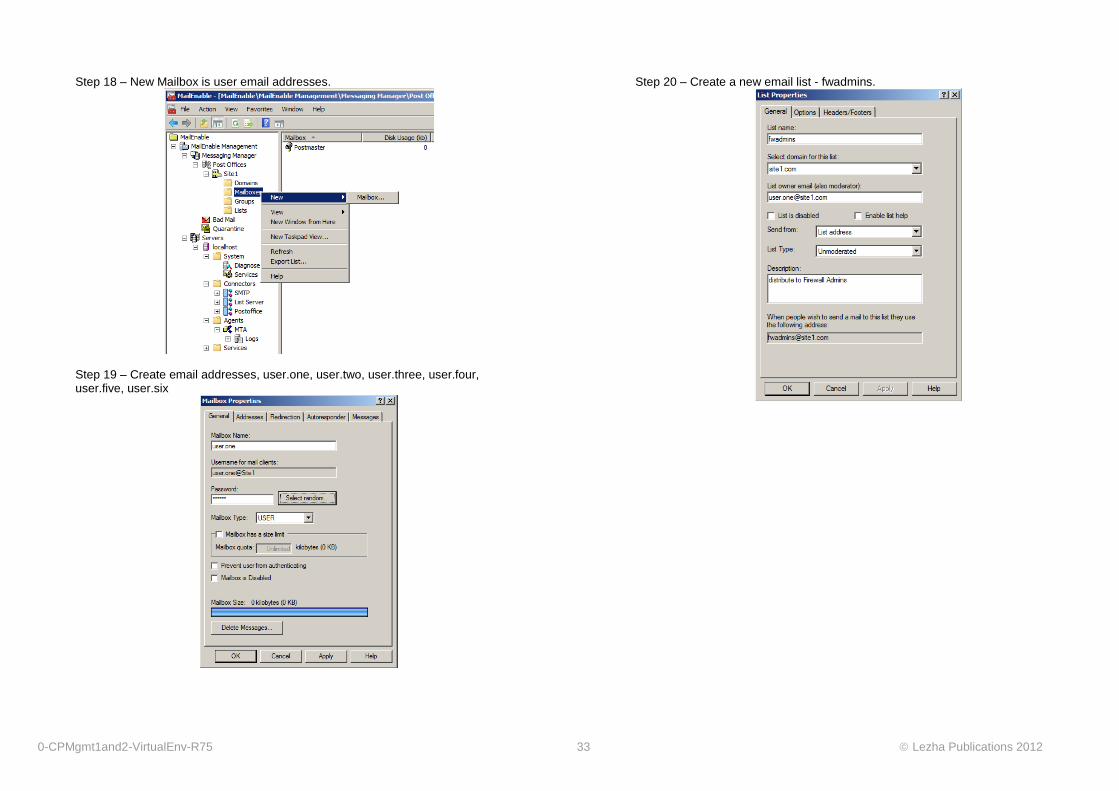
Step 18 – New Mailbox is user email addresses.
Step 19 – Create email addresses, user.one, user.two, user.three, user.four, user.five, user.six
Step 20 – Create a new email list - fwadmins.
0-CPMgmt1and2-VirtualEnv-R75 34 Lezha Publications 2012
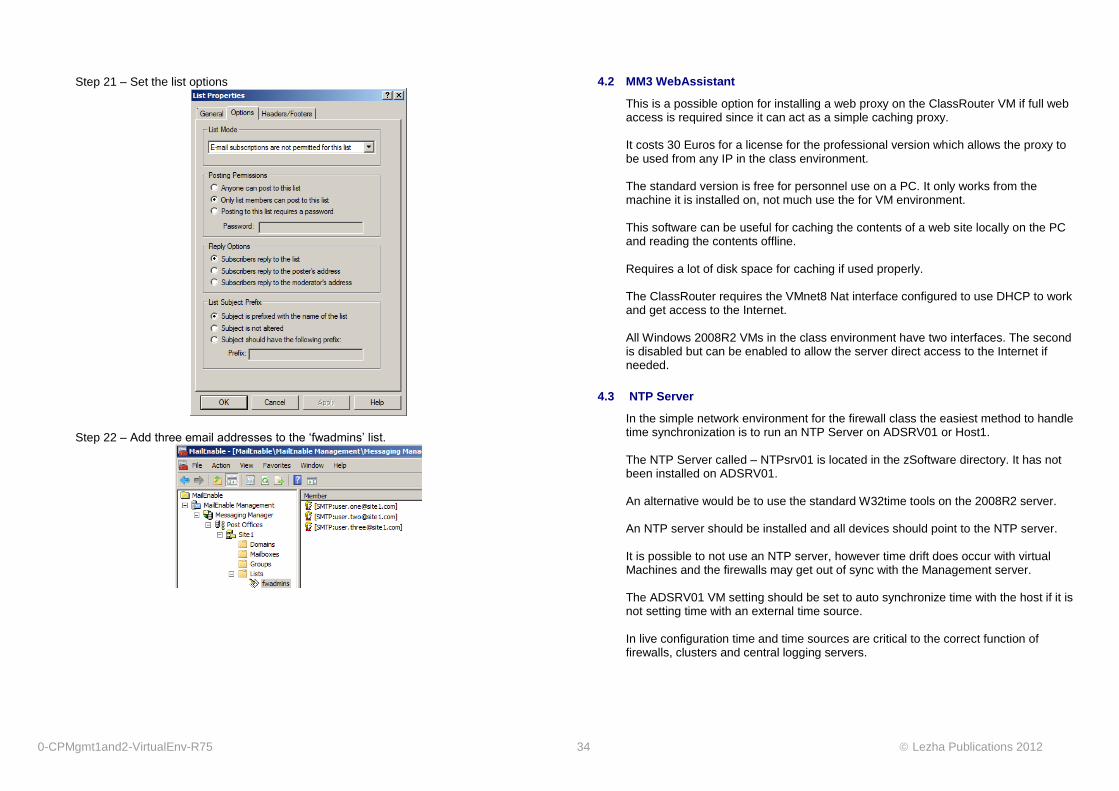
Step 21 – Set the list options
Step 22 – Add three email addresses to the ‘fwadmins’ list.
4.2 MM3 WebAssistant
This is a possible option for installing a web proxy on the ClassRouter VM if full web access is required since it can act as a simple caching proxy. It costs 30 Euros for a license for the professional version which allows the proxy to be used from any IP in the class environment. The standard version is free for personnel use on a PC. It only works from the machine it is installed on, not much use the for VM environment. This software can be useful for caching the contents of a web site locally on the PC and reading the contents offline. Requires a lot of disk space for caching if used properly. The ClassRouter requires the VMnet8 Nat interface configured to use DHCP to work and get access to the Internet. All Windows 2008R2 VMs in the class environment have two interfaces. The second is disabled but can be enabled to allow the server direct access to the Internet if needed.
4.3 NTP Server
In the simple network environment for the firewall class the easiest method to handle time synchronization is to run an NTP Server on ADSRV01 or Host1. The NTP Server called – NTPsrv01 is located in the zSoftware directory. It has not been installed on ADSRV01. An alternative would be to use the standard W32time tools on the 2008R2 server. An NTP server should be installed and all devices should point to the NTP server. It is possible to not use an NTP server, however time drift does occur with virtual Machines and the firewalls may get out of sync with the Management server. The ADSRV01 VM setting should be set to auto synchronize time with the host if it is not setting time with an external time source. In live configuration time and time sources are critical to the correct function of firewalls, clusters and central logging servers.
0-CPMgmt1and2-VirtualEnv-R75 35 Lezha Publications 2012
4.4 Resetting the Date and Time – extending the Eval License
Note: When you install the evaluation version you agreed to terms and conditions which might have included ‘not to reset the date and time’. Any person violating agreed terms and conditions do so at their own risk. Check Point will provide 30 day evaluation licenses if requested. If you have to reset the SmartCenter and Firewall clocks because you are running out of the 15 day evaluation period then there may be some issues. For the 5 day classroom trainer controlled training course the default 15 day evaluation licenses are not an issue. Resetting the clocks does work. However, it may be a useful exercise to reinstall from the Check Point components. It only about 3-4 hours to reinstall the SmartCenter and firewall and that includes creating all the objects and rules.
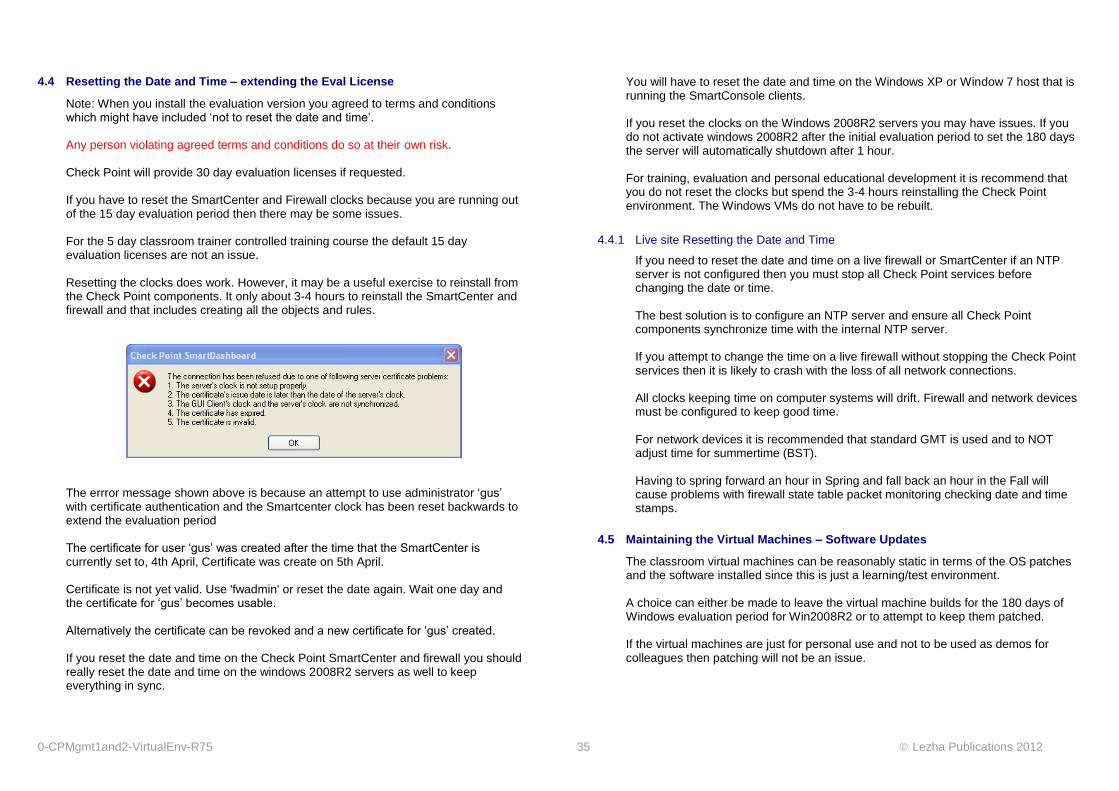
The errror message shown above is because an attempt to use administrator ‘gus’ with certificate authentication and the Smartcenter clock has been reset backwards to extend the evaluation period The certificate for user ‘gus’ was created after the time that the SmartCenter is currently set to, 4th April, Certificate was create on 5th April. Certificate is not yet valid. Use 'fwadmin' or reset the date again. Wait one day and the certificate for ‘gus’ becomes usable. Alternatively the certificate can be revoked and a new certificate for ‘gus’ created. If you reset the date and time on the Check Point SmartCenter and firewall you should really reset the date and time on the windows 2008R2 servers as well to keep everything in sync.
You will have to reset the date and time on the Windows XP or Window 7 host that is running the SmartConsole clients. If you reset the clocks on the Windows 2008R2 servers you may have issues. If you do not activate windows 2008R2 after the initial evaluation period to set the 180 days the server will automatically shutdown after 1 hour. For training, evaluation and personal educational development it is recommend that you do not reset the clocks but spend the 3-4 hours reinstalling the Check Point environment. The Windows VMs do not have to be rebuilt.
4.4.1 Live site Resetting the Date and Time
If you need to reset the date and time on a live firewall or SmartCenter if an NTP server is not configured then you must stop all Check Point services before changing the date or time. The best solution is to configure an NTP server and ensure all Check Point components synchronize time with the internal NTP server. If you attempt to change the time on a live firewall without stopping the Check Point services then it is likely to crash with the loss of all network connections. All clocks keeping time on computer systems will drift. Firewall and network devices must be configured to keep good time. For network devices it is recommended that standard GMT is used and to NOT adjust time for summertime (BST). Having to spring forward an hour in Spring and fall back an hour in the Fall will cause problems with firewall state table packet monitoring checking date and time stamps.
4.5 Maintaining the Virtual Machines – Software Updates
The classroom virtual machines can be reasonably static in terms of the OS patches and the software installed since this is just a learning/test environment. A choice can either be made to leave the virtual machine builds for the 180 days of Windows evaluation period for Win2008R2 or to attempt to keep them patched. If the virtual machines are just for personal use and not to be used as demos for colleagues then patching will not be an issue.