gallery.technet.microsoft.com · web viewtest lab guide: create a cluster shared volume using...
TRANSCRIPT

Test Lab Guide: Create a Cluster Shared Volume using Starwind Software
Mikhail Komarov
MVP Virtual Machine
Vladimir Savko
Date of last update: 3 May 2013
Editor Joe Davies
AbstractThis Microsoft Test Lab Guide (TLG) provides step-by-step instructions to create a cluster shared volume using Starwind software and demonstrate live migration in the Windows Server 2012 Base Configuration for Private Cloud test lab, using computers running Windows Server 2012.
Copyright InformationThis document is provided for informational purposes only and Microsoft makes no warranties, either express or implied, in this document. Information in this document, including URL and other Internet Web site references, is subject to change without notice. The entire risk of the use or the results from the use of this document remains with the user. Unless otherwise noted, the example companies, organizations, products, domain names, e-mail addresses, logos, people, places, and events depicted herein are fictitious, and no association with any real company, organization, product, domain name, e-mail address, logo, person, place, or event is intended or should be inferred. Complying with all applicable copyright laws is the responsibility of the user. Without limiting the rights under copyright, no part of this document may be reproduced, stored in or introduced into a retrieval system, or transmitted in any form or by any means (electronic, mechanical, photocopying, recording, or otherwise), or for any purpose, without the express written permission of Microsoft Corporation.
Microsoft may have patents, patent applications, trademarks, copyrights, or other intellectual property rights covering subject matter in this document. Except as expressly provided in any written license agreement from Microsoft, the furnishing of this document does not give you any license to these patents, trademarks, copyrights, or other intellectual property.
© 2013 Microsoft Corporation. All rights reserved.
Microsoft, Windows, Active Directory, Internet Explorer, and Windows Server are either registered trademarks or trademarks of Microsoft Corporation in the United States and/or other countries.
All other trademarks are property of their respective owners.

ContentsStep 1: Configure the Windows Server 2012 Base Configuration for Private Cloud lab...........4
Step 2: Configure the Hyper-V hosts to support failover clustering.........................................4
Step 3: Create ISCSI Target using Starwind Software...............................................................5
Step 4: Attach ISCSI LUN on HV1 and HV2 hosts......................................................................8
Step 5: Create Failover cluster and enable CSV......................................................................10
Step 6: Move APP1 to CSV.....................................................................................................11
Step 7: Live migration APP1...................................................................................................13

Test Lab Guide: Create Cluster Shared Volume using Starwind Software
Applies to Windows Server 2012
This lab demonstrates creating Cluster Shared Volume in Windows 2012.
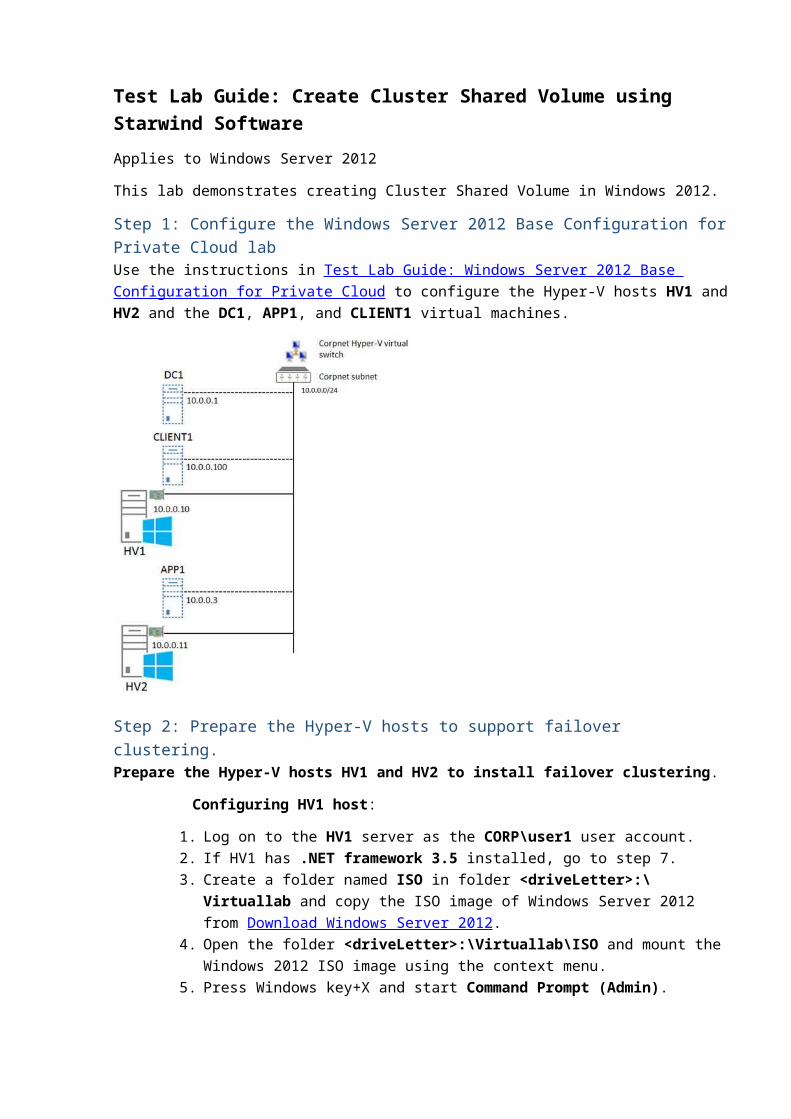
Step 1: Configure the Windows Server 2012 Base Configuration for Private Cloud labUse the instructions in Test Lab Guide: Windows Server 2012 Base Configuration for Private Cloud to configure the Hyper-V hosts HV1 and HV2 and the DC1, APP1, and CLIENT1 virtual machines.
Step 2: Prepare the Hyper-V hosts to support failover clustering.Prepare the Hyper-V hosts HV1 and HV2 to install failover clustering.
Configuring HV1 host:
1. Log on to the HV1 server as the CORP\user1 user account.2. If HV1 has .NET framework 3.5 installed, go to step 7.3. Create a folder named ISO in folder <driveLetter>:\Virtuallab and copy the ISO image of
Windows Server 2012 from Download Windows Server 2012.4. Open the folder <driveLetter>:\Virtuallab\ISO and mount the Windows 2012 ISO image
using the context menu.5. Press Windows key+X and start Command Prompt (Admin).6. Type Dism /Online /Enable-Feature /Featurename:NetFx3 /All /Source:Z:\Sources\
SXS /LimitAccess (Z is the drive created by mounting the ISO volume).7. Server Manager will start automatically. If it does not automatically start, click Start, type
servermanager.exe, and then click Server Manager.8. On the Manage menu, click Add Roles and Features.9. On the Select installation type page, select Role-based or feature-based installation and
then click Next.10. On the Select destination server page, select HV1 and then click Next.11. On the Select server roles page, click Next.
12. On the Features page select Failover Clustering, click Next.13. Restart HV1 and use Windows Update or internal WSUS to install updates.
Configuring HV2 host:
1. Log on to the HV2 server as the CORP\user1 user account.2. If HV2 has .NET framework 3.5 installed, go to step 7.3. Create a folder named ISO in folder <driveLetter>:\Virtuallab and copy the ISO image of
Windows Server 2012 from Download Windows Server 2012.4. Open the folder <driveLetter>:\Virtuallab\ISO and mount Windows 2012 ISO image
using the context menu.5. Windows key+X and start Command Prompt (Admin)6. Type Dism /Online /Enable-Feature /Featurename:NetFx3 /All /Source:Z:\Sources\SXS
/LimitAccess (Z is the drive created by mounting the ISO volume).7. Server Manager will start automatically. If it does not automatically start, click Start,
type servermanager.exe, and then click Server Manager.8. On the Manage menu of Server Manager, click Add Roles and Features.9. On the Select installation type page, select Role-based or feature-based installation and
then click Next.10. On the Select destination server page, select HV2, and then click Next.11. On the Select server roles page, click Next. 12. On the Features page select Failover Clustering, click Next.13. Restart HV2 and use Windows Update or internal WSUS to install updates.
Hosts HV1 and HV2 are ready for failover cluster creating.
Step 3: Create ISCSI Target using Starwind Software
In this step, you create an ISCSI target.
1. Go to site www.starwindsoftware.com, find free or trail version Starwind ISCSI SAN, download the software, and get trail license key.
2. Log on to the HV1 server as the CORP\user1 user account.3. Start the installation of the Starwind ISCSI SAN and type trail license key.4. After installation, start the Starwind management console and select Add
Starwind Server, type IP address HV1. After you add the HV1 server, you need to connect (see picture below).

5. Create a Quorum Disk with a size 1 GB. Select Add Device after connecting to HV1 server. Select Virtual Hard Disk, and then click Next. (See picture below.)
6. Select Image File device, and then click Next. (See picture below.)
7. Select Create new virtual disk, and then click Next. (See picture below.)
8. In New virtual disk location and file name, type a path to a physical volume on HV1. (See picture below.)

9. Next two steps in Add Device Wizard are by default. Select Create a new target, type cluster-disk in Target Alias: and select Allow multiple concurrent iSCSI connections (clustering). (See picture below.) Click Next, and then click Finish.
10. Create the second Data Disk, sized 50 GB. Repeat steps 5-7. On step 8, type a new file name and size. (See picture below.)
11. Next two steps in Add Device Wizard are by default, then select Attach to the existing target and select Allow multiple concurrent iSCSI connections (see picture below), Click Next, and then click Finish.

12. You should see the results (see picture below).
Step 4: Attach ISCSI LUN on HV1 and HV2 hostsIn this step, you attach ISCSI volume on HV1 and HV2 host.
1. Log on to the HV1 server as the CORP\user1 user account.2. Press the Windows logo key and type “ISCSI”. Start the iSCSI initiator and click Yes when
prompted to start the iSCSI service.

3. In Discover target portal, type HV1 and click OK. (See picture below.)
4. Select the Targets tab, and then click Connect. (See picture below.)
5. Press the Windows logo key + X and start Disk Management.

6. Change status to online, then initialize and quick format two new disks. Change the drive letters to Q and S. (See picture below.)
7. Select disks Q and S and change their states to offline. 8. Log on to the HV2 server as the CORP\user1 user account.9. Press Windows logo key and type “ISCSI”. Start the iSCSI initiator and click Yes when
prompted to start the iSCSI service.10. In the Discover target portal, type HV1 and click OK.11. Select the Target tab, and then click Connect. 12. Press Windows logo key + X and start Disk Management.13. Change status to online, and then add two new disks. Change their letters to Q and S.
Step 5: Create Failover cluster and enable CSV
In this step, you will create a failover cluster.
1. Log on to the HV1 server as the CORP\user1 user account.2. Press Windows logo key, type Fail, and then start Failover Cluster Management.3. Start Validate Cluster Configuration and add the names HV1.corp.contoso.com
and HV2.corp.contoso.com. Click Next.
4. Select Run all tests.5. After the test finish running, select Create the cluster now using the validates
nodes.6. After starting the create cluster wizard, type hv1.corp.contoso.com. Type the
cluster name HVCL and IP address 10.0.0.20.

7. After the create cluster wizard completes, start the Add node wizard and add a second node for hv2.corp.contoso.com.
8. After the add node wizard completes, select disk S and add a cluster shared volume.
Step 6: Move APP1 to CSV
In this step, you will move the APP1 virtual machine to the CSV volume.
1. Log on to the HV2 server as the CORP\user1 user account.2. Server Manager will start automatically. If it does not automatically start, click Windows
key, type servermanager.exe, and then click Server Manager.3. In the left panel click Hyper-V. In Servers, select HV2.4. Select virtual machine APP1 in the left Hyper-V Manager panel, and then select Move in
the Actions panel.5. Start the Move wizard and select Move the virtual machine storage. In the next step,
select Move all virtual machine’s data in single location, and then press Next. Type the path C:\ClusterStorage\volume1\, and then click Finish (see picture below).

6. Log on to the HV2 server as the CORP\user1 user account.7. Press the Windows key, type Fail, and then start Failover Cluster Management.8. Select Role, and then select Configurable Role in the context menu.9. Start the High Availability Wizard and select the Virtual machine role. (See picture below.)
10. Select the APP1 virtual machine (see picture below).
11. After completing the wizard finish, you should see the following:

Step 7: Live migration of APP1
In this step, you demonstrate live migration of the APP1 virtual machine.
1. Log on to the HV1 server as the CORP\user1 user account.2. Press Windows key, type Fail, and then start Failover Cluster Management.3. Select Role, and then select virtual machine APP1.4. Right-click APP1, point to Move, point to Live Migration, and then click Select Node (see
picture below).
5. In Move Virtual Machine, select HV1, and then click OK.
6. After migration, you should see the following:
7. There can be a problem with migration if you have different processors on the two physical hosts. Shutdown the virtual machine APP1 and change the processor setting in compatible mode, start the virtual machine, and repeat live migration.

The current configuration can be used for the following Test Lab Guides: Test Lab Guide: Monitoring Virtual machine in Cluster Shared Volume Test Lab Guide: Cluster Aware Update