instructables.com - diy bluetooth phone controlled bb-8 ...€¦ · intro:€ diy bluetooth phone...
TRANSCRIPT
http://www.instructables.com/id/DIY-Bluetooth-Phone-Controlled-BB-8-Droid-With-Ard/
technology workshop craft home food play outside costumes
DIY Bluetooth Phone Controlled BB-8 Droid with Arduino UNOby Imetomi on December 25, 2015
Table of Contents
DIY Bluetooth Phone Controlled BB-8 Droid with Arduino UNO . . . . . . . . . . . . . . . . . . . . . . . . . . . . . . . . . . . . . . . . . . . . . . . . . . . . . . . . . . . . . . . . . . . . . . . . . . . . 1
Intro: DIY Bluetooth Phone Controlled BB-8 Droid with Arduino UNO . . . . . . . . . . . . . . . . . . . . . . . . . . . . . . . . . . . . . . . . . . . . . . . . . . . . . . . . . . . . . . . . . . . . 3
Step 1: How does BB-8 works? . . . . . . . . . . . . . . . . . . . . . . . . . . . . . . . . . . . . . . . . . . . . . . . . . . . . . . . . . . . . . . . . . . . . . . . . . . . . . . . . . . . . . . . . . . . . . . . . 4
Step 2: Other Maker's Design . . . . . . . . . . . . . . . . . . . . . . . . . . . . . . . . . . . . . . . . . . . . . . . . . . . . . . . . . . . . . . . . . . . . . . . . . . . . . . . . . . . . . . . . . . . . . . . . . 5
Step 3: My Desing and Concept . . . . . . . . . . . . . . . . . . . . . . . . . . . . . . . . . . . . . . . . . . . . . . . . . . . . . . . . . . . . . . . . . . . . . . . . . . . . . . . . . . . . . . . . . . . . . . . 5
Step 4: Choose your microcontroller! . . . . . . . . . . . . . . . . . . . . . . . . . . . . . . . . . . . . . . . . . . . . . . . . . . . . . . . . . . . . . . . . . . . . . . . . . . . . . . . . . . . . . . . . . . . . 6
Step 5: LinkIt ONE: Parts . . . . . . . . . . . . . . . . . . . . . . . . . . . . . . . . . . . . . . . . . . . . . . . . . . . . . . . . . . . . . . . . . . . . . . . . . . . . . . . . . . . . . . . . . . . . . . . . . . . . 7
Parts: . . . . . . . . . . . . . . . . . . . . . . . . . . . . . . . . . . . . . . . . . . . . . . . . . . . . . . . . . . . . . . . . . . . . . . . . . . . . . . . . . . . . . . . . . . . . . . . . . . . . . . . . . . . . . . . . . . 7
Step 6: LinkIt ONE: The $1 Motor Driver . . . . . . . . . . . . . . . . . . . . . . . . . . . . . . . . . . . . . . . . . . . . . . . . . . . . . . . . . . . . . . . . . . . . . . . . . . . . . . . . . . . . . . . . . 8
Step 7: LinkIt ONE: The Code . . . . . . . . . . . . . . . . . . . . . . . . . . . . . . . . . . . . . . . . . . . . . . . . . . . . . . . . . . . . . . . . . . . . . . . . . . . . . . . . . . . . . . . . . . . . . . . . . 10
File Downloads . . . . . . . . . . . . . . . . . . . . . . . . . . . . . . . . . . . . . . . . . . . . . . . . . . . . . . . . . . . . . . . . . . . . . . . . . . . . . . . . . . . . . . . . . . . . . . . . . . . . . . . . . . . 10
Step 8: LinkIt ONE: The Audio Amp for Sound Effect . . . . . . . . . . . . . . . . . . . . . . . . . . . . . . . . . . . . . . . . . . . . . . . . . . . . . . . . . . . . . . . . . . . . . . . . . . . . . . . . 10
File Downloads . . . . . . . . . . . . . . . . . . . . . . . . . . . . . . . . . . . . . . . . . . . . . . . . . . . . . . . . . . . . . . . . . . . . . . . . . . . . . . . . . . . . . . . . . . . . . . . . . . . . . . . . . . . 11
Step 9: LinkIt ONE External Battery . . . . . . . . . . . . . . . . . . . . . . . . . . . . . . . . . . . . . . . . . . . . . . . . . . . . . . . . . . . . . . . . . . . . . . . . . . . . . . . . . . . . . . . . . . . . . 11
Step 10: LinkIt ONE: The test . . . . . . . . . . . . . . . . . . . . . . . . . . . . . . . . . . . . . . . . . . . . . . . . . . . . . . . . . . . . . . . . . . . . . . . . . . . . . . . . . . . . . . . . . . . . . . . . . 12
Step 11: Arduino UNO: Parts . . . . . . . . . . . . . . . . . . . . . . . . . . . . . . . . . . . . . . . . . . . . . . . . . . . . . . . . . . . . . . . . . . . . . . . . . . . . . . . . . . . . . . . . . . . . . . . . . . 13
Parts: . . . . . . . . . . . . . . . . . . . . . . . . . . . . . . . . . . . . . . . . . . . . . . . . . . . . . . . . . . . . . . . . . . . . . . . . . . . . . . . . . . . . . . . . . . . . . . . . . . . . . . . . . . . . . . . . . . 13
Step 12: The Ardiuno Code . . . . . . . . . . . . . . . . . . . . . . . . . . . . . . . . . . . . . . . . . . . . . . . . . . . . . . . . . . . . . . . . . . . . . . . . . . . . . . . . . . . . . . . . . . . . . . . . . . . 15
File Downloads . . . . . . . . . . . . . . . . . . . . . . . . . . . . . . . . . . . . . . . . . . . . . . . . . . . . . . . . . . . . . . . . . . . . . . . . . . . . . . . . . . . . . . . . . . . . . . . . . . . . . . . . . . . 16
Step 13: Choosing the Power Source . . . . . . . . . . . . . . . . . . . . . . . . . . . . . . . . . . . . . . . . . . . . . . . . . . . . . . . . . . . . . . . . . . . . . . . . . . . . . . . . . . . . . . . . . . . 17
Step 14: Build the Power Source . . . . . . . . . . . . . . . . . . . . . . . . . . . . . . . . . . . . . . . . . . . . . . . . . . . . . . . . . . . . . . . . . . . . . . . . . . . . . . . . . . . . . . . . . . . . . . . 17
Step 15: Choosing Motors . . . . . . . . . . . . . . . . . . . . . . . . . . . . . . . . . . . . . . . . . . . . . . . . . . . . . . . . . . . . . . . . . . . . . . . . . . . . . . . . . . . . . . . . . . . . . . . . . . . . 18
Step 16: The Circuit (Hardwere Part) . . . . . . . . . . . . . . . . . . . . . . . . . . . . . . . . . . . . . . . . . . . . . . . . . . . . . . . . . . . . . . . . . . . . . . . . . . . . . . . . . . . . . . . . . . . . 19
Step 17: The Motor Shield . . . . . . . . . . . . . . . . . . . . . . . . . . . . . . . . . . . . . . . . . . . . . . . . . . . . . . . . . . . . . . . . . . . . . . . . . . . . . . . . . . . . . . . . . . . . . . . . . . . . 20
Step 18: A Quick Test . . . . . . . . . . . . . . . . . . . . . . . . . . . . . . . . . . . . . . . . . . . . . . . . . . . . . . . . . . . . . . . . . . . . . . . . . . . . . . . . . . . . . . . . . . . . . . . . . . . . . . . 21
Step 19: The Mechanism . . . . . . . . . . . . . . . . . . . . . . . . . . . . . . . . . . . . . . . . . . . . . . . . . . . . . . . . . . . . . . . . . . . . . . . . . . . . . . . . . . . . . . . . . . . . . . . . . . . . . 22
Step 20: The Body in the Sphere . . . . . . . . . . . . . . . . . . . . . . . . . . . . . . . . . . . . . . . . . . . . . . . . . . . . . . . . . . . . . . . . . . . . . . . . . . . . . . . . . . . . . . . . . . . . . . . 23
Step 21: Steering . . . . . . . . . . . . . . . . . . . . . . . . . . . . . . . . . . . . . . . . . . . . . . . . . . . . . . . . . . . . . . . . . . . . . . . . . . . . . . . . . . . . . . . . . . . . . . . . . . . . . . . . . . 24
Step 22: The Servo . . . . . . . . . . . . . . . . . . . . . . . . . . . . . . . . . . . . . . . . . . . . . . . . . . . . . . . . . . . . . . . . . . . . . . . . . . . . . . . . . . . . . . . . . . . . . . . . . . . . . . . . . 26
Step 23: Optional Upgrade (head spin) . . . . . . . . . . . . . . . . . . . . . . . . . . . . . . . . . . . . . . . . . . . . . . . . . . . . . . . . . . . . . . . . . . . . . . . . . . . . . . . . . . . . . . . . . . 27
Step 24: The Head . . . . . . . . . . . . . . . . . . . . . . . . . . . . . . . . . . . . . . . . . . . . . . . . . . . . . . . . . . . . . . . . . . . . . . . . . . . . . . . . . . . . . . . . . . . . . . . . . . . . . . . . . 28
Step 25: Quick Test (Again) . . . . . . . . . . . . . . . . . . . . . . . . . . . . . . . . . . . . . . . . . . . . . . . . . . . . . . . . . . . . . . . . . . . . . . . . . . . . . . . . . . . . . . . . . . . . . . . . . . . 29
Step 26: Adding Some Extra Weight For Better Steering . . . . . . . . . . . . . . . . . . . . . . . . . . . . . . . . . . . . . . . . . . . . . . . . . . . . . . . . . . . . . . . . . . . . . . . . . . . . . 30
http://www.instructables.com/id/DIY-Bluetooth-Phone-Controlled-BB-8-Droid-With-Ard/
Step 27: Preparing for Paint . . . . . . . . . . . . . . . . . . . . . . . . . . . . . . . . . . . . . . . . . . . . . . . . . . . . . . . . . . . . . . . . . . . . . . . . . . . . . . . . . . . . . . . . . . . . . . . . . . 31
Step 28: Painting . . . . . . . . . . . . . . . . . . . . . . . . . . . . . . . . . . . . . . . . . . . . . . . . . . . . . . . . . . . . . . . . . . . . . . . . . . . . . . . . . . . . . . . . . . . . . . . . . . . . . . . . . . . 32
Step 29: The Pattern . . . . . . . . . . . . . . . . . . . . . . . . . . . . . . . . . . . . . . . . . . . . . . . . . . . . . . . . . . . . . . . . . . . . . . . . . . . . . . . . . . . . . . . . . . . . . . . . . . . . . . . . 33
File Downloads . . . . . . . . . . . . . . . . . . . . . . . . . . . . . . . . . . . . . . . . . . . . . . . . . . . . . . . . . . . . . . . . . . . . . . . . . . . . . . . . . . . . . . . . . . . . . . . . . . . . . . . . . . . 34
Step 30: Gluing the Pattern . . . . . . . . . . . . . . . . . . . . . . . . . . . . . . . . . . . . . . . . . . . . . . . . . . . . . . . . . . . . . . . . . . . . . . . . . . . . . . . . . . . . . . . . . . . . . . . . . . . 34
Step 31: The Eyes . . . . . . . . . . . . . . . . . . . . . . . . . . . . . . . . . . . . . . . . . . . . . . . . . . . . . . . . . . . . . . . . . . . . . . . . . . . . . . . . . . . . . . . . . . . . . . . . . . . . . . . . . . 35
Step 32: The Head Pattern . . . . . . . . . . . . . . . . . . . . . . . . . . . . . . . . . . . . . . . . . . . . . . . . . . . . . . . . . . . . . . . . . . . . . . . . . . . . . . . . . . . . . . . . . . . . . . . . . . . 37
Step 33: Decoration of the Head . . . . . . . . . . . . . . . . . . . . . . . . . . . . . . . . . . . . . . . . . . . . . . . . . . . . . . . . . . . . . . . . . . . . . . . . . . . . . . . . . . . . . . . . . . . . . . . 38
Step 34: Still Decorating... . . . . . . . . . . . . . . . . . . . . . . . . . . . . . . . . . . . . . . . . . . . . . . . . . . . . . . . . . . . . . . . . . . . . . . . . . . . . . . . . . . . . . . . . . . . . . . . . . . . . 39
Step 35: Details On the Body . . . . . . . . . . . . . . . . . . . . . . . . . . . . . . . . . . . . . . . . . . . . . . . . . . . . . . . . . . . . . . . . . . . . . . . . . . . . . . . . . . . . . . . . . . . . . . . . . . 40
Step 36: How to use the app? . . . . . . . . . . . . . . . . . . . . . . . . . . . . . . . . . . . . . . . . . . . . . . . . . . . . . . . . . . . . . . . . . . . . . . . . . . . . . . . . . . . . . . . . . . . . . . . . . 42
Step 37: This is droid you are looking for! . . . . . . . . . . . . . . . . . . . . . . . . . . . . . . . . . . . . . . . . . . . . . . . . . . . . . . . . . . . . . . . . . . . . . . . . . . . . . . . . . . . . . . . . 43
Related Instructables . . . . . . . . . . . . . . . . . . . . . . . . . . . . . . . . . . . . . . . . . . . . . . . . . . . . . . . . . . . . . . . . . . . . . . . . . . . . . . . . . . . . . . . . . . . . . . . . . . . . . . . . 44
Advertisements . . . . . . . . . . . . . . . . . . . . . . . . . . . . . . . . . . . . . . . . . . . . . . . . . . . . . . . . . . . . . . . . . . . . . . . . . . . . . . . . . . . . . . . . . . . . . . . . . . . . . . . . . . . . . . . 44
Comments . . . . . . . . . . . . . . . . . . . . . . . . . . . . . . . . . . . . . . . . . . . . . . . . . . . . . . . . . . . . . . . . . . . . . . . . . . . . . . . . . . . . . . . . . . . . . . . . . . . . . . . . . . . . . . . . 44
http://www.instructables.com/id/DIY-Bluetooth-Phone-Controlled-BB-8-Droid-With-Ard/
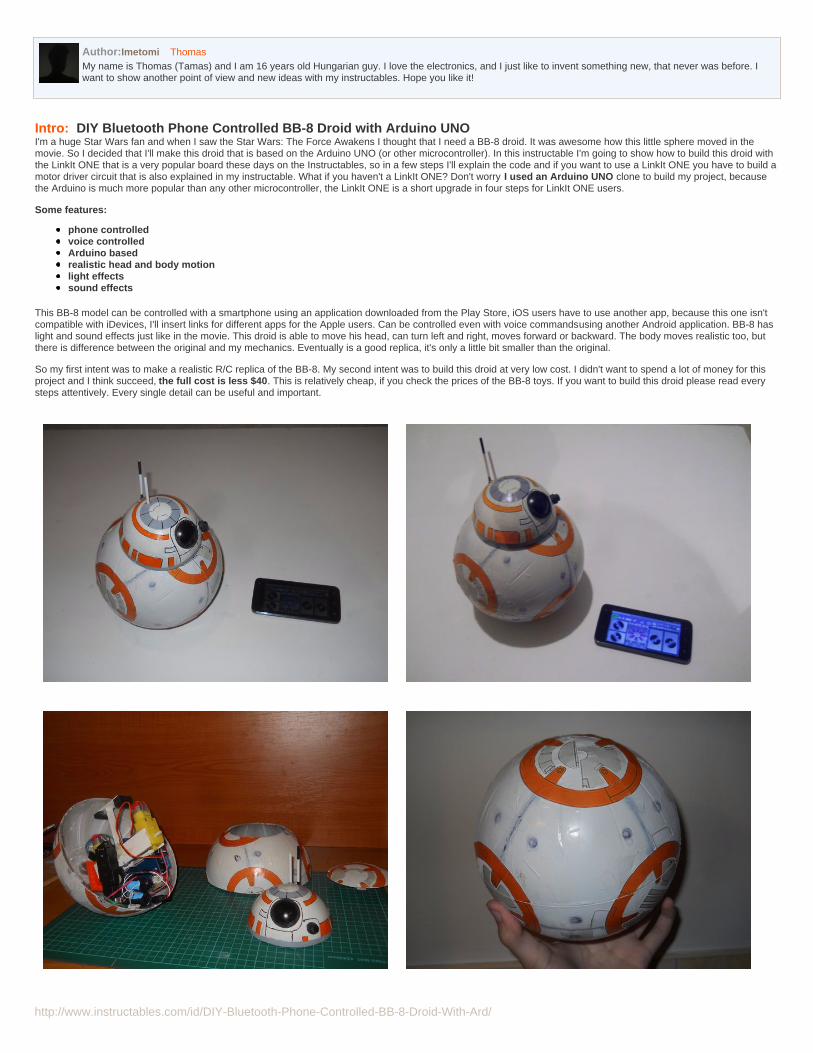
Author:Imetomi ThomasMy name is Thomas (Tamas) and I am 16 years old Hungarian guy. I love the electronics, and I just like to invent something new, that never was before. Iwant to show another point of view and new ideas with my instructables. Hope you like it!
Intro: DIY Bluetooth Phone Controlled BB-8 Droid with Arduino UNOI'm a huge Star Wars fan and when I saw the Star Wars: The Force Awakens I thought that I need a BB-8 droid. It was awesome how this little sphere moved in themovie. So I decided that I'll make this droid that is based on the Arduino UNO (or other microcontroller). In this instructable I'm going to show how to build this droid withthe LinkIt ONE that is a very popular board these days on the Instructables, so in a few steps I'll explain the code and if you want to use a LinkIt ONE you have to build amotor driver circuit that is also explained in my instructable. What if you haven't a LinkIt ONE? Don't worry I used an Arduino UNO clone to build my project, becausethe Arduino is much more popular than any other microcontroller, the LinkIt ONE is a short upgrade in four steps for LinkIt ONE users.
Some features:
phone controlledvoice controlledArduino basedrealistic head and body motionlight effectssound effects
This BB-8 model can be controlled with a smartphone using an application downloaded from the Play Store, iOS users have to use another app, because this one isn'tcompatible with iDevices, I'll insert links for different apps for the Apple users. Can be controlled even with voice commandsusing another Android application. BB-8 haslight and sound effects just like in the movie. This droid is able to move his head, can turn left and right, moves forward or backward. The body moves realistic too, butthere is difference between the original and my mechanics. Eventually is a good replica, it's only a little bit smaller than the original.
So my first intent was to make a realistic R/C replica of the BB-8. My second intent was to build this droid at very low cost. I didn't want to spend a lot of money for thisproject and I think succeed, the full cost is less $40. This is relatively cheap, if you check the prices of the BB-8 toys. If you want to build this droid please read everysteps attentively. Every single detail can be useful and important.
http://www.instructables.com/id/DIY-Bluetooth-Phone-Controlled-BB-8-Droid-With-Ard/
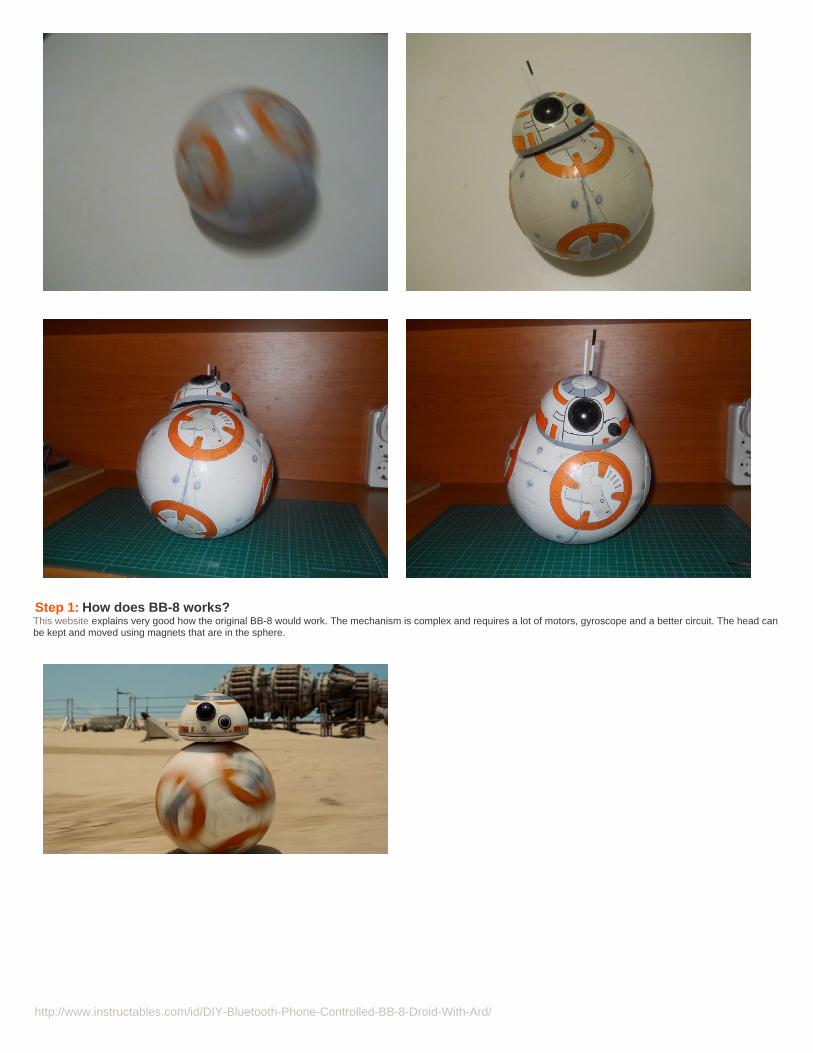
Step 1: How does BB-8 works?This website explains very good how the original BB-8 would work. The mechanism is complex and requires a lot of motors, gyroscope and a better circuit. The head canbe kept and moved using magnets that are in the sphere.
http://www.instructables.com/id/DIY-Bluetooth-Phone-Controlled-BB-8-Droid-With-Ard/
Step 2: Other Maker's DesignI think James Bruton's design is one of the best that I saw on the internet. It's simply awesome... But Mike Senna's droid is amazing too. I know that mine isn't so goodlike those, but I tried to make something new, invidual without copying the design of these two amazing makers.
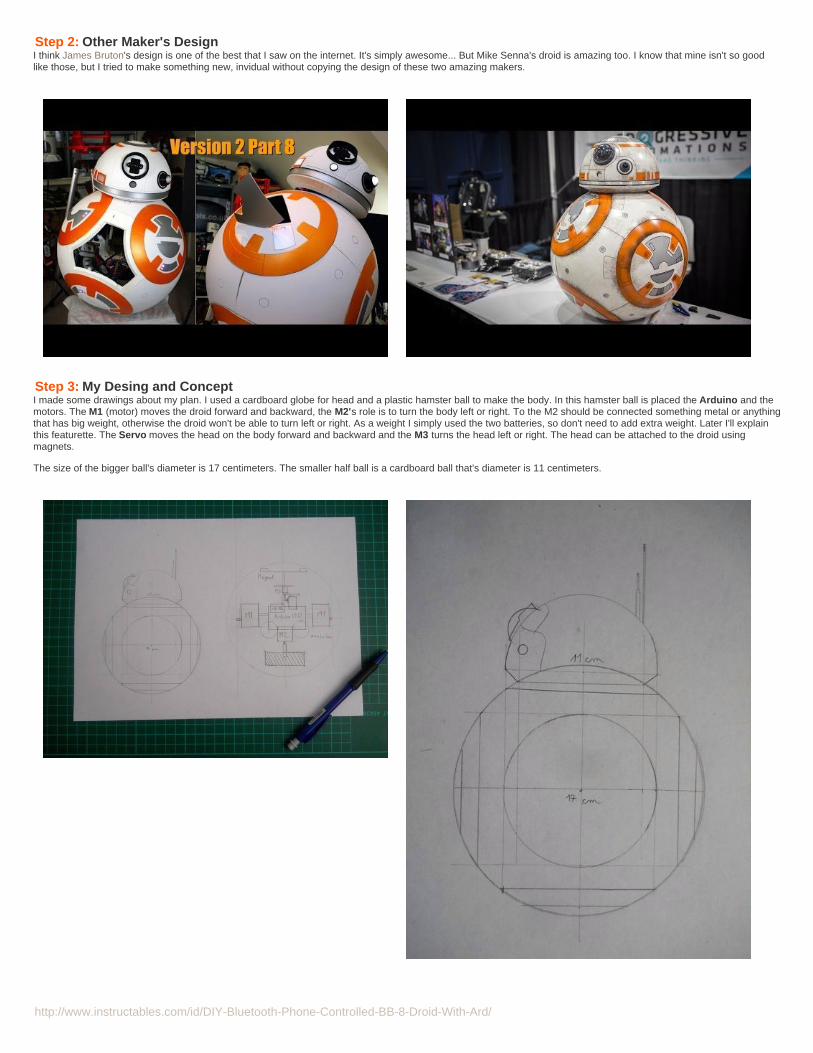
Step 3: My Desing and ConceptI made some drawings about my plan. I used a cardboard globe for head and a plastic hamster ball to make the body. In this hamster ball is placed the Arduino and themotors. The M1 (motor) moves the droid forward and backward, the M2's role is to turn the body left or right. To the M2 should be connected something metal or anythingthat has big weight, otherwise the droid won't be able to turn left or right. As a weight I simply used the two batteries, so don't need to add extra weight. Later I'll explainthis featurette. The Servo moves the head on the body forward and backward and the M3 turns the head left or right. The head can be attached to the droid usingmagnets.
The size of the bigger ball's diameter is 17 centimeters. The smaller half ball is a cardboard ball that's diameter is 11 centimeters.
http://www.instructables.com/id/DIY-Bluetooth-Phone-Controlled-BB-8-Droid-With-Ard/
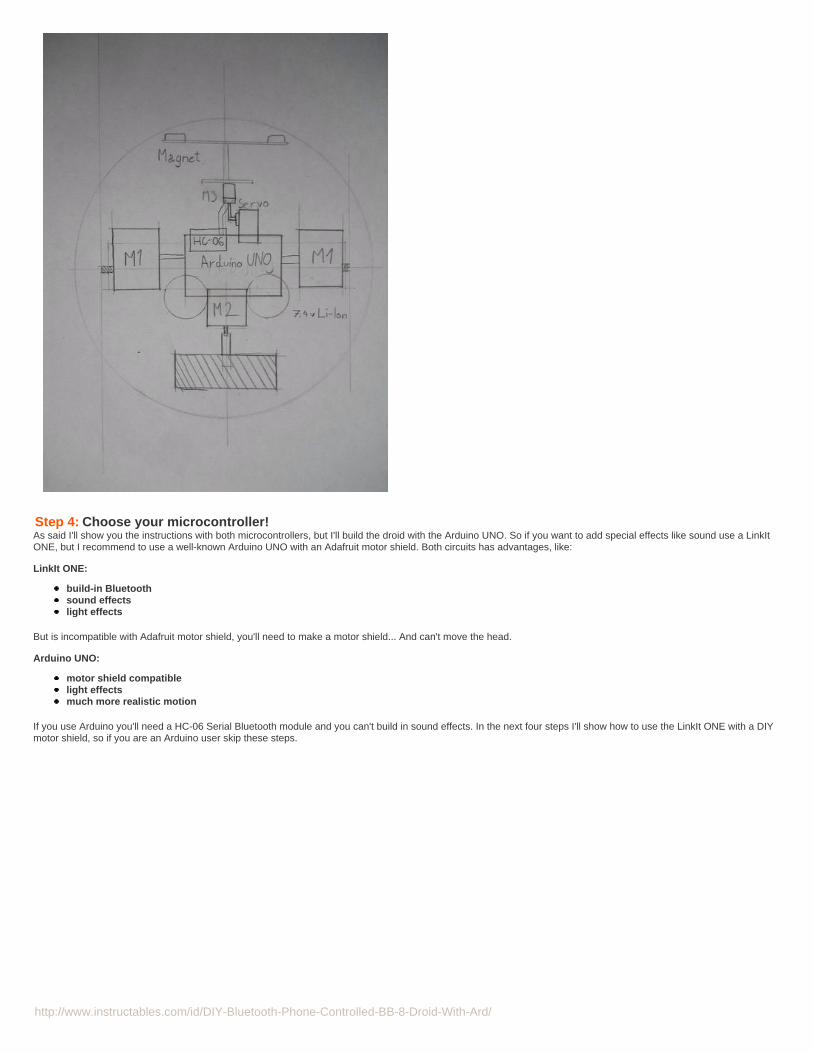
Step 4: Choose your microcontroller!As said I'll show you the instructions with both microcontrollers, but I'll build the droid with the Arduino UNO. So if you want to add special effects like sound use a LinkItONE, but I recommend to use a well-known Arduino UNO with an Adafruit motor shield. Both circuits has advantages, like:
LinkIt ONE:
build-in Bluetoothsound effectslight effects
But is incompatible with Adafruit motor shield, you'll need to make a motor shield... And can't move the head.
Arduino UNO:
motor shield compatiblelight effectsmuch more realistic motion
If you use Arduino you'll need a HC-06 Serial Bluetooth module and you can't build in sound effects. In the next four steps I'll show how to use the LinkIt ONE with a DIYmotor shield, so if you are an Arduino user skip these steps.
http://www.instructables.com/id/DIY-Bluetooth-Phone-Controlled-BB-8-Droid-With-Ard/
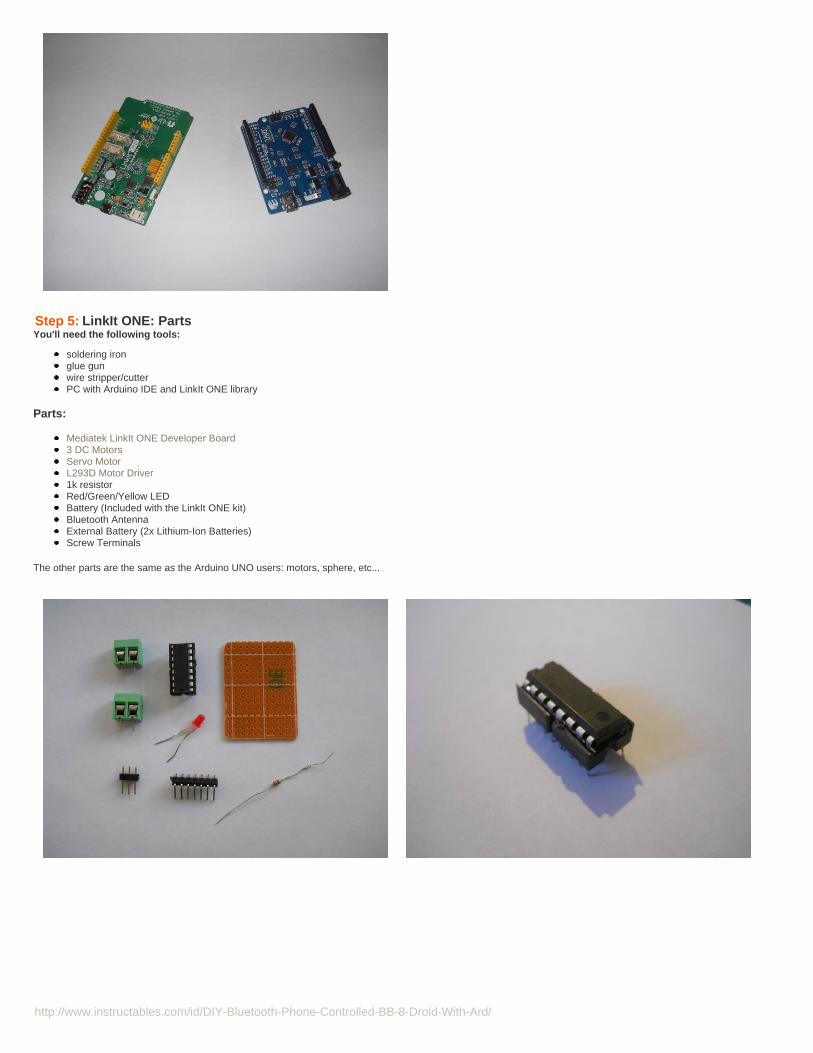
Step 5: LinkIt ONE: PartsYou'll need the following tools:
soldering ironglue gunwire stripper/cutterPC with Arduino IDE and LinkIt ONE library
Parts:
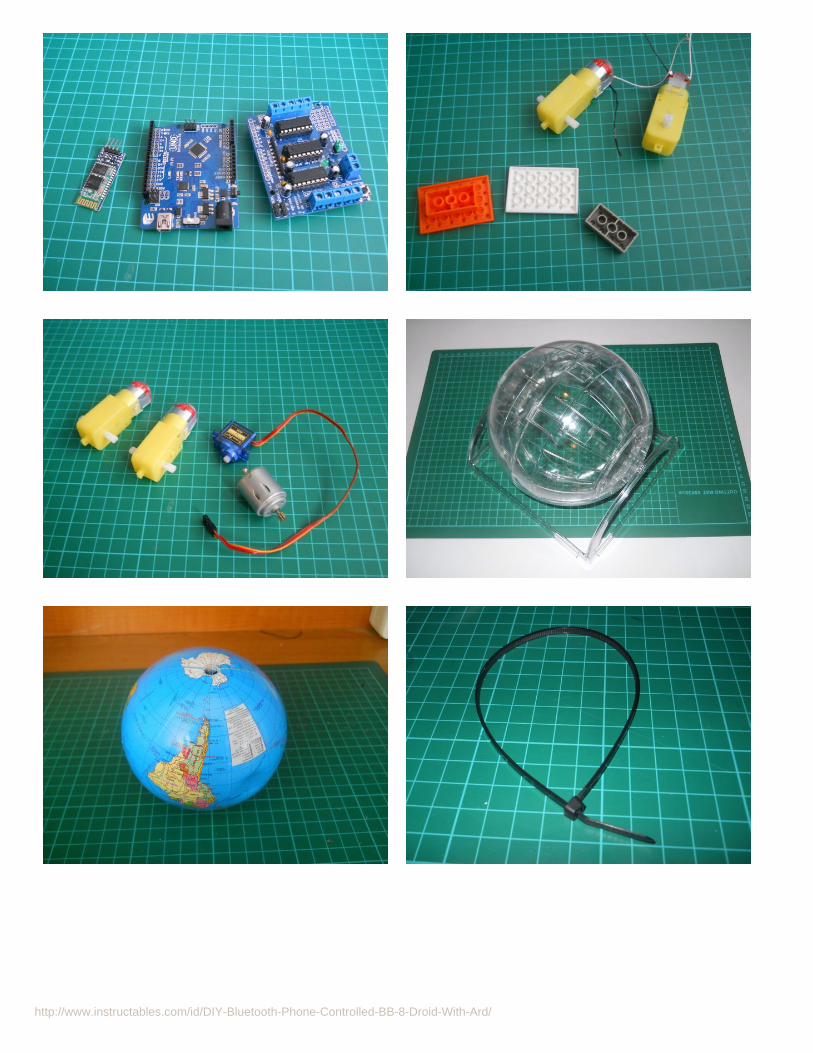
Mediatek LinkIt ONE Developer Board3 DC MotorsServo MotorL293D Motor Driver1k resistorRed/Green/Yellow LEDBattery (Included with the LinkIt ONE kit)Bluetooth AntennaExternal Battery (2x Lithium-Ion Batteries)Screw Terminals
The other parts are the same as the Arduino UNO users: motors, sphere, etc...
http://www.instructables.com/id/DIY-Bluetooth-Phone-Controlled-BB-8-Droid-With-Ard/
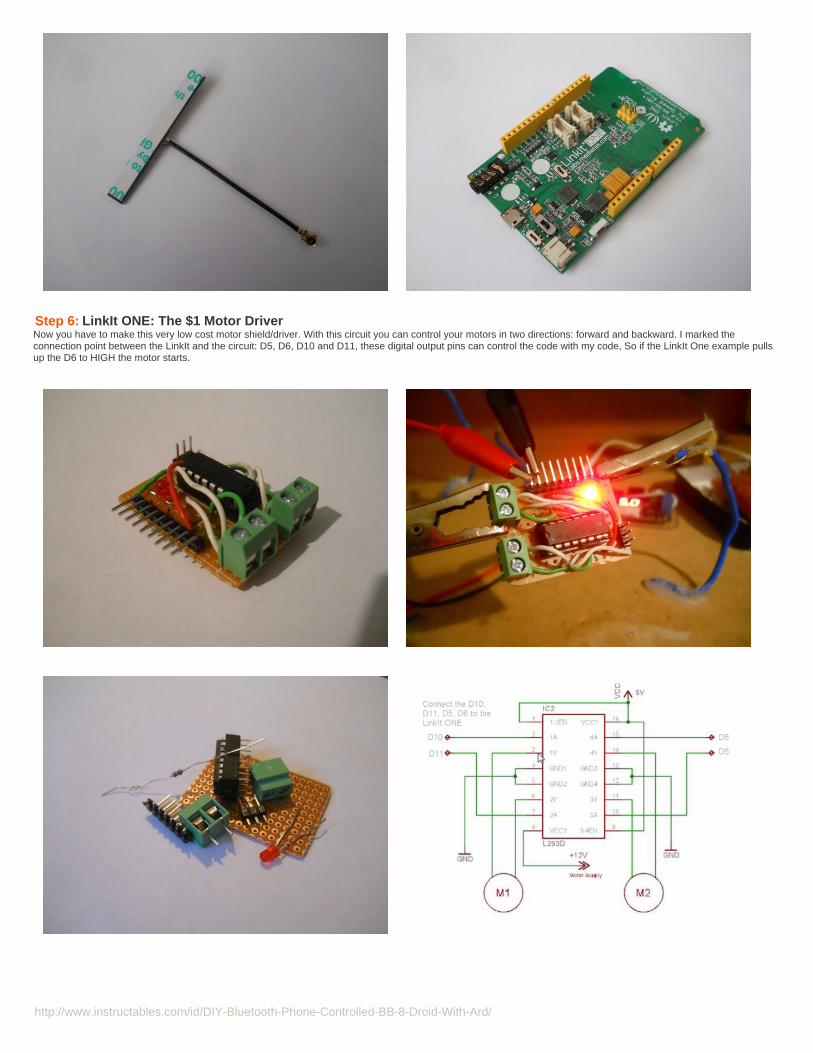
Step 6: LinkIt ONE: The $1 Motor DriverNow you have to make this very low cost motor shield/driver. With this circuit you can control your motors in two directions: forward and backward. I marked theconnection point between the LinkIt and the circuit: D5, D6, D10 and D11, these digital output pins can control the code with my code, So if the LinkIt One example pullsup the D6 to HIGH the motor starts.

http://www.instructables.com/id/DIY-Bluetooth-Phone-Controlled-BB-8-Droid-With-Ard/
http://www.instructables.com/id/DIY-Bluetooth-Phone-Controlled-BB-8-Droid-With-Ard/
Step 7: LinkIt ONE: The CodeAfter building the circuit download this or write an own code to recieve the bytes from the application. This code creates a bluetooth server, reads incoming bytes thenreacts to them by moving the servo and motors, turning on light or sound effects.
File Downloads
BB-8_LinkIt_ONE.ino (3 KB)[NOTE: When saving, if you see .tmp as the file ext, rename it to 'BB-8_LinkIt_ONE.ino']
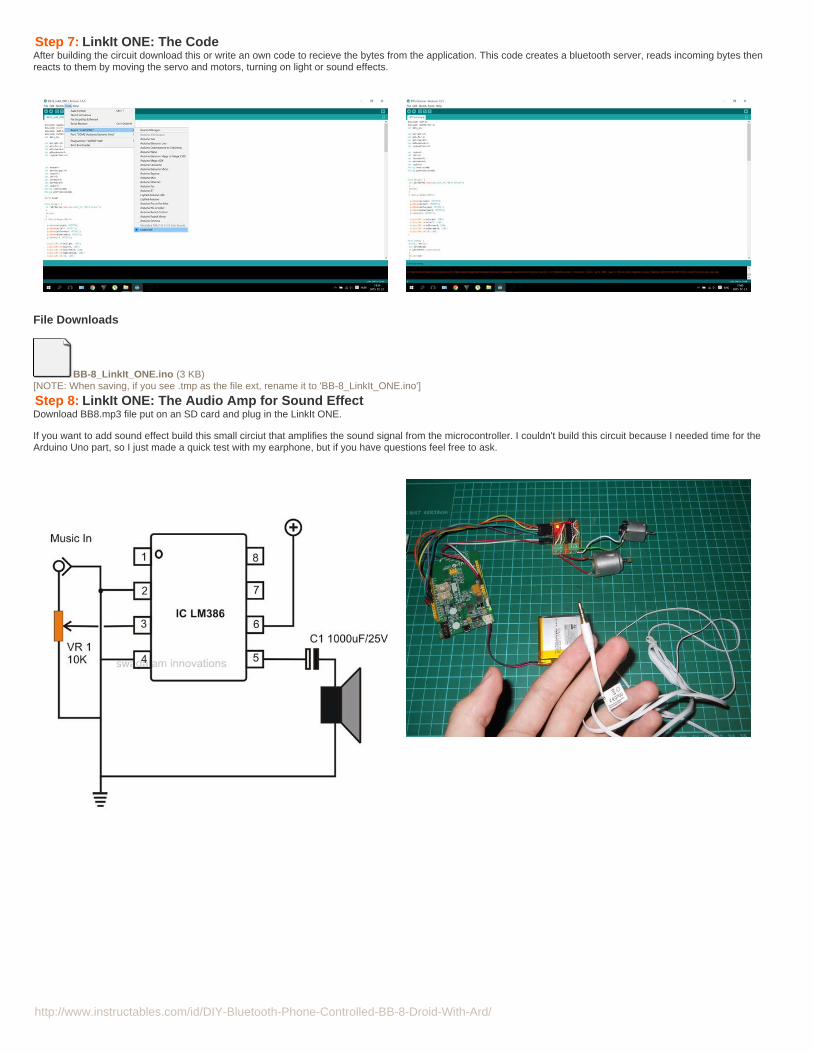
Step 8: LinkIt ONE: The Audio Amp for Sound EffectDownload BB8.mp3 file put on an SD card and plug in the LinkIt ONE.
If you want to add sound effect build this small circiut that amplifies the sound signal from the microcontroller. I couldn't build this circuit because I needed time for theArduino Uno part, so I just made a quick test with my earphone, but if you have questions feel free to ask.
http://www.instructables.com/id/DIY-Bluetooth-Phone-Controlled-BB-8-Droid-With-Ard/
File Downloads
BB8.mp3 (216 KB)[NOTE: When saving, if you see .tmp as the file ext, rename it to 'BB8.mp3']
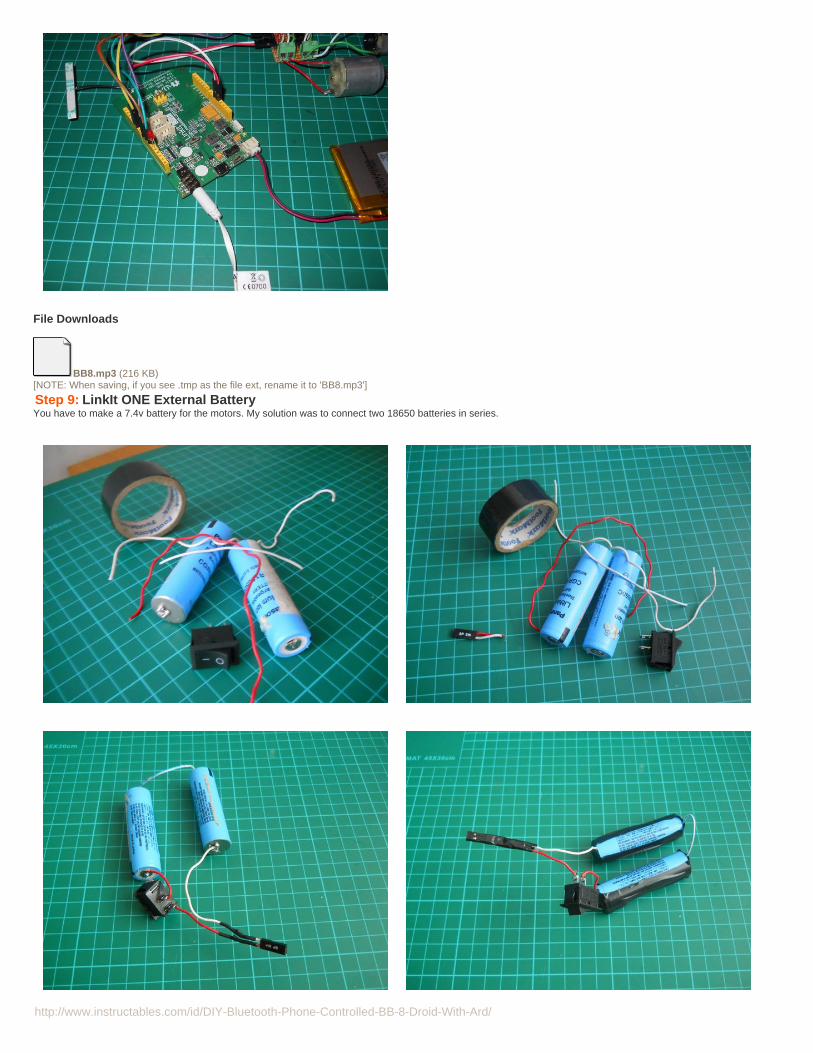
Step 9: LinkIt ONE External BatteryYou have to make a 7.4v battery for the motors. My solution was to connect two 18650 batteries in series.

http://www.instructables.com/id/DIY-Bluetooth-Phone-Controlled-BB-8-Droid-With-Ard/
Step 10: LinkIt ONE: The testI used some motors to test the circuit and the coed and they worked fine. At first launch the servo had some issue, but after this worked without problems. The soundthrough the earphones was very good. Look at the video if you want to see how it works. With this step I finished the explanation and instructions for the LinkIt ONE. Goto the mechanism part to see how to build the droid.

http://www.instructables.com/id/DIY-Bluetooth-Phone-Controlled-BB-8-Droid-With-Ard/
Step 11: Arduino UNO: PartsYou'll need the following tools:
soldering ironglue gunwire stripper/cutterPC with Arduino IDE and Adafruit Motor Shield Library
Parts:
Electronics:
Arduino Uno (buy from Amazon or eBay)HC-06 Serial Bluetooth ModuleMotor Shield18650 Lithium-Ion Battery (I salvaged mine from an old laptop, if you buy online beware fake Ultrafire batteries)DC Motors with Gears (3 Pieces)Servo MotorBlue LEDJumper Wires5.5mm Power Jack
Mechanism:
Some Lego PartsA Hamster BallA Plastic Globe (for head)Srews and Zip TiesPlastic or Plexy Glass sheetsMagnets
Appearence and Paint:
White Paint SprayBlack PaintBlue and Orange PaintPing-Pong Ball (for eye)Black Marker
Software:
Ardiono IDEAdafruit Motor Shield LibraryBT RC Car Android App
For paint you can use anything or any technique, example: print the circles of BB-8 then glue on the spehe.
http://www.instructables.com/id/DIY-Bluetooth-Phone-Controlled-BB-8-Droid-With-Ard/
http://www.instructables.com/id/DIY-Bluetooth-Phone-Controlled-BB-8-Droid-With-Ard/
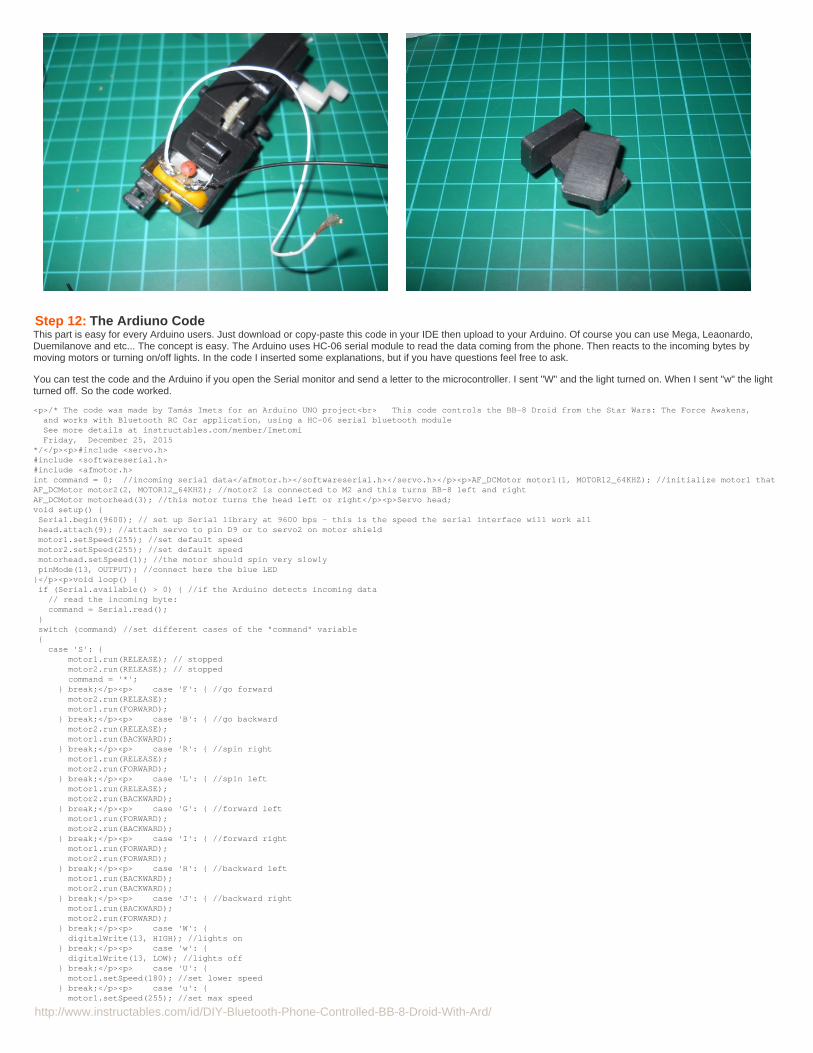
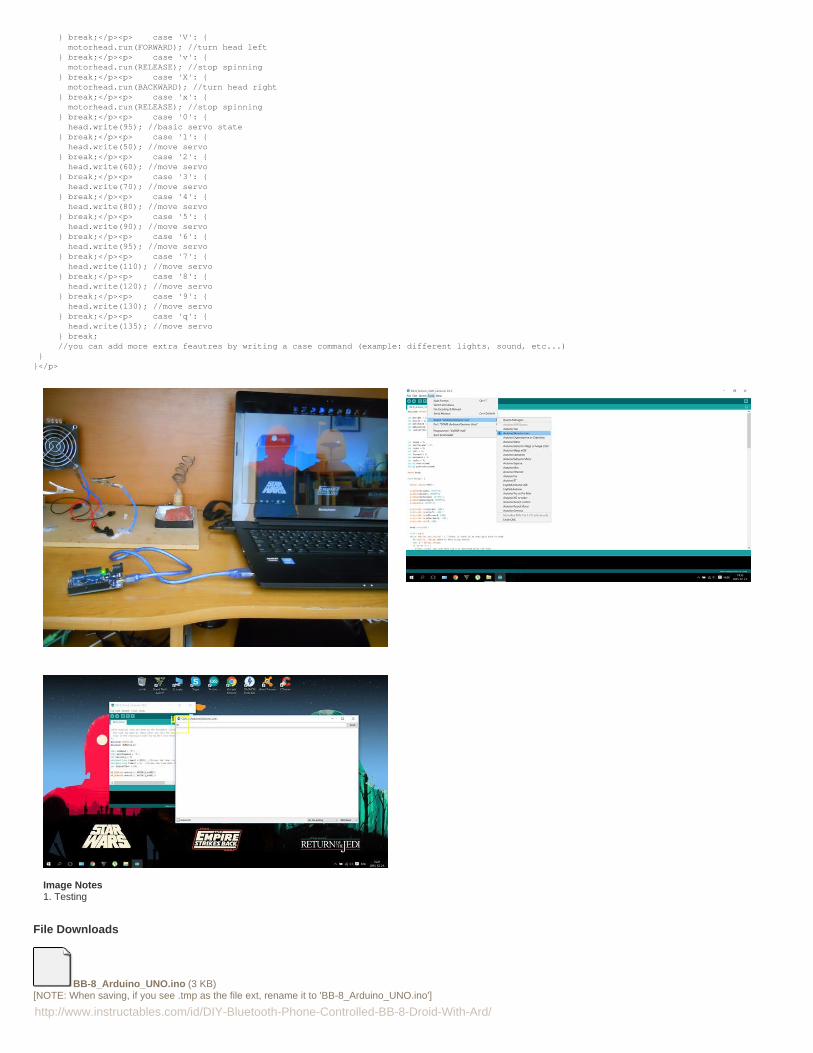
Step 12: The Ardiuno CodeThis part is easy for every Arduino users. Just download or copy-paste this code in your IDE then upload to your Arduino. Of course you can use Mega, Leaonardo,Duemilanove and etc... The concept is easy. The Arduino uses HC-06 serial module to read the data coming from the phone. Then reacts to the incoming bytes bymoving motors or turning on/off lights. In the code I inserted some explanations, but if you have questions feel free to ask.
You can test the code and the Arduino if you open the Serial monitor and send a letter to the microcontroller. I sent "W" and the light turned on. When I sent "w" the lightturned off. So the code worked.
<p>/* The code was made by Tamás Imets for an Arduino UNO project<br> This code controls the BB-8 Droid from the Star Wars: The Force Awakens, and works with Bluetooth RC Car application, using a HC-06 serial bluetooth module See more details at instructables.com/member/Imetomi Friday, December 25, 2015*/</p><p>#include <servo.h>#include <softwareserial.h>#include <afmotor.h>int command = 0; //incoming serial data</afmotor.h></softwareserial.h></servo.h></p><p>AF_DCMotor motor1(1, MOTOR12_64KHZ); //initialize motor1 that is connected to the M1 port, this motor moves forward and backwardAF_DCMotor motor2(2, MOTOR12_64KHZ); //motor2 is connected to M2 and this turns BB-8 left and rightAF_DCMotor motorhead(3); //this motor turns the head left or right</p><p>Servo head;void setup() { Serial.begin(9600); // set up Serial library at 9600 bps - this is the speed the serial interface will work all head.attach(9); //attach servo to pin D9 or to servo2 on motor shield motor1.setSpeed(255); //set default speed motor2.setSpeed(255); //set default speed motorhead.setSpeed(1); //the motor should spin very slowly pinMode(13, OUTPUT); //connect here the blue LED}</p><p>void loop() { if (Serial.available() > 0) { //if the Arduino detects incoming data // read the incoming byte: command = Serial.read(); } switch (command) //set different cases of the "command" variable { case 'S': { motor1.run(RELEASE); // stopped motor2.run(RELEASE); // stopped command = '*'; } break;</p><p> case 'F': { //go forward motor2.run(RELEASE); motor1.run(FORWARD); } break;</p><p> case 'B': { //go backward motor2.run(RELEASE); motor1.run(BACKWARD); } break;</p><p> case 'R': { //spin right motor1.run(RELEASE); motor2.run(FORWARD); } break;</p><p> case 'L': { //spin left motor1.run(RELEASE); motor2.run(BACKWARD); } break;</p><p> case 'G': { //forward left motor1.run(FORWARD); motor2.run(BACKWARD); } break;</p><p> case 'I': { //forward right motor1.run(FORWARD); motor2.run(FORWARD); } break;</p><p> case 'H': { //backward left motor1.run(BACKWARD); motor2.run(BACKWARD); } break;</p><p> case 'J': { //backward right motor1.run(BACKWARD); motor2.run(FORWARD); } break;</p><p> case 'W': { digitalWrite(13, HIGH); //lights on } break;</p><p> case 'w': { digitalWrite(13, LOW); //lights off } break;</p><p> case 'U': { motor1.setSpeed(180); //set lower speed } break;</p><p> case 'u': { motor1.setSpeed(255); //set max speed
http://www.instructables.com/id/DIY-Bluetooth-Phone-Controlled-BB-8-Droid-With-Ard/
} break;</p><p> case 'V': { motorhead.run(FORWARD); //turn head left } break;</p><p> case 'v': { motorhead.run(RELEASE); //stop spinning } break;</p><p> case 'X': { motorhead.run(BACKWARD); //turn head right } break;</p><p> case 'x': { motorhead.run(RELEASE); //stop spinning } break;</p><p> case '0': { head.write(95); //basic servo state } break;</p><p> case '1': { head.write(50); //move servo } break;</p><p> case '2': { head.write(60); //move servo } break;</p><p> case '3': { head.write(70); //move servo } break;</p><p> case '4': { head.write(80); //move servo } break;</p><p> case '5': { head.write(90); //move servo } break;</p><p> case '6': { head.write(95); //move servo } break;</p><p> case '7': { head.write(110); //move servo } break;</p><p> case '8': { head.write(120); //move servo } break;</p><p> case '9': { head.write(130); //move servo } break;</p><p> case 'q': { head.write(135); //move servo } break; //you can add more extra feautres by writing a case command (example: different lights, sound, etc...) }}</p>
Image Notes1. Testing
File Downloads
BB-8_Arduino_UNO.ino (3 KB)[NOTE: When saving, if you see .tmp as the file ext, rename it to 'BB-8_Arduino_UNO.ino']
http://www.instructables.com/id/DIY-Bluetooth-Phone-Controlled-BB-8-Droid-With-Ard/
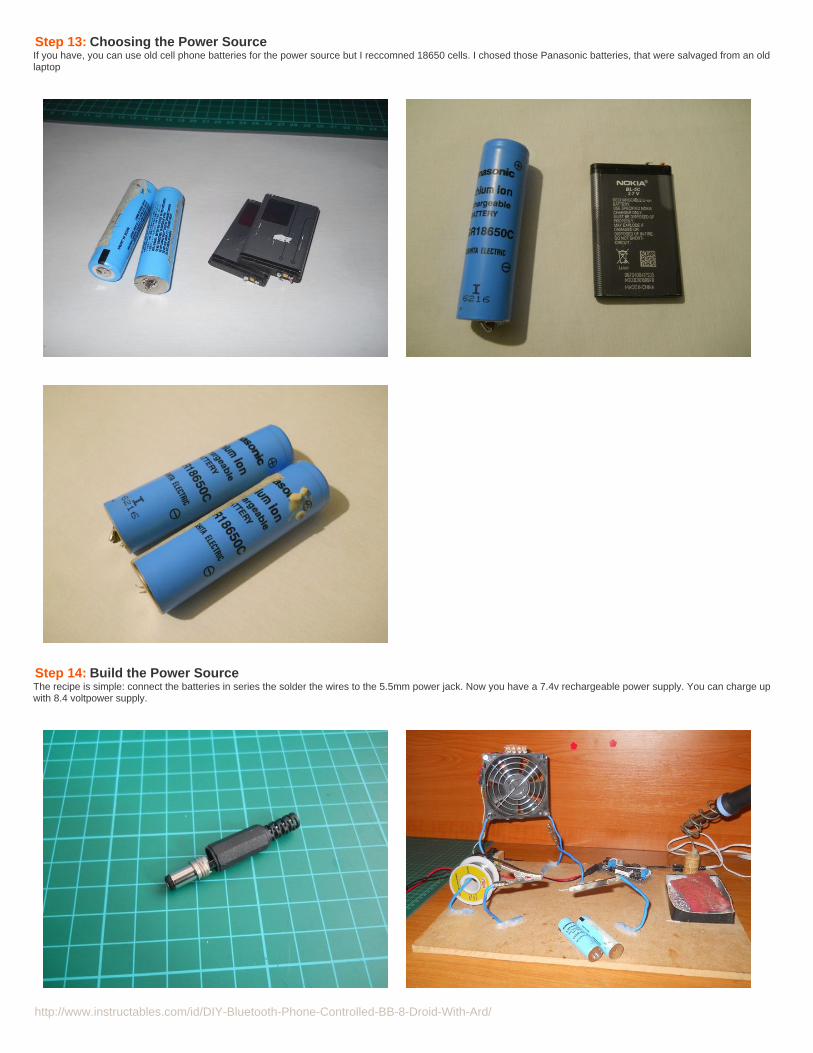
Step 13: Choosing the Power SourceIf you have, you can use old cell phone batteries for the power source but I reccomned 18650 cells. I chosed those Panasonic batteries, that were salvaged from an oldlaptop
Step 14: Build the Power SourceThe recipe is simple: connect the batteries in series the solder the wires to the 5.5mm power jack. Now you have a 7.4v rechargeable power supply. You can charge upwith 8.4 voltpower supply.
http://www.instructables.com/id/DIY-Bluetooth-Phone-Controlled-BB-8-Droid-With-Ard/
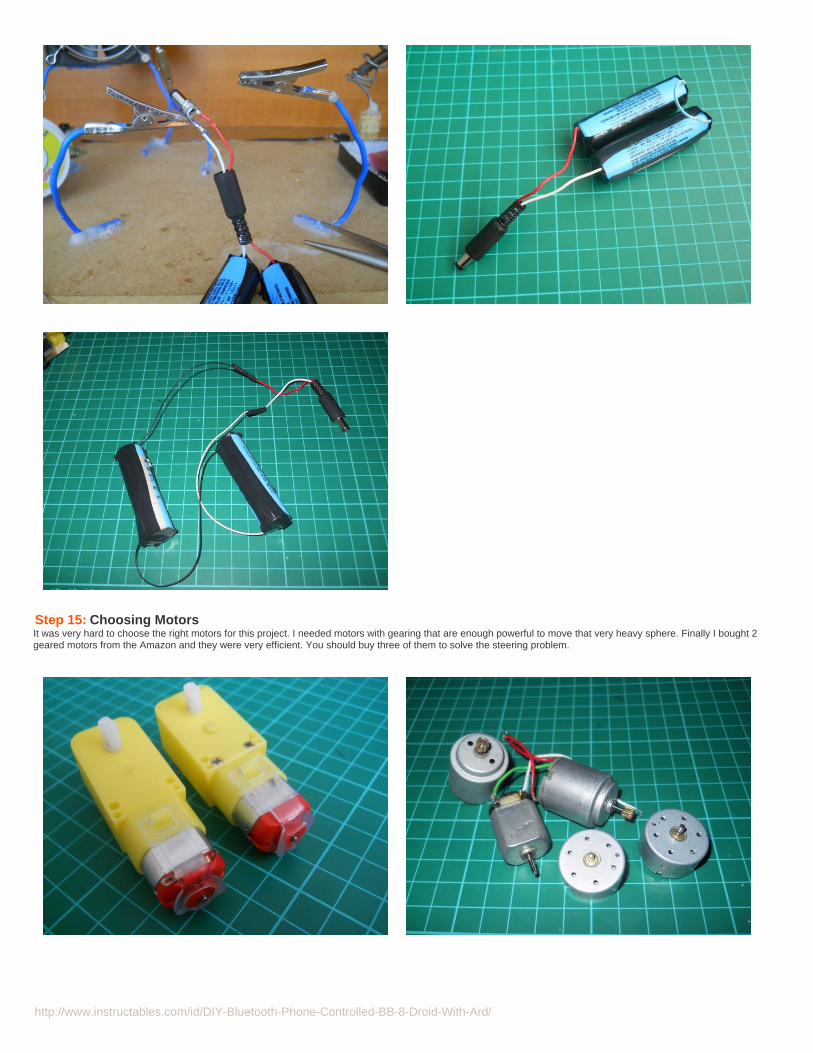
Step 15: Choosing MotorsIt was very hard to choose the right motors for this project. I needed motors with gearing that are enough powerful to move that very heavy sphere. Finally I bought 2geared motors from the Amazon and they were very efficient. You should buy three of them to solve the steering problem.
http://www.instructables.com/id/DIY-Bluetooth-Phone-Controlled-BB-8-Droid-With-Ard/
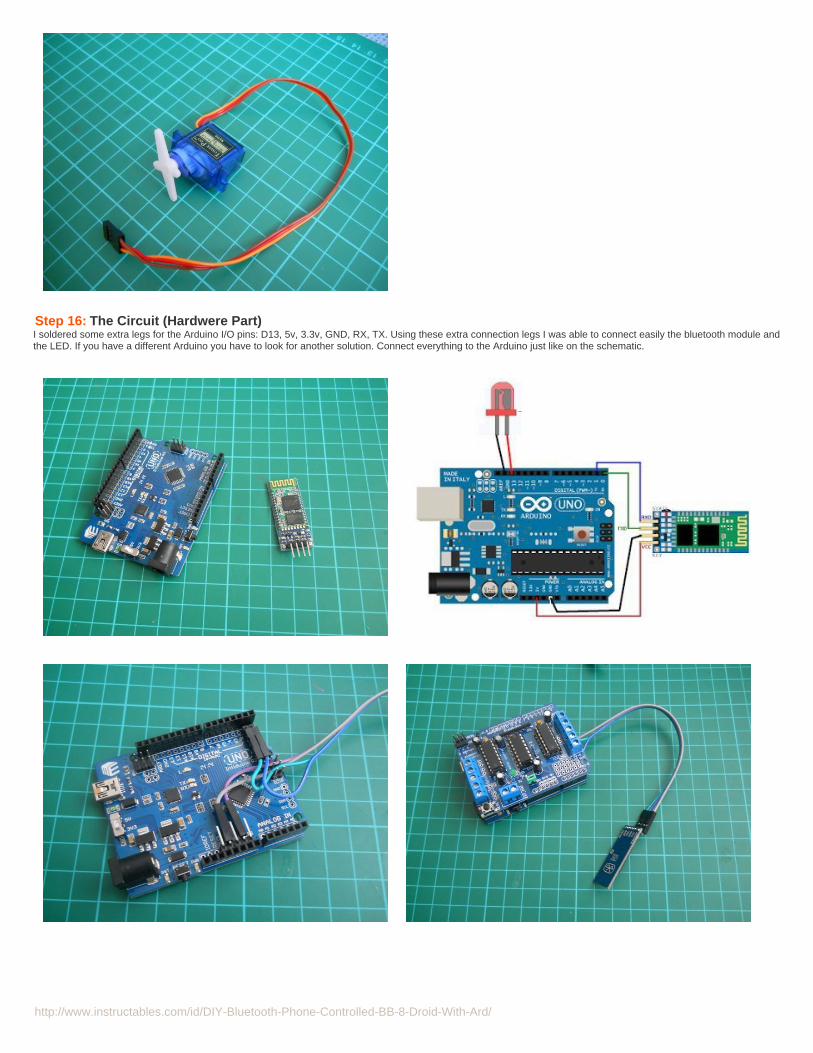
Step 16: The Circuit (Hardwere Part)I soldered some extra legs for the Arduino I/O pins: D13, 5v, 3.3v, GND, RX, TX. Using these extra connection legs I was able to connect easily the bluetooth module andthe LED. If you have a different Arduino you have to look for another solution. Connect everything to the Arduino just like on the schematic.
http://www.instructables.com/id/DIY-Bluetooth-Phone-Controlled-BB-8-Droid-With-Ard/
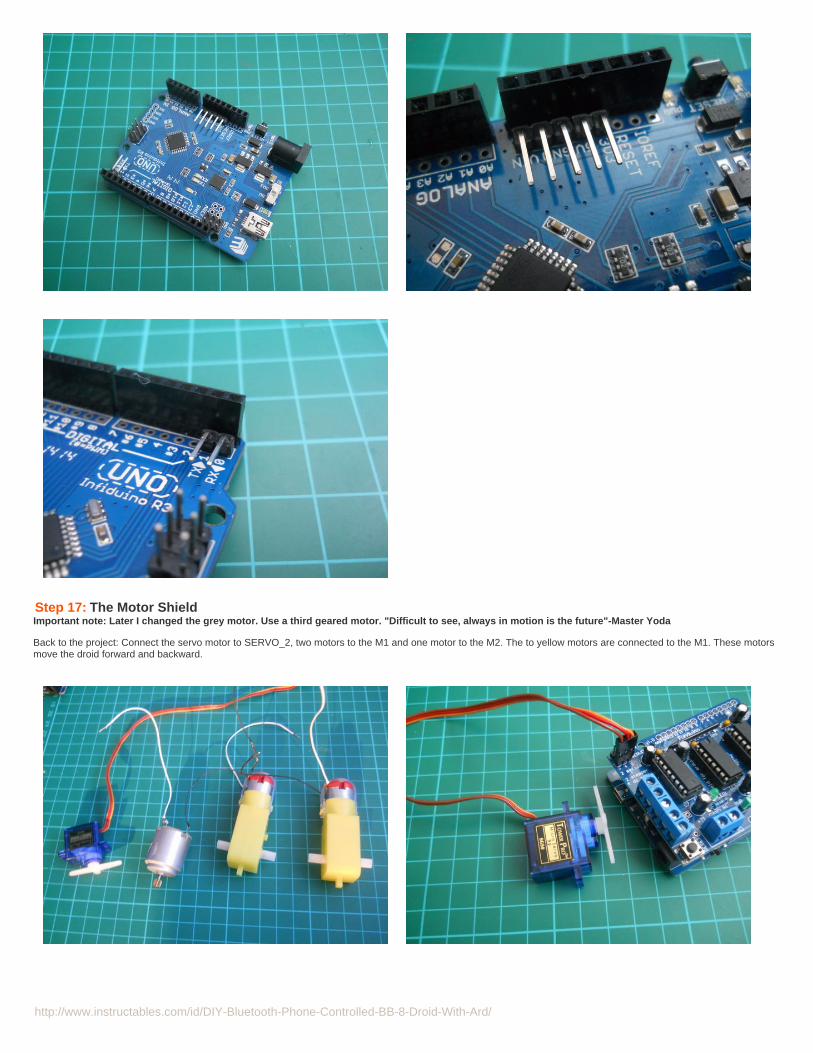
Step 17: The Motor ShieldImportant note: Later I changed the grey motor. Use a third geared motor. "Difficult to see, always in motion is the future"-Master Yoda
Back to the project: Connect the servo motor to SERVO_2, two motors to the M1 and one motor to the M2. The to yellow motors are connected to the M1. These motorsmove the droid forward and backward.
http://www.instructables.com/id/DIY-Bluetooth-Phone-Controlled-BB-8-Droid-With-Ard/
Image Notes1. This motor was changed to another.
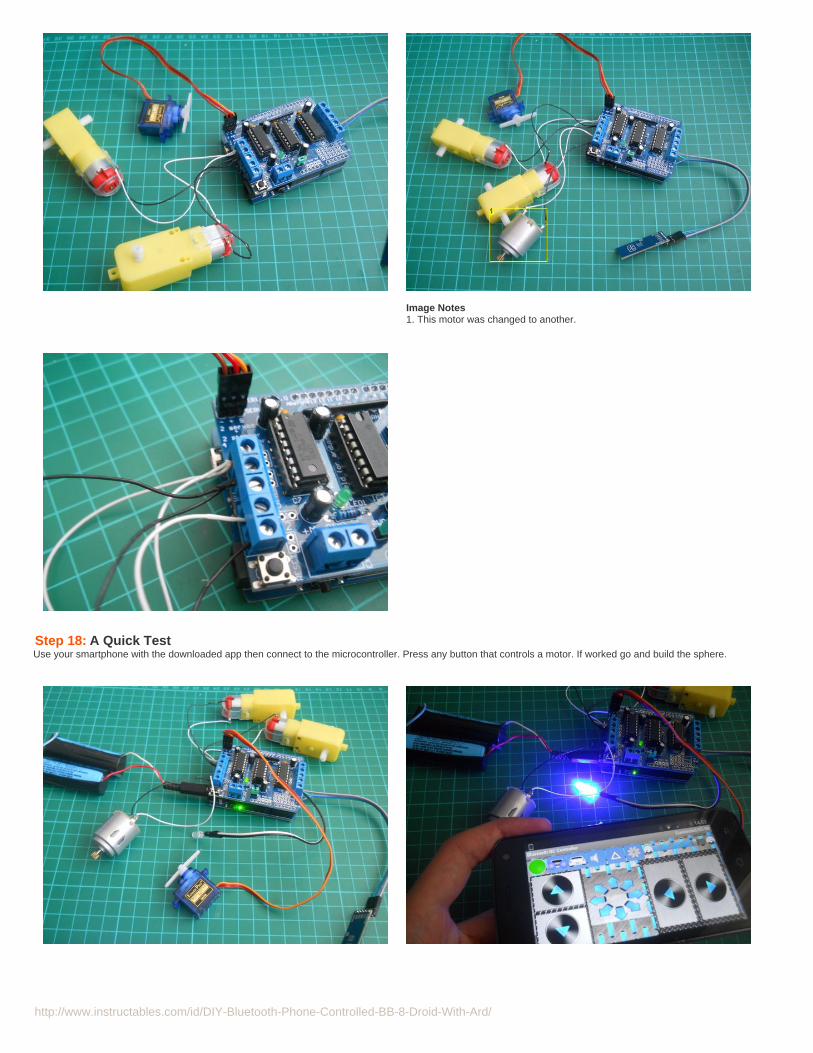
Step 18: A Quick TestUse your smartphone with the downloaded app then connect to the microcontroller. Press any button that controls a motor. If worked go and build the sphere.
http://www.instructables.com/id/DIY-Bluetooth-Phone-Controlled-BB-8-Droid-With-Ard/
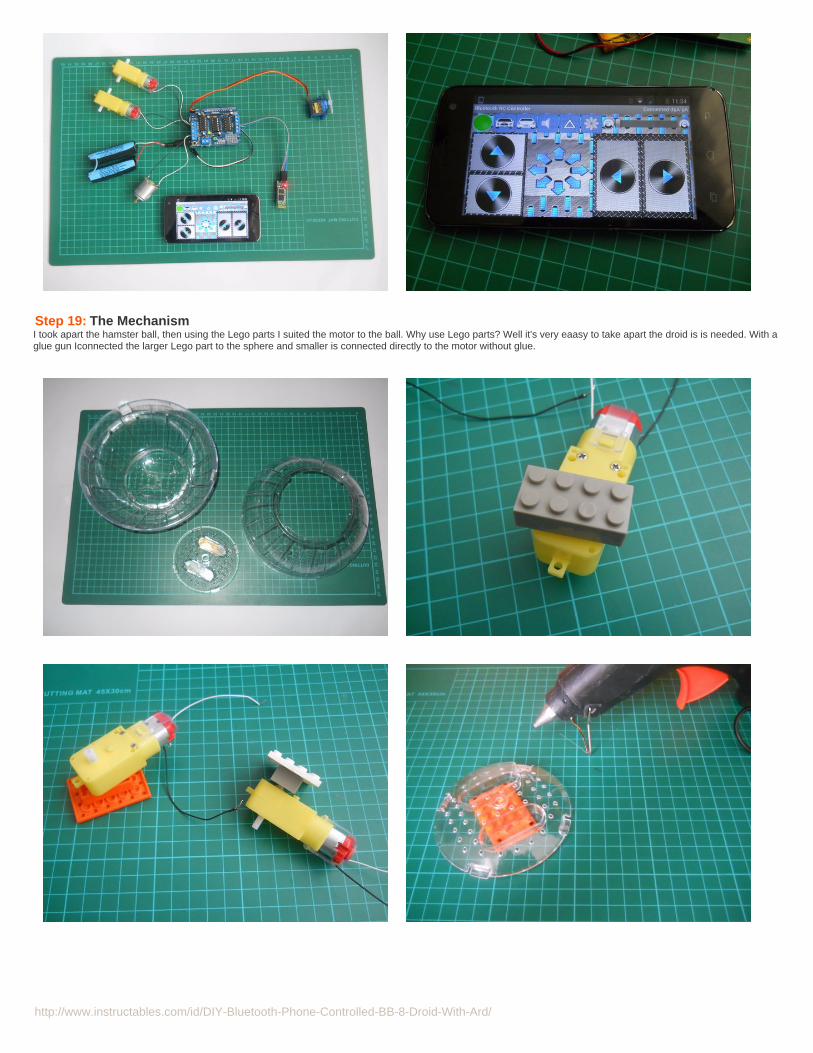
Step 19: The MechanismI took apart the hamster ball, then using the Lego parts I suited the motor to the ball. Why use Lego parts? Well it's very eaasy to take apart the droid is is needed. With aglue gun Iconnected the larger Lego part to the sphere and smaller is connected directly to the motor without glue.
http://www.instructables.com/id/DIY-Bluetooth-Phone-Controlled-BB-8-Droid-With-Ard/
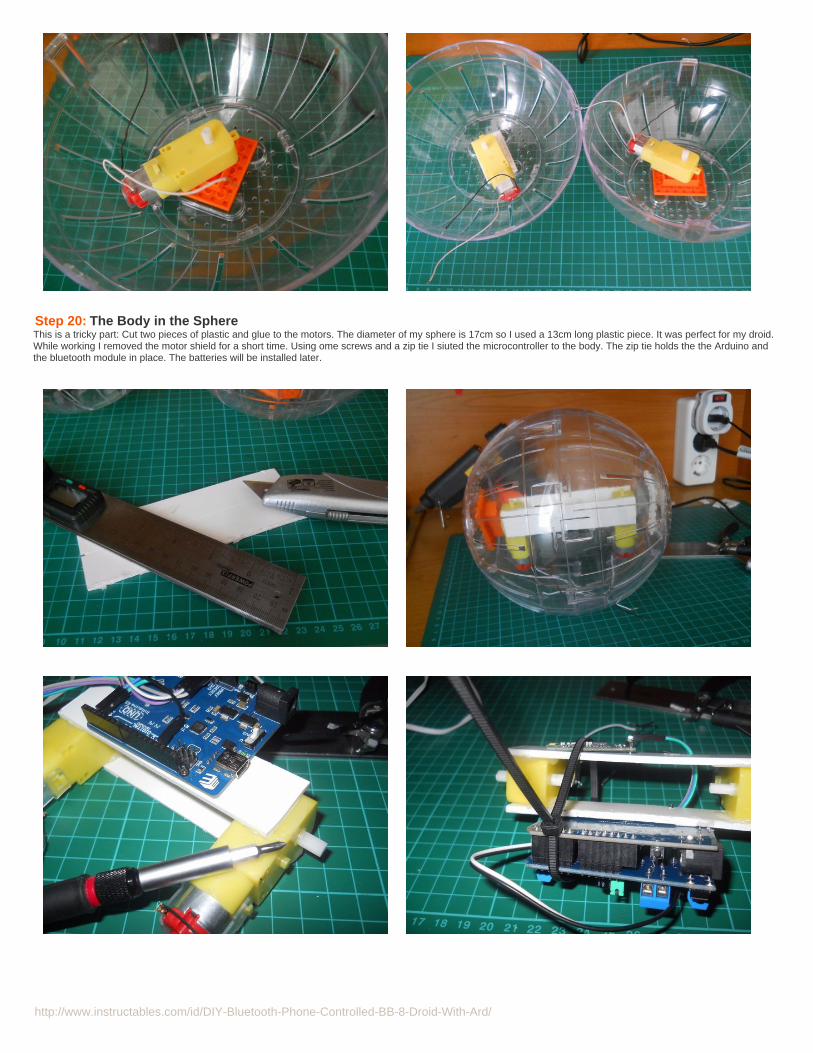
Step 20: The Body in the SphereThis is a tricky part: Cut two pieces of plastic and glue to the motors. The diameter of my sphere is 17cm so I used a 13cm long plastic piece. It was perfect for my droid.While working I removed the motor shield for a short time. Using ome screws and a zip tie I siuted the microcontroller to the body. The zip tie holds the the Arduino andthe bluetooth module in place. The batteries will be installed later.
http://www.instructables.com/id/DIY-Bluetooth-Phone-Controlled-BB-8-Droid-With-Ard/
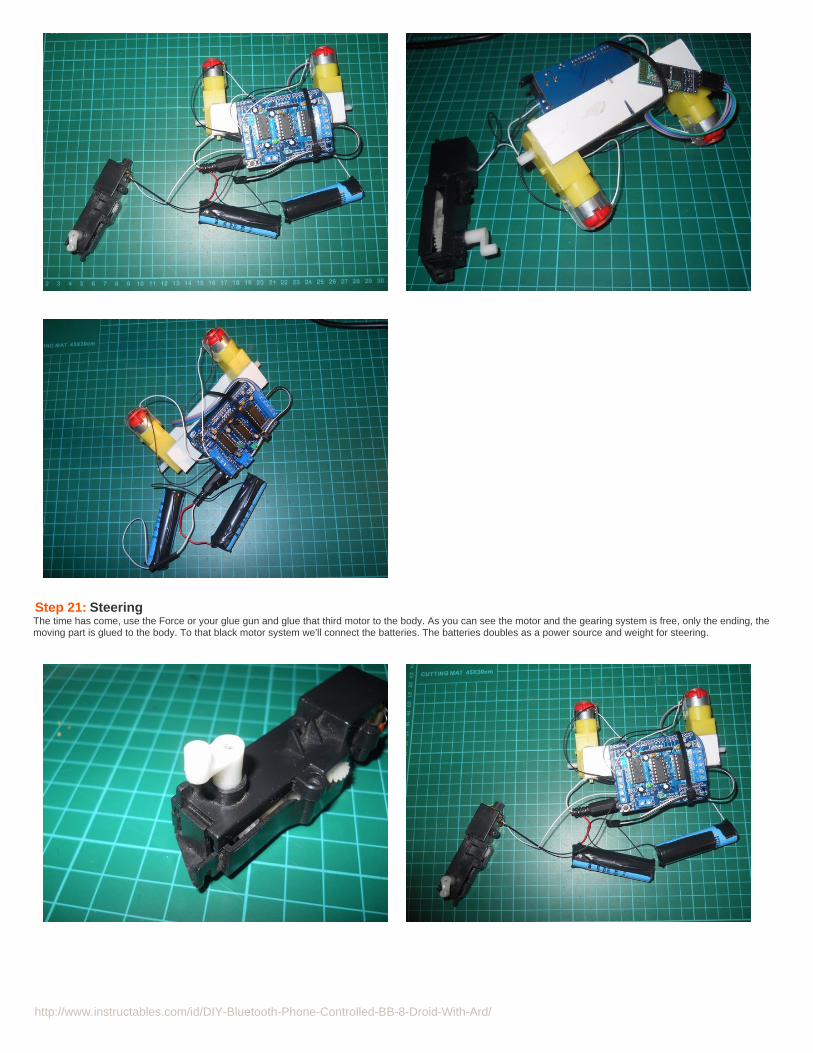
Step 21: SteeringThe time has come, use the Force or your glue gun and glue that third motor to the body. As you can see the motor and the gearing system is free, only the ending, themoving part is glued to the body. To that black motor system we'll connect the batteries. The batteries doubles as a power source and weight for steering.
http://www.instructables.com/id/DIY-Bluetooth-Phone-Controlled-BB-8-Droid-With-Ard/
http://www.instructables.com/id/DIY-Bluetooth-Phone-Controlled-BB-8-Droid-With-Ard/
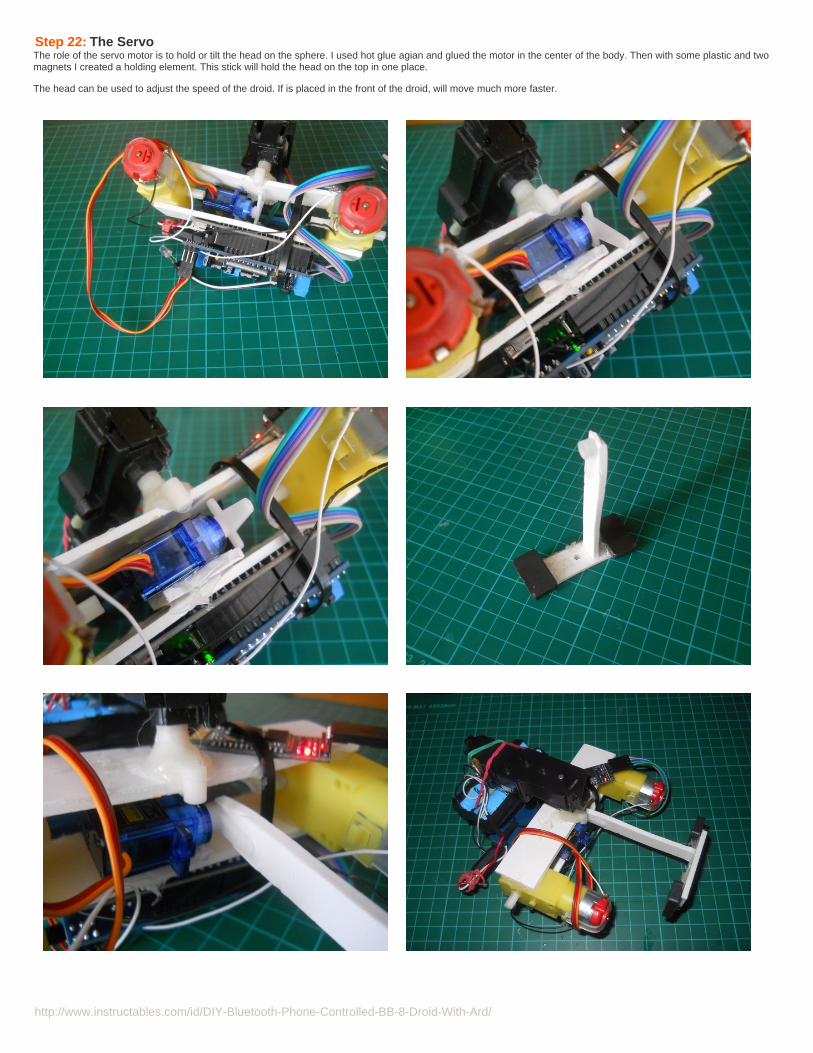
Step 22: The ServoThe role of the servo motor is to hold or tilt the head on the sphere. I used hot glue agian and glued the motor in the center of the body. Then with some plastic and twomagnets I created a holding element. This stick will hold the head on the top in one place.
The head can be used to adjust the speed of the droid. If is placed in the front of the droid, will move much more faster.
http://www.instructables.com/id/DIY-Bluetooth-Phone-Controlled-BB-8-Droid-With-Ard/
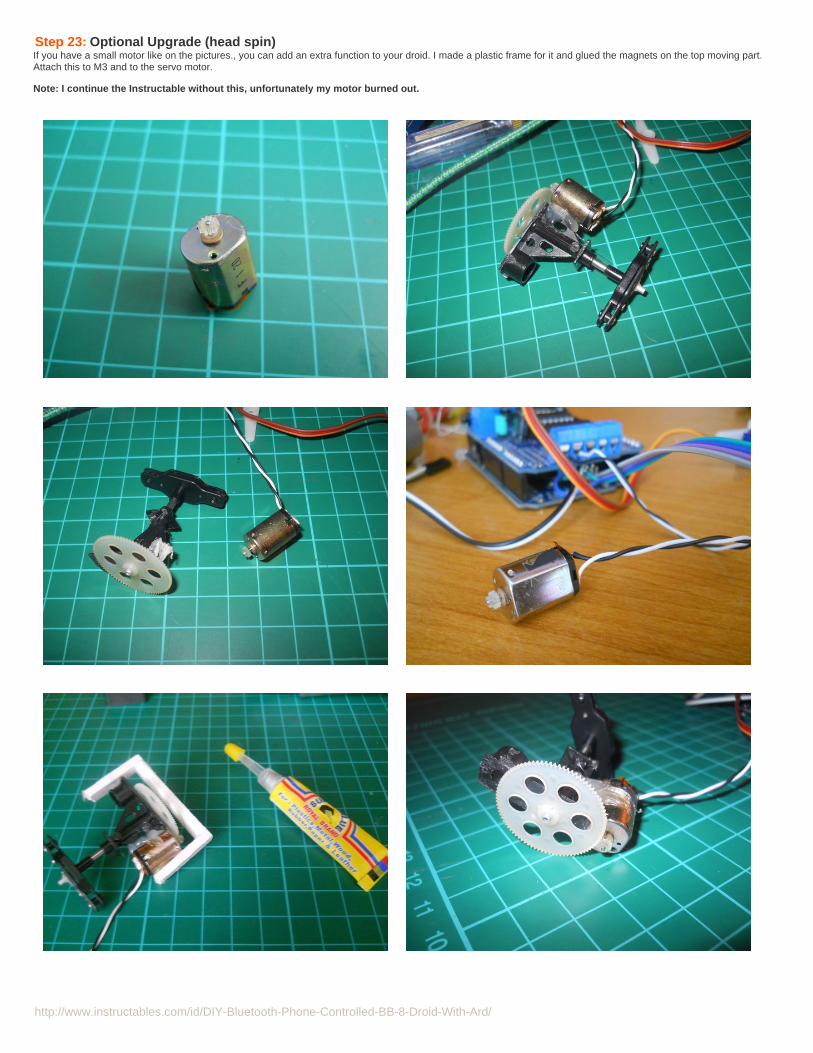
Step 23: Optional Upgrade (head spin)If you have a small motor like on the pictures., you can add an extra function to your droid. I made a plastic frame for it and glued the magnets on the top moving part.Attach this to M3 and to the servo motor.
Note: I continue the Instructable without this, unfortunately my motor burned out.
http://www.instructables.com/id/DIY-Bluetooth-Phone-Controlled-BB-8-Droid-With-Ard/
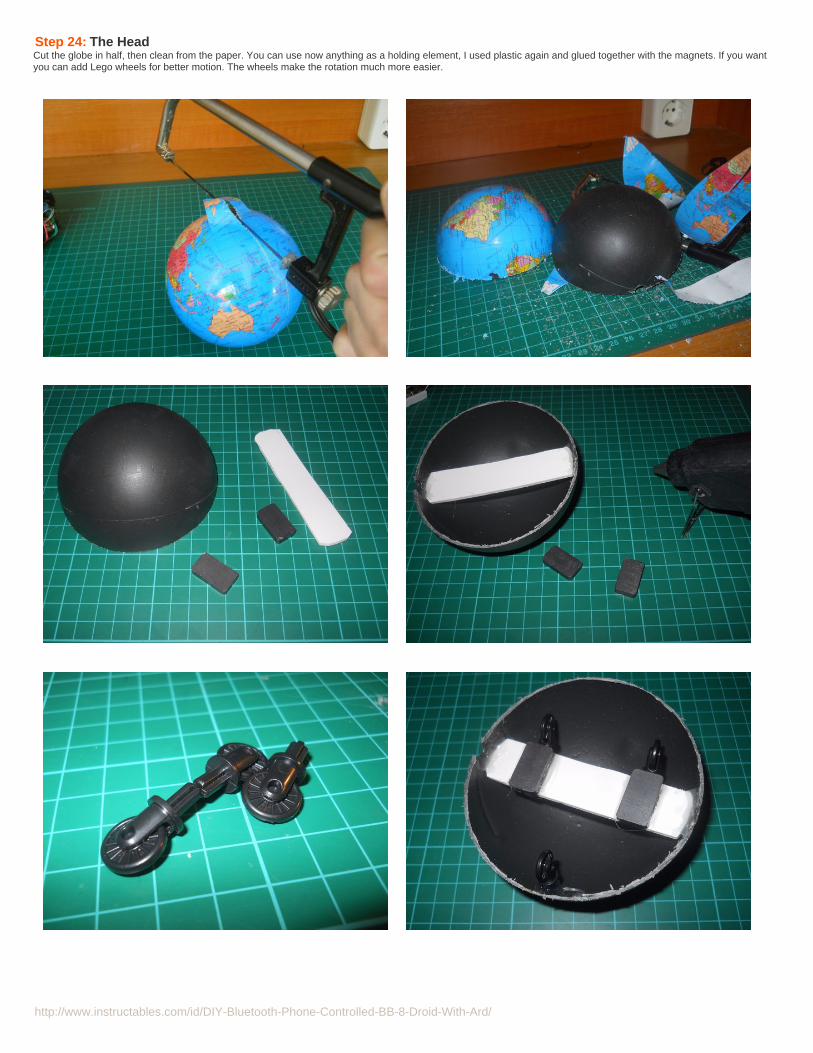
Step 24: The HeadCut the globe in half, then clean from the paper. You can use now anything as a holding element, I used plastic again and glued together with the magnets. If you wantyou can add Lego wheels for better motion. The wheels make the rotation much more easier.

http://www.instructables.com/id/DIY-Bluetooth-Phone-Controlled-BB-8-Droid-With-Ard/
Step 25: Quick Test (Again)Use the power of the Dark side or electricity and charge up the batteries. On the first picture you can see that I charged up my battery pack using a small variable powersupply. After 2 hours the battery was charged up with 400mA charging current.
If your droid is ready try it out. Put the head on the ball then try to control with the phone. First time was tricky, but after about five minutes was very easy. The headmoved very
http://www.instructables.com/id/DIY-Bluetooth-Phone-Controlled-BB-8-Droid-With-Ard/
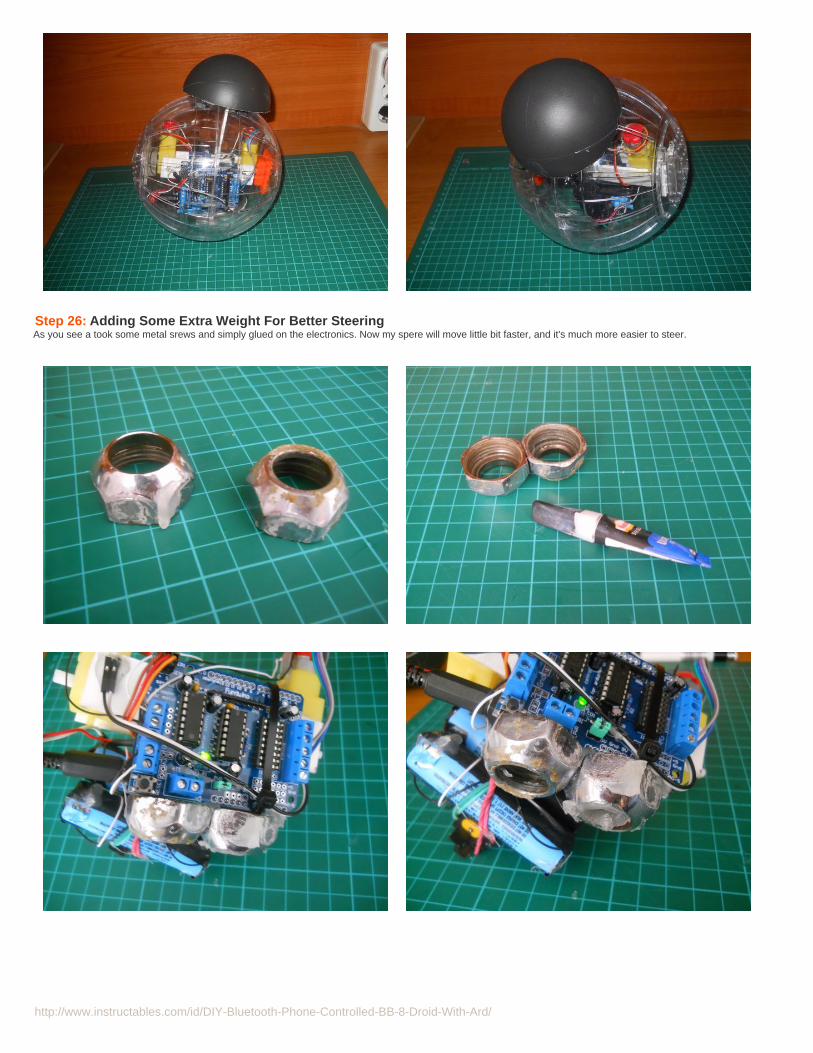
Step 26: Adding Some Extra Weight For Better SteeringAs you see a took some metal srews and simply glued on the electronics. Now my spere will move little bit faster, and it's much more easier to steer.
http://www.instructables.com/id/DIY-Bluetooth-Phone-Controlled-BB-8-Droid-With-Ard/
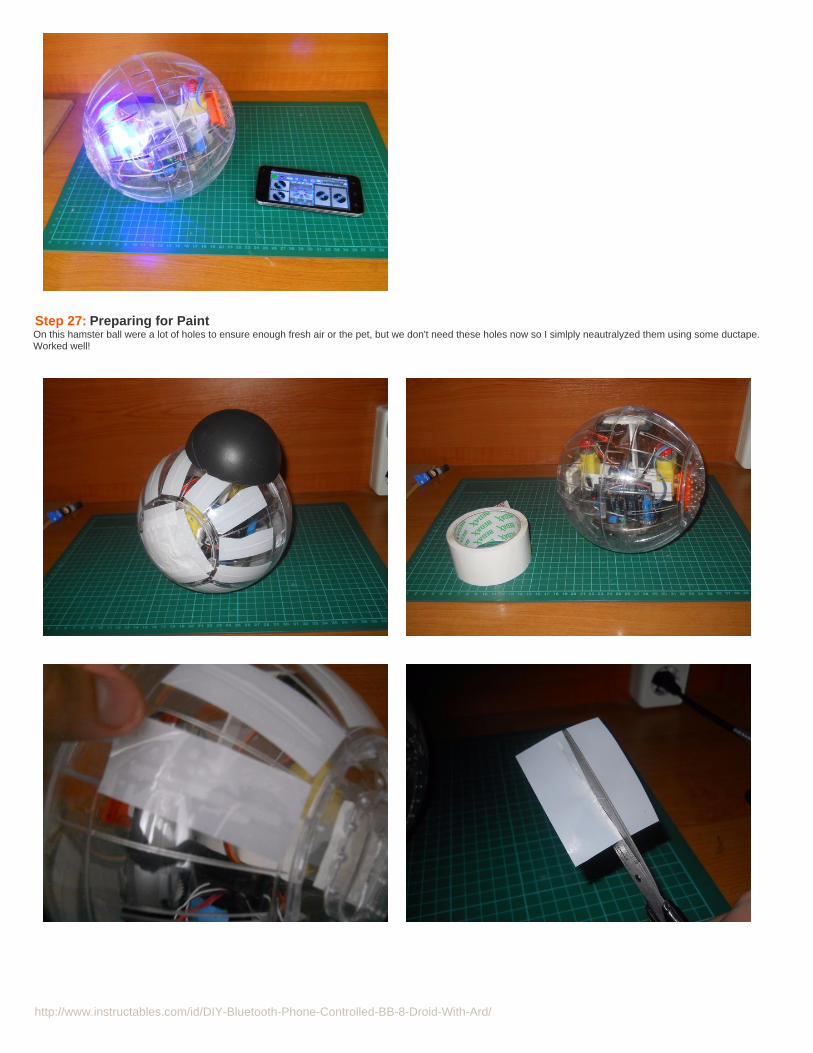
Step 27: Preparing for PaintOn this hamster ball were a lot of holes to ensure enough fresh air or the pet, but we don't need these holes now so I simlply neautralyzed them using some ductape.Worked well!
http://www.instructables.com/id/DIY-Bluetooth-Phone-Controlled-BB-8-Droid-With-Ard/
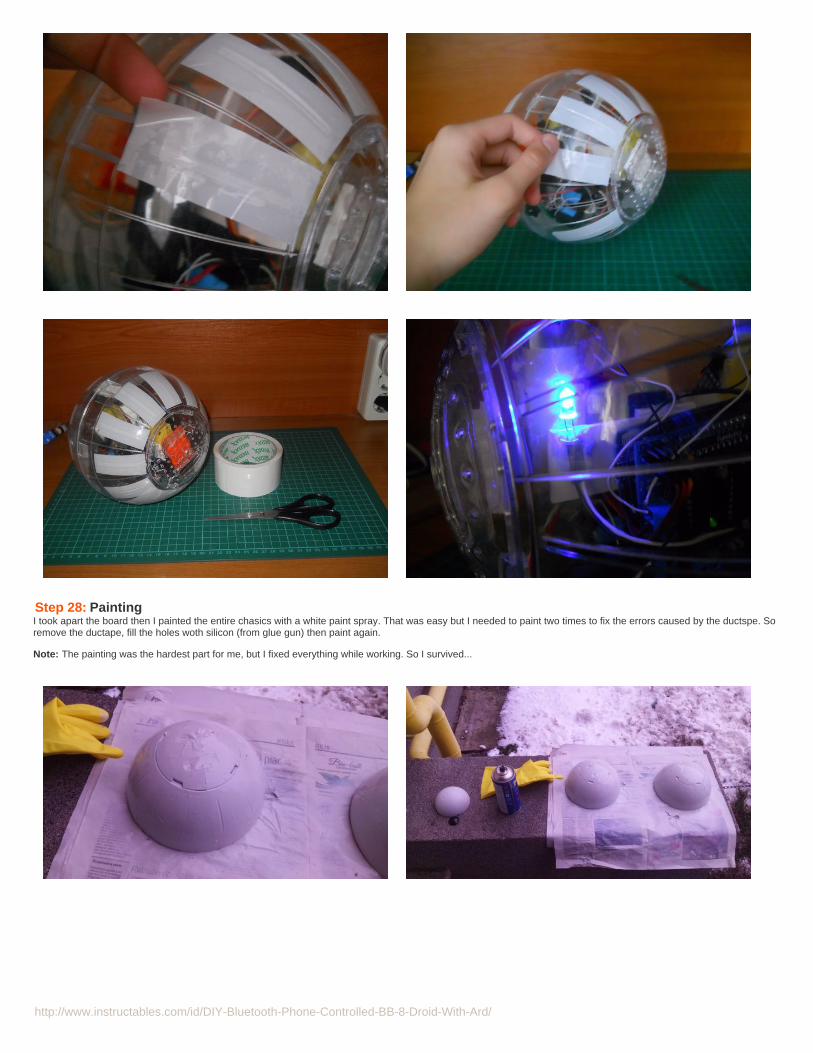
Step 28: PaintingI took apart the board then I painted the entire chasics with a white paint spray. That was easy but I needed to paint two times to fix the errors caused by the ductspe. Soremove the ductape, fill the holes woth silicon (from glue gun) then paint again.
Note: The painting was the hardest part for me, but I fixed everything while working. So I survived...
http://www.instructables.com/id/DIY-Bluetooth-Phone-Controlled-BB-8-Droid-With-Ard/
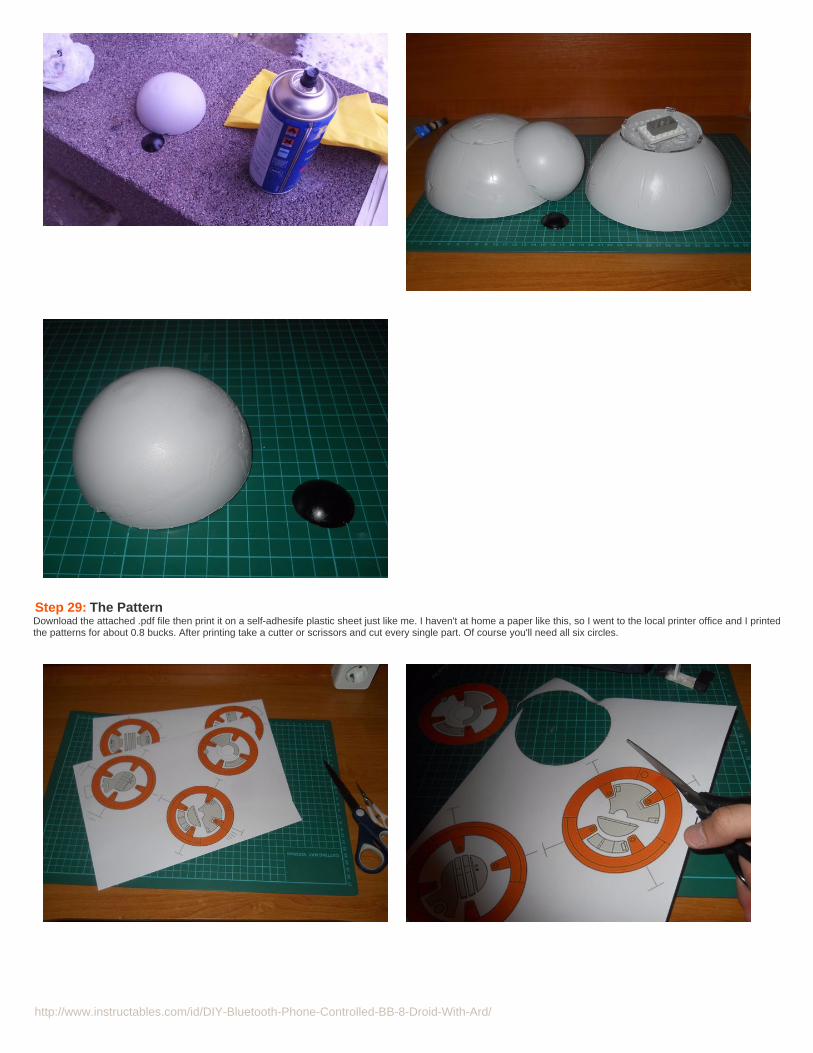
Step 29: The PatternDownload the attached .pdf file then print it on a self-adhesife plastic sheet just like me. I haven't at home a paper like this, so I went to the local printer office and I printedthe patterns for about 0.8 bucks. After printing take a cutter or scrissors and cut every single part. Of course you'll need all six circles.
http://www.instructables.com/id/DIY-Bluetooth-Phone-Controlled-BB-8-Droid-With-Ard/
File Downloads
BB-8 Pattern.pdf (1 MB)[NOTE: When saving, if you see .tmp as the file ext, rename it to 'BB-8 Pattern.pdf']
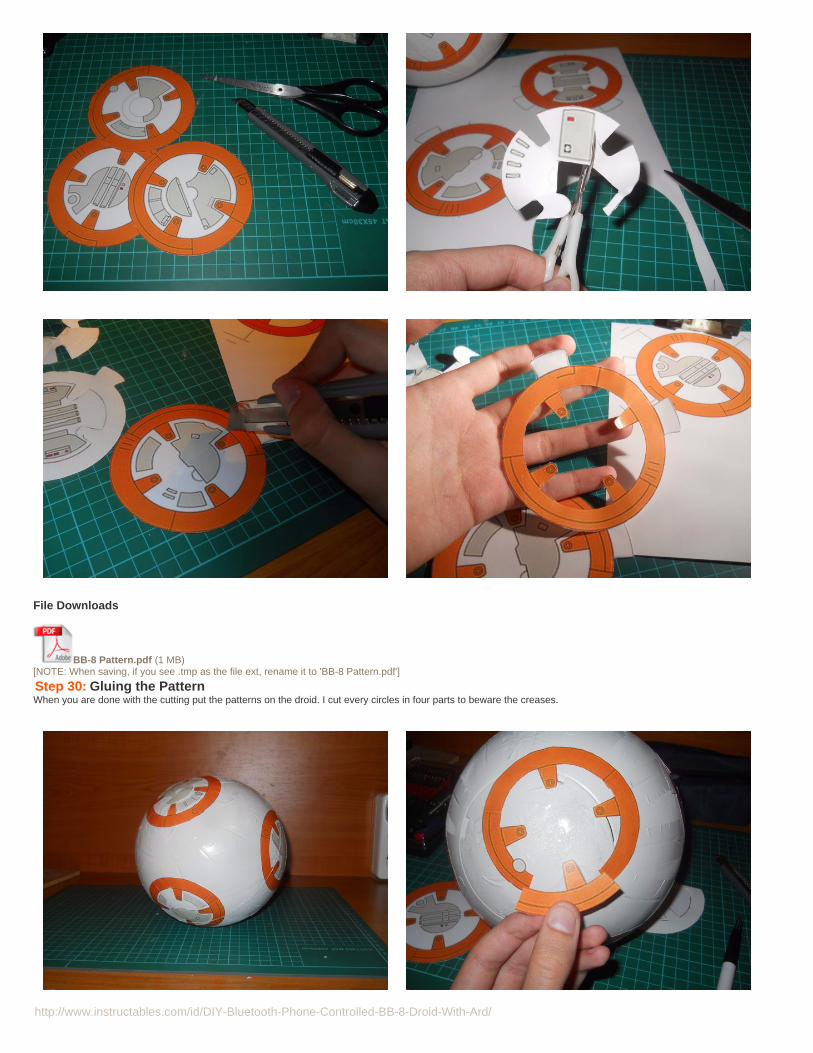
Step 30: Gluing the PatternWhen you are done with the cutting put the patterns on the droid. I cut every circles in four parts to beware the creases.
http://www.instructables.com/id/DIY-Bluetooth-Phone-Controlled-BB-8-Droid-With-Ard/
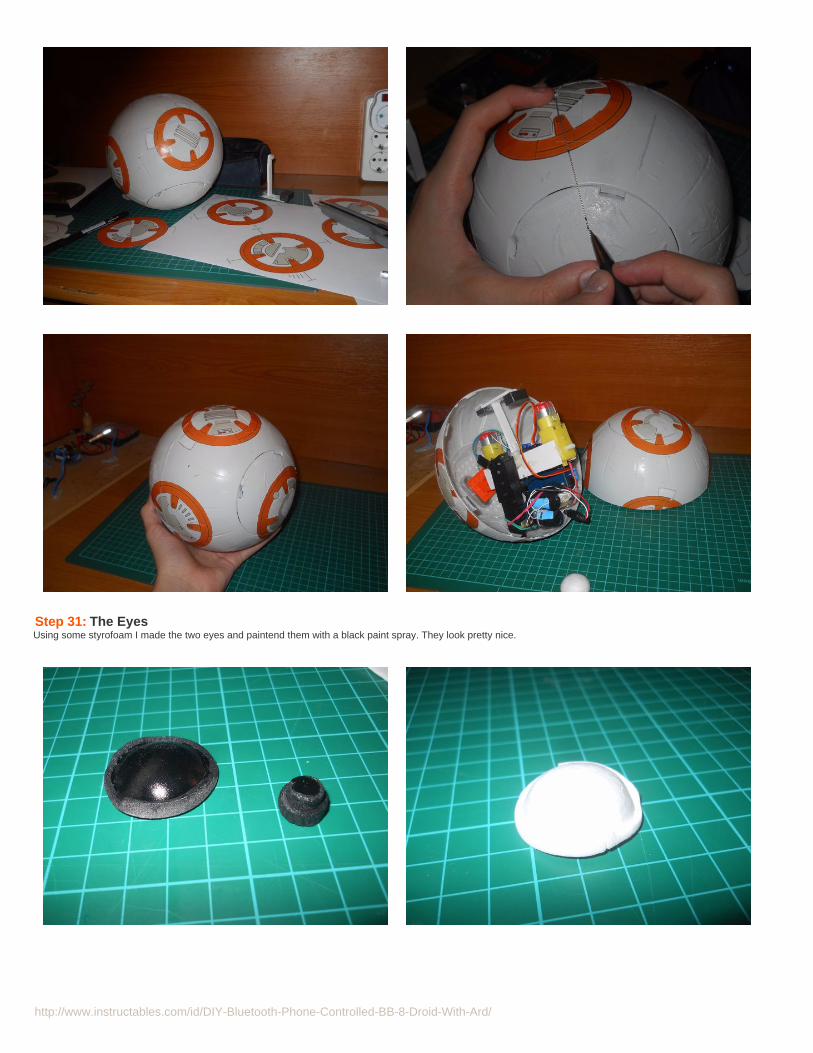
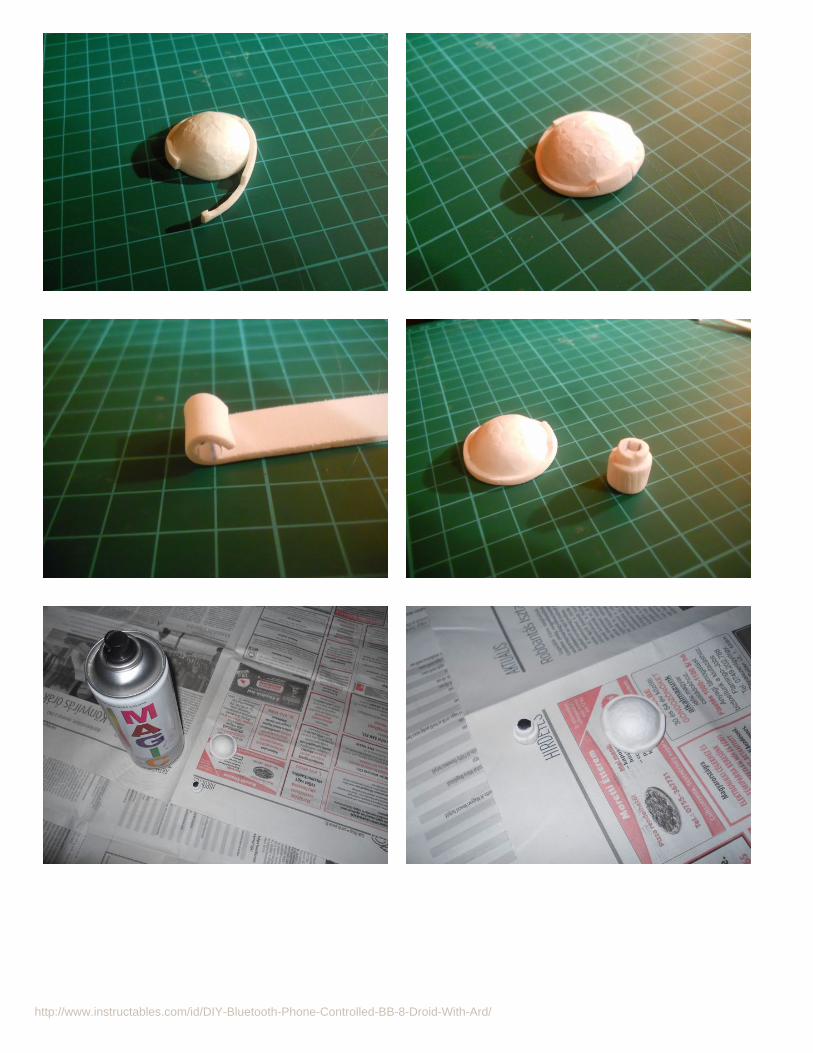
Step 31: The EyesUsing some styrofoam I made the two eyes and paintend them with a black paint spray. They look pretty nice.
http://www.instructables.com/id/DIY-Bluetooth-Phone-Controlled-BB-8-Droid-With-Ard/
http://www.instructables.com/id/DIY-Bluetooth-Phone-Controlled-BB-8-Droid-With-Ard/
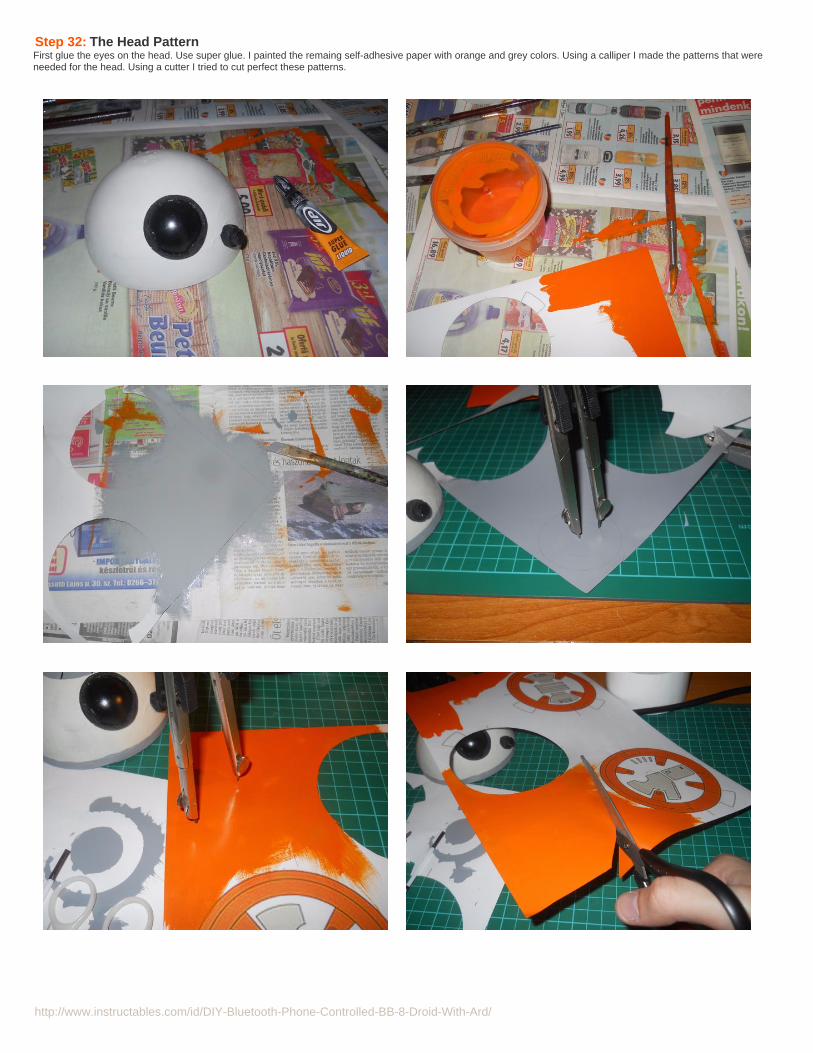
Step 32: The Head PatternFirst glue the eyes on the head. Use super glue. I painted the remaing self-adhesive paper with orange and grey colors. Using a calliper I made the patterns that wereneeded for the head. Using a cutter I tried to cut perfect these patterns.
http://www.instructables.com/id/DIY-Bluetooth-Phone-Controlled-BB-8-Droid-With-Ard/
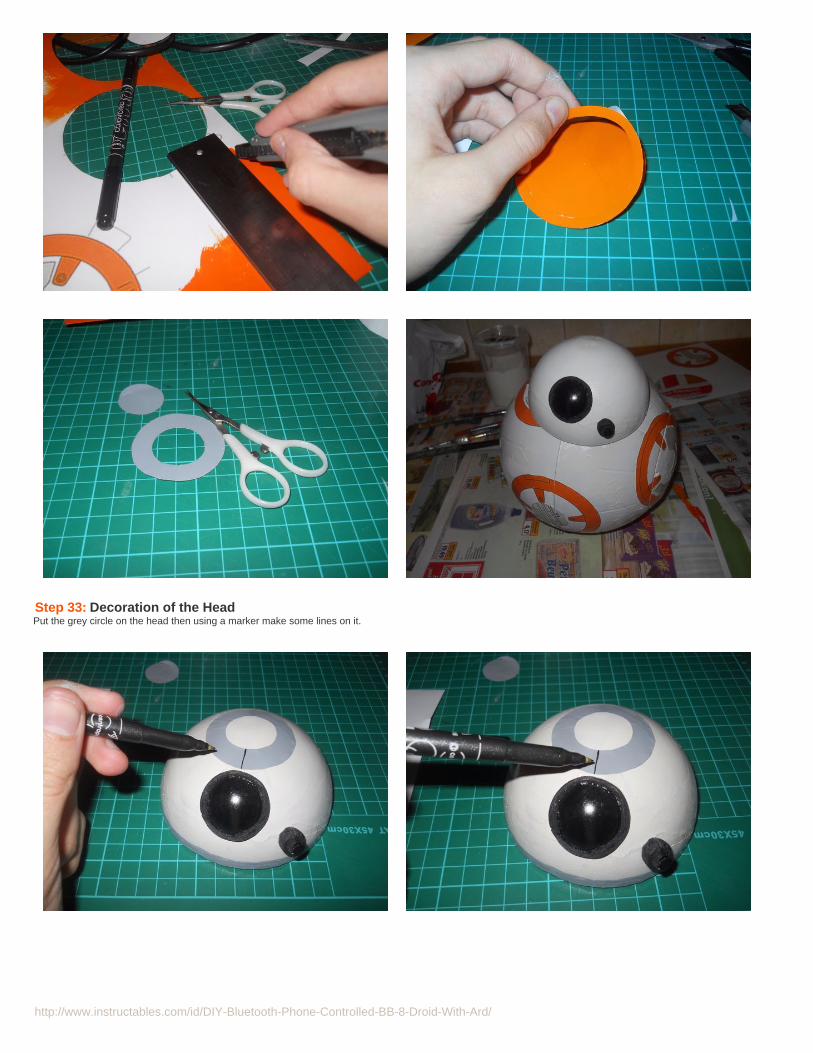
Step 33: Decoration of the HeadPut the grey circle on the head then using a marker make some lines on it.
http://www.instructables.com/id/DIY-Bluetooth-Phone-Controlled-BB-8-Droid-With-Ard/
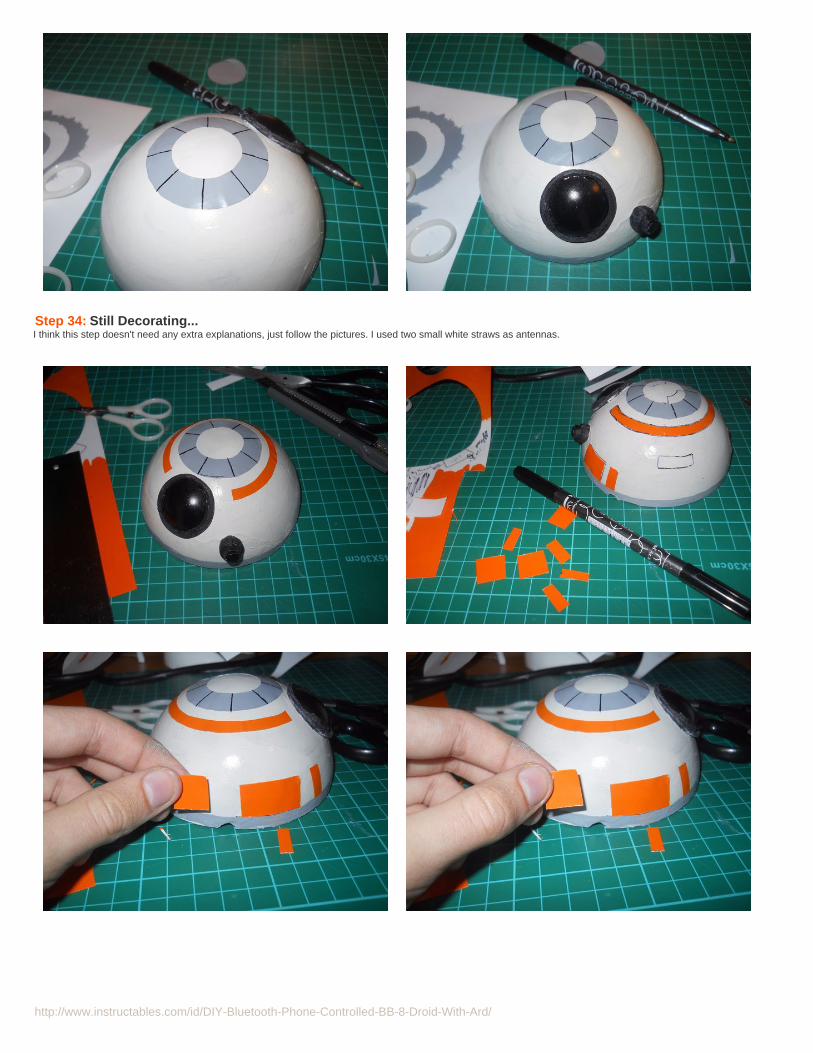
Step 34: Still Decorating...I think this step doesn't need any extra explanations, just follow the pictures. I used two small white straws as antennas.
http://www.instructables.com/id/DIY-Bluetooth-Phone-Controlled-BB-8-Droid-With-Ard/
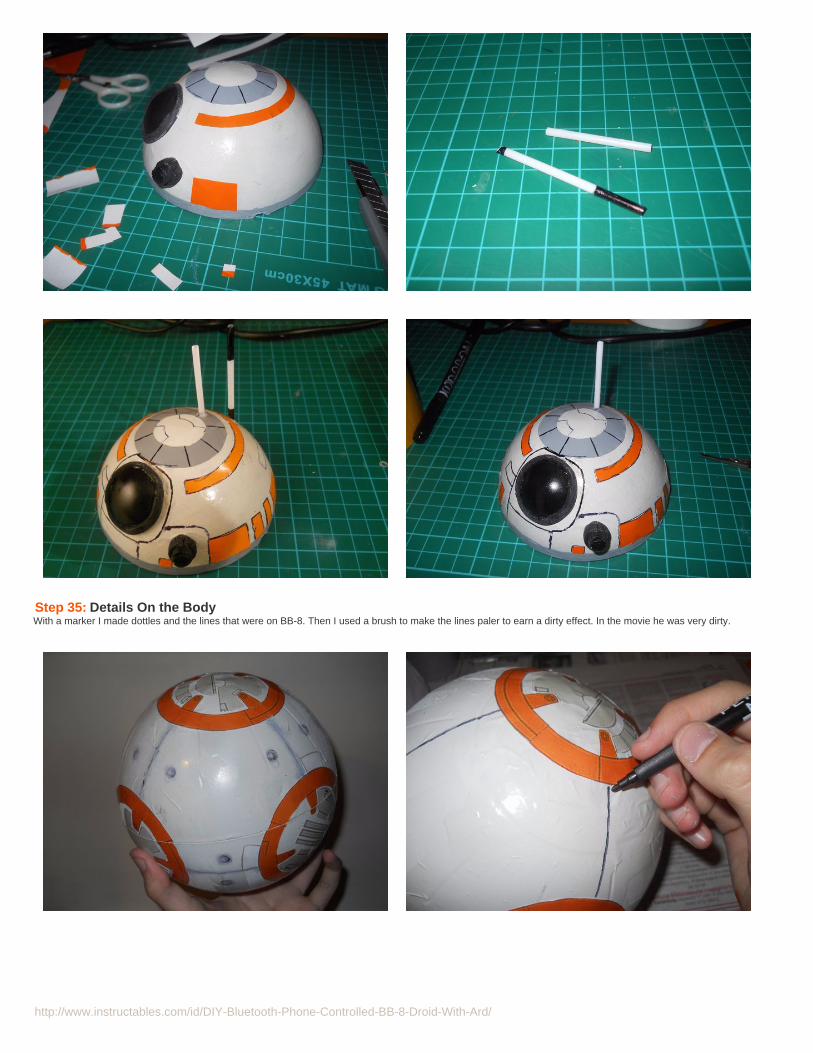
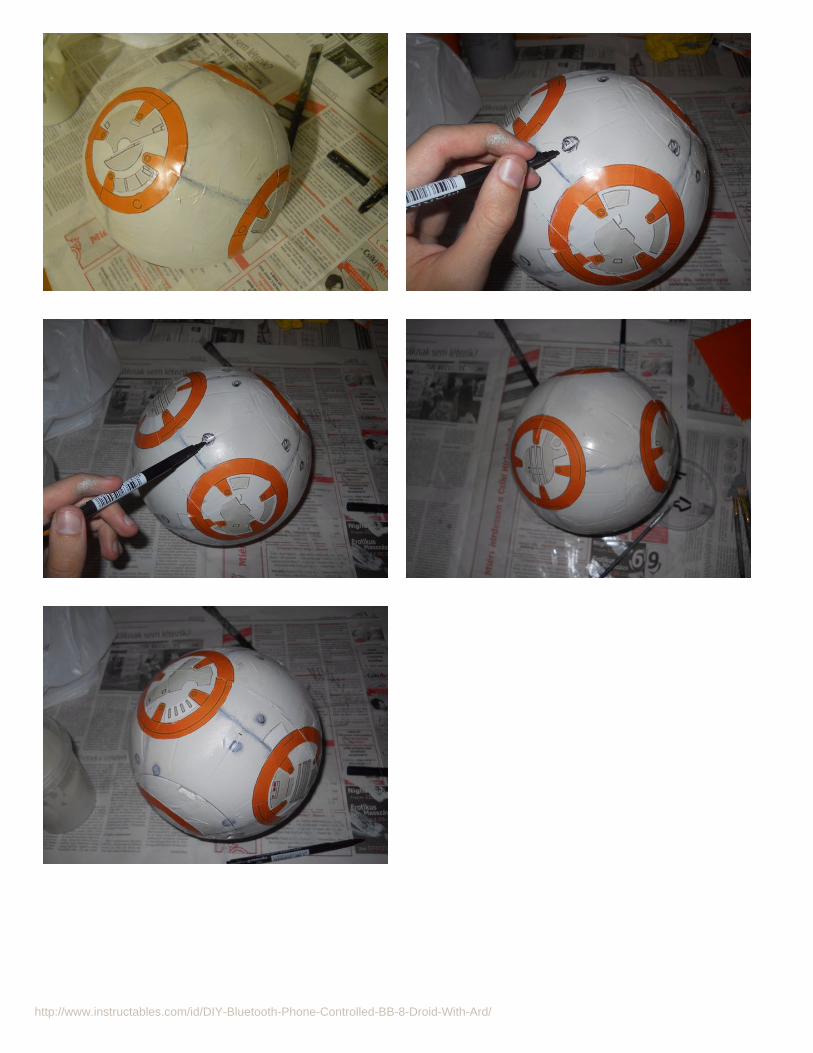
Step 35: Details On the BodyWith a marker I made dottles and the lines that were on BB-8. Then I used a brush to make the lines paler to earn a dirty effect. In the movie he was very dirty.
http://www.instructables.com/id/DIY-Bluetooth-Phone-Controlled-BB-8-Droid-With-Ard/
http://www.instructables.com/id/DIY-Bluetooth-Phone-Controlled-BB-8-Droid-With-Ard/
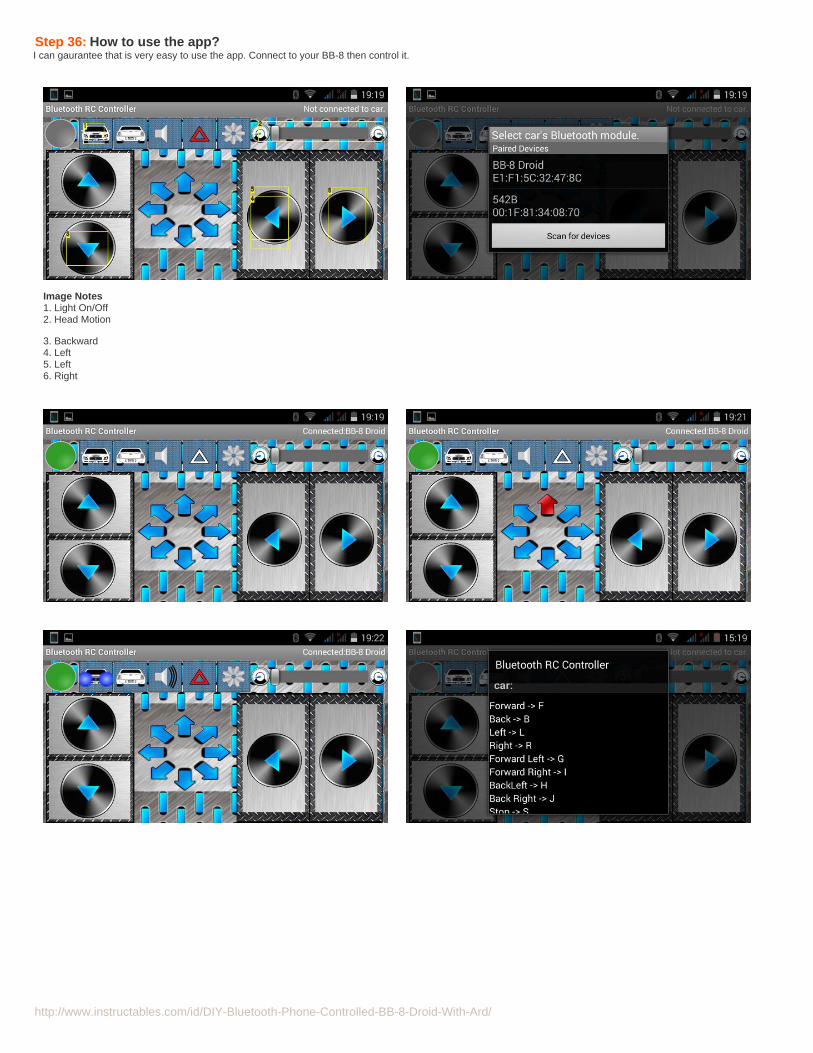
Step 36: How to use the app?I can gaurantee that is very easy to use the app. Connect to your BB-8 then control it.
Image Notes1. Light On/Off2. Head Motion
3. Backward4. Left5. Left6. Right

http://www.instructables.com/id/DIY-Bluetooth-Phone-Controlled-BB-8-Droid-With-Ard/
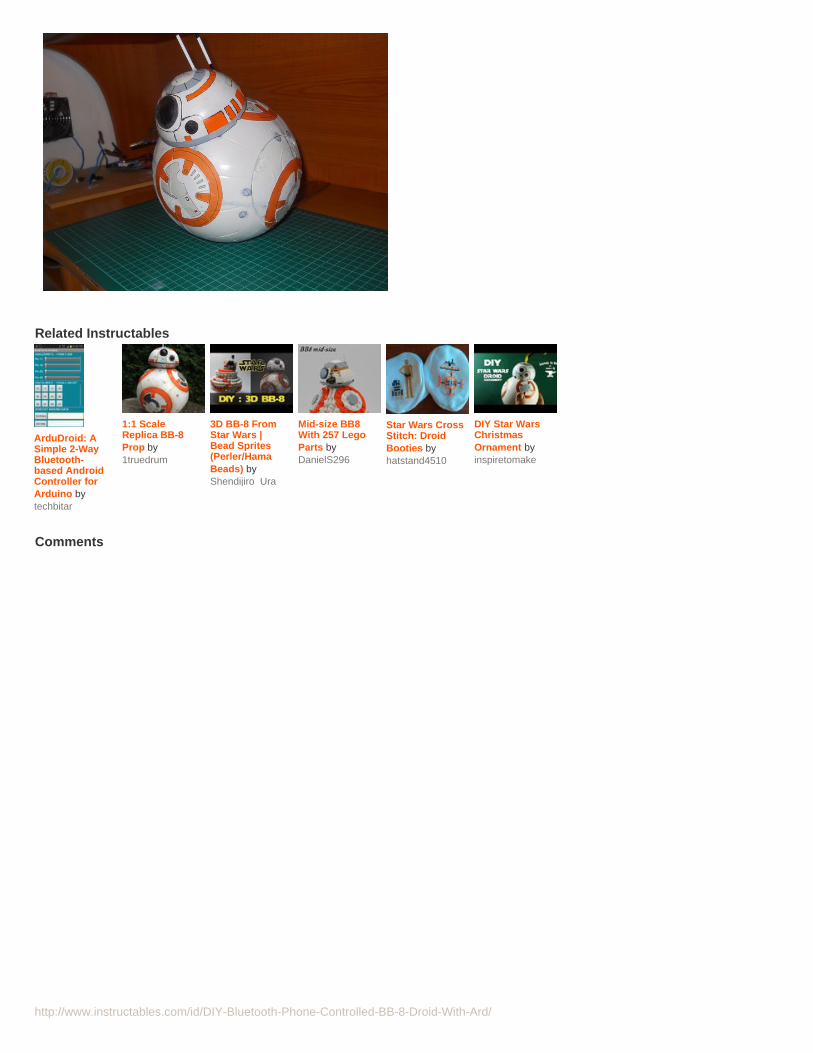
Step 37: This is droid you are looking for!Thank you for watching my Instructable. I really hope you liked it. I'll add a video an some new explanations tomorrow. If you liked give me a kindly vote! Have funwith this droid.
May the Force be with you!
http://www.instructables.com/id/DIY-Bluetooth-Phone-Controlled-BB-8-Droid-With-Ard/
Related Instructables
ArduDroid: ASimple 2-WayBluetooth-based AndroidController forArduino bytechbitar
1:1 ScaleReplica BB-8Prop by1truedrum
3D BB-8 FromStar Wars |Bead Sprites(Perler/HamaBeads) byShendijiro_Ura
Mid-size BB8With 257 LegoParts byDanielS296
Star Wars CrossStitch: DroidBooties byhatstand4510
DIY Star WarsChristmasOrnament byinspiretomake
Advertisements
Comments