© 2011 lwtl faculty team living with the lab pump performance testing
Post on 19-Dec-2015
215 views
TRANSCRIPT

© 2011 LWTL Faculty Team
Living with the Lab
Pump Performance Testing

© 2011 LWTL Faculty Team
Living with the Lab
Goal: Measure the pump curve(s)
Head versus flow rate: Efficiency versus flow rate:

© 2011 LWTL Faculty Team
Living with the Lab
Pump testing in a nutshell
Prep1. Make sure the pump works: dry and wet tests.2. Wire the circuit to measure voltage and current.3. Configure tubing for the pump test.
Data CollectionChange height of exit tube. Record mass flow rate, voltage and current.

© 2011 LWTL Faculty Team
Living with the Lab
Make sure the pump works:Dry and wet tests.

© 2011 LWTL Faculty Team
Living with the Lab
Dry Test: Make sure the impeller spins
Don’t run your pump too long without water. The purpose of the dry test is to verify that the motor works and that the impeller can rotate freely.

© 2011 LWTL Faculty Team
Living with the Lab
Debugging the dry test
If the impeller does not spin:– Is the lid so tight that impeller
rubs? If so, loosen the screws holding the lid in place.
– Is the motor misaligned? Try wiggling it.– Is the current limit on the power supply exceeded?
Increase the current dial.– Are the electrical leads making good contact?

© 2011 LWTL Faculty Team
Living with the Lab
Wet Test: Make sure the pump can move water.

© 2011 LWTL Faculty Team
Living with the Lab
8
• Keep water away from all electrical equipment except the pump, and do your best to keep the pump motor dry.
• Don’t handle the power supply or multimeter(s) with wet hands or wet feet (or when in contact with water).
• Prevent water from splashing onto or near the power supply.
• Wipe up any water that leaks onto the floor.• Report any problems encountered to your instructor.
SAFETY

© 2011 LWTL Faculty Team
Living with the Lab
Priming the pumpPriming is the addition of water to the pump cavity so that the impeller can create enough suction to pull water from the supply reservoir.
Use gravity feed from the supply pail to cause water to flow into the pump cavity.

© 2011 LWTL Faculty Team
Living with the Lab
Priming the pump
1. Connect the outlet tube first.

© 2011 LWTL Faculty Team
Living with the Lab
Priming the pump
1. Connect the outlet tube first.2. Connect the inlet tube from the
supply pail.

© 2011 LWTL Faculty Team
Living with the Lab
Priming the pump
1. Connect the outlet tube first.2. Connect the inlet tube from the
supply pail.3. Allow water to flow into the
pump cavity.

© 2011 LWTL Faculty Team
Living with the Lab
Priming the pump
1. Connect the outlet tube first.2. Connect the inlet tube from the
supply pail.3. Allow water to flow into the
pump cavity.4. Connect the power to the pump.

© 2011 LWTL Faculty Team
Living with the Lab
Debugging the wet testIf water is not flowing:– Are there bubbles in the line between the pail
and the pump? If so, tap the lines to move the bubbles.
– Is there water in the pump cavity? If not, make sure the inlet is below the surface of the water in the supply pail.

© 2011 LWTL Faculty Team
Living with the Lab
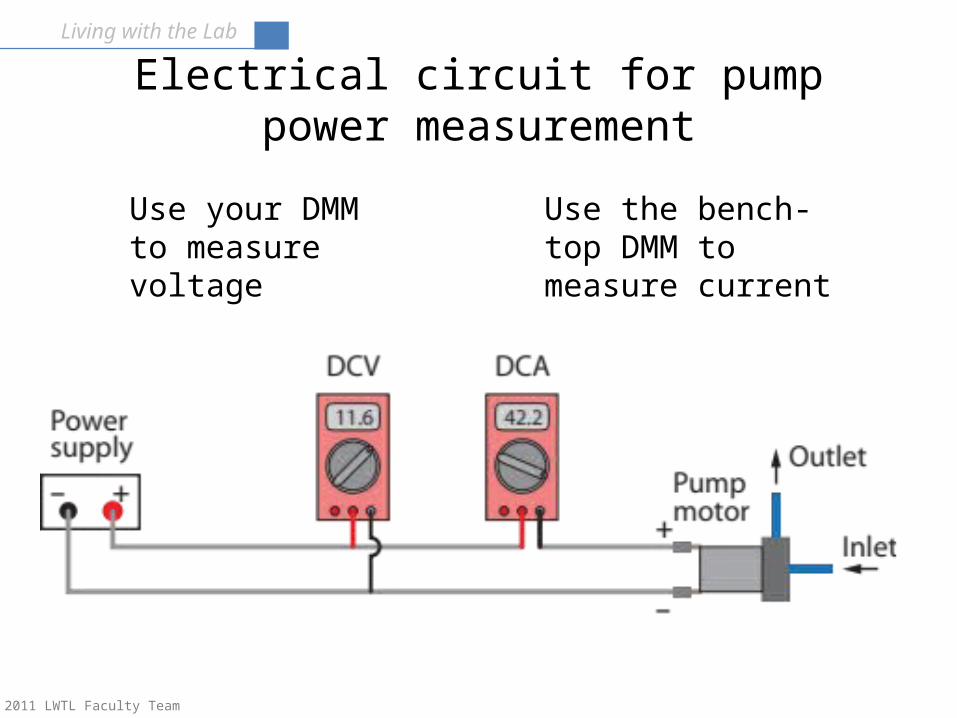
Set up the electrical circuit for measuring pump voltage and pump current.
© 2011 LWTL Faculty Team
Living with the Lab
Electrical circuit for pump power measurement
Use the bench-top DMM to measure current
Use your DMM to measure voltage

© 2011 LWTL Faculty Team
Living with the Lab
Can you make the connections?Use the DMM on top of the power supply to measure current.
© 2011 LWTL Faculty Team
Living with the Lab
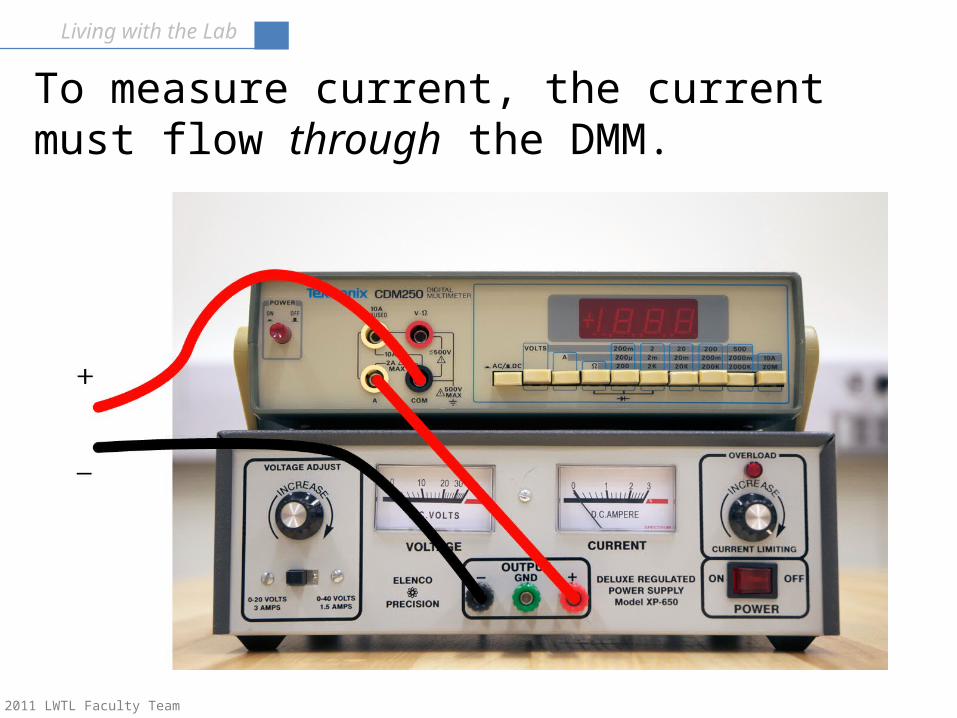
To measure current, the current must flow through the DMM.

© 2011 LWTL Faculty Team
Living with the Lab
To measure current, the current must flow through the DMM, and the settings must be correct.

© 2011 LWTL Faculty Team
Living with the Lab
20
• Keep water away from all electrical equipment except the pump, and do your best to keep the pump motor dry.
• Don’t handle the power supply or multimeter(s) with wet hands or wet feet (or when in contact with water).
• Prevent water from splashing onto or near the power supply.
• Wipe up any water that leaks onto the floor.• Report any problems encountered to your instructor.
SAFETY

© 2011 LWTL Faculty Team
Living with the Lab
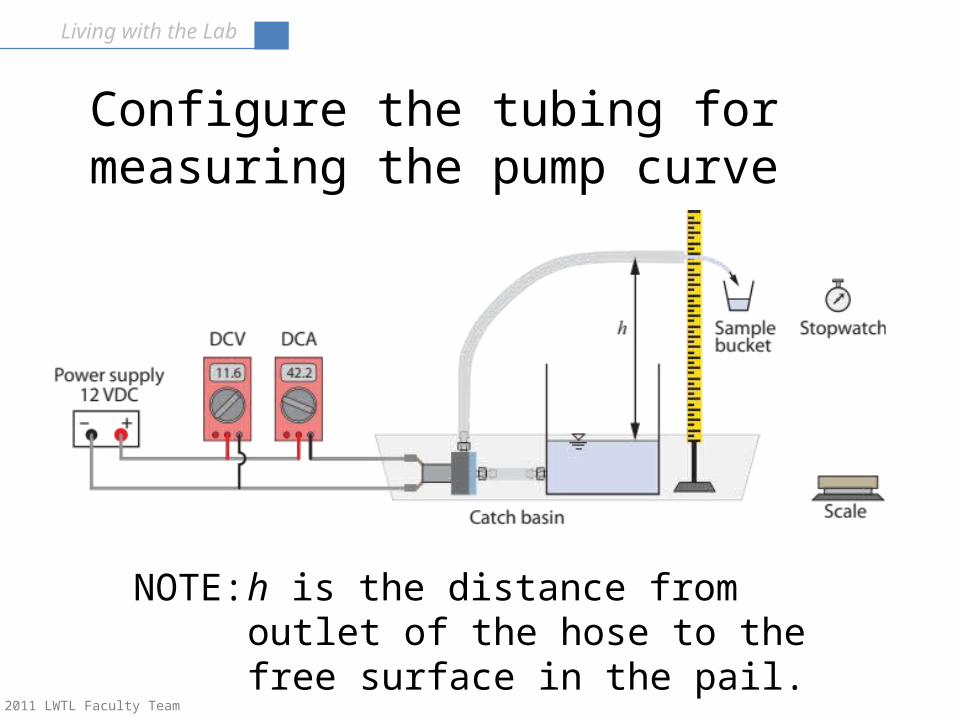
Configure the tubing for measuring the pump curve.
© 2011 LWTL Faculty Team
Living with the Lab
Configure the tubing for measuring the pump curve
NOTE: h is the distance from outlet of the hose to the free surface in the pail.

© 2011 LWTL Faculty Team
Living with the Lab
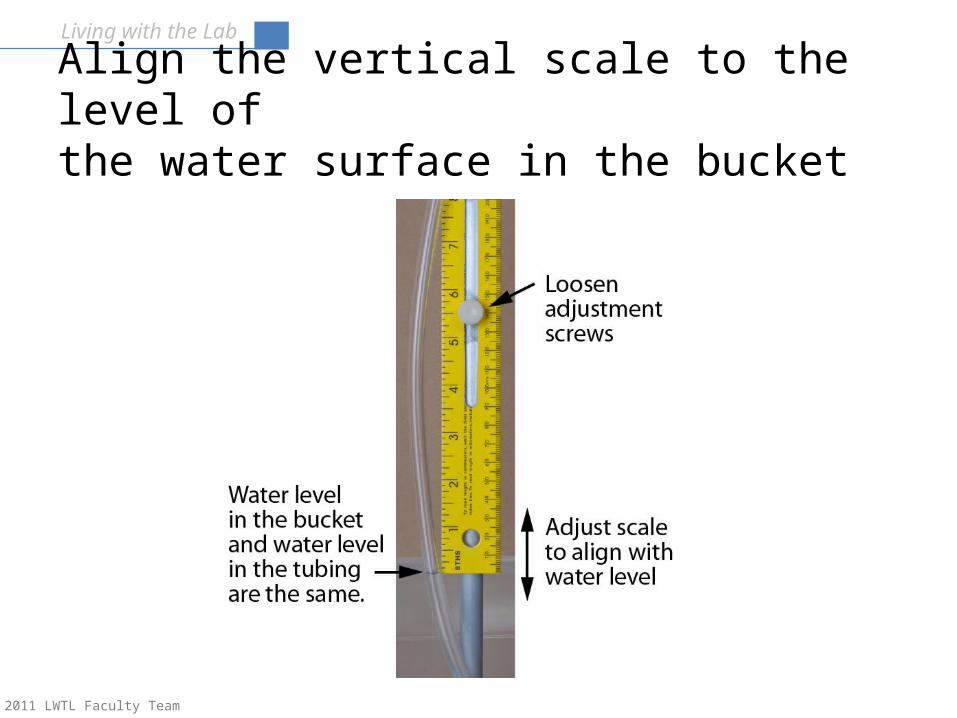
Preliminary Procedure1. Fill the supply pail to about one-third of full.2. Align the vertical scale to the water level in
the bucket.3. Set the tare weight of the small bucket.4. Hook pump to the supply pail and exit tube.

© 2011 LWTL Faculty Team
Living with the Lab
Align the vertical scale to the level ofthe water surface in the bucket
Adjustment screws
© 2011 LWTL Faculty Team
Living with the Lab
Align the vertical scale to the level ofthe water surface in the bucket

© 2011 LWTL Faculty Team
Living with the Lab
Use the tare function to cancel the dry weight of the pitcher used to collect water samples.
Empty pitcher on the scales Before clicking “zero” After clicking “zero”

© 2011 LWTL Faculty Team
Living with the Lab
Collecting Data: Basic Ideas1. You choose h, then measure V, I, ∆m and ∆t 2. Allow ∆t of at least 15 seconds. Use longer
times at low flow rates.3. Use strategic selection of the order of h– First measure at the extremes: Find the
maximum h first.– Fill in the middle of the range in random order
4. Use multimeters to measure V and I.Do not trust the meters on the power supply

© 2011 LWTL Faculty Team
Living with the Lab
Collecting Data: Basic Ideas (2)5. Do not make physical changes (e.g. changing
impellers) during a single data set. If you make changes, start over, but keep your data.
6. Do not throw away data. Make notes about suspicious data. Discard measurements only at the analysis stage when you are certain that the data is not valid.

© 2011 LWTL Faculty Team
Living with the Lab
Data Collection Procedure
1. Empty the collection bucket.2. Move the exit hose to a selected height– Water jet should exit the hose horizontally
3. Start the timer as the collection bucket is moved to capture the water
4. Collect “enough” water5. Record h, ∆m, ∆t, V and I6. Repeat for at least 10 settings (10 h values).
Note: Keep the pump running during these measurements.

© 2011 LWTL Faculty Team
Living with the Lab
Exit tube should be horizontal
Like this: Not like this:

© 2011 LWTL Faculty Team
Living with the Lab
Data sheet
• Label the sheet with team members, date, type of impeller (if more than one is used)
• Make columns of data for h, V, I, ∆m, ∆t.
h (inch) V (volts) I (amp) ∆m (g) ∆t (s)
This is just a sample data sheet. Make your own version on a full sheet of paper. Be prepared to take more data than you will eventually use.

© 2011 LWTL Faculty Team
Living with the Lab
Strategic data collection.

© 2011 LWTL Faculty Team
Living with the Lab
Naive data collectionThere is no need to use equal spacing of h values.
There is no need to collect data in order of increasing or decreasing h. In fact, it’s a bad idea
Don’t do it!Take h values in random or in strategic order.
The laws of Physics don’t care about equal ∆h!

© 2011 LWTL Faculty Team
Living with the Lab
Strategic data collectionFirst, establish the range of h for your pump.Note that the maximum h may change during the test. Your pump performance will change as you run your pump.

© 2011 LWTL Faculty Team
Living with the Lab
Strategic data collectionThe middle value of h determines the curvature of the data set

© 2011 LWTL Faculty Team
Living with the Lab
Strategic data collection
Fill in remainder of data in random order of h values in the range between minimum and maximum h.

© 2011 LWTL Faculty Team
Living with the Lab
Strategic data collectionIf the data reduction spreadsheet is created before taking measurements, you can see the pump curve emerge as data is collected. Otherwise, you will have to visualize the data with simple hand sketches.

© 2011 LWTL Faculty Team
Living with the Lab
Sample results
0.00 0.10 0.20 0.30 0.40 0.50 0.60 0.70 0.800
0.2
0.4
0.6
0.8
1
1.2Measured dataQuadratic fit
Flow rate (L/min)
Head
(m)
0.00 0.10 0.20 0.30 0.40 0.50 0.60 0.70 0.800
0.1
0.2
0.3
0.4
0.5
0.6
0.7
0.8
0.9
1Measured dataQuadratic Fit
Flow rate (L/min)
Efficie
ncy
(%)